Showing posts with label fabrics. Show all posts

Thursday, October 14, 2021

Collar structure and the importance of ease

     In some areas of a garment we may want substantial support and we need to figure out a way to create that structure with interfacing. We want that structure to not compress, squish down or lose its shape over time.   We don't want that interfacing in the seam allowances though because that will make them thick and bulky.  

The choice of structure in a collar for instance, could be something as heavy as buckram or multiple layers of collar canvas ( sized linen ) put together with or without a "glue" to hold the layers together. 

Here I have made a rough sample of one layer of linen collar canvas fused (with stitch wichery), to one layer of hair canvas. This may or may not be enough for your purposes,  you need to sample different materials to get the right combination.

If you use multiple layers laminated together with a fusible you should stitch through the layers to ensure they will not de-laminate over time.


Cut the laminate to the finished shape and size required - no seam allowances.


Laminate and cotton ready.


Stitch through the layers to hold the laminate together permanently.


Cut a piece of thin cotton larger than the laminate  

stitch the laminate to the cotton, stitching through all the layers again. 


Trim the cotton leaving a seam allowance beyond the edges of the laminate.


Cut your fashion fabric leaving ample seam allowances 


Baste the fashion fabric onto the laminate/cotton. *


* This is important- Baste the fashion fabric to the laminate/cotton over your hand, or a ham or tailor's egg to give it shape. A collar is going to go around the neck, so think of it as a partial circle. The outside of the circle is larger than the inside of the circle so the fashion fabric needs to be slightly bigger. If you just apply it flat on the table, it will resist being forced into a curve and will spend the rest of its days trying to lay flat again, and it will be trying to do that while attached to your jacket! 

The fabric thickness should be accounted for as well. Don't forget about turn of cloth! It takes a bit extra ease and seam allowance to wrap a thick fabric around the interfacing to the inside than a thin fabric. 

join the laminate to the fashion fabric by stitching about 1/8 inch away from the edge of the laminate through the layers.

Lay it flat on the table- see the slight ripples? You need this ease in the fabric to make a successful collar.


The same technique is used for the cuffs which are actually joined into a circle. Once you sew the cuff seam creating a cylinder you do not want to see any buckling of the structure.


Tuesday, October 5, 2021

18th Century costume getting to the fitting stage

 Getting to the fitting stage.

I was going to get one fitting for this costume. 

Seven years ago I made mock ups for the first fitting because a lot of decisions get made at that stage, ones I could not anticipate, and it is much easier to correct for fit and allow for design decisions when you aren't cutting into expensive fabric. 

Mock ups save time- mostly in sewing time, because putting together a mock up in a cheap muslin means you can prepare it faster.  If you cut something in the real fabric for a first fitting, you need to mark everything carefully, allow inlays in areas where you may anticipate changes for fit, and sew it together so that you can take it apart after the fitting.  All of the interior structure needs to go into the garment right away as well. For instance, in a mock up I might just apply some fusible to the fronts of the coat, but for this coat, the chest canvas was basted in as well as all the interfacing to support the full skirts of the period. In the fitting, you also need to know where and how to adjust for fit, and mark changes with chalk and pins (rather than sharpie on muslin). In a mock up I might feel more free to clip into certain areas or keep seam allowances narrow, but in the real fabric, you have to be much more careful.

What mock ups don't do is allow the designer or director a chance to see the real fabric in action early on. With only one fitting, cutting into the fabric was going to give the director a better idea of what the final costume would look like.  

So, one other thing to consider in saving sewing prep time with a mock up - you can get to the fitting stage faster - but you do then have to allow time as the cutter to alter your patterns and cut everything in the fashion fabric after the fitting. 

With two weeks from fitting to delivery, I didn't feel there wasn't enough time to make that happen.  

So I cut right into the real fabric for all of the pieces. Shirt, waistcoat, coat and breeches/tights. I passed off the shirt to a colleague to prepare, I sewed the waistcoat shell and breeches/tights and another colleague put the coat together for the fitting. It did help that I had a handle on the design, and from what I could tell, the measurements didn't indicate any big challenges, but still, it felt a little daunting to go out on that limb. 

All that being said, the first thing I looked at was the fabric itself. The coat fabric was a pretty brocade lamé without much substance. The waistcoat fabric had a bit more heft but it was unstable, the shirting was a somewhat sheer poly chiffon type fabric. The fabric for the breeches was a stretch velvet.

The coat and waistcoat fabrics both needed support, and the best thing I could do was to block fuse both of them. The coat was block fused with a product I know as "wool fuse" which gave the fabric a bit more body, and the waistcoat fronts were fused with a product called "sewer's dream" which is a very light almost sheer fusible.


"Sewer's dream" on the left and "wool fuse" on the right just to give you an idea of the differences in the two interfacings


The iron and table set up I use. This is an older Sheldon steam boiler and iron. It will give me 30 psi of steam when it heats up fully. I should know what the temp of the iron head is at but I don't so I  will put that on my to do list!


The coat fabric had a paisley woven design and to block fuse this meant I had to set myself up at my iron with a metre stick and square so I could keep the fabric squared up while fusing. My iron table is 24 inches by 62 inches, minus space for the boiler so I could only fuse just over half the width of the fabric as I went. 

First, press the coat fabric - all 8.5 metres of it and test for shrinkage. Then assess how much you need to fuse; I fused 6.5 metres. Cut the fusible, making sure it is on grain.  Set up at the iron table, with the fabric at your feet, the fusible carefully folded and ready to be laid on top. Bring the fabric it up onto the table,  square up the pattern in the fabric up with the metre stick and square, lay the fusible in place and fuse a section. Shift the fabric forward, do it all again, aligning the grain as you go. I tried to be thorough, but I knew that I just needed to stabilize it as best as I could and if there were areas that needed a bit more attention with the iron I could do that after the pieces were cut out.

Hours pass......

But finally the fabric is ready to be cut!


Sunday, January 17, 2021

Bathing suit drafting and construction- 2020 projects

 Well, where are we?

Oh yes, lets look at the next bathing suit I drafted. I had one successful pattern and contruction under my belt, so I felt this next one was worth using some fabric I had purchased but didn't want to waste on a trial garment.

I had an existing tankini suit that had seen better days, and I liked the design of the top, but I felt that it never really fit me that well. You know, it was good enough but better is better, right?

The top was a halter style with ties and a ring detail at the centre front bust. The ring was in great shape, so I took the old bodice apart- which is always an interesting and informative process. You can see the order that the garment was constructed and the techniques that were used.

I had been poking around at my local fabric store and I found some lightweight power net in a pale blue colour. It was onsale too! I decided, since I am experimenting, that I would try that as a lining in this suit. I think I also bought some flat rubber elastic for this one as well. I hadn't worked with it before, so why not now?

Stuart had a tutorial on his website for this process. I have since discovered that these lessons are now under a paywall. I think if you are interested in making bathing suits, or stretch wear it is well worth the cost.

My first draft, and then the altered pattern. I basically made the same pattern alterations here as I did in the first bathing suit in the previous post. (I added length over the bust)
I started again from scratch though, partially for the practice, and also to make sure that I wasn't making changes based on fabric characteristics.  

The second photo is the altered pattern. 

At the bottom you can see the idea of the design pinned up on the stand.

We will have a more detailed look at it next...


Saturday, July 15, 2017

Cutting an "old fashioned" bathing suit

Tucked in amongst the suits and trousers we are making, is a little project that was a lot of fun to do.
We needed to make an old fashioned bathing suit for the character of "the lifeguard".
Sort of like the gentleman second from the left in this photo.

First the material- we used a wool/Lycra blend from Whaleys which for some reason I cannot find listed on their website- I hope it has not been discontinued! It is really fabulous fabric. Pricey- yes, at $78/ yard  (2008 pricing from our stock tag) but for specific projects like period tights or period bathing suits, nothing else that I have used compares to it. Anyhow, being wool it does shrink too, so a wash and dry to preshrink it was necessary.
For the red stripes, we used a lightweight poly cotton colourfast knit that was cut into 3" strips and laid on top of the wool/Lycra base.
It is important to make sure the red was not going to run and turn the whole thing pink!

I had to make a few pattern decisions right off the bat. There are a few options for making this pattern.
Breaking it down- where do we want the seaming to be?
It could be an all in one unitard pattern- no waist seam. These unitards often have no CF seam at all. Sometimes they have a side seam, but many do not. In that case the pattern would have to have a CB seam from the neck down through the CB of the seat. All the body shaping happens through that one seam.
I didn't think that a CB seam in the bodice area would look right. Plus I am applying stripes, and that didn't seem like a good shape for this.

So I decided that the bodice should like a tank top, with only side and shoulder seams.

That leaves the lower section to think about.

Normally a pair of shorts has a waistline, CF, side and CB seams to shape around the body. I decided to not have a CF seam in the shorts, allowing the stripes to be applied flat across the front.
I decided to keep the waist seam, which would allow me to fit and adjust the garment length very easily.
Since we were applying stripes, I figured that a stripe could be used to disguise the waist join.
That meant that the back of the shorts would have a CB seam and all the length required through the fork or crotch extensions would be on the back piece.

This is the first fitting, cut right into the fabric and zigged together.You can see that I have pinned some length out of the bodice section. This was just at the back waist not in the front.The designer did not want this fit very tightly to the body, so I left the overall fit around the body as is, and honestly the waist seam allows a good fit without it being stretched to the limits.

I basted on a few stripes to confirm their width. I thread marked the neckline and armhole lines but did not insert any elastic at this point as I wanted to confirm the design lines.
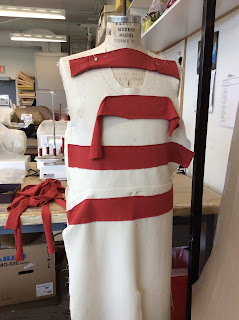


The next step was to mark the alterations, take it apart, cut the stripes and start sewing them to the base. We used a coverstitch machine to apply the stripes. The only tricky part was that we worked from the inside as we wanted the covering threads to cover the raw edge of the red stripes. The usual double line stitch of the coverstitch was now on the inside.


You can see the inside of the fronts more clearly here with the stripes applied.
At the waist we joined the bodice to the shorts with a flat overlapped seam rather than a regular seam so the join would not be noticeable. Again we used the coverstitch for this.
The same technique was used to put the shoulders together. This is much less bulky overall. The only seams that had regular four thread serging were CB of the shorts, inseam and the side seams.

The stripes on the front of the shorts section will determine how we place the stripes in the back section. If this were pre-striped fabric I would not be able to control the look of the stripes overall, and would likely have to cut this quite differently.


On the back of the shorts section, the CB seam was joined first, then it was attached to the back bodice. Then the stripes were applied.

You can see here that the third stripe down from the waist takes a drastic turn from the side seam under the seat, then over to the inseam. The stripes will match at the side seam, and will also match to the corresponding stripe on the front inseam.
This is where a pre-striped fabric will be a problem visually! It would never match up to the front at the inseam. Here we can manipulate things to be as we want them. Very tricky, don't you think?

Once all the stripes had been applied, the shoulders were sewn, and then the sides and inseam.

The final process was to finish the neckline and armholes. We wanted to install elastic in those edges but not in the usual manner of zigging or serging the elastic in. This seemed too thick to do that successfully. So we serged those seam allowances down to a scant 1.5cm, turned them to the inside  and stitched a half inch away to form casings, then fed elastic into the armholes and neckline. We could then adjust the length of the elastic as needed at the next and final fitting as seen below.

How much fun is that? 
It was a good project to stretch (haha) my pattern making and our sewing techniques.

cheers!


Sunday, May 14, 2017

Cutting cloth with one way design

Well, first I need to say that I am just crawling out from under one of the most trying times at work.
I shall not go into it here but suffice to say that management errors have left our department with crippling amounts of overtime.

Hence the lapse in my best laid blogging plans.

Back to the topic at hand though.
The designer makes 99% of our fabric decisions, and although the cutters are sometimes asked their opinion on whether it is suitable or not, usually it arrives on our table and we work with it.
Many fabrics don't pose much of an issue. The easiest are plain fabrics without a nap or one direction design- think a good plain woolen cloth. You can top and tail the layout of your pattern pieces (this means you can turn a pattern piece upside down/top to bottom in the layout) taking advantage of every square inch of the cloth and being quite frugal in its use.

Up the ladder from the basic could be a cloth with a woven pattern in it- a symmetrical or balanced check or stripe. The challenge is to place your pattern on the cloth keeping in mind the centering of the garment on the woven pattern in the cloth, and matching the pattern where needed at centre front and back and sleeves to body. You can still top and tail the layout.

Another rung up the ladder might be velvet (or corduroy), a definite one way fabric. I remember as a teenager, cutting myself a pair of overalls in corduroy, and being completely stymied by the fact that one side of the body looked dark and the other side light. I knew nothing about "nap" and I don't think I ever finished them as I was so confused.
We often cut velvet "nap- up" for the stage because it usually reads as  a richer colour than when cut nap down. You must cut your pieces all in one direction- you cannot turn a piece upside down to fit better on the layout because it will end up a different colour than the rest of the garment. You can turn a pattern piece over, only as long as up remains up. These fabrics often have a fair bit of wastage depending on the garment type.

Next up could be asymmetrical/unbalanced or one way printed or woven designs. These could be plaids, florals, uneven checks or uneven stripe combinations. These fabric designs cannot be "book matched" at the centre front or back.  When they are folded in half, right sides together for cutting, the design in the fabric does not lay matched atop each other.

I have run into uneven or unbalanced cloth a couple of times this year. Twice with suitings and once with a velvet floral. I had no problem making the decision of how to cut the velvet but I started wondering about the options for the stripes.
Here is one of the striped fabrics:


It made me wonder about whether I should cut the jacket as a one way design or not. I could conceivably cut the yardage in half lengthwise, and turn one layer of the fabric to make it symmetrical. Hmmm....I didn't do that in the end, but it did make me wonder if doing so was a "thing" or a no- no.


Here is a visual of what I mean. Imagine that you are looking at the centre front of a jacket- does it look better as a one way pattern or symmetrical? Chime in by all means!


Here is an example of an 18th Century style waistcoat in the floral velvet where you see the one way fabric in the cloth and how I have laid it out so the pattern continues uninterrupted at mid centre front. It requires enough fabric to do this and there are a lot of offcuts, which I used for the facings and such so as not to waste fabric.


Of course, it also takes a bit more time when cutting out cloth like this as you have to be quite careful to make sure that all your pattern pieces are oriented the same direction. The tricky bit is with pattern pieces like trouser backs and undersleeves. These pattern pieces are developed from the trouser front and top sleeve respectively. They "face the same way" when they are drafted.
In laying them out on the cloth you must make sure you flip the trouser underside pattern and the undersleeve to maintain the directional patterning at the side seam in trousers and of the sleeve.
that sounds complicated so here is a quick sketch of what I mean.


Okay, I think that is all I can muster up in the bad drawing department this evening!

It is certainly a lot to keep in mind while cutting things out!

Saturday, May 24, 2014

The fabric I fear....

Well, I am a tailor for a reason.
I like like wool. I like fabrics with some body that don't slide off the table if you look sideways at them. So I was a bit apprehensive about sewing the chiffon of the prom dress.
So what happens often with the thing you fear the most is that it turns out to be not a problem at all, and so it went with the chiffon.
OK, the seams were straight grain which helps.

First thing I did was pull a thread to determine the vertical cut I was going to make. Then I measured the amount I needed plus an allowance for french seams, pulled another thread and cut.
Then I had to unpick some of the flowers so I had a clear area to seam the skirt.
I did a french seam.

Once that was done, I marked a hem line on the underskirt as well as the chiffon layer and basted it in preparation for a bridal hem. (the chiffon was done on the straight grain so I didn't baste, just marked and pinned)

I am not sure whether this is a common technique anymore now that sergers are in widespread use. My colleagues offered two options of the same finish. One uses a narrow zig and the other a straight stitch. I chose the straight stitch version.


The technique in a nutshell: you turn up the hem allowance so the fold is about 1/8" below the hemline you want, then either zig or straight stitch through two layers on your basted line. Carefully trim away the excess hem allowance, right close to the stitch line you just did.
Now turn that folded edge up and stitch through the layers again, encasing the raw edge beside your first line of stitching.
It looks like this when it is done.
No lengthening after this so be sure that it is the hem length desired.


Oh, you need small sharp scissors (not like the ones in the photo) to trim close to your first line of stitching, and always go slowly and carefully when trimming!

Did I mention that the chiffon wasn't a problem?
I decided to pleat the waist rather than gather it, and up to this point it was all fine and dandy. I was feeling great until I started to pleat. It was like trying to corral a herd of cats.
That took some time (much longer than I planned as I did it twice), and a bit of cursing and required wine afterwards.
Sigh.


Saturday, October 19, 2013

Velvet survival

 Well, it seems that I have survived the velvet  after all.
It did require a bit of careful basting, especially when dealing with the collar. I used a heavy shirt fusible in the collar stand, but only one layer of lightweight interfacing in the fall. The velvet is not overly heavy, but it has more thickness than a regular shirting. The fall of the collar therefore needed to be a bit deeper to account for the turn of fabric at the top edge.
In the top picture I still had the top collar edge  basted because I wasn't sure it would look alright with a top stitch, or would behave under the presser foot of the machine. It did in the end.


The design called for the shirt sleeves to be rolled up, but of course the backside of the velvet would show if I made a regular shirt sleeve. Instead, I made a separate tubular cuff
and attached it to the shortened sleeve of the shirt. The cuff then folds up onto itself a bit and it is tight enough not to slip down the arm.

To finish it all off, it is attached to a brief, which keeps it looking nice and tidy no matter what movement is happening in the upper body. It also prevents the shirt hem from bunching up when it is tucked into the trousers.

I didn't put buttons on it, just sewed snaps on to close it up to the mid chest line, so nothing distracts from the velvet, which is a really fabulous colour I must say. Very flattering look, deep colour, simple cut, and rich looking fabric, and not as bad to sew as I had thought.

Thursday, October 3, 2013

Forgive me if I cry

Oh please forgive me if you see me crying, for I am sewing velvet. Stretch velvet....
Denise the velvet queen will be laughing, I know it! She will be thinking finally the cutter gets to share in the challenging fabric department!
I'll post again after I emerge with a finished garment. Don't tell her- it is not as bad as I thought.

Monday, June 4, 2012

fake fur and chain mail


    Well, I managed to get the fake fur cut out by 5 p.m. on Friday.
Susy even found some time to do a couple of stitching samples for me beforehand, just to see how it would behave at the machine.

The best way to seam this fur is to cut it on, or just inside the pattern sewing line and carefully pin then zig the raw edges together. This eliminates bulk at the seams, and is surprisingly strong- we both had a go at trying to pull it apart and couldn't. The zig stitch should actually fall over the raw edge, and if the tension is adjusted properly, you can almost pull the seam flat.

Once the seam is done, you can pull the fur out of the seam as needed with a yarn needle or even a plastic nail brush.

The cloak has bias to bias seaming over the shoulder and a straight to bias seam at the side back. In the velvet, the bias seams went together as cut, but, as you can imagine, the straight to bias had to be hung up to let the bias drop and subsequently the bias side dropped a good inch.
I don't know if a similar thing will happen with the fur, so I guess we will find out tomorrow as it is being put together.

The other thing I have to work out is how to best attach the chain mail sleeves to an under bodice that we made. I think it will entail a fabric strip with metal eyelets that is then sewn onto the bodice so the chain mail can be linked into the eyelets. Then we deal with what happens at the wrist and whether to link the chain mail to a cuff or a drawstring, because there is an armoured gauntlet glove to be worn but possibly taken off onstage.

Sunday, May 20, 2012

khaki uniform

 We made quite a few uniforms this season! Karen was just finishing up a jacket for an understudy who didn't fit into any of the existing uniforms that were originally pulled for this show.
This uniform is made of a cotton duck from Carr textiles. It was overdyed slightly, and I really like the feel of this fabric. I don't know the fabric weight, but it had a nice hand, not too heavy or light. It was just right for what we had to make.
Here it is on the stand in process. I cut right into fabric for this, and made a few minor changes at the first and only fitting I will have with it.


In this detail picture you can see the finishing treatment we used on the pockets and flaps. The pocket pleat is stitched closed from behind, and then the pocket was bagged out with silesia. We finished the top edge with a narrow bias binding of the same silesia. The pocket was then topstitched onto the front. The flap was interfaced and then bagged out with silesia and topstitched. The top edge was serged, then stitched in place before being folded down and topstitched along the top edge. 


The sleeves have a grown on gusset for specific movement the actor needs to do onstage. The green cuffs are interfaced, then the top edge is faced back with silesia, then joined in the round and slipped over the sleeves. The hem of the sleeve and the cuff were then joineed together and turned as one to the inside, and finished, then the lining was brought down and hand finished in place. This does allow easier alteration in that the cuff isn't stitched into the sleeve seam. If you want to maintain the proportion of the cuff and lengthen or shorten the sleeve in the future, you don't have to unpick the sleeve seam.

This was a different technique to the wool uniforms. The wool uniform cuffs and sleeves were too bulky to turn together at the hem, so the sleeve hem was cut raw at the finished length and the cuff hem allowance wrapped over that raw edge to the inside, where it was hemmed and finished by hand.


Here it is all finished and ready to go. He will wear a Sam Browne with this, and it will sit in the belt hooks provided, and the fabric epaulettes can be unbuttoned if needed to put the strap through. 

Friday, May 15, 2009

black and white dress


I thought that I would show you this dress from the ladies wear side of our room.
I love how graphic it is and what a nice job that both the cutter and the seamstress did with this collar.
The dress is actually one that was pulled from stock- which means that it was built for a previous show and it has been resurrected and altered to fit, and had this lovely collar added to it. The dress is made of Holland linen and the collar is of organdy with a cotton trim.

Monday, April 27, 2009

crunch time


Well, here we are getting down to the crunch.
Time seems to get shorter and the projects seem to last longer than they should in crunch time.
We will be teching a show this Thursday the 30th.
This waistcoat fabric arrived on my table along with trouser fabric a week ago Friday (17th) and the velveteen jacket fabric arrived on the 21st, with a little sketch as to what is was supposed to be. I had the trousers and waistcoat cut out by the Friday night, the jacket pattern made and cut out by Wednesday afternoon. The trousers and waistcoat were ready to fit by Wednesday and the basic shell of the jacket put together enough for a fitting on Friday (24th). Then there's trim to put on both garments, although I'm not showing you the trim on the jacket here.
Oh, add in a new waistcoat in addition to this one. Out of this fabric. Cut it out Saturday morning and it's halfway done now, Yeah team. I work with a great bunch of stitchers!!


Gotta have them ready to wear on stage by this Thursday. Yikes.

I hope they choose the buttons tomorrow.

Wednesday, April 8, 2009

day to day

Do you ever have one of those days? The ones when everything you've done over the last while, seems to change? I had one of those days, well all week was one of those days so far. Anyway......


Wool stripes Twill stripes

One thing that we have been trying to get ahead on is a striped jacket. The problem is that it is impossible to get the kind of striped fabric the designer was after so that means making stripes. We did some samples of striping with twill tape which comes in various widths, so the designer could play with the patterning on the fabric. The other thing we did was make stripes out of a cream wool- of course, the edges of straight grain strips need to be turned or finished somehow, so the twill tape was winning as a technique. After sourcing some
1 1/4" dyeable cotton twill to go along with the 1/2" and 3/4" twill in stock, I was set to give it to the dye room, and the designer changed his mind.
O.K. This show techs at the end of the month. I haven't been able to have a fitting in real fabric yet because I've been trying to get the striping decisions, and just when we were so close.....
So, we're going with the wool. Period. I hope.
I'm not even going to get into the discussions that happened today when 4 different tailors in two different cities are trying to make uniforms that look the same. Or how I was feeling when the tuxedo I have to make for one guy might not be needed but no-one is sure yet about that scene. Or the fittings yesterday that kept getting postponed for an hour at a time until finally one was cancelled.
Tomorrow will be better. I'm sure.
I hope the buyers pick up that bolt of "Wonder Under" tomorrow so we can stripe on!

Wednesday, March 4, 2009

mess jacket


Here's a pattern I made today.
It's for a military mess jacket. It will be red with black contrast. I'm hoping that they ordered barathea for it but it may be made in melton, if it doesn't come in the colour that the designer is after.
It has traditional frock coat seaming in the back, sits a few inches below the natural waist line and has a shawl collar, with contrast lapels, cuff details and epaulettes. The sleeve is a more modern pattern with the forearm seam wrapped to the inside rather than a "half and half" sleeve in which the forearm seam is more visible and the sleeve width is even from hem to elbow.
This will be a prototype, we'll be making a dozen or so of these.
Since we share our workroom with a ladies cutter, and team, it's nice for us to have a bit of colour to work with, rather than letting the women's wear have it all.