Friday, April 30, 2010

waistcoat with collar details

Another waistcoat- this one a little different from the Tattersall. This one has four welt pockets with the typical 1920's curved profiles. It also has a "grown-on" collar. This means that the collar is part of the front of the waistcoat- it is not "seamed- on". A seamed on or "laid-on collar is made up separately and "laid on" top of the fronts where it is caught down when sewing the facings on.
This collar is more reminiscent of a jacket's lapels in that it is part of the front that turns back like a lapel does. The hymo in the waistcoat front is padstitched lightly in the collar area and it turns back gently at the first button. It gets caught in the shoulder seam and has a back neck extension as well. This waistcoat was a bit more time consuming than a plain two pocket modern style, but I like to give characters little details like this.
This is part of a three piece suit that I cut this season, the jacket was detailed here in pattern matching.

Thursday, April 29, 2010

Tattersall waistcoat finished

Here is the Tattersall waistcoat all finished. It turned out quite nicely. We did change the buttons after the tech dress- the originals were too pale in colour. The fabric was quite light and I didn't want to fuse it, so I just went with it as is. I'm not the type who interlines the whole front with hymo (a wool and goat hair interfacing) in retrospect, I wish I had given it a bit more oomph somehow. Maybe flat mounting it? or maybe next time I will try to put the lightest weight hymo in the whole front just to see if I like it. I often think it is overkill to do that on all vests - and you do need skilled handling because you don't want the hymo in the seam allowances so it would all have to be cross-stitched in place first which probably takes more time and then I get to the budget and then you can see why fusing gets used.
Well, I'll get it back next January and see how well it has stood up to being worn- but for now I'm happy with it overall.


Monday, April 26, 2010

tails basted up

Here is the tailcoat in question basted up for a first fitting. Time was of the essence so we didn't even bother to put the breast pocket in right away.
The chest canvas is just basted in and the edges basted back. The collar is basted on.
There is some extra seam allowance on the waist of the body that allows for possible lengthening.
The skirt is hand basted to the waistline so that I can remove it easily if needed. The sleeves are lined and just basted in as well.
I like to have the CB of the skirt section basted back so it hangs edge to edge for the first fitting. It will then become apparent whether the tails are crossing over or pulling apart or sitting straight. If they aren't sitting straight it could be that the upper body isn't sitting properly - the fronts may be falling away and need to be lifted, or it could be that the waistline or the skirt needs adjustment. I leave about 3 1/2" of hem allowance too, just in case the designer wants longer tails
The coat doesn't really fit the stand very well. Many of our stands are based on an average height of 5' 8" - 5' 10", so the waist length is only around 17". This coat is for someone 6'4" tall so the coat waist is sitting on the upper hip area of the stand which is about 4 1/2" bigger then the person in question.
Therefore I cannot tell on the stand whether the tails will sit properly. I will need to be patient and wait for the fitting.


Sunday, April 25, 2010

full dress tailcoat

Full dress evening suit. Circa 1940's.
Every so often I realize how lucky I am when I am assigned work like this. A set of tails and trousers. They are going to look for a stock waistcoat but since the gentleman is quite tall 6'4" and a size 44, I may get to make that too.
One of the things I do before drafting a pattern is consult some research on my own. I like to get a feel for what the period details are, I had notes on a donated 1938 tailcoat and below, I have a picture from a 1933 tailor sample book as well as a description from a 1935 Progressive Tailor magazine. I have some reference from the early fifties but I don't think that is quite the style we are looking for so I am going to use the earlier references with a bit of modification for the tails we will make.
I looked at one reference from 1943- another tailor's order book and realized that there was a ban (in the U.S.A.) for the general public on ordering certain suits. No double breasted tuxedos, or tailsuits. In fact only the clergy was allowed to order either morning coats or frock coats. Of course, what the rules were for the general public, often didn't apply to people with money and connections, but there you have it.
I have cut the trousers with a high waist, as they ought to be, and the designer likes pleats so I am giving them two forward pleats. I will be using a silk grosgrain for the trouser stripe. For the jacket I will consult some of the period drafting references I have but I usually combine that information with my own drafting methods to make the pattern.

Tuesday, April 20, 2010

armhole mis-shape


I really don't like having to do any major alterations to factory made jackets because there is usually little you can do- and here's a case in point. This is a factory made DB jacket size 40 reg.
We took the sleeves out in hopes of an alteration and I can only stare at it with disbelief.
Does that look like an armhole? Well it is a hole, and a sleeve was in it but have you ever seen such crap? The hole, besides being grossly misshapen, is also big enough at 23 inches for me to get my head through with room to spare. And what is with the weird flare on the underarm panel?
How did manufacturers manage to devolve the shape to this? It has no relation to the body. It wouldn't even pass muster as a shirt armhole.

This is how they try to fit the most bodies into a size. This is why you cannot lift your arms up when wearing the jacket without getting binding across the mid upper arm and pulling the whole jacket up too. I know people nowadays equate big and sloppy with comfort. Are they lured in by the flat and fused fronts that mask the armhole and sleeve problems?

Is there some subliminal societal or psychological reasoning behind the restrictive clothing of the 21st century man that future generations will read about and this armhole/sleeve shape will be described like the ladies "hobble skirts" of the last century?
I know the public is less critical and educated about clothing- but really, did it have to come to this?

Saturday, April 17, 2010

Tattersall waistcoat basted

Here's the Tattersall waistcoat basted together for a fitting. I wasn't too sure about whether I had placed the waist seam in best spot, and we needed to get to the fitting stage quickly, so we went in with just the basic shell- no pockets in, with the edges and hem basted back.
As it turns out, I did raise the waist seam 3/4" at the fitting, it was too low. The rest of it was fine, so back to cutting table I go, took it apart and marked the alterations and handed it back for making up and finishing.
On Friday afternoon, I took the left front across to the other building where our old industrial buttonhole machine is kept ( the newer one is malfunctioning at the worst possible time) and put the buttonholes in. This waistcoat is likely to be wearable but unfinished on Monday when it is needed onstage.

Monday, April 12, 2010

trim patterns

I haven't shown you much of what is going on across the room, so here is a dress, apron and vest that Carol has cut. This is a wonderful example of putting together different fabrics and trims to make a stunning overall effect. I love this piece.
Another fabulous design from John Pennoyer.

Sunday, April 11, 2010

how to match patterns for pockets

I thought that after showing you some great pattern matching in the last post that perhaps you were wondering about how to do it.
I haven't taken any photos of the process so far, but I will try to describe two ways to do it.
Just words- bear with me.

To begin:
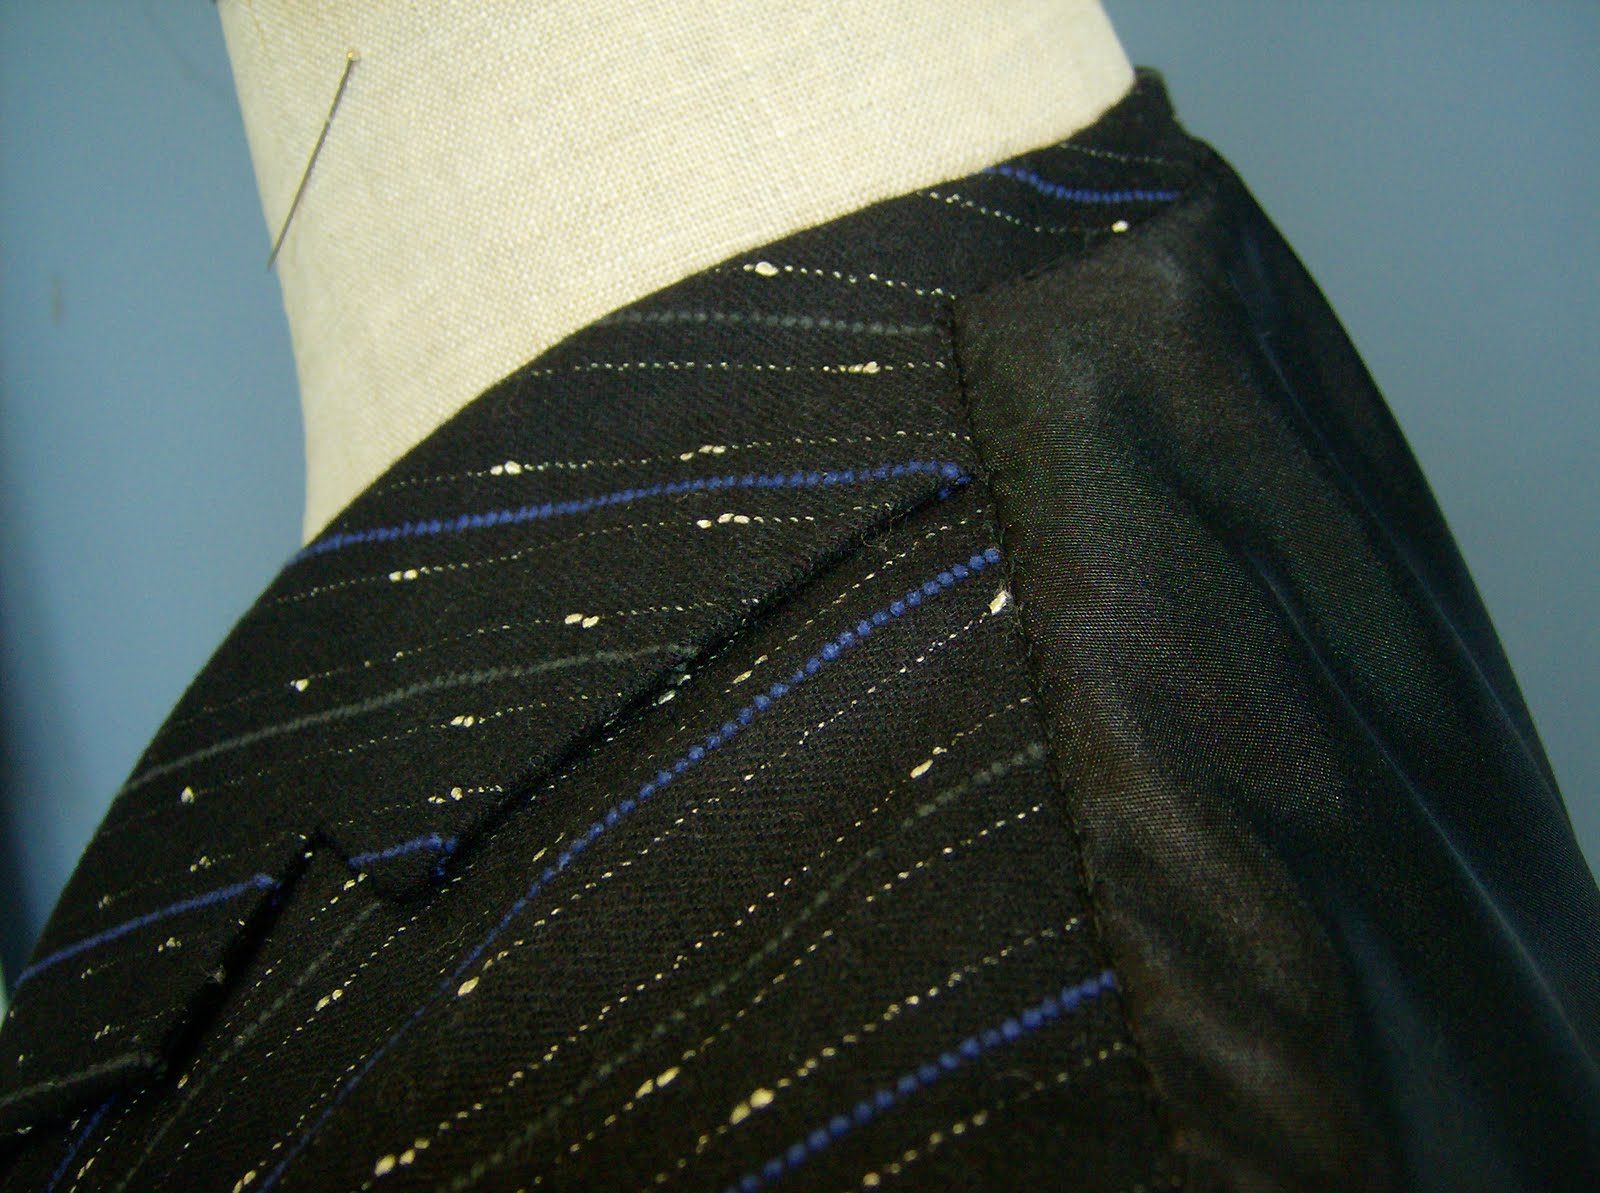
For a jacket breast pocket or a waistcoat pocket.
Take a piece of patterned fabric (stripes or plaid) and draw an angled line on the wrong side of the fabric to represent the sewing line of a pocket welt. Mark the beginning and end of the welt too.

You need to see this line from the right side of the fabric so line baste this marking by hand.

You will need a rectangular piece of fabric for your welt pocket. It should be big enough to cover the area of your pocket from about an inch below, an inch and a half to each side and three to four inches above.

Method one:
Take a sharpened piece of clay tailors chalk and using a ruler, chalk the sewing line on the right side of the fabric. Chalk a vertical line at the beginning and end of the pocket too.

Take your rectangle of fabric, with the right side up and carefully lower it on top of the chalked lines, matching the patterns in the fabric as you put it in place. Make sure that you have a larger area of fabric above the line- you only need a small amount below the line.
Pat gently to transfer the chalk from the front of the garment to the wrong side of the rectangle.
Lift away and you should now have a chalk line to use as your sewing line.
Triple check visually and then line baste. Trim the excess fabric below the line as this will be your seam allowance.
Baste it to the garment right sides together along the line and triple check that when you turn the welt up, the patterns in the fabric continue to match both along the sewing line, as well as horizontally.
Make your welt pocket.

Method two:
This is where I like to use a fusible.

Cut a straight grain strip of woven fusible the height of your finished welt, for instance, if your welt is 1"tall by 4 1/2" wide, cut a 1" straight grain strip about 5" in length.
You need a rectangle of fabric for the welt as described above.

Take your garment fabric to an ironing table. Lay it on the table with the good or right side of it facing up. You can see your basting which indicates the size and position of the welt.
Lay the fusible sticky side up in the position of your welt. Trim the ends of the fusible to the finished shape of the welt.
Now take your welt rectangle and position it over the fusible, lowering it carefully, as you match the patterns in the fabric. Triple check that you have not accidentally shifted the position of the fusible.
Take your iron and press gently, so that the fusible sticks to the rectangle of fabric over it.
Lift the rectangle off, and your welt shape is now in position.
Trim the fabric below the welt to your desired seam allowance, and check again before making your welt pocket.

I'm sure that there are other ways but I confess to being a fan of the second method, and we all use it with success. It gives you the finished shape so you have the angle of the sides as well as the top fold line. You can use it for flaps too.
If you use the first method, only use a clay chalk that will brush off your garment and leave no permanent marks.


Saturday, April 10, 2010

pattern matching


Matching Patterns.
This is a jacket of a three piece suit that Silvia is working on.
It is important to match the patterns in the fabric when you install your pockets. If the patterns are off, it is really noticeable and jars the eye. You can see how well Silvia has matched the breast welt as well as the hip flap pocket here.
This suit is a 1920's style and the curved edges of the welt are typical of the period as is the way the hip pocket is an inserted flap without a "lip" above it.
I make a pattern piece for the flap for the tailor, but not for the welt pockets. I mark the pocket placement, and then give an unmarked piece of fabric for the tailor to work with. It is her responsibility to sew a matched pocket.

Here it is ready for the collar to go on.


Wednesday, April 7, 2010

random details


I thought I'd show you a few random details of some of the costumes we've all been working on. From the top, a jacket armhole that I have cut.A pocket detail on an 18th century coat from the next room, a wild and wacky ladies collar in the large wardrobe and the back of a doublet that I cut.
Costumes are already being worn- we've had one show tech and is in dress rehearsals, another techs tomorrow and my next deadline is the 19th. I have a basket of work all cut and ready to go for my team, and I have started on my third show. I feel ahead of the game momentarily. Busy, busy, busy.

Monday, April 5, 2010

Tattersall waistcoat

On Thursday last week, I was down to my last set of patterns for one show- and it was a country look for Touchstone- a character who flees to the woods- a very common occurrence with Shakespeare.
His other two suits are more city than country, so this one gets a Tattersall waistcoat.

"Tattersall" isn't it funny how you take the names of things for granted- until you want to write something vaguely intelligent and then you have to look it up!
So Tattersalls has been the main British auctioneers of race horses for the last 250 years. That explains the connection of these waistcoats to wear when riding and thence the connection to country or sporting wear. It seems that there is a Tattersall check fabric - yellow with black check, which is not what I am using here, but I will call it a Tattersall for the style even though it seems that modern Tattersalls have lost most of the styling details and are now just a yellow checked vest.

My reference for this waistcoat is a tailor's sample book from the 1930's, and the details are a waist seam with two pinch pleats towards the chest, flapped lower pockets in the waist seam as well as two chest welt pockets. Some references show a collar. This one does not have a collar nor the pinch pleats although in the past I have made them with both.

In the photo above, you can see the waistcoat fronts with the pocket parts, the canvas support for the front and then the facing and front lining.
Now that I see it here, I think I will cut a waist seam in the facing, because I want a buttonhole right on the waist seam. I want it to be created by leaving a space unstitched in both the fronts and the facing. When the seam allowances are pressed open on both parts, all I will have to do is cut the canvas and then either just whip the fabric edges together or sew a buttonhole stitch over the opening. This is often a neater finish than a machine buttonhole through all the layers of seam allowance.

Sunday, April 4, 2010

hem support

Hem support.
I am a hold-out in my work-world for using non-fusibles to support the hems of garments. In fact I prefer to not use them at all except where really necessary, but I digress.

What is in your hem? There are many options and if you look inside a modern RTW suit jacket there may be a small area of fusible in the hem allowance but what holds your hem up?
It is very likely that the lining, and a small tack of stitch witchery is all that holds it up. Your sleeve and body hems are likely not stitched anywhere.

We tend to stick (no pun intended) with more traditional support in the hems like this piece of bias silesia. This silesia is cut on the bias so it can be slightly shaped as needed and has some give to it. It is laid in place so that it extends past the fold of the hem. It is stitched in place in the fold of the hem and along the vent with a small hand made pick stitch, barely noticeable on the right side of the fabric. The silesia is cut wide enough that it extends the height of the vent- and it gives you something to stitch to when hemming the garment. In the photo above, you can see that Denise has put in a large and loose cross-stitch along the upper edge of the silesia to keep it in place, and has basted the vents and the hem up in preparation for a first fitting.
You can use other support fabrics like bias linen or canvas- whatever is suitable for your purposes.

The problem with fusibles is that they become de-laminated in many cases especially with the amount of wear and tear and cleaning that our suits get. When fusible delaminates, you will see a bubbling on the right side of the garment and it can be almost impossible to re-press and re-glue it.
I figure that if we are making things to be used again and again, the time it takes to do this step is well worth it when you are faced with taking a whole hem down in a delaminated situation. I've also seen a few examples where whole jacket fronts have delaminated and while it may have been a time saver when the jacket was being made, I think it is false economy if it cannot be used again.

Saturday, April 3, 2010

linen suit

I haven't cut any linen suits for a few years, so it is nice to do one. This one is a three piece SB suit in early 1930's style. Above you can see the waistcoat getting a final baste at the back neck in preparation for its next fitting. Below you can see the jacket just before the sleeves and collar get basted on for the fitting.
I did a mock-up or toile earlier for this suit, so for the next fitting we usually baste the sleeves in, but leave the hems basted. We have our pockets in, or on, in this case, and we will baste the undercollar on but leave the top collar until after the fitting. The body hem is also left basted, but the silesia for support is already in place. The linings are left basted as well- in case of alterations being required, but also so we can move on to getting another jacket ready. The actor can wear the jacket with basted linings once or twice, and slip stitching the lining is a nice job to do when the the pressure is off- or it can always be handed off to someone else in need of work. Generally speaking though, for the tailor, it is nice to do that last bit of finishing yourself- it makes the job feel complete.


Friday, April 2, 2010

military overcoat


One of our tasks this year was to copy this vintage military coat. The original had a label from 1953, and was in fair condition- a few moth holes here and there, and it was missing it's button-in lining. The reason we couldn't use it was size- it is a size 38R and we needed a 46 tall.
I took notes and a few photos because I find that there are so many interesting details and frankly wonderful engineering on some of these vintage garments that you don't see anymore.
Some details were things that we didn't need to reproduce- the button out lining for one, as well as the type of armhole and resulting sleeve. The armhole dropped about 2" below the usual point, into a V shape. The sleeve had an underarm seam and a back seam but no front seam, and a correspondingly odd shape at the underarm to accommodate the V plus it had a grown-on gusset.
Below is our version- a lot longer proportionately than the original because the designer wanted calf length on a man 6' 5" tall. We also took the belt buckle and button from the vintage coat to use on the new one. All in all, a satisfying result.