Tuesday, June 29, 2010

18th century period coats

These are the reason I haven't written much lately. Very busy at work getting these ready!
The design for these is late eighteenth century- 1780-90 or so , but we aren't slavishly following any specific date/style reference. It is more important to achieve the "feel" of the character that the designer is after.

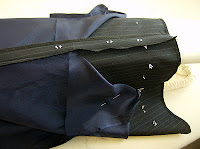
Each of these coats needed different types of support for the fabric. The fabric of the red coat above was as limp as a dishrag, so I decided to flat mount it on a sew-in interfacing called "Sew-sure". It comes in different weights, and I chose the lighter weight one for this.

I try not to fuse fabric because they can look like cardboard and then over the course of time, wear and cleaning the fusible can "de-fuse" and the result is nasty.

We started to sew in the interfacing on a panel, flat mounting it carefully by hand, but the fabric was not co-operating. Not at all. It was very irritating and I needed it ready for a fitting quickly, so I changed tactics, got a bolt of tricot fusible and fused the darn thing. It is still very soft, but workable and we went forward from there. Sometimes you just have to go with it, but I am not admitting defeat.......

In the past I have cut the canvas front of hymo from scratch, but this time, I tried using a lightweight pre-made overcoat chest canvas. I was a bit doubtful at first, but it has worked quite well, and has the benefit of being less expensive in both time and materials. The overcoat chest canvas was about $20.00 whereas hymo by the yard runs about the same price.

This coat fabric had a nice bit of body to it- a little bit of the sew-sure heavy or extra heavy interfacing went in the skirts from the waist down. That interfacing is crisp but light and doesn't seem to lose it's hand over time so it doesn't add much weight while it holds the skirts out. I used the overcoat chest canvas in this one too.
The last coat is this velvet - It feels like a cross between a cotton velveteen and a silk velvet. The skirts are interfaced in the same way as the other coats but the overall feel is a bit in between the other two.
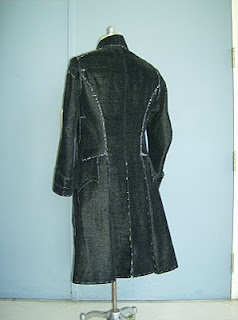
They are all just basted up ready to be fit with their respective waistcoats and fall front breeches. After the fittings we'll take them apart at the shoulders to make it easier to work on them, figure out the trim detailing and get to work putting them back together again.

Friday, June 18, 2010

another century

While I wait and wait for a fitting so we can finish the fully lined trousers, I bring you a few pictures of what we are up to now. We're heading back to the late eighteenth century, and these are shapes that I haven't cut for a few years now. That can be either good or bad- good because it allows a chance to fine tune the patternmaking process for these (which you won't find much of in books), good because I can improve on the past and every year brings a bit more knowledge and a more experienced approach, but it can be bad if you can't remember what you did 5 or 6 years ago.
I'm really happy with these- right from the mock-up stage, they felt right.

We were very productive this week- getting a suit jacket together for a fitting as well as a pair of breeches, a waistcoat, two coats and a half a period shirt made. I have another waistcoat, and a pair of breeches in the basket to start on Monday.

The photo on the left was what was on Susy's table on Thursday at 5 pm and this picture on the right is where she is at today ( Friday) at five. Still a way to go for a fitting but the fronts are looking good.
We are waiting for our designer to get back from the ballet where his show opens tomorrow. We will be adding trim to these costumes, and there is a big box of it in the other room just waiting to be pinned onto each costume. While we wait for him, we have done a baste up in the real fabric for these two coats, so hopefully we'll get them fit next week , then they can come apart to be trimmed as required.
This is a coat that Silvia was working on, and finished basting together this morning. She put the waistcoat together today and again we wait for fittings.
This is a very romantic looking period of design, and everyone that I have fit in these designs is very pleased so it makes for a good mood all round.

Sunday, June 13, 2010

trouser lining

I've been away on a one week lay off- but before I left I took some pictures of a pair of trousers in progress which were going to be fully lined both front and back.

The reason I am doing this is to give the thin papery fabric a bit more heft. I also do it with cream or other pale coloured fabrics to mask the show through of pockets and to eliminate any obvious visual difference if just the fronts were lined. It also gives a better feel of the 1940's if the fabric looks like it is heavier than this one is.


This will be a serged in lining technique rather than a dropped in lining.
Linings should be pre-shrunk but they also need to have ease allowed both across the body and in length. This is why the lining looks so puckered in the photo above.
In order to eventually hem the trousers without hemming them to the lining, we make a clip in the lining about 10 cm above the hem line as the lining is being installed. This allows the lining to be pulled out of the way as you serge the rest of the seam. This is the trouser front in the picture above, and a close up below.
This picture shows the side seam pressed open and the linings pinned back out of the way. You will need to clip the lining as far as the width of the seam allowance that you are pressing back. Denise's hint is to make a very shallow clip at this point, because you always clip further but only regret it if you clip too far.
More to come.....


Sunday, June 6, 2010

uniform first fitting

Every so often we need to build a costume for an understudy- this is one of those occasions. The pattern for this jacket was described earlier in this post.
Am I happy with this? I'm not sure. The figure is a bit of a challenge to deal with. I didn't take a photo of the back, or of the profile so some of the challenge is not seen in this photo.
I like to see the photos because they give you a sense of stepping back and seeing things in a different perspective. When you are actually in the fitting, your perspective can sometimes be too close if you know what I mean.
So, this gives me a chance to have a critical look at my own work.

Success
I got a fit on him that is balanced- adequate length and width for his chest and waist, good close fit in the back- no pulling or tipping of balance. Small armhole, and not overly padded in the shoulders.
We needed to keep the waist close fitting because the designer didn't want extra fabric bunching up when the sash was worn. That worked out fine.
I think it is a bit long but that can be fixed easily.
CB Vent sits straight no pulling apart.

Criticism
Looking at it now, I need to balance his proportions more. I'd like to broaden his shoulders to balance out the waist and hip proportions without giving him an enormous armhole, extreme shoulder pads or a drape cut.

The sewing was done by Lela- her first jacket (guided by Susy)and I think that she has done a good job, especially with the challenges of it being cream wool.

p.s. photos for the trouser lining technique will be upcoming- its been very busy around here so although I think about getting the trousers down from wardrobe maintenance in the morning, the next thing I know it is time to go home, and another day has passed!