Tuesday, December 19, 2017

Quilted jerkin

I am off and running on the next project which is a quilted jerkin.
this is for a gentleman with a size 56 chest, and I will not have a chance to fit him.
I made my pattern block, then padded up a stand at work to his shape using a variety of photos as reference.
Once I corrected the pattern, I marked it onto the base fabric. I also drew out all the quilting lines and sewed the darts.


On the outside of the base, I basted the batting in place over a ham to keep the shape from being flattened. I then cut away one of the batting layers to reduce bulk in the seam allowance.


I transferred the vertical dart I used in the base to a new horizontal position that will align with a quilting line.
Sew the dart closed than baste the silk fabric to the base matching the dart with my quilt line position.


Then I sewed the first quilt line along my dart by machine from the inside.
Once that was complete, I basted the vertical curved quilting line and then sewed it by machine as well.


The next step was to quilt upwards from the first line. Then downwards towards the waisr, and then the remaining vertical quilt lines around the armhole.


Do the same process to the other half of the back. Bind off the armholes and bottom edges. The CB seam allowances had a hong kong bias finish, then I joined the centre back seam.
Then I will bind the neckline with bias so it looks like the armhole finish.
Then I am onto the fronts.

Its a very nice red, quite seasonal in fact!


Wednesday, December 13, 2017

paned breeches updated and finished

Home again home again jiggity jig.
That month away felt so long, yet went by so quickly if you know what I mean.

It is refreshing to go to Montreal. There were so many wonderful cultural experiences to see and do. Here are some of the things I did while there.
AURA amazingly breathtaking! watch the video!
Leonard Cohen exhibit at MAC , Centaur Theatre,  Boys with Cars , McGill music concert , Redpath Museum , Souk à SAT , Cité Mémoire , Salon des Artisans Récupérateurs, Beautys, wandering the old town of Montreal and Griffintown, watching the Grey Cup with friends down in Lasalle, shopping, restaurants, Loving Vincent and The Other Side of Hope

I did work too. Really! No wonder I am a little tired!

so a few work photo updates
the paned trunk hose.
This is what I did with the tulle/net to create the shape under the "paned" layer. I forgot to take photos of this.

After applying the netting, sew the base layer up. 
I had already created a zip fly in the base layer before I applied the netting, so my fronts were actually joined together as I applied the net. Sew the inseams, then sew the centre front/centre back seam.
Sew the CB seam completely up before applying the waistband. The next steps can be modified, but this is how I did it, as I needed to have a fitting before finishing. I am also trying to think ahead as to how alterations could be easily made after the fitting, or in the future.
I interfaced and applied the base waistband (just a single layer), sewing it on so the seam allowances are facing outwards. This will make sense, I assure you. I turned the top edge of the waistband and pressed it.

Next, sew up the paned layer, inseams first, then cf/cb leaving the fly area open. Sew the waistband(single layer of fabric) on as usual. You now have two pairs of "shorts"
Slide the paned layer over the base layer. Baste the CF fly opening to the base layer.
Finger press the waistline seam allowance open, pushing the seam allowance of the panes downwards and baste the waistband seam allowance of the pane layer to the waistband seam allowance of the base layer. Machine these together close to the seam.
Slip stitch the centre front fly of the paned layer to the base with a permanent stitch. 
Baste the leg openings together flat.


Fit
make any alterations- I had to take a few small tucks in the back under the seat towards the inseam. I put the tucks in the base layer and gathered the paned layer to the new size.
Finish them!


I used premade bias tape to finish the leg opening. I sewed it on, cut my seam allowances down, wrapped the bias to the inside as a facing, and slip stitched the bias to the base fabric.
joined the waistband layers together on the top and front edges.
Sew on hooks and bars.
Voilà. 

Production photo credit Maxime Cote

Friday, December 1, 2017

More from Montreal

First, a little photo from this evening as I was walking home after work!
I love the light installations here in Montreal and especially these illuminated teeter totters at Place des Arts. They also make sounds as they are played on.
It is so much fun to see so many people enjoying them.
There was a Christmas craft show at the maison Durable, vendors there were selling crafts made from recyclable materials, a Christmas Market at Place des Arts, with outdoor vendors of crafts and food, and the souk à SAT across the street from us with local craft and food and artisans showing their work. It is all very festive.


I am going back from the last post to show you the base pattern for the short trunk hose. I need to take out some fabric below the seat in the back, either by gathering or darting ( I am already into the fabric so I have to make it work from where I am at now)


This is the base, with some netting applied and the paned pleated fabric draped over top, and put together for a fitting. 
I basically constructed an inner trouser base, and an outer trouser, and melded them together. I slip stitched the paned layer to the base at the fly front (yes I put a zip fly into these) I made sure the waist seam allowances of the outer layer turned down at the waist so the waistband itself is nice and flat. The two layers are then caught together at the leg opening. I need to make an alteration, reducing extra fabric at the hem/leg line so I will probably gather that edge on both layers.
Then I think I will face the leg opening back with bias as a finishing technique.

I am struggling with posting using my ipad, so forgive the short posts and any horrible spelling mistakes.
I will post a fitting photo soon.
Cheers!

Friday, November 24, 2017

Fast and furious

NTS progress update.
Week two is complete and we have been very busy.
We being myself, expert sewer Lisange and our part time student assistant L. working on the menswear.
Arrived on the Monday, met with our student designer, got organized and started drafting, as I had a day and half before Lisange would arrive to start sewing.

Lets see, I have drafted 3 pairs of period breeches and a pair of short trunk-hose.
Drafted two jerkins, cut them, Lisange sewed them, I fit the mock ups and then altered and cut them in real fabric. One is almost completely sewn.
Cut the breeches straight into fabric, Which I mainly sewed with some help from our student assistant, made them up to fitting stage and fit them. Fit the stock and borrowed costume pieces. Marked those alterations, and Lisange also cut a couple of period shirts and stitched one up.
Our head of wardrobe is very hands on and made a dent in some of the stock alterations this week.

So, what can I show you?
The short "trunk-hose"
The designer just could not find a pair of these in stock, nor to rent or borrow. We needed a time and material saving approach to these. The "panes are created by box pleating the fabric, and instead of trim, I zigged in gold thread to give the impression of trimmed panes. There are 10 "panes" and if we had used trim to define them, we would have needed 15-18 metres of trim. That is quite costly for a student show budget.
IMG_3006

Of course, this is just the top layer. The industrial zig machine and I had a few moments of irritation, but with a bit of perseverance, I got the edges done, pleated up and pinned in place. I think this will give the impression we are after.

There is a fitted base layer that I made first. The base layer will get a ruffle or two of tulle to help hold this "paned" layer out. The waist and bottom edge of the paned layer will get gathered in and the pleats will give the volume required. At least I hope that's how it will work!
We will see how it goes on Monday!
Bonne soirée, et bon fin de semaine.


Monday, November 20, 2017

Off to Montreal

Off to Montreal.
It has been a strange year in so many ways.
I have let the blog languish due to so many things going on in life. I have lost an aunt, an uncle, and two brothers in law in the past eight months. 
The work stresses were also enormous this season, so I have taken a bit of time off from blogging just to regroup and see where I am going next.

It turns out that "where I am going" is Montreal for another contract, to cut a show designed by one of the NTS student designers, and put on by the student actors. 
It am looking forward to revisiting the city, and working again with the talented wardrobe staff there.

Hopefully, I will find time and energy to post more regularly once I have returned home.


Saturday, July 15, 2017

Cutting an "old fashioned" bathing suit

Tucked in amongst the suits and trousers we are making, is a little project that was a lot of fun to do.
We needed to make an old fashioned bathing suit for the character of "the lifeguard".
Sort of like the gentleman second from the left in this photo.

First the material- we used a wool/Lycra blend from Whaleys which for some reason I cannot find listed on their website- I hope it has not been discontinued! It is really fabulous fabric. Pricey- yes, at $78/ yard  (2008 pricing from our stock tag) but for specific projects like period tights or period bathing suits, nothing else that I have used compares to it. Anyhow, being wool it does shrink too, so a wash and dry to preshrink it was necessary.
For the red stripes, we used a lightweight poly cotton colourfast knit that was cut into 3" strips and laid on top of the wool/Lycra base.
It is important to make sure the red was not going to run and turn the whole thing pink!

I had to make a few pattern decisions right off the bat. There are a few options for making this pattern.
Breaking it down- where do we want the seaming to be?
It could be an all in one unitard pattern- no waist seam. These unitards often have no CF seam at all. Sometimes they have a side seam, but many do not. In that case the pattern would have to have a CB seam from the neck down through the CB of the seat. All the body shaping happens through that one seam.
I didn't think that a CB seam in the bodice area would look right. Plus I am applying stripes, and that didn't seem like a good shape for this.

So I decided that the bodice should like a tank top, with only side and shoulder seams.

That leaves the lower section to think about.

Normally a pair of shorts has a waistline, CF, side and CB seams to shape around the body. I decided to not have a CF seam in the shorts, allowing the stripes to be applied flat across the front.
I decided to keep the waist seam, which would allow me to fit and adjust the garment length very easily.
Since we were applying stripes, I figured that a stripe could be used to disguise the waist join.
That meant that the back of the shorts would have a CB seam and all the length required through the fork or crotch extensions would be on the back piece.

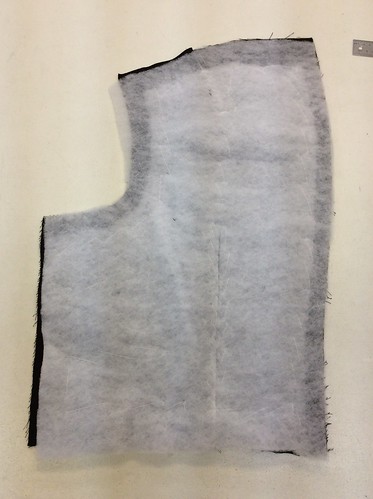
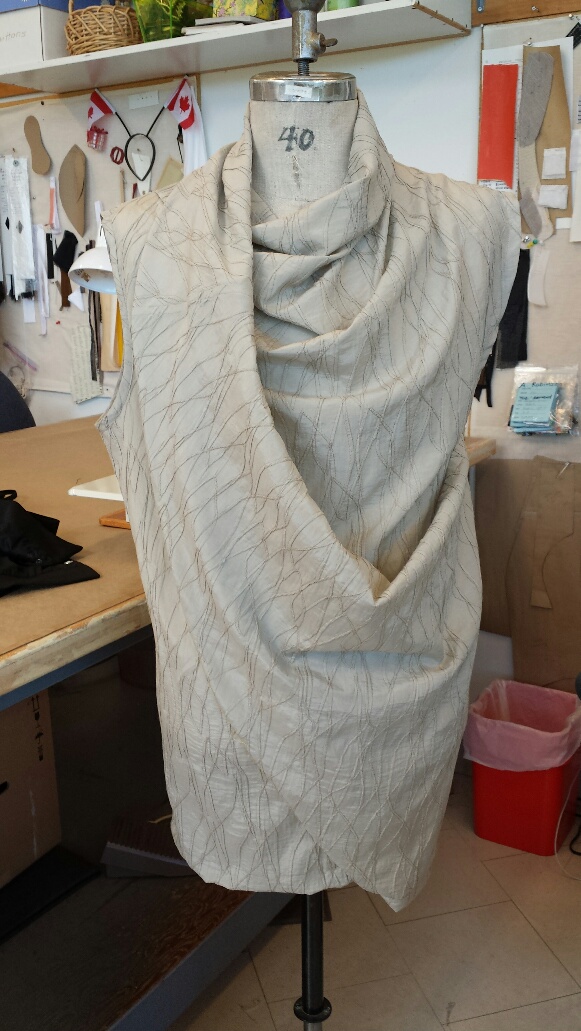
This is the first fitting, cut right into the fabric and zigged together.You can see that I have pinned some length out of the bodice section. This was just at the back waist not in the front.The designer did not want this fit very tightly to the body, so I left the overall fit around the body as is, and honestly the waist seam allows a good fit without it being stretched to the limits.

I basted on a few stripes to confirm their width. I thread marked the neckline and armhole lines but did not insert any elastic at this point as I wanted to confirm the design lines.


The next step was to mark the alterations, take it apart, cut the stripes and start sewing them to the base. We used a coverstitch machine to apply the stripes. The only tricky part was that we worked from the inside as we wanted the covering threads to cover the raw edge of the red stripes. The usual double line stitch of the coverstitch was now on the inside.


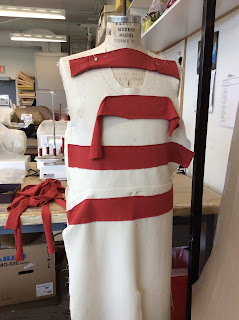
You can see the inside of the fronts more clearly here with the stripes applied.
At the waist we joined the bodice to the shorts with a flat overlapped seam rather than a regular seam so the join would not be noticeable. Again we used the coverstitch for this.
The same technique was used to put the shoulders together. This is much less bulky overall. The only seams that had regular four thread serging were CB of the shorts, inseam and the side seams.

The stripes on the front of the shorts section will determine how we place the stripes in the back section. If this were pre-striped fabric I would not be able to control the look of the stripes overall, and would likely have to cut this quite differently.


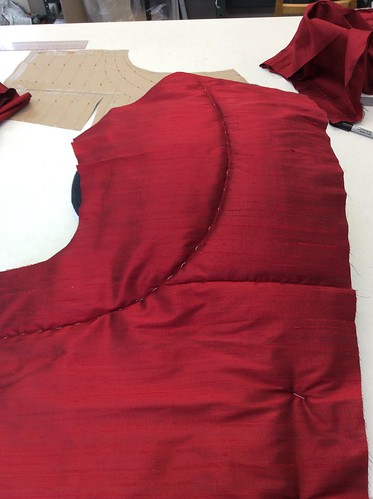
On the back of the shorts section, the CB seam was joined first, then it was attached to the back bodice. Then the stripes were applied.

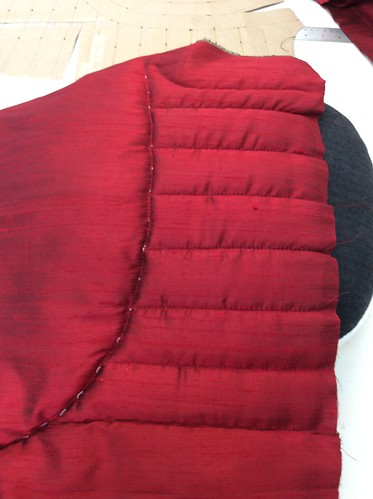
You can see here that the third stripe down from the waist takes a drastic turn from the side seam under the seat, then over to the inseam. The stripes will match at the side seam, and will also match to the corresponding stripe on the front inseam.
This is where a pre-striped fabric will be a problem visually! It would never match up to the front at the inseam. Here we can manipulate things to be as we want them. Very tricky, don't you think?

Once all the stripes had been applied, the shoulders were sewn, and then the sides and inseam.

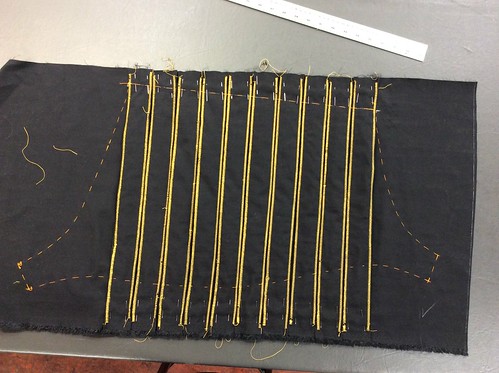
The final process was to finish the neckline and armholes. We wanted to install elastic in those edges but not in the usual manner of zigging or serging the elastic in. This seemed too thick to do that successfully. So we serged those seam allowances down to a scant 1.5cm, turned them to the inside  and stitched a half inch away to form casings, then fed elastic into the armholes and neckline. We could then adjust the length of the elastic as needed at the next and final fitting as seen below.

How much fun is that? 
It was a good project to stretch (haha) my pattern making and our sewing techniques.

cheers!


Sunday, May 14, 2017

Cutting cloth with one way design

Well, first I need to say that I am just crawling out from under one of the most trying times at work.
I shall not go into it here but suffice to say that management errors have left our department with crippling amounts of overtime.

Hence the lapse in my best laid blogging plans.

Back to the topic at hand though.
The designer makes 99% of our fabric decisions, and although the cutters are sometimes asked their opinion on whether it is suitable or not, usually it arrives on our table and we work with it.
Many fabrics don't pose much of an issue. The easiest are plain fabrics without a nap or one direction design- think a good plain woolen cloth. You can top and tail the layout of your pattern pieces (this means you can turn a pattern piece upside down/top to bottom in the layout) taking advantage of every square inch of the cloth and being quite frugal in its use.

Up the ladder from the basic could be a cloth with a woven pattern in it- a symmetrical or balanced check or stripe. The challenge is to place your pattern on the cloth keeping in mind the centering of the garment on the woven pattern in the cloth, and matching the pattern where needed at centre front and back and sleeves to body. You can still top and tail the layout.

Another rung up the ladder might be velvet (or corduroy), a definite one way fabric. I remember as a teenager, cutting myself a pair of overalls in corduroy, and being completely stymied by the fact that one side of the body looked dark and the other side light. I knew nothing about "nap" and I don't think I ever finished them as I was so confused.
We often cut velvet "nap- up" for the stage because it usually reads as  a richer colour than when cut nap down. You must cut your pieces all in one direction- you cannot turn a piece upside down to fit better on the layout because it will end up a different colour than the rest of the garment. You can turn a pattern piece over, only as long as up remains up. These fabrics often have a fair bit of wastage depending on the garment type.

Next up could be asymmetrical/unbalanced or one way printed or woven designs. These could be plaids, florals, uneven checks or uneven stripe combinations. These fabric designs cannot be "book matched" at the centre front or back.  When they are folded in half, right sides together for cutting, the design in the fabric does not lay matched atop each other.

I have run into uneven or unbalanced cloth a couple of times this year. Twice with suitings and once with a velvet floral. I had no problem making the decision of how to cut the velvet but I started wondering about the options for the stripes.
Here is one of the striped fabrics:


It made me wonder about whether I should cut the jacket as a one way design or not. I could conceivably cut the yardage in half lengthwise, and turn one layer of the fabric to make it symmetrical. Hmmm....I didn't do that in the end, but it did make me wonder if doing so was a "thing" or a no- no.


Here is a visual of what I mean. Imagine that you are looking at the centre front of a jacket- does it look better as a one way pattern or symmetrical? Chime in by all means!


Here is an example of an 18th Century style waistcoat in the floral velvet where you see the one way fabric in the cloth and how I have laid it out so the pattern continues uninterrupted at mid centre front. It requires enough fabric to do this and there are a lot of offcuts, which I used for the facings and such so as not to waste fabric.


Of course, it also takes a bit more time when cutting out cloth like this as you have to be quite careful to make sure that all your pattern pieces are oriented the same direction. The tricky bit is with pattern pieces like trouser backs and undersleeves. These pattern pieces are developed from the trouser front and top sleeve respectively. They "face the same way" when they are drafted.
In laying them out on the cloth you must make sure you flip the trouser underside pattern and the undersleeve to maintain the directional patterning at the side seam in trousers and of the sleeve.
that sounds complicated so here is a quick sketch of what I mean.


Okay, I think that is all I can muster up in the bad drawing department this evening!

It is certainly a lot to keep in mind while cutting things out!

Sunday, March 26, 2017

fitting and pattern alterations part 2

I thought I would follow up a little on the fitting and pattern alteration post where I was dealing with pattern alterations for scoliosis.


I had to make three different garments for this particular person, all with different patterning requirements.
We made a suit, a bolero and a 1950's style casual jacket. (with a quick change (11 seconds) front panel held on with magnets but that is a whole other bit of business)

With the bolero, I have created a seamed panelled back as it gave me more control over the fit. This garment does not have shoulder padding, whereas the suit jacket does.

I have laid the left body pieces over the right sides to show the differences in the two sides of the body.
I did end up lowering the armhole on the left side of the body as compared to the right.
I think you can see how much lower the left is at the shoulder, as well as the difference in width that was required on his right side at the upper blade area.


I have found this to be both a challenge and an interesting learning process.
Tomorrow I will try to lay out the pieces for the 1950's casual jacket which has a yoke as well as panel seams.

In terms of the suit jacket back, here it is in a finished state.
I think the comment about adding a dart on the left shoulder to make it visually more symmetrical was spot on but I left it as is because I had no time to re cut and reconfigure. If I had time to do it over, I would have tried to transfer some of the left horizontal drop into a shoulder dart rather than take it up with a shoulder pad.
Of course this stand does not reflect his actual shape so there is an air space on the right blade.


One of the job challenges is letting some things go, because we have such time pressures.
He was very happy with all the pieces we made, the designer is happy, I have learned something so I am happy too.

No time in the fittings to take really good shots for a blog, I make do with photos taken for the designer's references. :)

Sunday, March 5, 2017

A draped shirt

While I wait and wait for a fitting to find out if my pattern changes for scoliosis were successful, I thought I would browse back to last season just to see if there was anything interesting that I didn't have time to show you.

Ahh, I did find something- a draped shirt.
I don't often get draped garments in my work assignments, but I was delighted to see that one made its way to me last summer.
It is a nice challenge to make yourself think in slightly different ways and this certainly made me do that!

Here are some photos of the final shirt, the muslin toile  and the final pattern pieces

 The final shirt was made in a beautiful embroidered silk.
 It is sleeveless, and the back is quite plain. It also requires a centre  back seam.


 Not as nice in muslin, but I had to make sure it worked before cutting into expensive fabric.


Here you get a peek at what is going on around the neck. this is the area shown in the upper right area of the pattern pictured below.

The right shoulder (on the left side of the pattern below) is pleated to the back shoulder length. 
Even after making this, I kind of look at it with a bit of a head tilt, trying to make sense of the pattern. 

Below is the pattern piece for the left back of the shirt. 
The upper left area of this pattern piece (below) joins to the area in the upper right of the picture above and that ends up wrapping around the neck.The other half of the back is not shown. It was a basic shaped piece, with CB seam, side seam and a normal armhole shape.

Somewhere, we have some notes on the seaming techniques that we used to make this, which I should dig out and photograph as well, because once these costumes are done I mentally let them go- so the blog is a place for me to look back for reference!

Sunday, February 26, 2017

fitting and pattern alterations

One of the more challenging aspects of my job is drafting patterns to fit a variety of body shapes and fitting them to the individual.

Over the years you realize that almost no one is symmetrical, but some people are less symmetrical than others, sometimes from their occupation, sometimes from bad posture or habits (like carrying a heavy bag on one shoulder for years) some from injuries or occasionally a medical condition.

This week I fit a mock up suit on an actor/dancer who has scoliosis.

I had not measured him myself nor had I fit him before, so I drafted up a jacket and trousers to his basic measurements making no special pre-adjustments, figuring I would do that in the fitting.
Here is a photo of the my fitting adjustments.


I pinned out across his back as the left side is quite dropped, and on his right, I just cut the toile open over his blade.
(a good reason to make a muslin because you can cut it open rather than guess how much to add, and you can draw on it! )

Here is a look at it on a stand.

So, what to do?
First, I let it sit for a while, getting on with some other things which gave me a bit of time to think about it all. Then I made copies of the original pattern so I had individual pieces for his right and his left sides. Two back two side panels and two fronts.

I altered the left side of the pattern for a severely dropped shoulder/side. This entailed cutting from the mid back and mid front, angling down to the side back and front panel seam and closing out a good 1.5 cm there. the side panel piece was similarly reduced. (I will refit and see if this was enough of a modification.)

On the right side, I cut open the pattern down over the blade to the waist line. I cut horizontally at the waist line allowing the panel to spread apart the amount that I determined it needed in the fitting.
This opens up the back shoulder of course, and creates a large dart.

Now, this is going to be a striped suit. 
I laid the back patterns out on the fabric and had a look at what my options were.
The lower portion of backs need to be parallel, and could be, no problem. The CB at the neck needs to end up mid stripe or give that impression as well. I knew I might have to modify the dart placement to be as discreet as possible. 
I was not sure how this would look, but I chalked it out and pinned it up and I think it looks pretty good. At the neck, the left back ends up on a red stripe and the right back ends up with a full blue stripe! Win, win situation there! I did modify the dart placement slightly and I hope it becomes less noticeable once it is sewn
I am hoping that this does the trick, but I expect to have to tweak things a little bit more with some light padding here and there so I have my fingers crossed and onwards we go. The fronts need a bit of modification as well, but minor compared to the back so we will put the shell of this together and see what else needs to be done.


Monday, February 20, 2017

Catching up!

I feel as though I blinked and suddenly we have gone from December to mid February in a flash!

I hate to keep saying the same thing but it has been really busy in my world.
I took on a project that was late in starting, but I felt that we could pull it off.
I had people in place, the fabrics arrived just before the Christmas holiday started, I made some patterns then I came down with the flu.
I put everyone off for a few days, while I lay in bed feverish. Once my fever broke, I dragged myself to the studio to cut so we could be prepared for fittings the next week. What a hellish thing the flu is.

Well now that project is over, I have been back at my main job for a month now- and I waved goodbye to that project on Saturday.


One more project to be delivered - a ballet costume-  and I will be down to a single job and I can't tell you how good that feels.


Here is my Ballet coat.
I sent it in with a colleague for a fitting as I was otherwise unavailable on that day. Little did I know that the dancer I cut it for was injured and another dancer showed up to be fit. Luckily, they were quite similar in size!
There were a few changes that the designer (Colin Richmond)made, as you can see- shortening the hem, lengthening the sleeves, and he took it in quite a bit through the body- I had cut it with a lot more ease and had the skirts flared from a higher position on the body. The roll line was moved up and the collar reduced in proportions.
He added fur cuffs and a back belt.
Generally though, not too bad for a first fit in fabric.

Now it is boxed up ready to be delivered! I hope I get to go in and see the dress rehearsal, the show looks amazing from the sketches I have seen and the promo videos. The ballet wardrobe is one of my favourite wardrobes and everyone there deserves huge credit for their beautiful work!!


Next up in my world are productions of Guys and Dolls and HMS Pinafore! Two musicals that I have a great fondness for. I also have a 12th night that I will be working on so that should keep me busy!
Hopefully I will find more time to blog about them than I have recently.


Oh!
I also added something useful to the studio....
I have been on the lookout for a larger sized male judy, and found one last week on an online sales site. I didn't really need a full body judy, but he is a beauty! The price was well within my range and I just couldn't pass it up. It is a 42 young men's size which is great as the torso is longer- more proportional- to someone 6 feet tall, which is so much better than the standard 5'8" models.

Back to work tomorrow.