Showing posts with label 21st century. Show all posts

Friday, April 2, 2021

lockdown project- a coat for myself

It seems that spring is here, and it is time to switch out the winter clothes for something slightly lighter. That makes me remember that I had another lockdown project I can tell you about. 

I made a coat for myself. 

I still have the first coat I ever made for myself, way back in the early 1980's. It was a Vogue pattern, I believe, I bought the fabric at Duthler's in London Ontario- they had nice fabric in the day! Sigh.

It was a classic cut, DB camel coloured tailored coat. I haven't worn it in decades, I did love it, but, it was time to make a new coat. 

First-design- I had to pick a style. Oh gosh, I had so many pins of women's overcoats on Pinterest that I liked but I couldn't decide on any of them. Then, I saw an online ad for a winter coat at the Bay, and I liked it enough that I thought I could use it as a jumping off point. 


I did a little drawing first. 


Then I got out my base/block pattern that I drafted and fit on myself last year.


I made a pattern, started a mock up and realized it had way too much ease allowance, so I started over,  made a new pattern and cut right into fabric. I figured I would baste it together and try it on as I went and make adjustments to the style and fit on the fly.

Maybe not the best decision, but in my defense, I had what I will call "Covid Brain",  very fuzzy thinking, and I had the time to spend. 

This project also provided something I had been lacking since the lockdowns, and that was a deadline! I planned to have it finished in time for my working gig in Montreal.

I muddled through. I am sure Lela thought I was crazy at times when we were working in the studio together but it all worked out in the end and I got a coat out of it.

I will show you some of the stages in the upcoming posts.


Sunday, January 24, 2021

bathing suit sewing tips- a bagged out edge with elastic

Okay, so apart from the basics of getting the swimsuit and lining cut out, there was a small sample to be made.


On the neckline of the bodice, the elastic is applied differently than on the other edges. The front neck edge does not have a visible zig or cover stitch holding the elastic in place. The lining is used to bag out that edge. It is the left edge in this photo, where you see the zig on the blue lining.


You can see here, that the neck edge is bagged out but the armhole edge has a visible zig stitch 

I made a sample before starting.

For the sample you need a piece of the fashion fabric, a piece of lining and the elastic. I thread marked the line in yellow so you can see it. 

The lining and the fabric are placed right sides together. The elastic will be serged to the two fabrics, keeping the one edge of the elastic right against the line that is marked in yellow. 


You could zig it on if you do not have a serger. 

Here you can see that as the lining is turned to the inside, the elastic edge stays along the yellow thread line, which of course, is the finished edge.   
It all nice and neat. 

The final step is to control the edge by understitching. I am going to zig the elastic to the lining and in doing so, that will keep the lining and elastic in place on the inside of the garment.

The layers are opened up and laid down flat (sorry no photo of that!!)

The lining and elastic seam is under the foot and the fashion fabric is to the right of the foot while you are stitching. 

This is when you can test your machine for the best zig width and stitch length, as well as to see that you need a new needle! (Boo, skipped stitches are not good!) That is why a sample is a good thing to do! Identify issues before you work on the final garment.


Remember, the face of the fashion fabric is not caught in the zig, and when it is all laid in place, you get this nice clean edge. 


This, by the way, is the same technique I use on a tailored trouser waistband. Instead of bagging out  the top edge of the waistband, I do a variation on this, using the waistband canvas in the place of the elastic and it offsets the seam between the wool and the silesia. 

I will have to look for a photo of the technique used on trousers, I am sure I have one somewhere.

Cheers!

Sunday, January 17, 2021

Bathing suit drafting and construction- 2020 projects

 Well, where are we?

Oh yes, lets look at the next bathing suit I drafted. I had one successful pattern and contruction under my belt, so I felt this next one was worth using some fabric I had purchased but didn't want to waste on a trial garment.

I had an existing tankini suit that had seen better days, and I liked the design of the top, but I felt that it never really fit me that well. You know, it was good enough but better is better, right?

The top was a halter style with ties and a ring detail at the centre front bust. The ring was in great shape, so I took the old bodice apart- which is always an interesting and informative process. You can see the order that the garment was constructed and the techniques that were used.

I had been poking around at my local fabric store and I found some lightweight power net in a pale blue colour. It was onsale too! I decided, since I am experimenting, that I would try that as a lining in this suit. I think I also bought some flat rubber elastic for this one as well. I hadn't worked with it before, so why not now?

Stuart had a tutorial on his website for this process. I have since discovered that these lessons are now under a paywall. I think if you are interested in making bathing suits, or stretch wear it is well worth the cost.

My first draft, and then the altered pattern. I basically made the same pattern alterations here as I did in the first bathing suit in the previous post. (I added length over the bust)
I started again from scratch though, partially for the practice, and also to make sure that I wasn't making changes based on fabric characteristics.  

The second photo is the altered pattern. 

At the bottom you can see the idea of the design pinned up on the stand.

We will have a more detailed look at it next...


Sunday, May 14, 2017

Cutting cloth with one way design

Well, first I need to say that I am just crawling out from under one of the most trying times at work.
I shall not go into it here but suffice to say that management errors have left our department with crippling amounts of overtime.

Hence the lapse in my best laid blogging plans.

Back to the topic at hand though.
The designer makes 99% of our fabric decisions, and although the cutters are sometimes asked their opinion on whether it is suitable or not, usually it arrives on our table and we work with it.
Many fabrics don't pose much of an issue. The easiest are plain fabrics without a nap or one direction design- think a good plain woolen cloth. You can top and tail the layout of your pattern pieces (this means you can turn a pattern piece upside down/top to bottom in the layout) taking advantage of every square inch of the cloth and being quite frugal in its use.

Up the ladder from the basic could be a cloth with a woven pattern in it- a symmetrical or balanced check or stripe. The challenge is to place your pattern on the cloth keeping in mind the centering of the garment on the woven pattern in the cloth, and matching the pattern where needed at centre front and back and sleeves to body. You can still top and tail the layout.

Another rung up the ladder might be velvet (or corduroy), a definite one way fabric. I remember as a teenager, cutting myself a pair of overalls in corduroy, and being completely stymied by the fact that one side of the body looked dark and the other side light. I knew nothing about "nap" and I don't think I ever finished them as I was so confused.
We often cut velvet "nap- up" for the stage because it usually reads as  a richer colour than when cut nap down. You must cut your pieces all in one direction- you cannot turn a piece upside down to fit better on the layout because it will end up a different colour than the rest of the garment. You can turn a pattern piece over, only as long as up remains up. These fabrics often have a fair bit of wastage depending on the garment type.

Next up could be asymmetrical/unbalanced or one way printed or woven designs. These could be plaids, florals, uneven checks or uneven stripe combinations. These fabric designs cannot be "book matched" at the centre front or back.  When they are folded in half, right sides together for cutting, the design in the fabric does not lay matched atop each other.

I have run into uneven or unbalanced cloth a couple of times this year. Twice with suitings and once with a velvet floral. I had no problem making the decision of how to cut the velvet but I started wondering about the options for the stripes.
Here is one of the striped fabrics:


It made me wonder about whether I should cut the jacket as a one way design or not. I could conceivably cut the yardage in half lengthwise, and turn one layer of the fabric to make it symmetrical. Hmmm....I didn't do that in the end, but it did make me wonder if doing so was a "thing" or a no- no.


Here is a visual of what I mean. Imagine that you are looking at the centre front of a jacket- does it look better as a one way pattern or symmetrical? Chime in by all means!


Here is an example of an 18th Century style waistcoat in the floral velvet where you see the one way fabric in the cloth and how I have laid it out so the pattern continues uninterrupted at mid centre front. It requires enough fabric to do this and there are a lot of offcuts, which I used for the facings and such so as not to waste fabric.


Of course, it also takes a bit more time when cutting out cloth like this as you have to be quite careful to make sure that all your pattern pieces are oriented the same direction. The tricky bit is with pattern pieces like trouser backs and undersleeves. These pattern pieces are developed from the trouser front and top sleeve respectively. They "face the same way" when they are drafted.
In laying them out on the cloth you must make sure you flip the trouser underside pattern and the undersleeve to maintain the directional patterning at the side seam in trousers and of the sleeve.
that sounds complicated so here is a quick sketch of what I mean.


Okay, I think that is all I can muster up in the bad drawing department this evening!

It is certainly a lot to keep in mind while cutting things out!

Sunday, May 1, 2016

checking things off the list

Today I got to check one big thing off my list!

The studio has been moved. Ten adults, two kids, two truckloads and 4 and a half hours later, done. Thanks to all my friends who helped.  Terry for providing a truck and Jeff who fixed the hydraulic lift switch at the new place, so unloading was a breeze. The kids had what is likely a fairly rare opportunity to ride up and down on a very old freight elevator- the ones with the pull down wooden gates and the kind where the operator (me) has to manually stop so the floor levels are even.

Of course the new space is not set up, and we need to do some work on it first, so everything is stacked and under wraps for now.
But one thing is off the list.
Now we can pack up the car with our daughter's belongings and move her tomorrow. I am missing a day of work but there are only so many things you can do on one week end.

I had a tech dress yesterday until 7pm and thankfully they got through a very technically demanding show. That is one more thing to check off my list as well.

I don't often list my workload here in full, but all of this list making makes me think I should let you in on how much work we have produced since mid January. This is me pattern making and with four tailors plus one extra set of hands for three weeks.
so here goes
Show 1: 1940's plus fantasy costumes- (all this built from scratch)
9 jackets
6 waistcoats
5 trousers
1 pair pleated shorts
5 long sleeved shirts
3 unitards
2 medieval gowns
2 velvet capes
2 fur capelets
1 wolf in fake fur including a tail and all supports structure
2 centaur costumes
1 bodice for a tree
1 pair of trousers for a tree (stilt walker)
1 lion cape
1 lion cowl
2 sets of leather spats with fake fur trim
2 sets of protective gear for wearing a prop
1 cowl and hood
a variety of stock costumes including 3 trousers made into shorts, 4 wraiths, a witch's footman, shirts collars, and more that I cannot think of right now.

Show 2: 1940's (all this built from scratch)
2 three piece suits
2 shirts
1 two piece suit
2 pair trousers
altering a variety of stock jeans t shirts and puchased clothing

We are already behind for the next show, so I am not sure how much spare time I will have in the next little while to post but we will see.


How often do you get to make a tree? A theatrical tailor's life is quite varied for sure!
Kudos to Heather in props who really made him into a tree. Great work!


Sunday, April 10, 2016

a man in wolf's clothing?

It has been quite hectic here with all that is going on. I think I say this a lot don't I?
I mentioned in a reply to a comment that everything is happening April 30th!
We need to assist our daughter to move out of her university digs and into a sublet in the city she is in, and I have a tech dress rehearsal on the 30th too. I guess my studio is moving on May 1st, and therefore my dear husband is on his own for the big city/daughter move. Whew!

I believe that I have been able to secure a new spot for my studio -knock on wood- but I am waiting for confirmation and a few more small details to be worked out. It is a relief, and just in time because I have more than enough stress with work and life in general.
I still need to hire a truck and finish packing up in preparation. I will also need to do some painting and flooring work before I can set things up, so I don't think I will be set up and functioning right away. Oh well, at least there is a light on the horizon.

So I actually have two shows going into tech in three weeks, one on the 28th and the other on the 30th. Then I have a small window to get a show together for the mid May period. The pace is not going to get slower for a while yet.

Here's one of two costumes that I fit yesterday, which I am quite happy with. This is an example of what I term "there is no formula" for doing the work we do. Trial and error  experience and adaptation. Or flying by the seat of your pants way of working!

This is the wolf.
This has been in limbo for a few weeks while we were backed up with other priorities. The tail was ready though! There was a lot of pattern making to do for this costume.

The base layer to this costume is a stretch legging and a long sleeved stretch top that zips up the front.
I think it should have been a unitard and it may still get joined together but for now it is two pieces.
Pattern number one and two- actually, I had to redo the patterns as I was given a fabric to use that had a different stretch factor, but there wasn't enough of it in the end to make the whole costume. So ditch those patterns, get new fabric, recalculate the stretch and make new patterns!

We also needed a pattern for the basque that supports the tail. That pattern I developed from a skirt draft. ( I am not actually following a specific draft, merely the concept of it here).

The next set of pattern making involved the fur layer.
The fur does not stretch. We have a few hanging stands in the wardrobe, but the one with a good size for the torso has legs only to above the knee, and the stands with full legs have short stocky bodies.  I decided to trust my flat pattern making skills to figure it out rather than draping something on a stand.

I then needed to draft for the fur layer and figure out how it could be manipulated to fit closely in the body and allow the actor full movement. He demonstrated some of the fight choreography (full lunges in armour) in the first fitting, so that informed my subsequent thinking.

The fur on the wolf's tail was applied in sections to allow movement, and I applied the same principle to the leg area.
I drafted up a trouser pattern outline, and then modified it to be closer fitting, then I figured out the areas of overlap.

My actual pattern is so marked up with thinking lines that I drew a little diagram of what I did.

I didn't need to cover the areas of the body that are covered with armour, such as the lower legs which have greaves, and a knee piece - what are they called?   Poleyns, I believe.

The thigh area fur is cut in four pieces. It is seamed up the back of the leg and shaped to follow the contours of the thigh and buttocks. It has an inseam and outseam, and a seam up the front of the leg where I left adjustment room- extra seam allowance.

The over layer is like a pair of short shorts.
I reduced the girth a bit as I am working off a trouser draft, which is too roomy in general. I also darted out from the CF and CB lines to the hem of the shorts in order to get a closer fit there.

The basque was made of duck and corseting and is heavily boned with spiral steels in order to support the escutcheon for the tail.
We found out that we need to shorten the spring inside the tail as you can see! Move the escutcheon piece upwards as well.
The escutcheon piece has holes drilled in it so it can be sewn on. It needs to have some kind of keeper as well, because the tail is very bouncy and popped out of the holder. Well that is what the fittings are for- figuring stuff out- what works and what doesn't.
We will then cover the basque with fur.

In the course of talking this through with Susy- who put it all together, we found that we could sew an elastic to the edge of the fur, and use that elastic as a means to attach the fur to the leggings. That means the thigh piece can be a little bigger than the thigh measurement, we can ease the fur to the elastic, and when it is attached there is still some give for muscle expansion.

The same principle with the shorts- the lowered waist can be eased onto elastic then attached to the stretch legging. This leaves the fur shorts free to move independently from the fur on the thigh. and also still be a pull on garment.
I had a lucky guess in how nicely the pieces worked together. The fur is bulky so the over layer needs to be bigger than you might think, and all our layers worked well together. you couldn't tell they were actually two pieces.

We did a similar process with the chest and armhole and sleeves. The fur elbow to upper bicep in one piece, the fur upper sleeve attached to the fur armhole facings/chest area, but left loose over the upper arm piece.
We will leave the armholes and sleeve of the stretch and fur separate so the fur pieces just float over the stretch. That should allow the most freedom of movement-  I hope it does anyway. Seemed good on the day anyway.

The other fitting was for a suit- which I guess i will talk about later as this post has gone on and taken me most of the day to get together.

Later....


also
Goodbye to our friend, Paul "eggs" Benedict, sound engineer extraordinaire, and all around lovely person.
2016 has been difficult- losing so many people we have had in our lives.


Friday, March 4, 2016

Such a week!

All my plans kind of went out the window this week.

I woke up Monday after a great week end, with this strange heaviness over me. I was walking to work and wondering why I was feeling that way. "Carry on!" as they say, but at 9:30 am  I received a phone call from the building manager where I have my personal studio/workspace.

"This cannot be good" I thought,  and it wasn't. The factory where I am situated is evicting all its tenants because they need the space.

We have quite a history in the furniture business here.
It is an old furniture factory, built in 1900 and 25 years ago the building had a lot of unused space and they started leasing space to artisans who were grateful to have a reasonably priced place to create. There have been woodworkers, potters, cobblers, artists and yes tailors and cutters all clustered on a floor or two there.
Recently the business has been storing a lot of product there as the storage of wood products was grandfathered into the system, and they need their space back.

There is a potter and woodworker whose livelihoods are made by what they produce there. Myself and my colleagues - another cutter and a theatrical milliner and a wig maker are slightly better off in that we work part of the year for a large theatre and use our space to generate income for the time we are "unemployed" laid off. We can rent at the theatre but it is not guaranteed to be available when we need it and for some of us, our freelance projects overlap slightly with our "employment" and the rentals stop once the theatre staff start work. Which is totally reasonable.

Our situation is complicated because we had reasonable rents which meant we could absorb the rental costs into a partial year of earning potential, but these days, it is so difficult to find light industrial space at all, let alone at a reasonable rate. I see so many places that are empty (sometimes for years) but the landlords would rather they stay that way rather than reducing the rent and having a tenant.
There must be some advantage to them doing so I just don't understand it.

So we have to go. Where? I don't know, but the search is on and it is proving difficult so far.
We have banded together to look for another location and I guess I will have to put some extra projects on hold while I try to work this out.

So, that is my tale of woe.


p.s. a Facebook page has been set up for those of us who were members of the Cutter and Tailor forum, please visit it and lets keep in touch. I hope to see you there. If the link doesn't work check the comment section two posts back.

I am off for my annual ski week end (no wifi) and will come back refreshed and energized, ready to take on the real estate world!

Saturday, February 13, 2016

Radio silence has ended! plus cool stuff

Hello one and all,

I realized today that I have not had much to say on the blog recently.
I am trying to figure out why that is.

I do have a lot of thoughts, but the topics are either so complicated that I give up trying to write about them or so fleeting in nature that they don't prod me to write.

For the moment though, you may may be interested in the fact that as a tailor- cutter in a theatre, I am called on to make all sorts of garments, and this year I do have some suits, yes, but I have a bit more of things like this.

yes, unitards or variations on the theme!

I often joke with people as I am taking their measurements, that I need to take some certain specific ones, in case we have to make them a unitard! Sometimes that happens.
We actually don't take the detailed type of measurements that a place like cirque will take for their costumes, so when unitards or other stretch wear arises, it can be a bit of hit or miss.
These types of garments and the patterns required for them depend greatly on the fabric chosen.

Can I put a public service announcement here for all designers? Please, please, buy good all way stretch. Spend the money for it. Fabric that stretches in both directions makes for easier pattern making and for wearing. 

In this case, I have basically a one way stretch fabric. I had to cut it with the stretch around the body and the non-stretch vertically. The upper body will not be seen, so I have worked around the lack of stretch in the crushed velvet legs by adding a very stretchy fabric above the waist. In this manner I hope to have given the actor some comfort in being able to sit down easily at least.

This was a first fit, all zigged together with somewhat incorrect (old) measurements, so I have some work to do, tweaking the pattern.

Oh, what is that thing he is attached to you ask?

It is a wire frame body of an animal. You will have to wait for a bit for more details, but it also is a first trial fit on the actor. Our prop maker Kenny (a mastermind of an artist, sculptor and maker of cool things)  has built these frames for the show we are working on. The bands around the actor's thighs are attached to wires that connect to the back legs of the sculpture, so when the actor walks, the animal legs walk as well. Very cool.

Strange co-incidence, Kenny and I trained in the same fine arts program but he graduated just before I started. We have been working together for 25+ years and only found this out last month! We had the same instructors and had a moment reminiscing about that time. Isn't it funny how these things happen?

I think this season will feature structure quite prominently as I look around the wardrobe these days, so I will endeavour to get some postings up about that and rekindle my blogging spirit.

Cheers

here's a little video link to a bit more of Kenny's work....please watch it, it gives me goosebumps.


Thursday, January 15, 2015

Beginning

Beginning. What a weird word. Beginning. Maybe I have been translating too much recently. I start to look at words and wonder what the root meaning is.

Anyway, it is a new year, and I am soon to be back at my regular contract gig. It feels a bit like September used to feel as a student. The beginning of a new session.

Here is my table all fresh and newly covered, binders with show info and budgets organized, ready to begin.


Speaking of beginning and beginners, I have been thinking a lot about beginners and how people view or assume to begin to learn tailoring. Beginning, the words gets stranger on the page the more I write it!

One was a personal experience with a student who had graduated as a designer, and the other a random Internet guy who had decided that he had an interest in clothes and wanted to become a bespoke tailor as a profession. Neither had actually ever sewn anything, never even bought a commercial pattern and made themselves a basic shirt.

Now I am someone who learned both from skilled individuals in a hands on environment as well as through books and experimentation without guidance.

I like to see people with initiative and a drive to get to their goals but in some cases it makes me wonder  about the disconnect between an idea and achieving it.

I am reminded of a friend's child who seemed to be addicted to video games and not much else. He especially loved the hockey videos, so much so that he asked to play for real and his parents signed him up.
What a shock he had! It was not the same as sitting in front of the monitor making things happen with the push of a button. It was cold, he had to wear a whole lot of gear, he had to actually skate which meant moving around and being physically active. The puck hurts if you get hit with it and the ice is cold and hard when you fall down on it. He wanted to drop out but his parents made him stick it out for the season. I wonder now 15 years later what he thinks about that experience?

I tell you this because wanting to become a bespoke tailor with no real sewing experience is going to be a bit more of a process than you may imagine and requires a bit more than a burning interest in fashion.

I won't begin another rant, but my advice is  - get some hands on experience. Start now. Buy a commercial pattern to start, make a drawstring bag, a placemat, a Christmas stocking- anything really. Look for a beginners sewing class to take. Look for a basic machine, basic materials to start. you don't need a lot of tools nor anything fancy, but you do need to practice making things. Not thinking about making things, really making things. Make these things over and over and gradually you will get better at making these things. Then build up your experience by making more complicated things, and do it again and again. Enjoy it.

You have to start there. Not by trying to drafting your own jacket pattern before you can thread a sewing machine. Not by talking about it, or reading about Savile Row, but by actually doing it.
You have to get out on the ice!


Monday, October 27, 2014

Parka pattern and bonus beadwork!

So I have just been in a whirlwind of activity since finishing the opera. I am not sure if I am afraid that when I stop I will crash, but I have been getting a lot done. Except for the garden.....it still needs some TLC.

But following up to the previous post in which I am making a pattern for an amautik inspired parka, I made a toile for Yvette, and fit it on her on Saturday. It wasn't too bad, although the hood needed work, as I suspected.

Today I managed to alter the pattern and trace a copy of it out for her so she can order material. She is planning on making it out of melton with a separate wind resistant outer shell.

Here is what it looked like on my table. No sleeves in the photo.

Interesting don't you think? Can you see how it goes together? This is a simplified amautik inspired piece. The child's amautik that I took a pattern from is much more complicated!

Interesting things are the only "extra-curricular" projects I take on these days.

This was indeed "interesting", and I hope she gets her fabric soon, because now I am interested in seeing it as a finished garment. I will leave it to her to add her rickrack trim details and patch pockets. I wonder if she is going to put beading on it? She showed me some beautiful beaded pieces that she rescued from mukluks and other garments they wore in the north, that finally wore out.
Really beautiful work.

Oh, I have a pair of beaded gauntlet gloves.....just let me run and get them.


These were given to my father in law many years ago. He worked for the Indian Affairs Department of the Canadian government in Saskatchewan.


Smoked moose hide. They still smell. Even now.
Early 1960's I think.  Northern Saskatchewan.
Beautiful bead work.

Thanks to my DH who happened by and was willing to be a model.


Friday, October 24, 2014

Project puzzles.

Every so often interesting projects turn up out of the blue and I have to say that  love it when this happens.
Give me a puzzle and I am on it.

This week I am making a pattern for a friend who spend quite some time in the Arctic decades ago and wanted to make herself a new winter coat. She wants a modern take on a traditional amautik. 

I have not checked all the information I was told about, and I do not pretend to know very much at all about these garments. Just be forewarned. 

She told me how the Inuit would wrap their babies when they were small and carry them inside the coat, up against the mothers back. The coats were cut in such a way that as the babies grew, they were accommodated by the shape of the coat. The hoods were made large enough to cover the heads of both the mother and child.
The babies were held in place with a cord or sash that looped through a hanging cord at the centre front of the coat, pulled down between the breasts and wrapped around the waist holding the back of the coat tight and keeping the baby inside. She recounted how the mothers would line the inside of the coat back with moss, (no diapers then) that would absorb the child's urine and feces for later removal.

She gave me a child's size cotton amautik that she had, which I took a pattern from, and I have to say it was a very complicated garment. More complicated than it looks.

I am refraining from posting a picture of the pattern I made, as I believe that it is considered the intellectual property of the Inuit and that needs to be respected.

It was quite fun to design a coat for her incorporating some of the traditional aspects of the amautik.
I will have a mock up fitting with her tomorrow, and I am interested to see if she likes it. I know the hood isn't quite right on mine, but I really was winging it! Hooray for mock ups! She plans on making the coat out of melton, and has a nice little Arctic fox in her freezer (really!) that she may use to trim the hood....

The other puzzle I am working on is a soft case for a stand up bass I made for another friend almost 20 years ago. The zipper finally went!
Just a wee repair, but it was another one of those fascinating puzzles that grabbed my attention. His old case was not sturdy and it was falling apart and I took it on myself to make a new one all those years ago.

In other news, if you want to see the waistcoat for the Opera in action so to speak, click here.
The beautiful dress and the other ladies' costume was cut by my colleague Margaret.


Tuesday, June 17, 2014

prom dress wrap up


To wrap up the prom dress saga, here's a rundown of the finishing process.
Once I had the skirt attached to the bodice, I turned the CB allowance on the bodice to the inside and cross stitched it down.
I sewed a hook and loop at the top and basted a zipper in place. I then pick stitched the zipper in.


Then I made a belt out of the bias lame that I had fused with wool fuse. I didn't want it to lose its shape so I sewed in a piece of grosgrain. I stitched it by machine on one side and cross stitched the other side down and finished the inside with a piece of ribbon to cover the gap. It had two hooks and loops sewn on the ends to close it, and it was tacked to the dress waist by hand at the back and sides. I tacked it at the CF too but not quite in the right place as I noticed it pulled a little when she had it on. Oh well....

I stitched the bias straps in place by hand, picking through about an 1/8th of an inch from the bodice edge.

Last but not least I made a bow tie. How could I refuse at this point?


Why blue? Two dresses. I made two dresses for two different proms. Can't believe I did that!

But here's a crazy story... I took the blue fabric scrap to work so I could fuse some interfacing on it. I did it at lunch. Every one had left the room and I had just finished pressing 3 metres of muslin for a toile. I got the fabric and interfacing ready on the ironing table and walked away for a minute to check something else, and when I returned I took the iron and put it on the fabric and it melted right through the interfacing and poly stain. I mean melted it leaving an iron shaped hole in the fabric and a melted crust of blue polyester satin in an iron shape on the iron table cover. I have never experienced this before. The iron thermostat had gone haywire and overheated. I took some hot iron cleaner and tried to clean the sole plate and it boiled.
Good thing it wasn't the dress!!!!
Luckily I had another scrap of fabric.

Finally, two dresses, one happy girl, one exhausted mother (awake til she got home, hello 3am).


I really meant to be more diligent with documenting the process, but you know, I think I would still be stitching them if I had.

Now somebody has to get out and cut the weeds grass in the yard! The things that get neglected while sewing after work.


Now back to the usual fare here. I have some 18th century and Roman costumes to do!

Sunday, June 8, 2014

Prom dress update- almost done

Well, like many projects, I had the best intentions of documenting the complete process, and then reality took over as I was sewing after work and at home and before I knew it, I realized I hadn't taken as many pictures of the process as I had envisioned. At least the dresses were finished on time!
Here's a little summary:

The chiffon over skirt was pleated up and I hand basted the pleats first then I ran a line of machine stitching on that line as well as a half an inch both above and below before trimming away some of the excess fabric. I figured that I wouldn't be lucky enough to not have to adjust the length so these lines of stitching kept everything together when the time came to adjust the length. I basted the chiffon skirt to the underlayer at the waist and pinned it to the bodice on a dress stand to check the hem, and sure enough, I needed to make a little adjustment on the sides, so I unpicked the basting bit by bit and repinned until everything looked good and then I rebasted the waist of the skirts.
You can see the amount I adjusted at the sides in this picture.
The bodice is two layers of polyester white satin. Certainly not the most forgiving fabric. That being said this is a dress that likely will be worn once, so no point in bemoaning the fact that it is what it is.
I marked out each piece separately for both the under and overlayer.
I used the seam allowances of the underlayer to create bone channels for the plastic boning. The only seam allowance that gave me trouble was the front panel over the bust. This fabric doesn't take well to being eased and as the edge of the 1/2" wide  seam allowance is slightly longer than the seam it is a part of, it rippled a bit when making the bone casing. It wouldn't press out well either, so if I did it again, (which I did in the second dress) I would make a separate bone casing for that particular bone and then the seam allowance can be trimmed down and made to behave.

I also made sure to machine stitch the top edge and waist line of each of the pieces for the inner layer. This shows me the pattern line, but more importantly, stays the areas of the bodice that are a bit on the bias, such as the side front panel at the top edge. I checked the measurements of the pieces against the pattern after this. That side front panel had stretched out ever so slightly so I used that stay stitch to ease the edge back to its correct size.

I then sewed the top layer of satin just on the outer edge of my pattern lines to allow a smidgen of ease.
Place the bodice right sides together and bagged out the upper edge, pressed, under stitched and trimmed the seam allowance down. Then I basted along the upper edge to hold the fabrics as one and smoothed everything in place before basting the layers together at the waist, and then serging the raw edge of the waist and CB seam allowances.

Once the bodice was prepared, I worked on the pleated overlayer. I used a bias strip rather than the shaped piece in my original plan (thanks again to colleagues!). The bias can mold around the body and a bonus was that the tension on the bias piece made the front area stand up vertically and the rest of the strap laid flat! I also could make length/tension adjustments easily!
I fused the lame with a piece of wool fuse which is a soft spongy fusible I had on hand.
                                                             
 I had this prepared and prefit from an earlier fitting,
so I stitched the top edge of the pleated net to the lame and then arranged the pleating at the waist. Baste the layers together at the waist,  then baste the skirts on and fit to check.

Everything seemed fine! so I finally machined bodice to skirt, and trimmed the excess seam allowances down.

The worst was over!

next up will be all the finishing details.


Saturday, May 24, 2014

The fabric I fear....

Well, I am a tailor for a reason.
I like like wool. I like fabrics with some body that don't slide off the table if you look sideways at them. So I was a bit apprehensive about sewing the chiffon of the prom dress.
So what happens often with the thing you fear the most is that it turns out to be not a problem at all, and so it went with the chiffon.
OK, the seams were straight grain which helps.

First thing I did was pull a thread to determine the vertical cut I was going to make. Then I measured the amount I needed plus an allowance for french seams, pulled another thread and cut.
Then I had to unpick some of the flowers so I had a clear area to seam the skirt.
I did a french seam.

Once that was done, I marked a hem line on the underskirt as well as the chiffon layer and basted it in preparation for a bridal hem. (the chiffon was done on the straight grain so I didn't baste, just marked and pinned)

I am not sure whether this is a common technique anymore now that sergers are in widespread use. My colleagues offered two options of the same finish. One uses a narrow zig and the other a straight stitch. I chose the straight stitch version.


The technique in a nutshell: you turn up the hem allowance so the fold is about 1/8" below the hemline you want, then either zig or straight stitch through two layers on your basted line. Carefully trim away the excess hem allowance, right close to the stitch line you just did.
Now turn that folded edge up and stitch through the layers again, encasing the raw edge beside your first line of stitching.
It looks like this when it is done.
No lengthening after this so be sure that it is the hem length desired.


Oh, you need small sharp scissors (not like the ones in the photo) to trim close to your first line of stitching, and always go slowly and carefully when trimming!

Did I mention that the chiffon wasn't a problem?
I decided to pleat the waist rather than gather it, and up to this point it was all fine and dandy. I was feeling great until I started to pleat. It was like trying to corral a herd of cats.
That took some time (much longer than I planned as I did it twice), and a bit of cursing and required wine afterwards.
Sigh.


Monday, May 19, 2014

prom dress: toile bodice fitting

Finally getting to the dress.
I am excited to be making some progress! Sometimes just doing something different kind of perks you up.


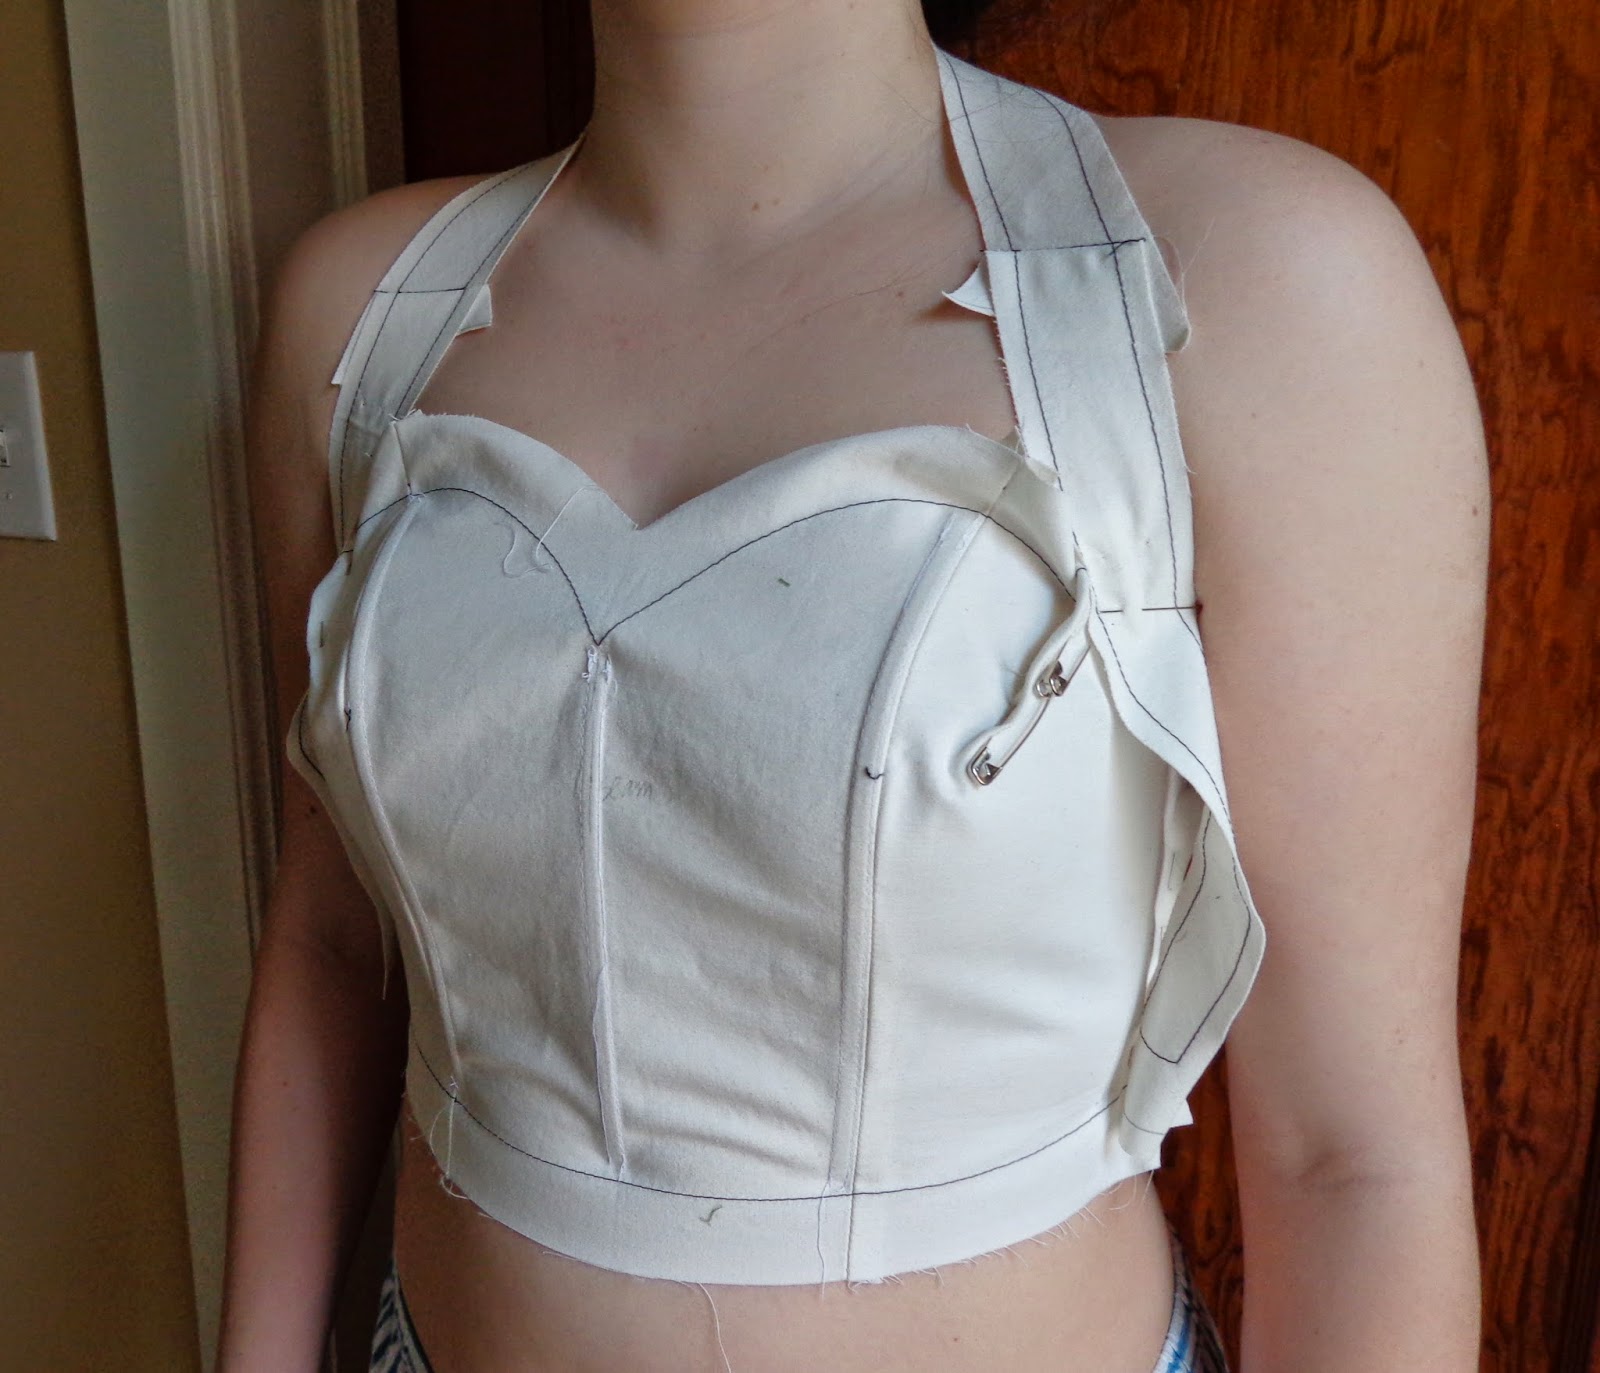
So I have fit the bodice I drafted, and was very pleased with the fit so far.

I pinned out about .5cm on the double on the side seams, as well as a dart in bodice side front panel as you can see here.


We were also playing around with turning the neckband around to see what a halter strap would look like. 

I might do a little shaping under the bust as well, and make the CF a seam instead of cutting it on the fold, but so far so good.
I used some rigilene boning in this mock-up because I had it on hand, but I do not like it.
The boning I will use is 1/4" German plastic boning that I will get from Farthingales. You do not have to worry about the ends poking through or capping the ends, it can be inserted into channels or stitched through.
The other type of boning that I would typically use is 1/4" wide spiral steels. They have the advantage of flexing around curves much better than anything else, so in this case, I may use one over the front curved seam or see if I can redistribute some of the shaping between the front and side front panels.
I will try to use the seam allowance on the inner layer to create casings for the bones, and may move the side seam forward to give a bit more support to the front of the bodice.


One note that applies to all sewing projects- start as you mean to go on. By that I mean you should include things like shoulder pads when making a jacket, boning if you are making a strapless bodice. I have also noted that people often choose fabric for a toile/mock-up that is totally unlike what they plan to use in the end. Pick something that has teh characteristics of the final garment, otherwise it just won't give you the true story.

Saturday, May 10, 2014

prom dress part four - drafting

 I feel like the month of May is trying to rush by, and I have been slogging it out doing overtime at work. This means that I feel quite behind on the prom dress project but I managed to squeeze a bodice draft into my week-end.
When I was first training as a cutter, I used Dress Pattern Designing by Natalie Bray as a text, so since I am familiar with it, it seemed the best choice to use for this block.
Some of my colleagues use it or use it as a jumping off point.  Just like the men's drafts, you cannot expect it to be 100% right off the page. With practice, of course, you begin to see the shapes being created on paper and can recognize areas that you can tweak or modify right away for a better fit, but a toile or mock-up is always a good idea.

One thing I did was to reduce the amount of ease in the basic block. There is usually 2 inches on the half in this draft, but I want a close fit, so I reduced it to 1 inch on the half.  This should be close to what I need.

I didn't take all the ease out beacause I wanted some ease in order to be able to fit it properly.
Too tight is always more difficult to deal with. It is so much easier to be able to pin the excess out, and see that your alterations are not causing other problems. If your garment is too tight, it can be difficult to determine how best to fix it. Too tight at the waist for instance can cause bodices to ride up, distorting the position of darts as well as affecting the armholes and even neckline and shoulders. You can end up in a guessing game that entails multiple changes when really all you may have needed is more fitting ease.


I marked out the style lines on the basic pattern, front and back, then I traced them to a clean sheet of paper using a needle point tracing wheel. I will keep the original block intact so that I can go back and manipulate it as needed. For instance,  even though I measured her myself, I think the bust point to bust point measurement seems narrow, so I could go back and easily make the front panel wider, and the side front panel narrower, without throwing anything off.


Once that was done, I trued up all the seam and style lines, and cut out my pattern.
Then I cut out a mock-up, leaving an inch of seam allowance both below the "waistline" as well as above the upper edge of the bodice. All the lines on this pattern are "nett" so I can choose how much seam allowance I want in specific areas.

Next will be the skirt and then a fitting. 

Sunday, May 4, 2014

prom dress part three-pattern sketch

When I am getting ready to make a pattern for  garment, I often find it helpful to sketch out the rough pattern shapes. This dress is not particularly complicated but it is a helpful process to go through nevertheless.
  You can then look for potential style, cutting or fitting issues. 

So, as I would if I was actually drafting, I would start with sketching out the basic block, and then drawing in the pattern lines.


The bodice front will be in two pieces to fit closely over the bust.
  Allow enough seam allowance on the top edge so if bodice needs pinching in along the top edge, you can still correct the line. Same goes for the waist seam allowance.

The back could be cut in two panels or the two sections could be made into one, and eliminate the seam.
  If cut as one piece, allow enough seam allowance to make changes without re cutting.

The collar/neck piece shape is made by closing the bust dart from the bust to the shoulder, closing the back shoulder dart and then putting the front and back shoulders together and drawing out the shape desired.
  It could be cut in one piece but if the CF is on the straight grain, it puts the majority of the neck piece on a bit of the bias which may stretch, so it may be more prudent to allow a shoulder seam in the neck piece, which would keep the back portion on a more stable grain. Not sure how much tension can be put on this piece without it buckling on either edge. It will be a more decorative rather than a structural part of the dress. 

The pleated overlay is created by initially closing the panel seam/dart from waist to bust, then opening/flaring out the top edge. You could calculate how many pleats you want at the neck, and how deep they might be first and then measure out how much more you need open the top edge.
  The amount to add depends on the fabric chosen and what looks good, so allow enough for changes to be made. The more flare, the more the side ends up on the bias, so that may be an issue with stretching.

The bodice will also need some kind of boning to keep the shape, and provide support. The boning will have to be attached to an inner structure.

The under skirt could be cut into panels which keeps the waist seam flat and allows for flare at the hem.

The over skirt has to be cut with the bottom edge straight, so figure out how much fabric is needed at the hem, then the length at the front, side and CB is marked, and the gathering lines are drawn in hitting those marks. 
  Remember that gathering an edge tends to hollow it out and therefore shorten in the other direction, so keep it in mind. Alterations to the hem have to happen at the waist.

Pick the shoes! they are needed to get the final skirt length.

Did I miss anything? Oh yes, figure out where the closure will be and how long it needs to be. I imagine CB. It may need a waist stay, so perhaps an inner grosgrain waistband that hooks closed first and takes tension off the zipper closure.......

Okay, onwards!

Sunday, April 20, 2014

step two- prom dress idea/drawing/breakdown

OK, the next step is to get the dress idea on paper.
my daughter saw a dress she liked on the Internet. Yes, she could have ordered it from a mystery place in China, but I have dissuaded her from doing so. These are my reasons:


One- will it arrive in time or at all? Panic if it doesn't.
Two- will it fit? Altering it could be a pain, and could be a panic due to time restraints.
Three- at the price, we are contributing to underpaid labour and worse maybe child labour.
Four- lets support local businesses, so we bought the fabric locally.
Five- Quality? for the online price, it may not look like you want it to.
Six- I can make it.

So we have modified the original design to reflect the fabrics we found locally. We had a great time one evening at our local fabric store, the manager and the salesperson all got into the act, pulling fabrics out and discussing the pros and cons of the colour combinations and such.


Break it down:
A structured strapless bodice, boned for support.
A sheer chiffon over skirt that has fabric roses along the hem. Gathered into the waist.
An underskirt, that will likely have panel seams to eliminate any extra bulk at the waist and give enough walking room at the hem.
A neckband which will need a bit of structure. It wraps around the back and attaches to the bodice almost under the arms.
The neckband supports a pleated sheer net over-layer that covers the front of the bodice, and ends under the waistband/belt.
The "belt"/waistband is applied to the bodice.
Likely a zip closure CB.

We need the shoes to determine the length of the skirt, and I need to get some fabric for the inner bodice, and a zip, oh,  and thread. Sigh.

I'd like to take a moment here to say that in general I think the prom dress situation is out of hand. Now I am going to be making this, and the fabrics were less than $100.00 and it will look like a more  expensive gown than it is, but there are girls buying $600+ dresses for a one night event and it makes me uncomfortable.

I have been trying to get across the fact that you don't need to peak in high school.
Thumbs up to everyone who is venturing to make their own dresses.


Saturday, March 29, 2014

I'm glad you are making that

As a tailor, there are fabrics that are difficult to work with, (silk velvet) ones that I would prefer not to work with (silk velvet), but as I was walking around the wardobe, I was  looking at some of the dresses being made, and all I can say is I am glad it is you making that and not me. There is a reason I am a tailor after all! I don't like fabric that is disturbed by someone sneezing in the next room.
Dresses like this

or this


or this.

So how did I end up with this on my kitchen table? 
Must be some kind of cosmic revenge, or motherly insanity, but this will become a prom dress sometime before June. Thankfully Johanna will make the pattern, which will be quicker than if I do it, but I am going to sew it.
Wish me luck!

Thursday, January 30, 2014

Last minute costuming

I am tired.
Exhausted actually, but I finished a very last minute project tonight after "work". A pair of jeans, a shirt and modifications for a bought shirt to do in a week cause Andrew and Kaitlyn are off to Sochi.


Strangely enough, I have been working on jeans at "work" and this project happened to include a pair of jeans. Very serendipitous
It was very nice fabric to work with as far as velvet goes, and is a deep rich black that gets washed out in hasty photo sessions.

Stretch black velvet jeans. With red top stitching. A happy combination!

I got the fabric Friday morning, took the afternoon off my regular job, washed and dried and pressed the fabrics, made a shirt pattern and had the shirt cut out, with instructions for making to be handed off to Silvia by 5pm, jeans patterned and cut out by 9:30 pm. Made them up to the waistband point on Sunday afternoon, and managed to get the last bits done tonight.
You don't have to be crazy to be in this business but it helps!

 Faked front pockets.
 Inserting the zip and edge stitching the fly.
There is a nice trick to doing this that I discovered while figuring out the jeans for work. I will follow up with it later, I promise!
Fly done and top stitched.

I stopped taking pictures after this because I just lost documentation motivation!

Sorry for the sideways view.


I think they turned out quite well, I just hope they fit perfectly, because there isn't time for a fitting which is really nerve wracking because even though I have my patterns for the last few things I made for reference, it is a style change- lower waist, closer fit through the legs and a stretch fabric- and I prefer to fit and know for sure than hope for the best, but at this late date hoping for the best is all I can do.