Showing posts with label design. Show all posts

Thursday, December 17, 2015

Cutaway variation

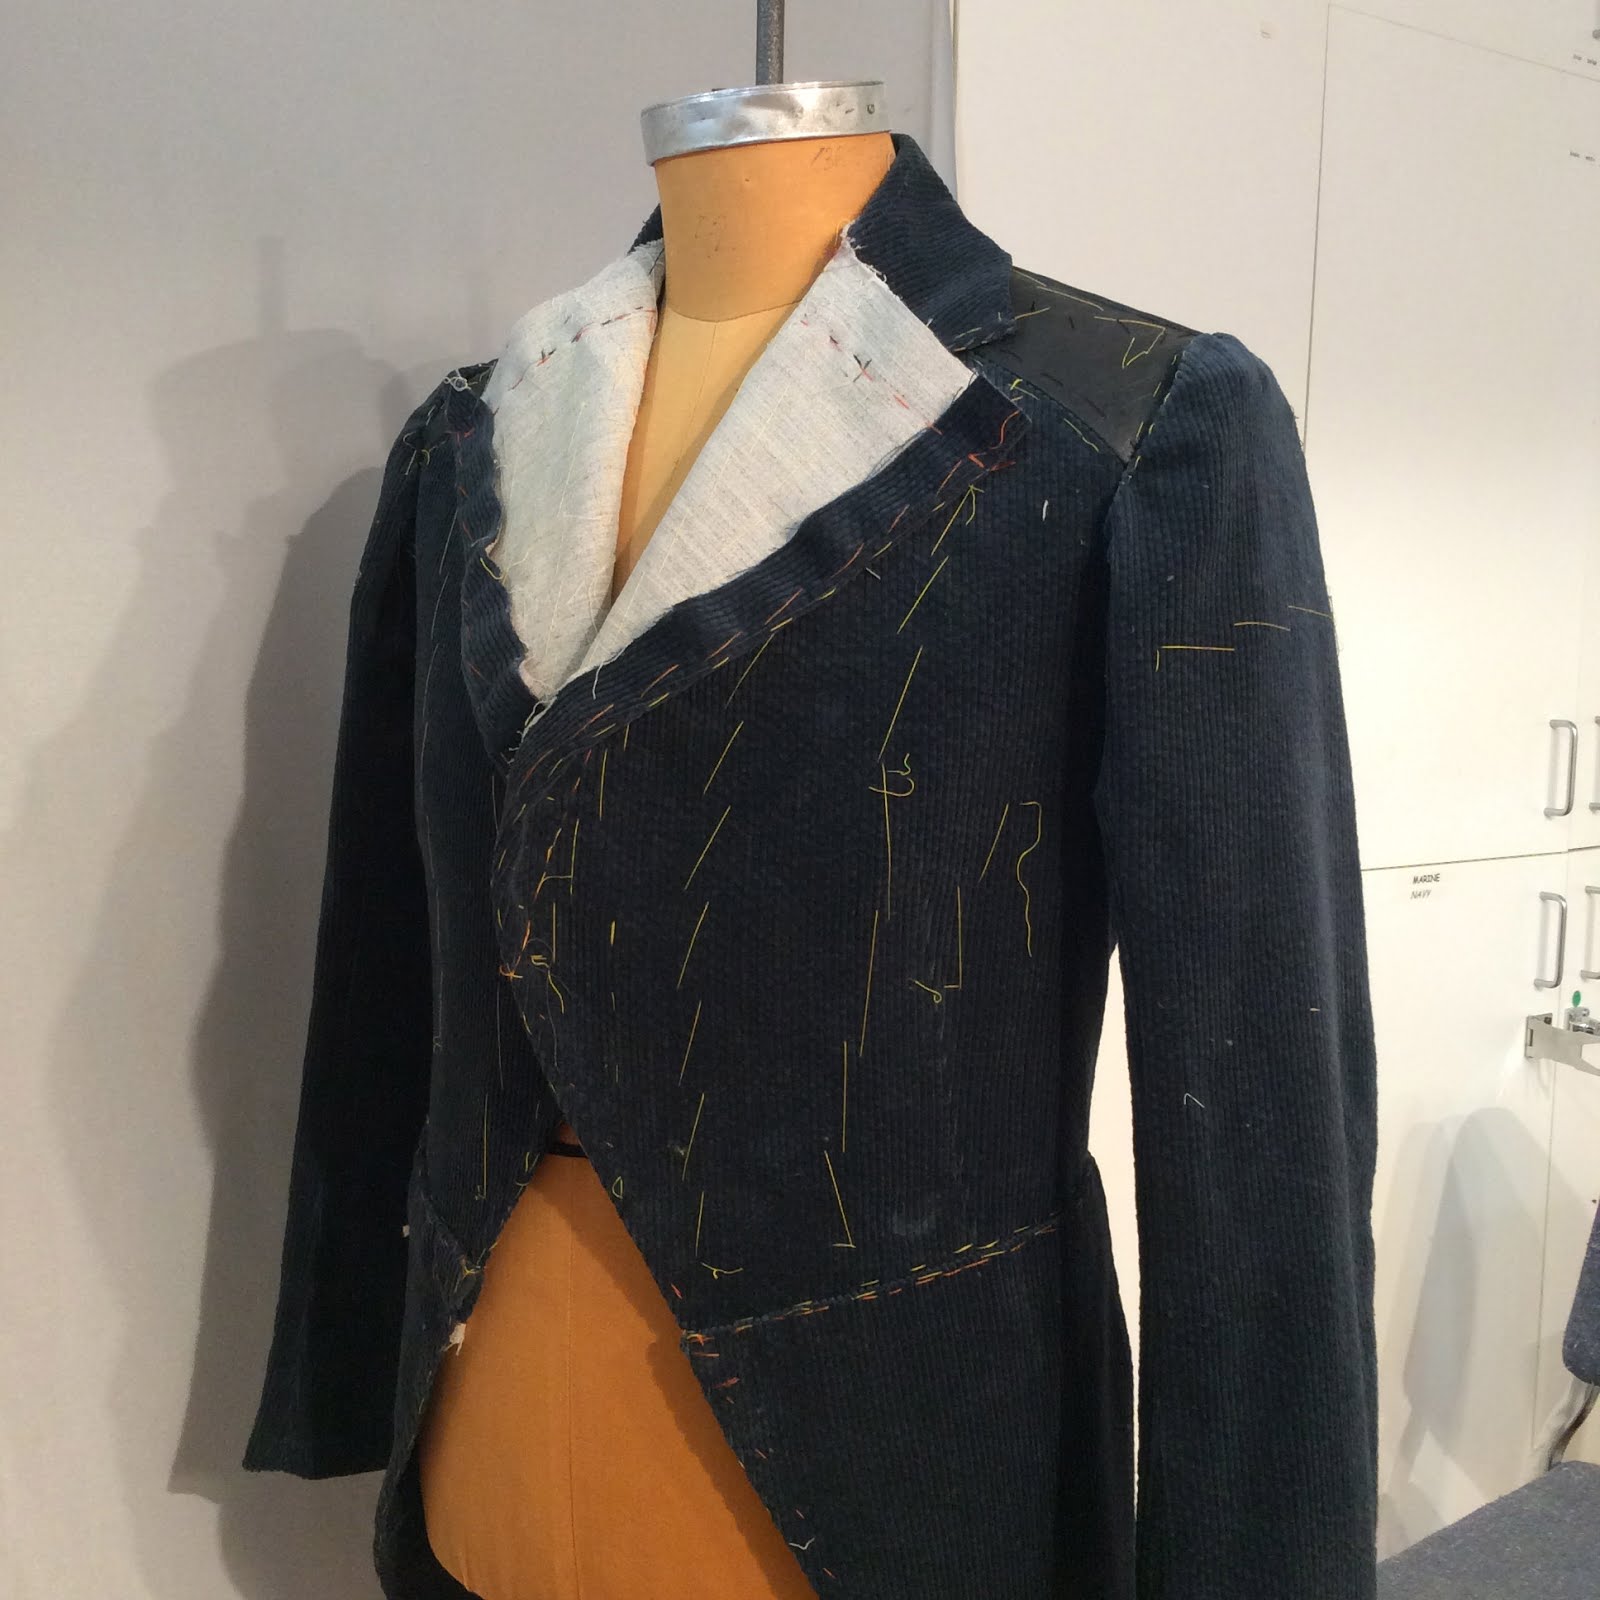
Another body coat that I cut in Montreal.
This is a variation on a cutaway that I cut and sewed while in Montreal.


The student designer chose to have a modern twist on an 1870's inspired cutaway coat with inspiration from jeans jacket and motorcycle jacket styling. One of her first ideas was to have an asymmetrical zipper opening as in the motorcycle jacket, but keep the body shaping of a traditional tailcoat. I don't know why she ditched that idea, as I think it could have been quite fun, but in the end she came back to me with the DB 1870's inspiration and the leather yoke.
The back seaming was modified from the traditional so the seams run vertically into the yoke like a jean jacket in a way.
The corduroy for the jacket was luckily (for budget reasons) found in stock and she dyed it this colour. The leather (also found in stock) was a perfect pairing.

She wanted the collar to have quite a tall stand, and a few different inspirations, one of which was a type of modern convertible collar and the other more of an 1830's style. We ended up with more of the 1830's in feel.
I think it is difficult for students and new designers who don't really know how things are constructed to parse out what they really want. They see many pictures but don't quite "get" how particular details work or don't work or whether they can be incorporated successfully.
It is also difficult for me to describe the options of the variations and how they work without making the poor student's eyes glaze over because they really don't understand half of how things work.

In a situation where you are building a show in less than a month, there isn't a lot of time for experimentation either.


Over the month, for the men's wear, I cut and we built the cream frock coat and large described earlier, this cutaway coat, a suit jacket styled vest, a wrap skirt for a man, an asymmetrical tunic in waffle cotton with a period stand collar and strap and buckle closures. There was also a cape that incorporated a pair of exaggerated 4 inch deep pointy shoulder pads with a tulip collar trimmed in feathers, a pair of 1820's style pleated trousers, a pair of drop crotch riding breeches, a pair of ethnic inspired drop crotch trousers, plus alterations to an 18th century coat, a military jacket, and a few other bits and pieces.

We were very busy indeed!


Friday, October 24, 2014

Project puzzles.

Every so often interesting projects turn up out of the blue and I have to say that  love it when this happens.
Give me a puzzle and I am on it.

This week I am making a pattern for a friend who spend quite some time in the Arctic decades ago and wanted to make herself a new winter coat. She wants a modern take on a traditional amautik. 

I have not checked all the information I was told about, and I do not pretend to know very much at all about these garments. Just be forewarned. 

She told me how the Inuit would wrap their babies when they were small and carry them inside the coat, up against the mothers back. The coats were cut in such a way that as the babies grew, they were accommodated by the shape of the coat. The hoods were made large enough to cover the heads of both the mother and child.
The babies were held in place with a cord or sash that looped through a hanging cord at the centre front of the coat, pulled down between the breasts and wrapped around the waist holding the back of the coat tight and keeping the baby inside. She recounted how the mothers would line the inside of the coat back with moss, (no diapers then) that would absorb the child's urine and feces for later removal.

She gave me a child's size cotton amautik that she had, which I took a pattern from, and I have to say it was a very complicated garment. More complicated than it looks.

I am refraining from posting a picture of the pattern I made, as I believe that it is considered the intellectual property of the Inuit and that needs to be respected.

It was quite fun to design a coat for her incorporating some of the traditional aspects of the amautik.
I will have a mock up fitting with her tomorrow, and I am interested to see if she likes it. I know the hood isn't quite right on mine, but I really was winging it! Hooray for mock ups! She plans on making the coat out of melton, and has a nice little Arctic fox in her freezer (really!) that she may use to trim the hood....

The other puzzle I am working on is a soft case for a stand up bass I made for another friend almost 20 years ago. The zipper finally went!
Just a wee repair, but it was another one of those fascinating puzzles that grabbed my attention. His old case was not sturdy and it was falling apart and I took it on myself to make a new one all those years ago.

In other news, if you want to see the waistcoat for the Opera in action so to speak, click here.
The beautiful dress and the other ladies' costume was cut by my colleague Margaret.


Thursday, May 29, 2014

The finished cape

I don't want to neglect the fact that I have had other work to do- its not all prom dresses here. I confess though to making my daughter two dresses! There I said it. Call me crazy, but the deal was the second dress had to use some of the original fabric and the same bodice fabric and shape..
Anyway....more on that later.

Earlier, I had posted about the very large red velveteen cape here but I haven't followed up yet with how it turned out.

So first, the finished item front and back.

The designer had the crowns embroidered onto the off cuts of the velveteen. Once they came back from the embroidery place, they had a fusible backing applied to them. In the best of all worlds with no budgetary constraints we would have liked to sew them on by hand, but in reality, we couldn't do that, so our decorating department did a test using a paper backed fusible- and it worked, so they were fused and then they were individually cut out and trimmed to shape.

We had a fitting with the full costume and the cape to determine the hem length (the front length is important to get right) - we don't want to trip up our actors! The actor did a bit of movement in it, at which point we decided that it needed to have a harness inside to stay put. We took it back to the table, removed the lining which had been basted in for the fitting, made a neckline correction, and then prepared to hem the beast. 
I knew the cape had to have a closed lining, which means hand sewing the lining hem to the velveteen, but hemming the velveteen by hand seemed like both a daunting task and perhaps not a strong enough technique. We have a semi industrial Bernina that does a blind hem stitch, so the velvet hem allowance was trimmed to one inch and hand basted in place to prep for the blind hemming. It worked like a dream and was pretty much invisible. That process alone trimmed hours off the time. 

Once the hem was done, off it went to the designer, who, with her assistant, laid it out first on the floor to place the crowns, then put it on a stand and tweaked the placement until she was happy with it. 

The next stage went to the decorating department, and they carefully fused each crown using a velvet press cloth to minimize any chance of crushing the surrounding velveteen.

Then it came back to us. 
It was laid out again on a big table for the lining to be basted back in. Each step needs to be checked, so back it went onto the stand to make sure the lining wasn't pulling anywhere, then back to the table to be hand sewn along the front edges, neckline and hem.

Not quite done yet! 
The last stages were to make a harness, and cover the harness in the same fabric as the doublet. The harness was then hand stitched to the cape  from the back neck to just in front of the shoulders. 
Last but not least, the front corners of the cape needed to attach to the doublet and look like it just sits there magically. A couple of hooks and snaps took care of that and then we were finished.

All done and happy with it. 
Now do I keep the pattern for it, or not? Maybe the half muslin would be easier to store.....hmmm.....


Sunday, April 20, 2014

step two- prom dress idea/drawing/breakdown

OK, the next step is to get the dress idea on paper.
my daughter saw a dress she liked on the Internet. Yes, she could have ordered it from a mystery place in China, but I have dissuaded her from doing so. These are my reasons:


One- will it arrive in time or at all? Panic if it doesn't.
Two- will it fit? Altering it could be a pain, and could be a panic due to time restraints.
Three- at the price, we are contributing to underpaid labour and worse maybe child labour.
Four- lets support local businesses, so we bought the fabric locally.
Five- Quality? for the online price, it may not look like you want it to.
Six- I can make it.

So we have modified the original design to reflect the fabrics we found locally. We had a great time one evening at our local fabric store, the manager and the salesperson all got into the act, pulling fabrics out and discussing the pros and cons of the colour combinations and such.


Break it down:
A structured strapless bodice, boned for support.
A sheer chiffon over skirt that has fabric roses along the hem. Gathered into the waist.
An underskirt, that will likely have panel seams to eliminate any extra bulk at the waist and give enough walking room at the hem.
A neckband which will need a bit of structure. It wraps around the back and attaches to the bodice almost under the arms.
The neckband supports a pleated sheer net over-layer that covers the front of the bodice, and ends under the waistband/belt.
The "belt"/waistband is applied to the bodice.
Likely a zip closure CB.

We need the shoes to determine the length of the skirt, and I need to get some fabric for the inner bodice, and a zip, oh,  and thread. Sigh.

I'd like to take a moment here to say that in general I think the prom dress situation is out of hand. Now I am going to be making this, and the fabrics were less than $100.00 and it will look like a more  expensive gown than it is, but there are girls buying $600+ dresses for a one night event and it makes me uncomfortable.

I have been trying to get across the fact that you don't need to peak in high school.
Thumbs up to everyone who is venturing to make their own dresses.


Wednesday, December 8, 2010

Extreme styles

I have been collecting reference materials for a number of years now and as I was organizing things the other day I stopped to leaf through some of these catalogues and books.
I try to photograph or photocopy the more fragile examples so I don't have to worry about them becoming more damaged and I thought I'd share some of the things here with you.
We often think of extreme fashions as being something limited to our own present time because we don't often see examples of earlier times.
I wonder what people thought of these possibilities that were available to order in this 1914 Bannerman Tailoring of Chicago catalogue.
Obviously someone used the book as ascrapbook and interestingly they seemed to paste over most of the really interesting fashion plates and left the basic looks untouched- co-incidence? Who knows, but you can see some of this look developing earlier and I think the "novelty" drafts in The Blue Book of Men's Tailoring shows evidence of this direction in fashion.
Enjoy and I'll post more later.

Wednesday, August 11, 2010

costume and sculpture 2

The Birds by Aristophanes designed by Teresa Przybylski was a project that I had a lot of fun doing.
Teresa is a wonderfully creative designer and teacher and I had worked with her on a few other projects before this one. The show was great.

As you can see from the sketch, we were making what I called "bird cages" for the actors to wear. These were a couple of the more complex pieces.
The structures were made out of rigilene and nylon webbing. The rigilene is dyable (who knew?) so we had what seemed like miles of it and the webbing dyed in preparation.
Estimating how much rigilene we needed for the project was it's own challenge!

For rigidity we then stitched the rigilene double so we could be guaranteed that it would hold its shape through the production.
There were some challenges along the way- one was how to hold some of the shapes together while working it out- rigilene is not pinable to itself and less so if it is double thickness, so we had to come up with a technique involving bull dog clips, masking tape and twill tape.
Rigilene has a natural circular tendency, so I worked with that by trying to use circular forms for the main structures, clip or tape them together to try out the proportions, then hang or pin them them on the stand so I could stand back and have a look. The pieces that rested against the body were probably the easiest to deal with and the free form floating shapes more difficult.
If it looked good, we would stitch it together in components at the machine, then we would re clip it and hang it up again, have another look with the designer, take it apart if it didn't look right and continue on until we had our final shapes.
Then it all had to be put together as a whole and I think that is what gives Denise the shivers- trying to mark the placement of each intersecting component and then wrangle it to the sewing machine where it felt as though you were sewing inside out and backwards while standing on your head to get it under the needle.


Wednesday, July 29, 2009

suspender engineering


Wendy brought these suspenders (braces) in the other day. They belonged to her great uncle who died about ten years ago. He was 98 when he passed. I can't begin to guess how old these suspenders are and I haven't had time to even look for any references in my research.
What struck me was the design and engineering involved in something that was of such "everyday" use, and how little of that detail we see in things today.

Monday, June 8, 2009

begin again


Well, our designer is coming in this week and we've still not finished with fittings for understudies in the previous shows.

So, I need to juggle the workload (and my poor head, which could use a rest) around in order to get some things ready for him to see.

I've been asked to cut right into fabric, which can be a bit nerve racking because this is our finished product- so I better be right or I have to be able to make it right if I am wrong. (within budget too!)
There are many elements that come into play when interpreting a design and making it real. One is the feel of what the designer is after. If the design is set in a specific time, say the 1920's, there are still many variations within it that help to define the character. There are period details in tailoring that can be rather subtle to the average eye and it is my job to know or discover these when making patterns. In addition to design interpretation I have to deal with all different shapes and sizes of actors. Some of them I have made things for previously so I have an idea of their shape and figuration, but others I haven't, and I am working from measurements that I did not take myself, so the pressure is on to get all of these elements right the first time through.

So, I've started with some trousers.

Wednesday, April 8, 2009

day to day

Do you ever have one of those days? The ones when everything you've done over the last while, seems to change? I had one of those days, well all week was one of those days so far. Anyway......


Wool stripes Twill stripes

One thing that we have been trying to get ahead on is a striped jacket. The problem is that it is impossible to get the kind of striped fabric the designer was after so that means making stripes. We did some samples of striping with twill tape which comes in various widths, so the designer could play with the patterning on the fabric. The other thing we did was make stripes out of a cream wool- of course, the edges of straight grain strips need to be turned or finished somehow, so the twill tape was winning as a technique. After sourcing some
1 1/4" dyeable cotton twill to go along with the 1/2" and 3/4" twill in stock, I was set to give it to the dye room, and the designer changed his mind.
O.K. This show techs at the end of the month. I haven't been able to have a fitting in real fabric yet because I've been trying to get the striping decisions, and just when we were so close.....
So, we're going with the wool. Period. I hope.
I'm not even going to get into the discussions that happened today when 4 different tailors in two different cities are trying to make uniforms that look the same. Or how I was feeling when the tuxedo I have to make for one guy might not be needed but no-one is sure yet about that scene. Or the fittings yesterday that kept getting postponed for an hour at a time until finally one was cancelled.
Tomorrow will be better. I'm sure.
I hope the buyers pick up that bolt of "Wonder Under" tomorrow so we can stripe on!