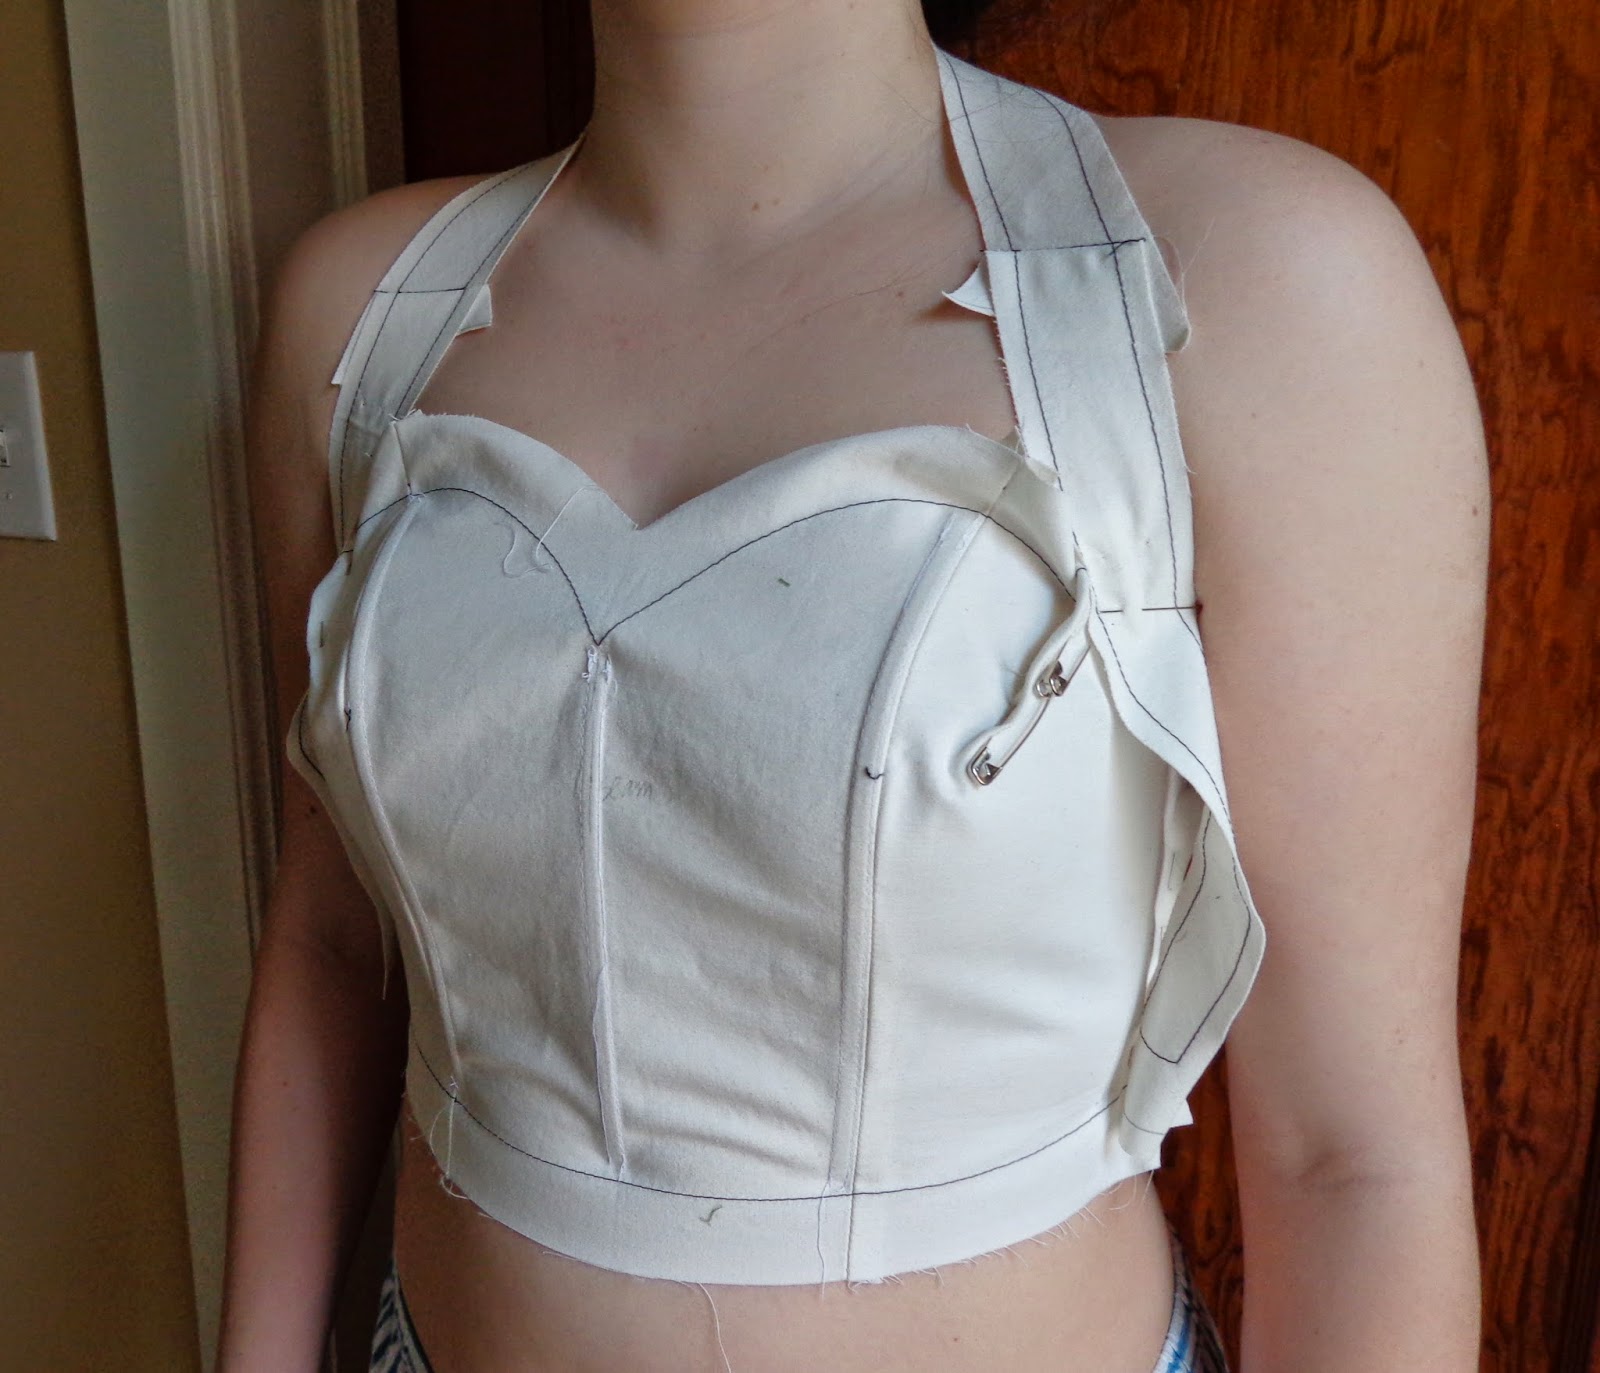
I thought that I should follow up on the thoughts about structure. This won't be that post as I am finding myself with no spare time these days.
I have been trying to get photos of this dress and all its underpinnings, and I keep missing the time when it is on the dress form in its most basic form, but I will get them!
My colleague Carol, is making three dresses in this style- talk about needing underpinnings to support a shape- I think it is one of the most extreme shapes of women's fashion don't you?
Here's a link to the V&A museum which describes a dress of this type they have in their collection.
For my part, last week, among other things, I made a pair of trousers for a tree.
Yes. I am still working out the structure to support the form, and the actor, designer, and choreographers and coaches are working out whether the stilts will be set at a maximum of 48 inches from the ground or whether that is too tall!
It made me a bit nervous at the fitting watching the actor work at 28 inches up so I cannot imagine walking around four feet off the ground. We will see.
I have not had any luck so far finding another studio space but I am trying to be hopeful but also to plan for the possibility of putting my equipment in storage for a time.
There just are not enough hours in the day or week to work 40 hours, eat sleep and track down landlords and property owners and set up times to view locations.
Anyway, carry on! as they say.
Showing posts with label dresses. Show all posts
Saturday, March 19, 2016
Wednesday, December 16, 2015
Period dress costume video
I just thought I would share this video made last year documenting the process of a period dress from drawing to finished dress.
The dress was cut by my friend and talented colleague Carol M, and sewn by a whole team of talented people.
Hope you enjoy it!
The dress was cut by my friend and talented colleague Carol M, and sewn by a whole team of talented people.
Hope you enjoy it!
Tuesday, June 17, 2014
prom dress wrap up
To wrap up the prom dress saga, here's a rundown of the finishing process.
Once I had the skirt attached to the bodice, I turned the CB allowance on the bodice to the inside and cross stitched it down.
I sewed a hook and loop at the top and basted a zipper in place. I then pick stitched the zipper in.
Then I made a belt out of the bias lame that I had fused with wool fuse. I didn't want it to lose its shape so I sewed in a piece of grosgrain. I stitched it by machine on one side and cross stitched the other side down and finished the inside with a piece of ribbon to cover the gap. It had two hooks and loops sewn on the ends to close it, and it was tacked to the dress waist by hand at the back and sides. I tacked it at the CF too but not quite in the right place as I noticed it pulled a little when she had it on. Oh well....
I stitched the bias straps in place by hand, picking through about an 1/8th of an inch from the bodice edge.
Last but not least I made a bow tie. How could I refuse at this point?
Why blue? Two dresses. I made two dresses for two different proms. Can't believe I did that!
But here's a crazy story... I took the blue fabric scrap to work so I could fuse some interfacing on it. I did it at lunch. Every one had left the room and I had just finished pressing 3 metres of muslin for a toile. I got the fabric and interfacing ready on the ironing table and walked away for a minute to check something else, and when I returned I took the iron and put it on the fabric and it melted right through the interfacing and poly stain. I mean melted it leaving an iron shaped hole in the fabric and a melted crust of blue polyester satin in an iron shape on the iron table cover. I have never experienced this before. The iron thermostat had gone haywire and overheated. I took some hot iron cleaner and tried to clean the sole plate and it boiled.
Good thing it wasn't the dress!!!!
Luckily I had another scrap of fabric.
Finally, two dresses, one happy girl, one exhausted mother (awake til she got home, hello 3am).
I really meant to be more diligent with documenting the process, but you know, I think I would still be stitching them if I had.
Now somebody has to get out and cut the weeds grass in the yard! The things that get neglected while sewing after work.
Now back to the usual fare here. I have some 18th century and Roman costumes to do!
Sunday, June 8, 2014
Prom dress update- almost done
Well, like many projects, I had the best intentions of documenting the complete process, and then reality took over as I was sewing after work and at home and before I knew it, I realized I hadn't taken as many pictures of the process as I had envisioned. At least the dresses were finished on time!
Here's a little summary:
The chiffon over skirt was pleated up and I hand basted the pleats first then I ran a line of machine stitching on that line as well as a half an inch both above and below before trimming away some of the excess fabric. I figured that I wouldn't be lucky enough to not have to adjust the length so these lines of stitching kept everything together when the time came to adjust the length. I basted the chiffon skirt to the underlayer at the waist and pinned it to the bodice on a dress stand to check the hem, and sure enough, I needed to make a little adjustment on the sides, so I unpicked the basting bit by bit and repinned until everything looked good and then I rebasted the waist of the skirts.
You can see the amount I adjusted at the sides in this picture.
The bodice is two layers of polyester white satin. Certainly not the most forgiving fabric. That being said this is a dress that likely will be worn once, so no point in bemoaning the fact that it is what it is.
I marked out each piece separately for both the under and overlayer.
I used the seam allowances of the underlayer to create bone channels for the plastic boning. The only seam allowance that gave me trouble was the front panel over the bust. This fabric doesn't take well to being eased and as the edge of the 1/2" wide seam allowance is slightly longer than the seam it is a part of, it rippled a bit when making the bone casing. It wouldn't press out well either, so if I did it again, (which I did in the second dress) I would make a separate bone casing for that particular bone and then the seam allowance can be trimmed down and made to behave.
I also made sure to machine stitch the top edge and waist line of each of the pieces for the inner layer. This shows me the pattern line, but more importantly, stays the areas of the bodice that are a bit on the bias, such as the side front panel at the top edge. I checked the measurements of the pieces against the pattern after this. That side front panel had stretched out ever so slightly so I used that stay stitch to ease the edge back to its correct size.
I then sewed the top layer of satin just on the outer edge of my pattern lines to allow a smidgen of ease.
Place the bodice right sides together and bagged out the upper edge, pressed, under stitched and trimmed the seam allowance down. Then I basted along the upper edge to hold the fabrics as one and smoothed everything in place before basting the layers together at the waist, and then serging the raw edge of the waist and CB seam allowances.
Once the bodice was prepared, I worked on the pleated overlayer. I used a bias strip rather than the shaped piece in my original plan (thanks again to colleagues!). The bias can mold around the body and a bonus was that the tension on the bias piece made the front area stand up vertically and the rest of the strap laid flat! I also could make length/tension adjustments easily!
I fused the lame with a piece of wool fuse which is a soft spongy fusible I had on hand.
I had this prepared and prefit from an earlier fitting,
so I stitched the top edge of the pleated net to the lame and then arranged the pleating at the waist. Baste the layers together at the waist, then baste the skirts on and fit to check.
Everything seemed fine! so I finally machined bodice to skirt, and trimmed the excess seam allowances down.
The worst was over!
next up will be all the finishing details.
Here's a little summary:
The chiffon over skirt was pleated up and I hand basted the pleats first then I ran a line of machine stitching on that line as well as a half an inch both above and below before trimming away some of the excess fabric. I figured that I wouldn't be lucky enough to not have to adjust the length so these lines of stitching kept everything together when the time came to adjust the length. I basted the chiffon skirt to the underlayer at the waist and pinned it to the bodice on a dress stand to check the hem, and sure enough, I needed to make a little adjustment on the sides, so I unpicked the basting bit by bit and repinned until everything looked good and then I rebasted the waist of the skirts.
You can see the amount I adjusted at the sides in this picture.
The bodice is two layers of polyester white satin. Certainly not the most forgiving fabric. That being said this is a dress that likely will be worn once, so no point in bemoaning the fact that it is what it is.
I marked out each piece separately for both the under and overlayer.
I used the seam allowances of the underlayer to create bone channels for the plastic boning. The only seam allowance that gave me trouble was the front panel over the bust. This fabric doesn't take well to being eased and as the edge of the 1/2" wide seam allowance is slightly longer than the seam it is a part of, it rippled a bit when making the bone casing. It wouldn't press out well either, so if I did it again, (which I did in the second dress) I would make a separate bone casing for that particular bone and then the seam allowance can be trimmed down and made to behave.
I also made sure to machine stitch the top edge and waist line of each of the pieces for the inner layer. This shows me the pattern line, but more importantly, stays the areas of the bodice that are a bit on the bias, such as the side front panel at the top edge. I checked the measurements of the pieces against the pattern after this. That side front panel had stretched out ever so slightly so I used that stay stitch to ease the edge back to its correct size.
I then sewed the top layer of satin just on the outer edge of my pattern lines to allow a smidgen of ease.
Place the bodice right sides together and bagged out the upper edge, pressed, under stitched and trimmed the seam allowance down. Then I basted along the upper edge to hold the fabrics as one and smoothed everything in place before basting the layers together at the waist, and then serging the raw edge of the waist and CB seam allowances.
Once the bodice was prepared, I worked on the pleated overlayer. I used a bias strip rather than the shaped piece in my original plan (thanks again to colleagues!). The bias can mold around the body and a bonus was that the tension on the bias piece made the front area stand up vertically and the rest of the strap laid flat! I also could make length/tension adjustments easily!
I fused the lame with a piece of wool fuse which is a soft spongy fusible I had on hand.
I had this prepared and prefit from an earlier fitting,so I stitched the top edge of the pleated net to the lame and then arranged the pleating at the waist. Baste the layers together at the waist, then baste the skirts on and fit to check.
Everything seemed fine! so I finally machined bodice to skirt, and trimmed the excess seam allowances down.
The worst was over!
next up will be all the finishing details.
Saturday, May 24, 2014
The fabric I fear....
Well, I am a tailor for a reason.
I like like wool. I like fabrics with some body that don't slide off the table if you look sideways at them. So I was a bit apprehensive about sewing the chiffon of the prom dress.
So what happens often with the thing you fear the most is that it turns out to be not a problem at all, and so it went with the chiffon.
OK, the seams were straight grain which helps.
First thing I did was pull a thread to determine the vertical cut I was going to make. Then I measured the amount I needed plus an allowance for french seams, pulled another thread and cut.
Then I had to unpick some of the flowers so I had a clear area to seam the skirt.
I did a french seam.
Once that was done, I marked a hem line on the underskirt as well as the chiffon layer and basted it in preparation for a bridal hem. (the chiffon was done on the straight grain so I didn't baste, just marked and pinned)
I am not sure whether this is a common technique anymore now that sergers are in widespread use. My colleagues offered two options of the same finish. One uses a narrow zig and the other a straight stitch. I chose the straight stitch version.
The technique in a nutshell: you turn up the hem allowance so the fold is about 1/8" below the hemline you want, then either zig or straight stitch through two layers on your basted line. Carefully trim away the excess hem allowance, right close to the stitch line you just did.
Now turn that folded edge up and stitch through the layers again, encasing the raw edge beside your first line of stitching.
It looks like this when it is done.
No lengthening after this so be sure that it is the hem length desired.
Oh, you need small sharp scissors (not like the ones in the photo) to trim close to your first line of stitching, and always go slowly and carefully when trimming!
Did I mention that the chiffon wasn't a problem?
I decided to pleat the waist rather than gather it, and up to this point it was all fine and dandy. I was feeling great until I started to pleat. It was like trying to corral a herd of cats.
That took some time (much longer than I planned as I did it twice), and a bit of cursing and required wine afterwards.
Sigh.
I like like wool. I like fabrics with some body that don't slide off the table if you look sideways at them. So I was a bit apprehensive about sewing the chiffon of the prom dress.
So what happens often with the thing you fear the most is that it turns out to be not a problem at all, and so it went with the chiffon.
OK, the seams were straight grain which helps.
First thing I did was pull a thread to determine the vertical cut I was going to make. Then I measured the amount I needed plus an allowance for french seams, pulled another thread and cut.
Then I had to unpick some of the flowers so I had a clear area to seam the skirt.
I did a french seam.
Once that was done, I marked a hem line on the underskirt as well as the chiffon layer and basted it in preparation for a bridal hem. (the chiffon was done on the straight grain so I didn't baste, just marked and pinned)
I am not sure whether this is a common technique anymore now that sergers are in widespread use. My colleagues offered two options of the same finish. One uses a narrow zig and the other a straight stitch. I chose the straight stitch version.
The technique in a nutshell: you turn up the hem allowance so the fold is about 1/8" below the hemline you want, then either zig or straight stitch through two layers on your basted line. Carefully trim away the excess hem allowance, right close to the stitch line you just did.
Now turn that folded edge up and stitch through the layers again, encasing the raw edge beside your first line of stitching.
It looks like this when it is done.
No lengthening after this so be sure that it is the hem length desired.
Oh, you need small sharp scissors (not like the ones in the photo) to trim close to your first line of stitching, and always go slowly and carefully when trimming!
Did I mention that the chiffon wasn't a problem?
I decided to pleat the waist rather than gather it, and up to this point it was all fine and dandy. I was feeling great until I started to pleat. It was like trying to corral a herd of cats.
That took some time (much longer than I planned as I did it twice), and a bit of cursing and required wine afterwards.
Sigh.
Monday, May 19, 2014
prom dress: toile bodice fitting
Finally getting to the dress.
I am excited to be making some progress! Sometimes just doing something different kind of perks you up.
So I have fit the bodice I drafted, and was very pleased with the fit so far.
I pinned out about .5cm on the double on the side seams, as well as a dart in bodice side front panel as you can see here.
We were also playing around with turning the neckband around to see what a halter strap would look like.
I might do a little shaping under the bust as well, and make the CF a seam instead of cutting it on the fold, but so far so good.
I used some rigilene boning in this mock-up because I had it on hand, but I do not like it.
The boning I will use is 1/4" German plastic boning that I will get from Farthingales. You do not have to worry about the ends poking through or capping the ends, it can be inserted into channels or stitched through.
The other type of boning that I would typically use is 1/4" wide spiral steels. They have the advantage of flexing around curves much better than anything else, so in this case, I may use one over the front curved seam or see if I can redistribute some of the shaping between the front and side front panels.
I will try to use the seam allowance on the inner layer to create casings for the bones, and may move the side seam forward to give a bit more support to the front of the bodice.
One note that applies to all sewing projects- start as you mean to go on. By that I mean you should include things like shoulder pads when making a jacket, boning if you are making a strapless bodice. I have also noted that people often choose fabric for a toile/mock-up that is totally unlike what they plan to use in the end. Pick something that has teh characteristics of the final garment, otherwise it just won't give you the true story.
I am excited to be making some progress! Sometimes just doing something different kind of perks you up.
So I have fit the bodice I drafted, and was very pleased with the fit so far.
I pinned out about .5cm on the double on the side seams, as well as a dart in bodice side front panel as you can see here.
We were also playing around with turning the neckband around to see what a halter strap would look like.
I might do a little shaping under the bust as well, and make the CF a seam instead of cutting it on the fold, but so far so good.
I used some rigilene boning in this mock-up because I had it on hand, but I do not like it.
The boning I will use is 1/4" German plastic boning that I will get from Farthingales. You do not have to worry about the ends poking through or capping the ends, it can be inserted into channels or stitched through.
The other type of boning that I would typically use is 1/4" wide spiral steels. They have the advantage of flexing around curves much better than anything else, so in this case, I may use one over the front curved seam or see if I can redistribute some of the shaping between the front and side front panels.
I will try to use the seam allowance on the inner layer to create casings for the bones, and may move the side seam forward to give a bit more support to the front of the bodice.
One note that applies to all sewing projects- start as you mean to go on. By that I mean you should include things like shoulder pads when making a jacket, boning if you are making a strapless bodice. I have also noted that people often choose fabric for a toile/mock-up that is totally unlike what they plan to use in the end. Pick something that has teh characteristics of the final garment, otherwise it just won't give you the true story.
Saturday, May 10, 2014
prom dress part four - drafting
I feel like the month of May is trying to rush by, and I have been slogging it out doing overtime at work. This means that I feel quite behind on the prom dress project but I managed to squeeze a bodice draft into my week-end.
When I was first training as a cutter, I used Dress Pattern Designing by Natalie Bray as a text, so since I am familiar with it, it seemed the best choice to use for this block.
Some of my colleagues use it or use it as a jumping off point. Just like the men's drafts, you cannot expect it to be 100% right off the page. With practice, of course, you begin to see the shapes being created on paper and can recognize areas that you can tweak or modify right away for a better fit, but a toile or mock-up is always a good idea.
One thing I did was to reduce the amount of ease in the basic block. There is usually 2 inches on the half in this draft, but I want a close fit, so I reduced it to 1 inch on the half. This should be close to what I need.
I didn't take all the ease out beacause I wanted some ease in order to be able to fit it properly.
Too tight is always more difficult to deal with. It is so much easier to be able to pin the excess out, and see that your alterations are not causing other problems. If your garment is too tight, it can be difficult to determine how best to fix it. Too tight at the waist for instance can cause bodices to ride up, distorting the position of darts as well as affecting the armholes and even neckline and shoulders. You can end up in a guessing game that entails multiple changes when really all you may have needed is more fitting ease.
When I was first training as a cutter, I used Dress Pattern Designing by Natalie Bray as a text, so since I am familiar with it, it seemed the best choice to use for this block.
Some of my colleagues use it or use it as a jumping off point. Just like the men's drafts, you cannot expect it to be 100% right off the page. With practice, of course, you begin to see the shapes being created on paper and can recognize areas that you can tweak or modify right away for a better fit, but a toile or mock-up is always a good idea.
One thing I did was to reduce the amount of ease in the basic block. There is usually 2 inches on the half in this draft, but I want a close fit, so I reduced it to 1 inch on the half. This should be close to what I need.
I didn't take all the ease out beacause I wanted some ease in order to be able to fit it properly.
Too tight is always more difficult to deal with. It is so much easier to be able to pin the excess out, and see that your alterations are not causing other problems. If your garment is too tight, it can be difficult to determine how best to fix it. Too tight at the waist for instance can cause bodices to ride up, distorting the position of darts as well as affecting the armholes and even neckline and shoulders. You can end up in a guessing game that entails multiple changes when really all you may have needed is more fitting ease.
I marked out the style lines on the basic pattern, front and back, then I traced them to a clean sheet of paper using a needle point tracing wheel. I will keep the original block intact so that I can go back and manipulate it as needed. For instance, even though I measured her myself, I think the bust point to bust point measurement seems narrow, so I could go back and easily make the front panel wider, and the side front panel narrower, without throwing anything off.
Once that was done, I trued up all the seam and style lines, and cut out my pattern.
Then I cut out a mock-up, leaving an inch of seam allowance both below the "waistline" as well as above the upper edge of the bodice. All the lines on this pattern are "nett" so I can choose how much seam allowance I want in specific areas.
Next will be the skirt and then a fitting.
Labels:
21st century,
drafts,
dresses,
ladies,
pattern,
pattern drafting
Sunday, May 4, 2014
prom dress part three-pattern sketch
When I am getting ready to make a pattern for garment, I often find it helpful to sketch out the rough pattern shapes. This dress is not particularly complicated but it is a helpful process to go through nevertheless.
You can then look for potential style, cutting or fitting issues.
So, as I would if I was actually drafting, I would start with sketching out the basic block, and then drawing in the pattern lines.
The bodice front will be in two pieces to fit closely over the bust.
Allow enough seam allowance on the top edge so if bodice needs pinching in along the top edge, you can still correct the line. Same goes for the waist seam allowance.
The back could be cut in two panels or the two sections could be made into one, and eliminate the seam.
If cut as one piece, allow enough seam allowance to make changes without re cutting.
The collar/neck piece shape is made by closing the bust dart from the bust to the shoulder, closing the back shoulder dart and then putting the front and back shoulders together and drawing out the shape desired.
It could be cut in one piece but if the CF is on the straight grain, it puts the majority of the neck piece on a bit of the bias which may stretch, so it may be more prudent to allow a shoulder seam in the neck piece, which would keep the back portion on a more stable grain. Not sure how much tension can be put on this piece without it buckling on either edge. It will be a more decorative rather than a structural part of the dress.
The pleated overlay is created by initially closing the panel seam/dart from waist to bust, then opening/flaring out the top edge. You could calculate how many pleats you want at the neck, and how deep they might be first and then measure out how much more you need open the top edge.
The amount to add depends on the fabric chosen and what looks good, so allow enough for changes to be made. The more flare, the more the side ends up on the bias, so that may be an issue with stretching.
The bodice will also need some kind of boning to keep the shape, and provide support. The boning will have to be attached to an inner structure.
The under skirt could be cut into panels which keeps the waist seam flat and allows for flare at the hem.
The over skirt has to be cut with the bottom edge straight, so figure out how much fabric is needed at the hem, then the length at the front, side and CB is marked, and the gathering lines are drawn in hitting those marks.
Remember that gathering an edge tends to hollow it out and therefore shorten in the other direction, so keep it in mind. Alterations to the hem have to happen at the waist.
Pick the shoes! they are needed to get the final skirt length.
Did I miss anything? Oh yes, figure out where the closure will be and how long it needs to be. I imagine CB. It may need a waist stay, so perhaps an inner grosgrain waistband that hooks closed first and takes tension off the zipper closure.......
Okay, onwards!
You can then look for potential style, cutting or fitting issues.
So, as I would if I was actually drafting, I would start with sketching out the basic block, and then drawing in the pattern lines.
The bodice front will be in two pieces to fit closely over the bust.
Allow enough seam allowance on the top edge so if bodice needs pinching in along the top edge, you can still correct the line. Same goes for the waist seam allowance.
The back could be cut in two panels or the two sections could be made into one, and eliminate the seam.
If cut as one piece, allow enough seam allowance to make changes without re cutting.
The collar/neck piece shape is made by closing the bust dart from the bust to the shoulder, closing the back shoulder dart and then putting the front and back shoulders together and drawing out the shape desired.
It could be cut in one piece but if the CF is on the straight grain, it puts the majority of the neck piece on a bit of the bias which may stretch, so it may be more prudent to allow a shoulder seam in the neck piece, which would keep the back portion on a more stable grain. Not sure how much tension can be put on this piece without it buckling on either edge. It will be a more decorative rather than a structural part of the dress.
The pleated overlay is created by initially closing the panel seam/dart from waist to bust, then opening/flaring out the top edge. You could calculate how many pleats you want at the neck, and how deep they might be first and then measure out how much more you need open the top edge.
The amount to add depends on the fabric chosen and what looks good, so allow enough for changes to be made. The more flare, the more the side ends up on the bias, so that may be an issue with stretching.
The bodice will also need some kind of boning to keep the shape, and provide support. The boning will have to be attached to an inner structure.
The under skirt could be cut into panels which keeps the waist seam flat and allows for flare at the hem.
The over skirt has to be cut with the bottom edge straight, so figure out how much fabric is needed at the hem, then the length at the front, side and CB is marked, and the gathering lines are drawn in hitting those marks.
Remember that gathering an edge tends to hollow it out and therefore shorten in the other direction, so keep it in mind. Alterations to the hem have to happen at the waist.
Pick the shoes! they are needed to get the final skirt length.
Did I miss anything? Oh yes, figure out where the closure will be and how long it needs to be. I imagine CB. It may need a waist stay, so perhaps an inner grosgrain waistband that hooks closed first and takes tension off the zipper closure.......
Okay, onwards!
Labels:
21st century,
dresses,
pattern,
pattern drafting,
sketch,
techniques
Sunday, April 20, 2014
step two- prom dress idea/drawing/breakdown
OK, the next step is to get the dress idea on paper.
my daughter saw a dress she liked on the Internet. Yes, she could have ordered it from a mystery place in China, but I have dissuaded her from doing so. These are my reasons:
One- will it arrive in time or at all? Panic if it doesn't.
Two- will it fit? Altering it could be a pain, and could be a panic due to time restraints.
Three- at the price, we are contributing to underpaid labour and worse maybe child labour.
Four- lets support local businesses, so we bought the fabric locally.
Five- Quality? for the online price, it may not look like you want it to.
Six- I can make it.
So we have modified the original design to reflect the fabrics we found locally. We had a great time one evening at our local fabric store, the manager and the salesperson all got into the act, pulling fabrics out and discussing the pros and cons of the colour combinations and such.
A sheer chiffon over skirt that has fabric roses along the hem. Gathered into the waist.
An underskirt, that will likely have panel seams to eliminate any extra bulk at the waist and give enough walking room at the hem.
A neckband which will need a bit of structure. It wraps around the back and attaches to the bodice almost under the arms.
The neckband supports a pleated sheer net over-layer that covers the front of the bodice, and ends under the waistband/belt.
The "belt"/waistband is applied to the bodice.
Likely a zip closure CB.
We need the shoes to determine the length of the skirt, and I need to get some fabric for the inner bodice, and a zip, oh, and thread. Sigh.
I'd like to take a moment here to say that in general I think the prom dress situation is out of hand. Now I am going to be making this, and the fabrics were less than $100.00 and it will look like a more expensive gown than it is, but there are girls buying $600+ dresses for a one night event and it makes me uncomfortable.
I have been trying to get across the fact that you don't need to peak in high school.
Thumbs up to everyone who is venturing to make their own dresses.
my daughter saw a dress she liked on the Internet. Yes, she could have ordered it from a mystery place in China, but I have dissuaded her from doing so. These are my reasons:
One- will it arrive in time or at all? Panic if it doesn't.
Two- will it fit? Altering it could be a pain, and could be a panic due to time restraints.
Three- at the price, we are contributing to underpaid labour and worse maybe child labour.
Four- lets support local businesses, so we bought the fabric locally.
Five- Quality? for the online price, it may not look like you want it to.
Six- I can make it.
So we have modified the original design to reflect the fabrics we found locally. We had a great time one evening at our local fabric store, the manager and the salesperson all got into the act, pulling fabrics out and discussing the pros and cons of the colour combinations and such.
Break it down:
A structured strapless bodice, boned for support.A sheer chiffon over skirt that has fabric roses along the hem. Gathered into the waist.
An underskirt, that will likely have panel seams to eliminate any extra bulk at the waist and give enough walking room at the hem.
A neckband which will need a bit of structure. It wraps around the back and attaches to the bodice almost under the arms.
The neckband supports a pleated sheer net over-layer that covers the front of the bodice, and ends under the waistband/belt.
The "belt"/waistband is applied to the bodice.
Likely a zip closure CB.
We need the shoes to determine the length of the skirt, and I need to get some fabric for the inner bodice, and a zip, oh, and thread. Sigh.
I'd like to take a moment here to say that in general I think the prom dress situation is out of hand. Now I am going to be making this, and the fabrics were less than $100.00 and it will look like a more expensive gown than it is, but there are girls buying $600+ dresses for a one night event and it makes me uncomfortable.
I have been trying to get across the fact that you don't need to peak in high school.
Thumbs up to everyone who is venturing to make their own dresses.
Saturday, March 29, 2014
I'm glad you are making that
As a tailor, there are fabrics that are difficult to work with, (silk velvet) ones that I would prefer not to work with (silk velvet), but as I was walking around the wardobe, I was looking at some of the dresses being made, and all I can say is I am glad it is you making that and not me. There is a reason I am a tailor after all! I don't like fabric that is disturbed by someone sneezing in the next room.
Dresses like this
or this
or this.
Dresses like this
or this
or this.
So how did I end up with this on my kitchen table?
Must be some kind of cosmic revenge, or motherly insanity, but this will become a prom dress sometime before June. Thankfully Johanna will make the pattern, which will be quicker than if I do it, but I am going to sew it.
Wish me luck!
Wednesday, February 15, 2012
what the ladies are wearing
While I am busy making uniforms and suits, the ladies cutters are busy with their work. Thank goodness for wool, is what I say! I actually have something sparkly to make as well, something stretchy too.
Thursday, April 21, 2011
19th century dresses too
We used to share our space with Carol who cut ladies wear, but she's been sent over to another building, so I had not seen any of the women's costumes for the 19th century designed show we are working on.
Today I ventured over after work and took a few random pictures of some ladies dresses on the stands- cut by Margaret.
The colour is totally off in this picture, sorry! I really liked the little "sleeve cap" of pleated self fabric on this bodice. The colour is better in the shot below.
I can never get over the size of the sleeves for these dresses, and I love the variations of using the fabrics on different grains as well as using the fabrics to make the trim details- pleats, ruffles, bindings, to emphasize and delineate the shapes.
The white at the waist of the green dress is the waistband of the skirt- they still need to be joined together.
We'll be seeing this show on stage in about a week and a half and we have a fair bit of work to accomplish between now and then. I spent the majority of the afternoon putting buttonholes in waistcoats, tomorrow I'm going to be doing some sewing too, just to get us a little further ahead.
Monday, April 12, 2010
trim patterns
Friday, August 21, 2009
decorations


I find so many things when I clean up at work.
Here's an example of some skirt decorations that were made (and rejected) for a period dress that Libby was working on a few years ago.
I love that they are made with fabric and pipe cleaners- you know the fuzzy wired bendable kind.
I think they are lovely, so since I have a pair of panels, I think I will hang them on my wall for some colour next season.
Friday, May 15, 2009
black and white dress


I thought that I would show you this dress from the ladies wear side of our room.
I love how graphic it is and what a nice job that both the cutter and the seamstress did with this collar.
The dress is actually one that was pulled from stock- which means that it was built for a previous show and it has been resurrected and altered to fit, and had this lovely collar added to it. The dress is made of Holland linen and the collar is of organdy with a cotton trim.
Wednesday, April 15, 2009
variations


Here again on the other side of the room, ladies wear is appearing on stands. I liked the design of the pleating on the skirt, it's unusual. The skirt is black velveteen, the blouse worn with it is lace over an ombre lining and it will be worn belted. There is also some kind of wrap or shawl affair draped around the shoulders. It's all very dark and a bit dramatic .
Compare it to this which is in the large wardrobe. Just a bit of contrast
don't you think?
Tuesday, March 17, 2009
more dresses


More dresses seen in progress while leaving for the day. These are being made in another workroom of the four work spaces that we inhabit.
There are five tailors including a junior tailor this year as well as 7 ladies wear cutters, including a junior, currently on staff right now, so that is 12 cutters, 10 with teams of 6 and the juniors have three sewers each. I think that makes 78 cutters and sewers right now, and lots of work going on.
There is so much work to do in such a short time line, with designers that aren't always in residence, and the rehearsals for the shows, that we often wonder if we're going to get through it all.
Yesterday, there were 28 costume fittings between 9am and 6pm, for 7 different shows,using 3 fitting rooms and the manager's office, 12 wig fittings, 2 boot fittings, and one millinery fitting. That left 57 outstanding fitting requests to be carried over to the next day(in addition to new requests on Monday). I don't know how stage management is coping.
Thursday, March 5, 2009
cute dresses

Here are a couple of cute dresses that are being made on the other side of the room.
The cutters here usually specialise in either women's or men's costuming. Since there are many more men onstage generally, sometimes the ladies wear cutters get assigned period men's wear along with their usual type of workload. This is one of those years, so along with these and other dresses, Carol has a big chunk of men's costuming too.
All in all, it's nice to share the workspace with a team that does ladies wear, and we often share tips and tricks of sewing and cutting as well as moral support and the occasional baked treats.
Cutters:
I don't know how our job would translate in the US theatre or in the fashion biz, but here is a brief description for what it's worth.
The cutter receives a workload from the wardrobe office. This consists of the designer's sketches, and the budget sheets. The cutters then have meetings with the designer(s) about their assignments. The designers choose and purchase the fabrics and related items like trim and buttons, (we hope it is sooner rather than later).
We then get the measurement sheets and start drafting or draping to make patterns, interpreting the designs. We then either cut mock-ups/toiles or cut right into the fashion fabric, supervise a team of 6 sewers who construct the costumes, fit the actors, alter the patterns and cut or alter the costume, supervise the construction, and keep track of the budget sheets and time records.
Costumes will generally have two or three fittings that will include people from boots and shoes, millinery, wigs, bijoux, costume breakdown, and sometimes props.
We are a repertory theatre which means that as a department, we will work on many shows at once. At the beginning of the year that is usually eight shows, then they overlap with a few middle shows and then two to four later openers. Each cutter starts with three shows to work on at the same time.The wardrobe swells to about 80 people by March, and we inhabit 4 different work spaces.
It can get a little crazy!
Subscribe to:
Posts (Atom)