


I've been away on a one week lay off- but before I left I took some pictures of a pair of trousers in progress which were going to be fully lined both front and back.
The reason I am doing this is to give the thin papery fabric a bit more heft. I also do it with cream or other pale coloured fabrics to mask the show through of pockets and to eliminate any obvious visual difference if just the fronts were lined. It also gives a better feel of the 1940's if the fabric looks like it is heavier than this one is.
 This will be a serged in lining technique rather than a dropped in lining.
Linings should be pre-shrunk but they also need to have ease allowed both across the body and in length. This is why the lining looks so puckered in the photo above.
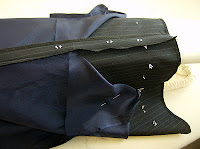
In order to eventually hem the trousers without hemming them to the lining, we make a clip in the lining about 10 cm above the hem line as the lining is being installed. This allows the lining to be pulled out of the way as you serge the rest of the seam. This is the trouser front in the picture above, and a close up below.

This picture shows the side seam pressed open and the linings pinned back out of the way. You will need to clip the lining as far as the width of the seam allowance that you are pressing back. Denise's hint is to make a very shallow clip at this point, because you always clip further but only regret it if you clip too far.
 More to come.....
the length ease: do you put it into trunk part?
ReplyDeleteYes, obviously the rise is a shorter distance but we ease the lining in lengthwise there too. Use the crotch line as a starting point by notching the lining and the trousers, then ease from there up and from there down evenly. It is important to keep the lining from twisting.
ReplyDelete