Showing posts with label teaching. Show all posts

Monday, May 17, 2021

perspective on home sewist issues

 Time seems so fluid these days, I can't believe a month has passed since I last posted.  

I was thinking the other day about how the pattern making process is a mystery to a lot of people.

I don't take the process for granted, yet I am at a different vantage point regarding pattern making than the average or even experienced home sewist.  I have almost 30 years of experience doing this, intensive years of learning how to draft, how to fit different bodies and how to adapt the information provided (measurements and design) into a paper pattern. 

There is always something to learn, problems to solve, and I enjoy that aspect of the work. In the absence of a lot of work (Covid issues),  I have tuned in more to the home sewist platforms and their particular challenges. 

Yesterday I read a post on Instagram (blog post here) about a sewing wiki. I found it interesting that these two women were considering this, but I think they have made a wise choice in not going forward.  I cannot imagine trying to curate the information! The thought makes me ill 😉. 

The internet has opened up a lot of information to so many people in such a positive manner, but unfortunately it also has let loose a lot of misinformation. I think it is mostly misguided, not malicious in any way. I think there has been a generational gap (or two) of knowledge and learning in the area of pattern making and sewing, and now that the art and craft of it is seeing a resurgence, the gap is showing.

 In the age of social media and the loyalties it engenders, I have noticed a certain interesting embracing of failure. It sometimes seems that people identify with the struggle and sharing the struggle, often to the point of dismissing or disregarding sound advice. I am all for figuring stuff out on your own, but why not accept good advice or pointers in favour of failure?  Eventually with time you may realize that you have been reinventing the wheel.

I guess I am just seeing it from a much different perspective than most.


Anyway, I could go on and on about it all, but I am sure that would be too much for both of us. 

I was going to post about my coat pattern here today, but this is already too long. That will be another post.

I would be interested in your opinions on this, 

cheers.


Sunday, November 27, 2011

interpreting measurements

Sorry for the long delay in posting, these past few weeks have been very intense and busy but now I am back home from my teaching gig, just in time to feel the Christmas rush coming at me!

I was spending this training time going over the drafting of body coats (tail-coats, frock and morning coats) and one of the first things we needed to do was measure our fit volunteer.
Thank-you, by the way, to all our fit volunteers- it can be a bit unnerving to stand there while we poke and prod and talk about you objectively.

Most of the time, we are given measurements that are taken by someone else, and could be quite out of date, so our job is often made more difficult by the lack of information.

Even if you yourself take the measurements, it is difficult sometimes interpreting them when making an individualized pattern or even modifying a block pattern. We are always pressed for time and it is difficult to spend time analysing the figure you are measuring in the 10 minutes we are allotted for measuring. That is where photos come in handy.

But we must press on, as we may be preparing costumes weeks in advance of actually having the person on site, so you must be a bit of a number detective to make your patterns.

Once the measurements have been taken, the issue of how to interpret the individual measurements is one that many people struggle with.

In this instance, the nape to waist measurement as taken was 18 1/4". OK, you think, so what? Well, when you are drafting you generally keep in mind some proportionate formulas such as the nape to waist measure is generally 1/4 of the man's height. In this case that worked out to 17 1/4". A full inch less than the taken measurement. The question was which number was correct?
The answer is that both are, but lets go backwards a bit.

I recommended drafting to the proportionate waist length to start. Then think about why the other number is longer. In this case, the contour of his back makes it longer. Why- well, like many men he is at the gym working out and the building up of the back muscles is a very common occurrence. The trapezius muscles are large and they bulk up easily.

So, to apply the extra measured length on the draft by marking the waistline at 18 1/4" from the nape, and drafting everything else in relation to that length of waist would be a problem. The length needed in the draft is above the scye line not below it. You have to put the fabric where the body needs it.

To demonstrate we just cut a proportionate coat and put it on him. What happened? The centre back waist stood away from the body. There were drag lines running from the blade toward the side waist and the front of the coat was pushing against the front waist area.
To boldly show how much and where the extra length in the back was needed, I had my student cut the coat straight across the upper back. Gently then, don't cut his shirt!
Lo, and behold, the coat dropped an inch at the centre back seam and a full 1/2" at the armhole.
We then pinned in a strip of fabric, so it was held together. The drag lines disappeared. The back waist dropped into his body, and the pressure on the fronts was released.

The other thing that happened is that slightly more width was needed across the back- I'm not sure the original measurement was accurate to begin with, but since the body is three dimensional, an increase in one dimension- length, corresponds to an increase in the opposing direction too- width.

It is always fun to do this. Of course you wouldn't just cut open a real coat and waste fabric, but for teaching it is the most direct method to illustrate the point!


Thursday, October 13, 2011

jeans draft back

So I finished the draft of the jeans back.
On the second page the instructions continue for the front and then into the instructions for the back before you get to the section headed "underside".
Why did they do that?
Hard to know, so the instructions 17 from 4... and 18 from 4... and locate 19 should really be in the underside section. Never mind.
One thing I thought odd was to use 1/4 waist size to locate point 18. Can't say I've seen that before and they don't explain it so carry on anyway and find 19 in order to develop your seat angle.

I think the rest of the instructions are OK to follow and this is what I ended up with.
So what is strange?
No dart. Not even an indication of a dart and with an 8 inch waist to hip difference I expected something.
The other thing I find odd is the look of the height and angle of point 21. It looks short and trucated and the angle where it intersects the waistline is not at 90 degrees. More about this in a minute.

I measured the pattern at the hip level, using a line 1/6 scale up from the crotch or fork line on the fronts and across the hip on the back(dash line) and measured the pattern at 19 7/8 inch, which is slightly less that the actual hip measurement, so no ease.
In the description it says "the main thing to be considered in the preparation of the draft of jean is to cut to fit the figure closely at hips seat and upper legs without being uncomfortable."
I guess that means no ease.

I measured the waist and came to 16 1/2 inches on the half which gives a waist of 33 inches. The back waist is 8 1/2 inches and perhaps that half inch is to be eased into the waist band to act as the missing dart. Maybe you should fold out the 1/2 inch to shape the yoke? Well they don't mention doing anything with it at all.

If the waist is eased that will hollow out the back waist line (that is what happens when you ease a line in, it hollows out) so that the intersection of CB and back waist line are closer to a 90 degree angle.

If you don't have a 90 degree angle at the CB your CB seam forms a hollow vee at the waist line.
So what to do? You could raise the back waist so that it intersects the CB run at a 90 degree angle which gives more coverage over the seat when bending (orange line).You could hollow out the waistline a bit as you ease it in and leave the CB run as is. I guess that would depend on fitting it on someone to see if it worked. I would cut on the extra myself, as it is easier to remove fabric you don't want than to wish you had it afterwards.

I make the same point regarding the CF which also should meet the waist line at a 90 degree angle otherwise the waistline vees there too.

Lastly I cut out the fronts and marked the seam allowances and laid the inseams together to see the seam run. (Looks ok if you can decide what line they mean for you to use as CF)

I also line up the side seams which again, don't run smoothly into each other which begs the question of how to handle that when sewing and if you follow the given line, will it sit nicely on the body, or should those seams also be trued up so they run together more harmoniously?

So, interesting. Can you tell where all the shaping needed for an eight inch waist to hip difference has gone?
A little in the CF, a lot in the side seams, if you put the pattern together at the hip area you can see the large dart takeout, the rest in the CB which isn't really as much as I imagined for a pair of jeans. I'm not sure how I feel about this- I'd likely shift things around a bit.

I would have expected a CB line a bit more angled in a pair of jeans, it puts the CB more on the bias and allows the bias to mould around the seat a bit. They also don't mention the size of the thigh which is a measurement that is useful in closely fitted jeans. The thigh size and the CB line angle and length are all related, and affect one another.

I think that if I was going to try these out, I'd cut a toile in denim and leave ample inlays or seam allowances in the areas of concern.

I'm off to do my fittings tomorrow, so I may not surface for a few days. I'd love to read your thoughts on this draft, especially if you have tried it out.


Monday, October 10, 2011

jeans draft front


So I have drafted the fronts of the jeans, as instructed.
Beginning with the crotch or "fork line", at "0".
0-1 is the rise , less the waistband which I decided was 1 and 1/2 inches deep.
the instructions progress logically until you get to
"draw the fly seam"
Looking at the illustration of the draft makes this instruction confusing.
So I left it for a moment and went to the next few instructions
0-8 to find the hip point
9 from 7 to get the waist point
11 is 1 inch above the fork line and 1/2 inch from the fly seam grow on fly at point 10-11.

Ok so this is irritating.
There is 1/2 inch seam allowance allowed, so you can see the dotted line inside the lower area of the fly line that is drawn from 6 indicating the seam allowance. At 11 it turns abruptly into the solid line from 11 to 10.
10 is 1/2 inch in from 7 so one assumes that is seam allowance.
Then you see the fly line from 6 running into a point above 11 in a small dotted line, that seems to run into the line 10- 11 as well.
It makes it very confusing to determine where the centre front line is if you didn't want a grow on fly.
The abrupt angle formed at 11 isn't pleasing to me either.

I am very opinionated about drafts and I think they should be clear.
This one doesn't get any marks for clarity.

What else can I say at this point? I think that there will need to be some truing up of angles at some point, but I will draft the back next ( I think there is something odd going on there as well), so I'll go onward and try to make sense of it all at the end.


Friday, October 7, 2011

reading the draft


Well, the first thing to notice on the first page of the draft is the rise, and the difference between the waist and hip measurement.

First, the rise.
Obviously in comparison to the last draft I talked about, the rise on the jeans pattern is much shorter. The rise on the trousers was 13 inches and the jeans rise is 10 1/2 inches.
Jeans generally sit below the natural waist. How much below is a style decision.
That makes sense.

The next thing that caught my eye was the difference between the waist measurement of 32 inches and the hip at 40 inches.
This seems odd. That is an 8 inch difference. That is about the standard difference for women.

The last pair we looked at had a difference of 6 inches, and since jeans sit lower than the natural waist, where the body is generally bigger, I would have expected a smaller difference not a greater one.

Which begs the question: What is a standard difference?
The number we have for this draft in metric are: waist 81.28cm and hip 101.6cm (20cm difference)

I checked in Metric pattern cutting for menswear which is close to the era we are dealing with.

The chart for regular mature figures:
natural waist of 82 cm, hip 100cm, (18cm difference)
trouser waist (4cm below natural waist) 85 cm

For Athletic figures:
natural waist 83cm, hip 102cm, (19cm difference)
trouser waist 86cm (4cm below natural waist)

So, what to think? It could be based on a real measurement rather than a standard. It indicates to me that there will be some accomodation in the draft for a large seat.

Hmmm.....
carrying on,
there is a 1/2 inch seam allowance allowed throughout the draft.
That is a change from the previous standard of 1/4 inch. Keep that in mind.

Next step is to start drafting.

Saturday, September 24, 2011

fly pattern

Hi, Sorry for the delay in posting, I'm up to my ears getting a bunch of ballet doublets prepared for fittings


I'm just going to talk about the button fly, which would have been used for these trousers.

I start by tracing off the front of the trousers, from the waist down to the inseam.
You can then mark off the placement for the buttonholes.
At the waist, the closure options are either a trouser hook and bar, or an inside button on the fly or a visible button and hole.

We almost always would use a hook and bar at the waist but it is, of course, your preference. You may also want to make your fly piece with an angled tab for an inner button at the waist, to provide more support, like most modern trousers have.

Generally, there are 5 buttons on the fly and they need to be spaced approximately 4.5cm apart.
The first button needs to be set below the waistband interfacing, and I have placed this sample at 1", then spaced the buttons 4.5 cm apart. You also need to leave about 3/4 to 1 inch of space after the last buttonhole to find the fly notch. The notch will be in the curve of the front line.

You can play around with the length of the fly opening a bit, but beware of making the fly buttons too close or too far apart.
The width of the fly piece is usally around 2", tapering gracefully down to the inseam, and yes they were cut that long!

The button hole piece can be cut slightly shorter, but usually still continues below the notch, to reduce bulk in the fly, but the facing and extension pieces usually extend right to the inseam.

When cutting out, you will need these pieces:
A self facing for the left front (unless the fabric is really thick- then use silesia)
The button hole piece which is comprised of a layer of self fabric, a layer of silesia and some kind of interfacing for the buttonholes.
The right front extension which will be a layer of self fabric, and a layer of silesia, and again some kind of interfacing, to support the buttons being sewn there.

Cutting out the fly pieces can result in a lot of concerned moments holding up the pattern to your body to figure out what side of the pattern faces up and how to lay it on the fabric, so here's a hint.
If you always draft the pattern as we did here, flip it over and chalk that onto your fabric, this will give you the extension and the facing, cut right sides together, the extension being topmost.
Then take these and place them on the fabric again and cut one more piece one layer thick (the right side of the fabric is facing downwards). This is the button hole piece. Cut the pieces again on a double layer of silesia and then cut interfacing of your choice. The interfacing should be cut short- to just the level of the fly notch , again to reduce bulk in the fly area.
The fly stitching holds everything in place, and it needs to clear the button holes, and then tapers down ending below the fly notch, not at it like modern trousers do.

The more I talk about it the more I realize I need visuals, which will have to be later, since they are not on my computer. I'll see if I can locate them.

In the meantime, did you find the draft easy or difficult to follow?
Did you draft to the measurements given first before trying to draft to someone else's or your own measures?
Are you going to try them out in muslin?
Just curious!
Should we look at some other drafts?
Let me know.


Sunday, September 18, 2011

waistband

This draft has a grown on waistband but you need a pattern for the interfacing or waistband canvas.
When I first started sewing for the theatre, I was often handed an oversize piece of waistband interfacing that didn't seem to make much sense to me. It was slightly curved and there was a process of sewing it in that was very time consuming and it seemed to waste a lot of materials.

I needed to know why it was that shape, and to streamline the process, so this is how I make my waistband interfacing pattern.
First, trace out the front waistband section onto a new piece of paper.

Lay the side seams together, as they would be sewn- remember there are seam allowances included in the pattern and you don't want to include seam allowances in your pattern for the interfacing, because it will be too big.
Trace over as far as the dart.

Move the pattern over, laying the dart seam to dart seam (closing the dart) and trace off the rest of the waist from the trouser pattern.
This is a good exercise to check the accuracy of your pattern.
Here you can see that the dart legs are not the same length and need to be corrected on the trouser pattern. This is something that should be done before you get to this point, so walk the seam lines of your patterns and make sure it is accurate.
I don't particularly like the shape I've drawn for the "fishtail" so I would probably draw something more pleasing rather than leave it the way it is.
I was trying to just follow the draft as written to see how it turned out, I would normally correct things as I go, and you should too. If it looks wrong or ugly it probably is. It does take time to develop an eye, but also confidence to act on it.

Draw in the waistline, curving it slightly as shown, connecting it to the front waistline.
Now, when you cut your waistband canvas (interfacing) you want to be able to catch it to the waist stitching, so you will need to add 1/4 inch to the bottom of the interfacing pattern. You will also add 2" to the CF of the pattern to allow for interfacing to go into the fly extension on the right hand side of the trousers.
The other thing to remember is that this pattern likely has 1/4" seam allowance on the top edge too, so that needs to be removed from your waistband pattern.

The waistband pattern will of course change if you have a smaller dart take up or two back darts, so the same shape doesn't work on all patterns. I make a separate pattern for every pair of trousers.

These trousers should sit well up into the hollow of the back, and when sewing up the CB, I would sew only up about as far as 1/2 inch past the waist line allowing the waistband to splay above that point. If in a fitting you want to or can close it then go ahead but I would guess it needs to splay.


Wednesday, September 14, 2011

drafting the trouser back

Here we are, ready to start drafting the back of the trousers.
I have cut out the front pattern, laid it on a new piece of paper, and traced around it.
I have then drawn in the horizontal and vertical construction lines, and the points from the fronts that are needed to draft the backs.

So,

Pivoting from 14, sweep from 9 to 16, 2 1/2 inches.

17 from 14 and 18 from 12 are each 1 inch (for seams).
The back of the trouser leg is made wider than the front. The fronts were measured at 1/4 total knee and hem but they have 1/4 inch seam allowance included in that. The backs are made an inch bigger, but they also have seam allowance included. Am I making any sense or just making something simple confusing??

Lets move on.

19 is 1/2 of 0 to 9
20 from 0 equals 1/3 scale plus 1 inch.
This is to establish the CB seat angle, so go ahead and draw a line from 19 to 20 and extend it above the top line by a few inches in preparation.


The next instructions help to find the width of the hip. Measure from 6 to 3 on the fronts, take that number, and starting at 20, measure over to the hip line 1/2 seat plus 2 inches for seam allowance and ease.
22 is 2 1/2 inches up from the top line. I am thinking it is along the straight line from 19-20.
Hollow 3/8 inch at 23. The centre back line has shaping.
Now to measure the waist you are going to start by measuring the front waist, and apply that number at 23, measure over half the total waist measurement plus 2 inches to find 24. Measure over 1/4 inch and square up to 25. The width of the waistband here is 2 inches the same as it is on the front.
The next instructions have a "typo".
It should read 26 from 22 equals 1 1/2 inches, shape up 1 1/2 inches to 27 and complete top.

Measure over 3 1/2 inches from 25 to find 28 which is the dart.
The dart should be squared to the waistline in this draft.

Now the dart can make people confused. The dart has seam allowances. The width of the dart is given as 1/2 inch but it has 1/4 inch seam allowances so it adds up to 1 inch in total.
The dart length is given as 4 1/2 inches and cut out, but it is much longer when sewn with the seam allowances. I have drawn the allowances in so you can see it.

Now you have all the points needed so you can draw in your seam lines.
The inseam is pretty straight from hem to knee, then hollows out to come to point 16.
the outseam is again pretty straight from hem to knee, then ever so slightly hollows inwards from knee to hip and curves outwards over the hip through point 21 up to point 24.

When you shape the top line, make sure the dart legs (there's another terminology word) are the same length. If you just draw it as I have done for an example, one side ends up being slightly longer and you don't want that.
Dart Legs: the seam lines of a dart.

Draw in the seat seam as shown. I like to put the inseams together: point 9 of the fronts to point 16 of the backs and draw a nice line from one to the other. Follow up to 20 which will be a bit of a bump in the line as you hollow out to get to 23 and flare back out to 22.

Curve the hem downwards 1/2" as shown.
Cut out your pattern.

The photos were taken on different days - one sunny and one overcast so I apologize for the strange colours going on.

Next I'll just show you how to make a pattern for the fly and the waistband interfacing.

Sunday, September 11, 2011

Drafting the trouser front


Ok, Sorry for the delay, but one of my job prospects has come through and I had to stop everything and make a toile for a fitting on Tuesday.

So when you are drafting, the paper is on the table in front of you and the tops of the trousers will be to your left and the hems will be to your right.
I am going to follow the instructions and rewrite them to suit my explanations.

One more bit of terminology:
Square a line, square out: this means to draw a perpendicular line to another line at a specific point on the draft. Be accurate, a 90 degree angle is required.

First step.
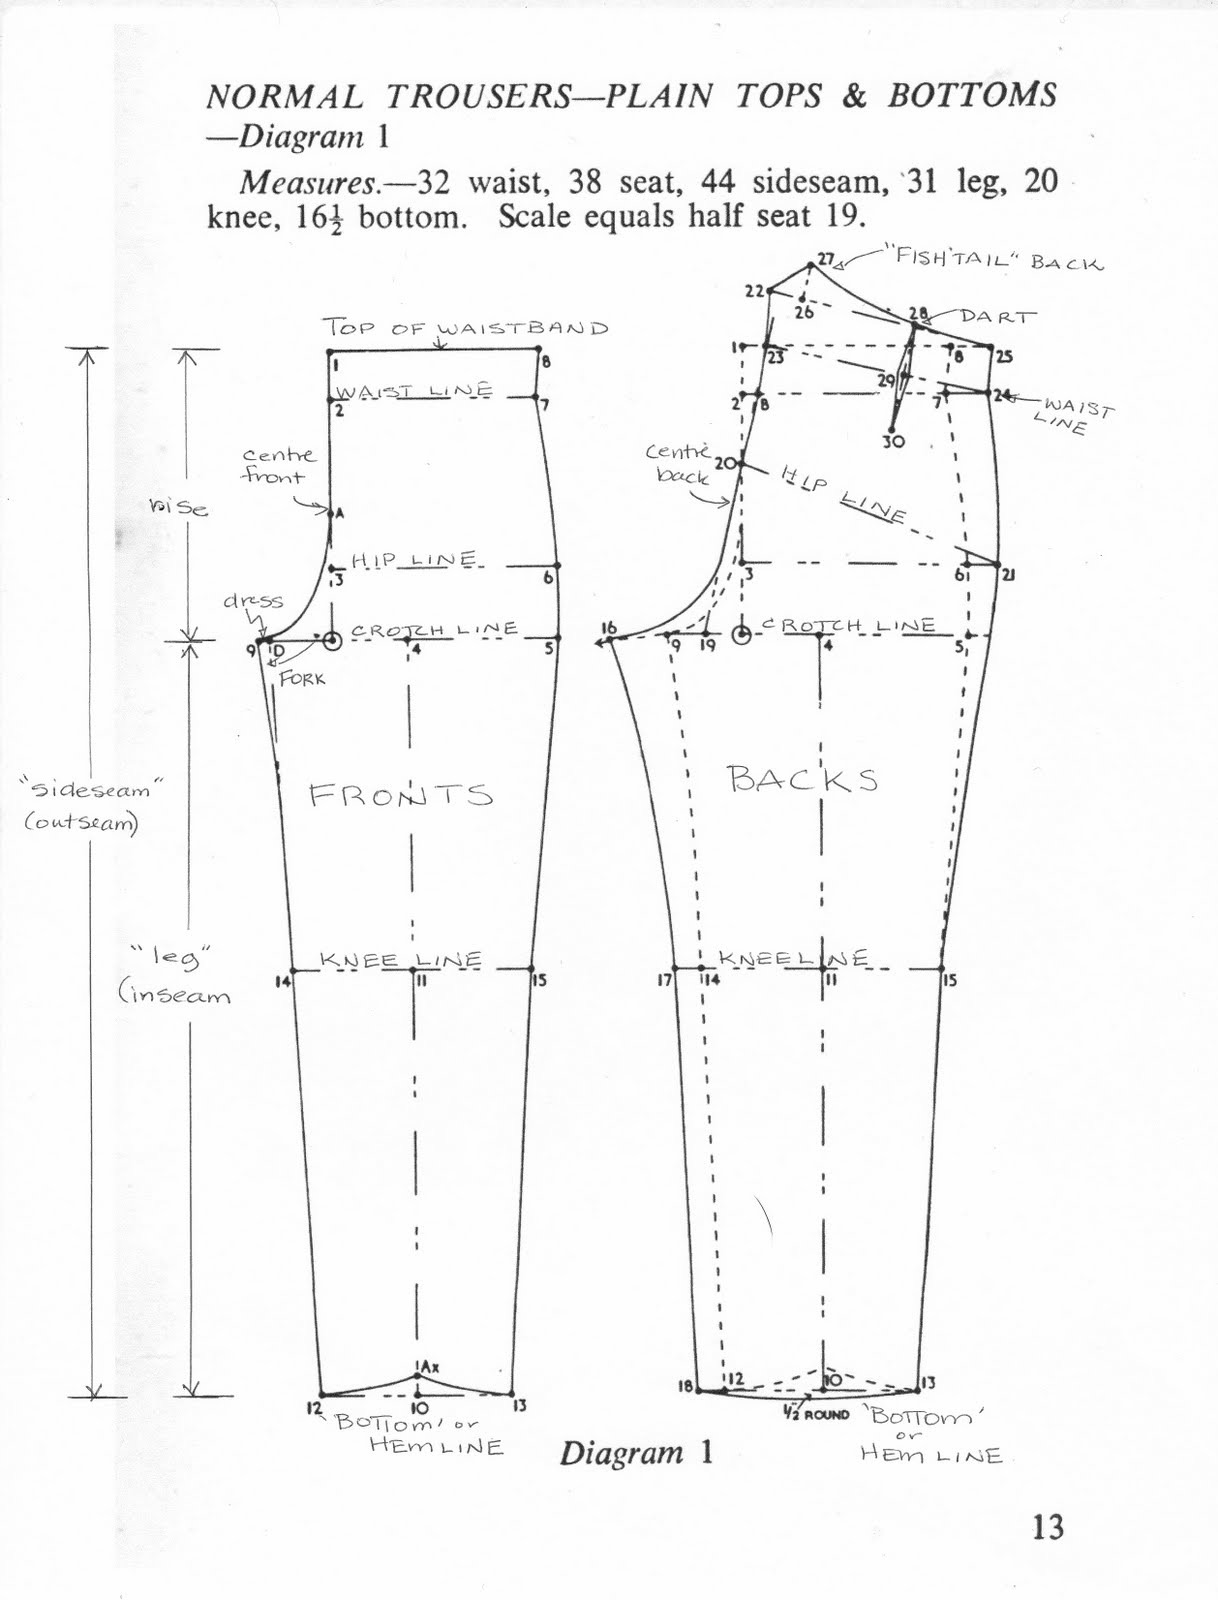
The first instruction is 1 from 0 equals the body rise, 13 inches. Stop.

Obviously you have to have a line to start from, not just an arbitrary point hovering in space. Point 0 is on the crotch line, so your first step is to draw a line that will be the crotch line. This line is perpendicular to the table edge.

Now pick a point on the line to be point 0. Label it.

Now square a line perpendicular to the first line, from point o extending the new line to your left.

Measure up from point 0, the rise, 13 inches, and mark point 1. This is the top of the waistband.
Measure down 2 inches from 1 to find point 2. This is your waistline.
Measure up from point 0, 1/6 scale to find point 3. This is your hip or seat line level.
Measure up from point 0, 5 1/4" to find A. That is a guide point for drawing the centre front curve.
Stop.
Now, you will need to square out from point 1, point 2, and point 3. You should do that now.

Next step.

measure from 0 along crotch line, 1/6 scale to find point 4. This is the mid point of the leg.

measure from 0, along crotch line, 1/4 total hip measurement to find point 5.
measure from 3 along the hip line, 1/4 total hip meaurement minus 1/4" to find point 6.
measure from 2 on the waist line, 1/4 of the total waist plus 1/2" to find point 7.
measure from point 1 along the top line, the distance 2-7 plus 1/4" to find point 8.
measure from point 0 along the crotch line (towards yourself) 1/6 scale to find point 9.

Stop.
You will need to square a line down from point 4.

Measure from point 4, along this new line, the inseam plus a seam. (a seam allowance here is 1/4inch), so 31 1/4 inches total, to find point 10. This is the hem line.
Find the halfway point on line 4-10 and make a mark, then measure up 2 inches to find point 11. This is the knee line.
Just to clarify, the measurement from 4 to 11 will be 2 inches less than the measurement from 11 to 10.

Stop and square out in both directions from point 10 to make your hemline and from point 11 at the knee line.


At the hem line, measure 1/4 of the bottom (hem width) from point 10 in both directions to find points 12 and 13.
At the knee line, measure out 1/4 of the knee measurement from point 11 in both directions to locate points 14 and 15.

Measure up from point 10, 3/4 inch and mark point Ax.
Measure from 9 on the crotch line 1/2 inch to locate point D for the dress.

Okay, now you are going to join the points to make the pattern.
I think in this case, you could join the points with a ruler for guidelines. Do this lightly in pencil.

You can then draw in your pattern lines with this thought in mind:

Generally speaking, there are very few areas of a draft of any kind that have straight lines. so my advice over and over will be to draw nice lines. Even if you are using curved rulers, it is a good exercise to draw your lines by eye and train the eye hand connection.
Draw beautiful lines. period.

I'll continue tomorrow with drawing in the lines and working toward the back


Thursday, September 8, 2011

trouser drafting terminology

Terminology
Before you start drafting, it is a good idea to make sure you understand some terminology.

Lets begin at the beginning.

Waist: the waist measurement given - in this case 32 inches

Seat: (hip) is the hip measurement given - 38 inches

Sideseam: also known as the outseam -44 inches

Leg: also known as the inseam- 31 inches

Knee: which is the measurement of the desired trouser size at the knee- not the persons actual knee, is given as 20 inches.

Bottom: which is the desired hem circumference, not the person's bottom!
is given as 16 1/2 inches.

Scale: one half of the seat measure, so that is 19 inches.
You use scale, or half of a particular measure in drafting for a few reasons.
One: the pattern generally represents half of the body.
Two: many systems of drafting use proportions of a measurement in
determining other areas of the pattern
*you may also see scale written as "on the square"*

Scale, or "on the square" refers to the tailor's square, which is used in drafting. The divisions marked on the tailors square are divisions based on one half of a body measurement.
So for a hip of 40 inches, you would use 20 inches in the draft. If you need to find 1/3 of the scale, you would find the thirds divisions and then look for the number 20 within that area. From the corner of the square to that mark measures 1/3 of 20 inches, or 6 2/3 inches.

The square is a calculator which is especially helpful if you draft in imperial. If you don't have a tailor's square I recommend drafting in metric, using a calculator.

Rise: this is the difference between the inseam and outseam.

This distance can be a measurement or a proportional calculation. The number is greater for trousers designed to be worn at the natural waist and lesser for trousers designed to be worn just above the hip bones.

Dress: an allowance of extra room in the crotch on the pattern for, how shall I put it, the male anatomy. Usually from the era when boxers were the usual underwear, before the advent of briefs and underwear that holds everything closer to the body.
One side of the trouser pattern is larger and that seam line must be shrunk or eased in to match the other, shorter seam line creating a kind of pouched effect. There is varying debate on the amount of "dress" that should be cut in, but modern trouser patterns have generally eliminated it.

Other terms that may be encountered:

Fork: that is the area on the pattern that extends between the legs. In making up trousers, you may see reference to a "fork stay" which is a folded piece of silesia laid in place in the curved area of the crotch.
Fish: another word for a dart- sometimes a double ended dart. In older texts you may read, "take out a fish" in the back.
P.T.U.: permanent turn ups, also known as Cuffs
Nett: means without seam allowance, in other words, on the line. Think of your "gross" pay and your "net" pay- net has had the deductions made.
Spring: a flaring out of a line
Grown-on: part of the pattern as a whole- not sewn on.
Disproportion: measurements that are not the "ideal". Usually, it is the difference between the ideal measurements and the ones you have to work with.
Undersides: back of the trouser pattern
Topsides: front of the trouser pattern
Sweep: to take your measuring tape, fix one end at a certain point, measure to another point and then use that distance like the radius of a circle to sweep or draw an arc.

Whew, I got carried away! I'm sure there are more I haven't thought of.
Not all these words are used in this draft but if you are using old drafting methods you will run across them, guaranteed!

Read through the drafting instructions before you start and figure out if there are things you aren't sure of.

Tuesday, September 6, 2011

Trouser pattern shapes

As I mentioned in my last post, I though it might be interesting to walk you through the process of drafting a pair of men's trousers from a published draft.

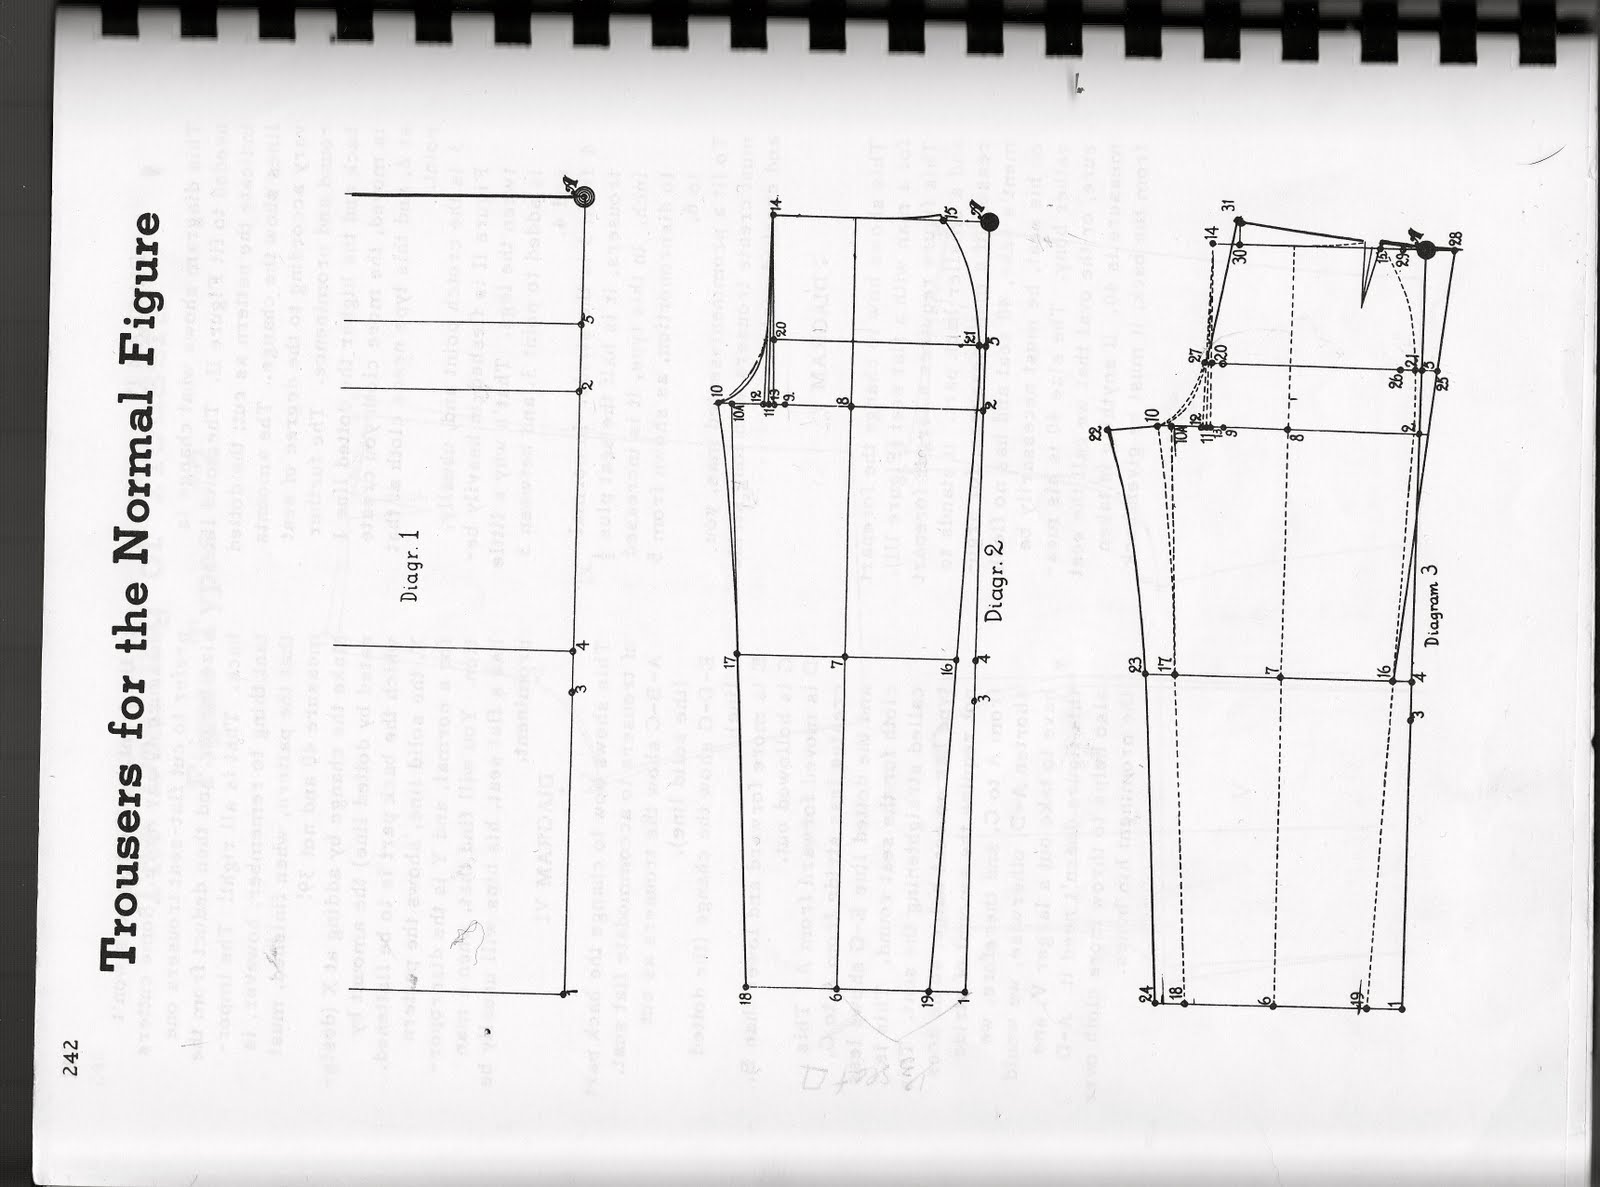
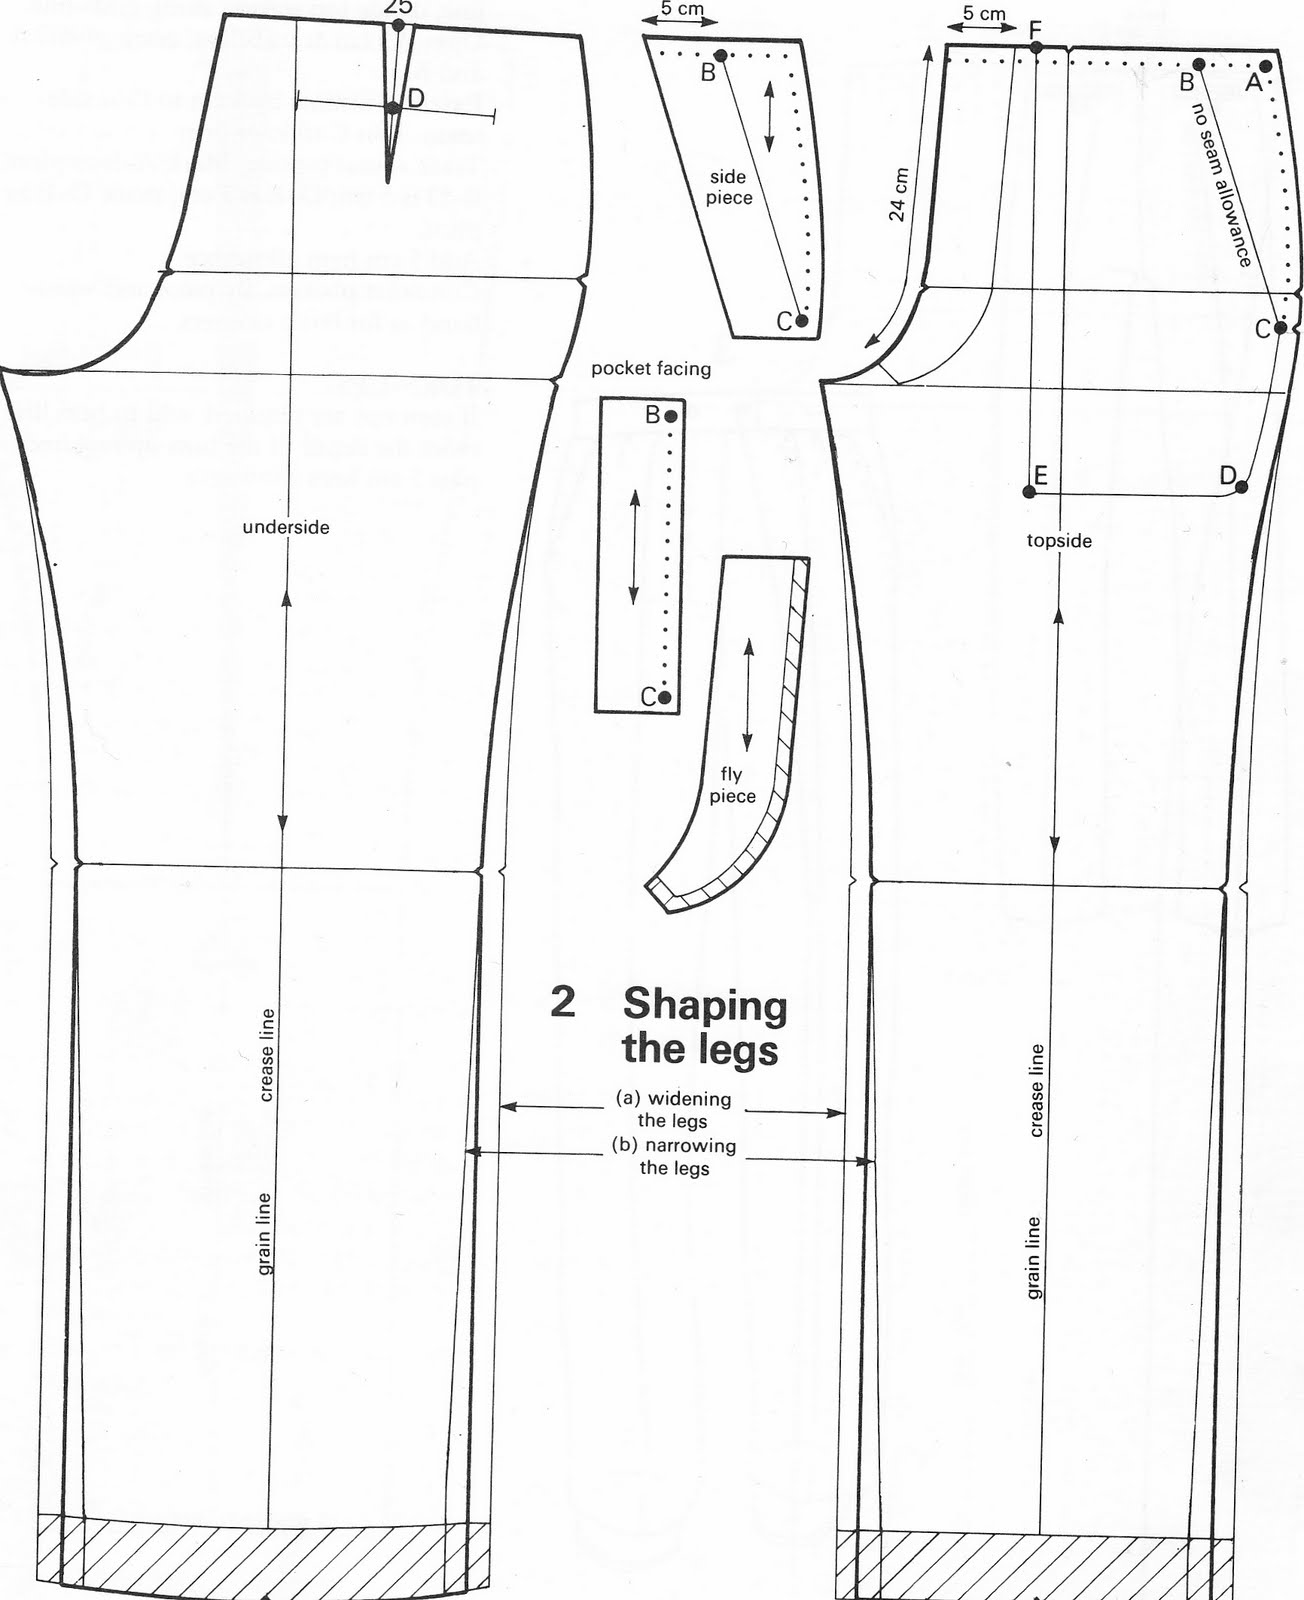
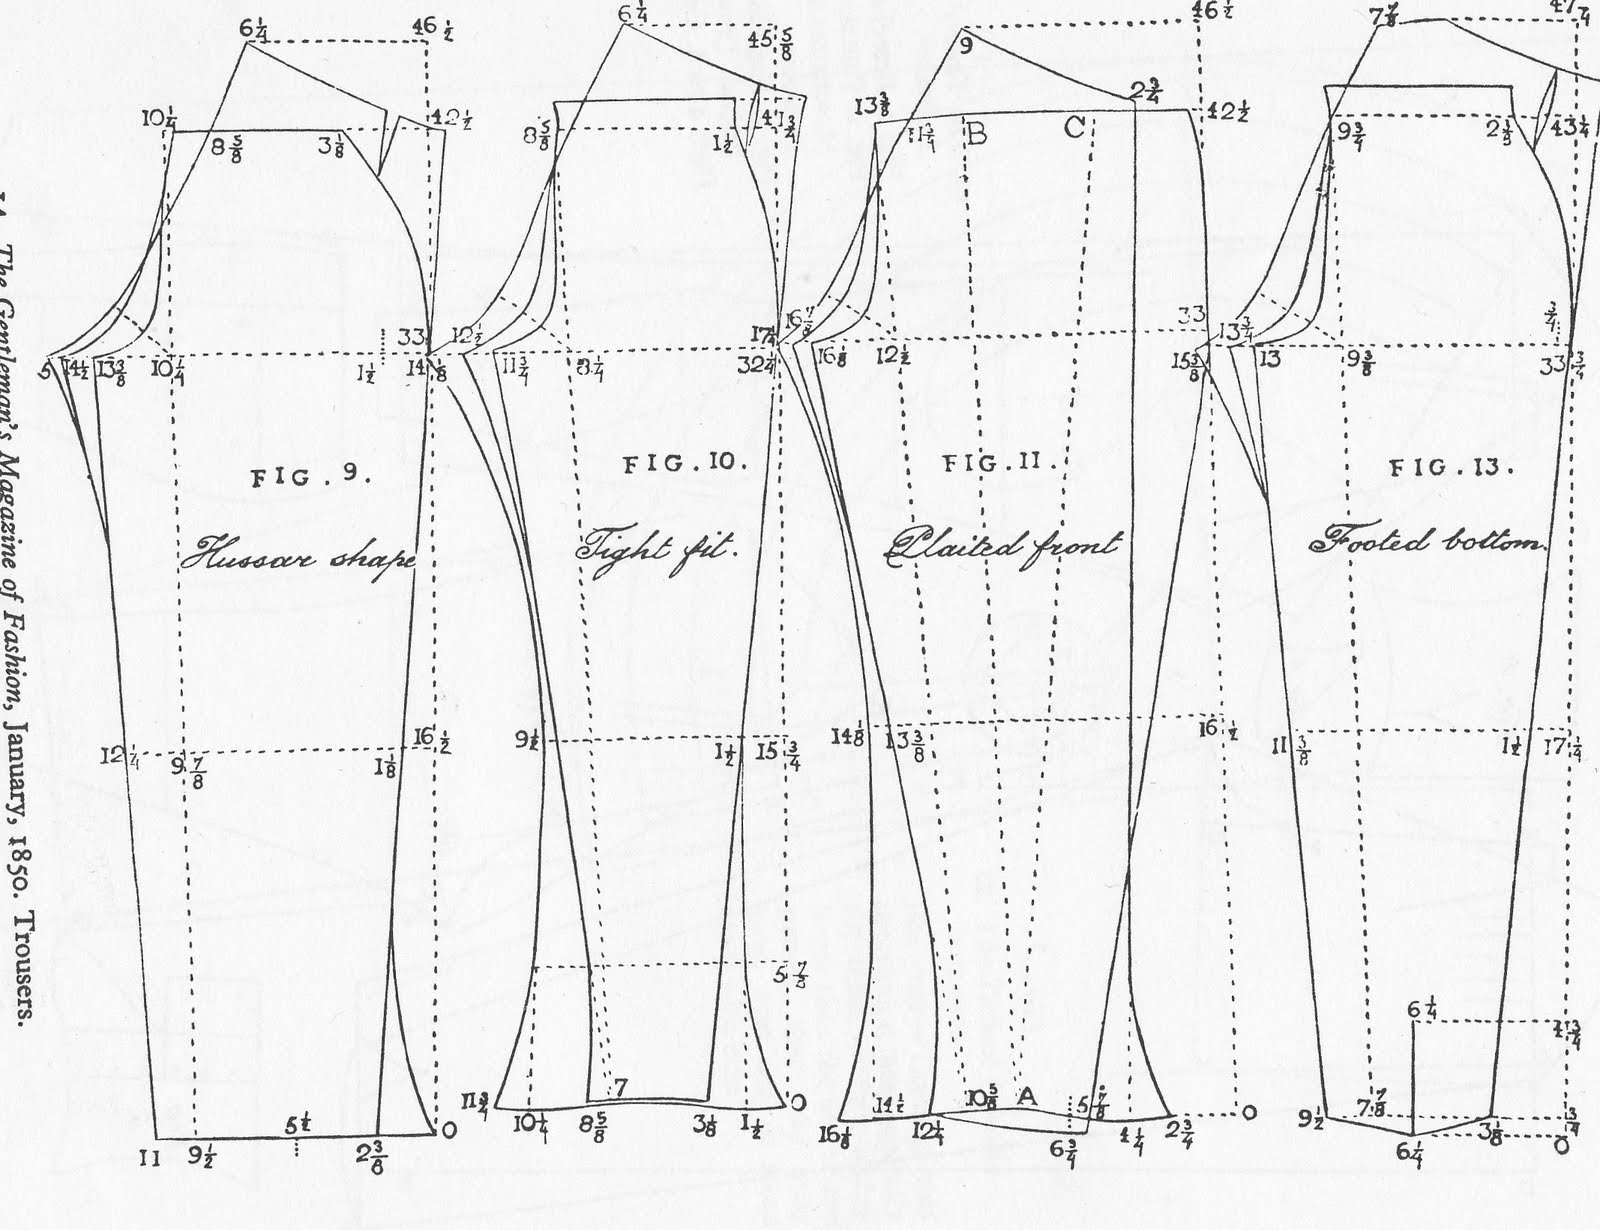
In preparation for this, and in my previous teaching, I like to point out that trouser pattern shapes have changed quite a lot over the years, as I hope you can see from this selection of patterns I have scanned. All of them will produce a pair of trousers but with different silhouettes.
One of the things I have done with the apprentices I have trained is draft these old patterns and make them up so you can really see the differences in the final shape. We won't be doing that here, but in order to recreate the silhouette of the period, you need to understand how the patterns work.
For most theatrical tailors, once you understand the mechanics, you put them to use by developing your own drafts rather than trying to use the 1980's Metric Pattern Cutting draft to make mid Victorian trousers.

These are c.1850 from The Cut of Men's Clothes by Norah Waugh

This is c. 1920 from The Climax System for cutting gentlemen's garments.

The Modern Tailor Outfitter and Clothier c.1940
The Modern Mitchell System c.1950's
Metric Pattern Cutting for Menswear by Winnifred Aldrich 4th ed c.1997 but I think the draft is the same as it was in the 1980 version.

So, if you are deciding which draft to use keep in mind what you want the finished product to look like. Don't use a 1940's draft if you want low-rise modern fitting trousers. You will just make youself frustrated.

Next, I'll give you a list of tools needed to draft a pattern and the draft I have chosen to use. Feel free to draft along and ask questions. I've done it so often that it is easy to forget that others have not, so I hope this will make sense.

I'll probably draft in both full and 1/4 scale because it is easier to scan a page than take good pictures of a fullsize pattern.


Saturday, August 27, 2011

Teaching

Over the past decade, I have been involved in teaching individuals and groups about tailoring and cutting (patternmaking).
I've been aware for some time that training is limited to non-existent in the theatrical field and to some degree in the fashion world of menswear.

There are sites such as the Cutter and Tailor where drafts and drafting instruction, and to some degree construction techniques have been posted online, but for the inexperienced, following the instructions can feel like learning a foreign language, interesting, but more often than not, frustrating.

Many people attempt to draft patterns because they want to make patterns for their own particular body, and that can produce more frustration because the patterns are for the proportionate person, and if you do not have that figure, you end up struggling even more to understand how to make it all work. Not to mention, many of the same people have never sewn in their life so they are trying to master two rather difficult subjects at the same time.

The construction methods available are often dated and limited. Tailoring is also something that is difficult to learn well or professionally, without someone by your side to demonstrate, to physically show you what to do: how to hold the fabric, use a thimble, make a welt pocket, etc...
Additionally, many people want to learn but are not interested in becoming professional tailors. Many people also cannot afford to go back to school full time even if there were course being offered. So we have a dilemma.


I am working on developing some of what I teach as a series of online courses, and I'd like to pick your brain about whether that would be something you would be interested in paying for.

Have you taken any online courses? What do you think worked or didn't in terms of that learning experience? Was there time alloted to chat with the instructor? Did the course use Skype or Facetime? Was the subject something that required a hands on approach like painting rather than a cerebral only approach like analysing the popular novel?

In the spirit of it all, I thought I'd walk through drafting a basic trouser pattern. This won't be set up as a course but just a testing of the water for me and maybe fun and informative for you.
What do you say?

I'll be absent here for a week or so for personal reasons, but I'll be back after Labour Day to hear what you think of this.

Enjoy the last week of official "summer", lets enjoy it while it is here. Good luck if you are heading to school or sending someone off to school, and if you are in the path of hurricane Irene, be safe!

Saturday, January 15, 2011

balance measurements

I've been out of town the past couple of weeks mentoring and teaching, with another week to go so I haven't had much time to post.
I have had time though, to think a lot about some things that crop up again and again in teaching:
a lack of clear and up-front discussion about how the drafts need to be changed for balance, figure irregularities and just plain old bigger sizes.
I thought I'd talk a bit about balance first.
Balance is the way a garment hangs on the body. An example of bad balance is if your coat tips up in the front, hitting your seat behind you and causing drag lines from the hip up on the diagonal toward the chest. It means that your front balance is short.

Now I know that if you read some of the old texts very thoroughly, you will find some information but rarely is it in plain, easy to understand language. The measurements required in some of those books also require the use of specialized measuring tape equipment that sadly has disappeared.
I know too, that many more modern texts are dealing with learning to draft primarily for the RTW market and that is a different situation from what I need to do and what I need to teach.

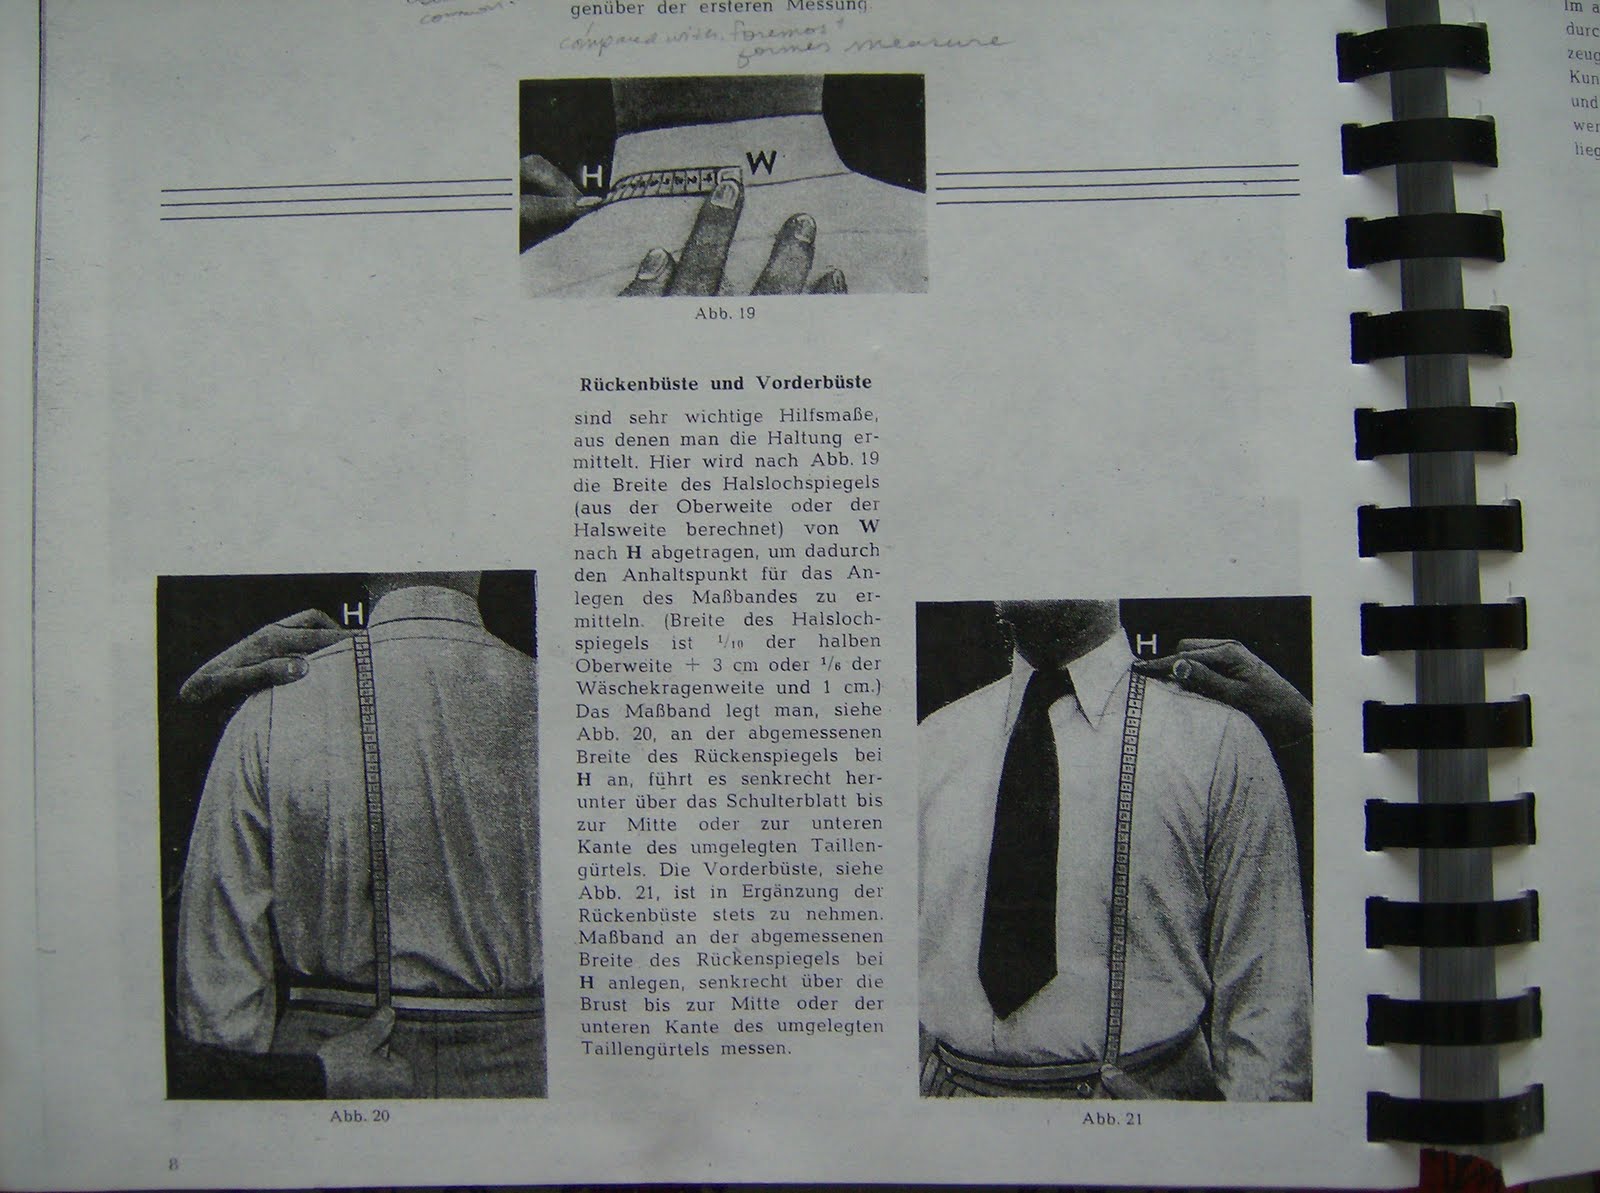
One of the basic balance measurements can be a measurement from nape to CF waist- it can tell you a great deal about the front length required on a pattern. It does not tell you a great deal about the person's back, but you would still be taking a nape to waist back measurement and between the two can make pattern adjustments.
This page from a German text, pictured above, gives instructions for taking two important "help measures" for balance. Similar measurements are also mentioned very briefly at the very end of "The Art of Fitting Gentlemen's Garments".
The difference is that in the German text, they don't just leave you hanging, wondering how to apply these helpful measurements, they do show the average, the long back/short front person, and the short back/long front person as well as the changes required in the patterns to achieve a well balanced garment.


This is essential knowledge in making individualized patterns- I cannot tell you how many people are drafting up the basic formula for varying sizes and shapes but not using some kind of measurement for balance. They are frustrated in their process because the garment doesn't fit right or sometimes at all, and they don't realize what needs to be changed at the pattern stage.

So, why is that? Balance applies to women's wear too, and most of the measurement sheets for women have a number of balance measurements taken but not for the men, so I encourage people to take the extra measures, apply them and it will make a huge difference in both the fitting stage, and in your end result.


Monday, January 3, 2011

Teaching Patternmaking

I've been thinking a lot about this recently because I am doing more and more of it.
There seems to be a definite lack of instruction available regarding menswear. So, why is that?

My guesses are:

Most community college courses focus on women's wear.

Tradition- menswear/tailoring was traditionally taught as a one on one situation: ie apprenticeships.

Loss of information.

Lack of interest.


In regards to the first, I guess since women tend to spend more money on a wider variety of clothing and ever changing styles, the colleges are figuring that's where the money is. It is a rare student who wants to do anything different and if they do, they have to have the strength of their convictions to forge ahead- often with minimal to no guidance because the staff isn't trained to teach menswear.

Tradition- has it hindered or helped? Apprenticeships were the norm in tailoring but over the past century and specifically the past 50 years, the independent tailor has been replaced by MTM (made to measure) and RTW (ready to wear). The tailor's children (boys) were often expected or encouraged to learn the trade, but the clothing world has changed, and job options have opened up for many people so fewer continued with the tradition.
This has led specically to a loss of information. From what I can see, most information both in the traditional construction and in patternmaking was passed on verbally and by physically showing the student and without anyone to teach, the information is not passed on.


Lack of interest.
Well here's a story: I was being interviewed for an inhouse article about myself and my job, and I asked to see the rough copy before it went to print. In regards to why I specialize in menswear, this is what I read:
"So why choose to do boring suits when you could have been making fabulous ball gowns".
Well, that about sums that up.

It is a pretty sad state of affairs really.

Where am I going with this?
I could rant about it all, and believe me I have, but instead I am trying to figure out how to focus my instructional methods- and so far I have a pile of notes and drafting paper strewn about, (no help from my cat), and wondering how best to affect change.


Tuesday, December 7, 2010

It's all talk

No pictures for today and it has been a while since I last posted. So it's all talk.

We finished up this morning with one last jacket fitting that was delayed and I have been going over the past month's teaching and learning process in my mind.
I think that we made real progress in drafting and fitting the trousers and waistcoats and it's true that Lela had some experience there already. Jackets presented different challenges.........in the drafting and fitting and styling.

All drafts on the page are the equivalent of all talk and no action. You can read things in books and follow written instructions until your head is about to explode with information but it means very little until you actually put it on the body and see if and how it works. (then your head really explodes!)

It is always a bit of an eye-opener for junior cutters. You can tell people that the draft is only a starting point but it takes doing a fitting for that to really sink in.

Our fit volunteers presented us with a variety of fitting challenges. We encountered sloping shoulders and very square shoulders. We dealt with built up athletic backs, figure irregularities caused by the person's occupation, we had a guy with a waist to hip difference of 8" and another with a chest to waist drop of 8"......They were tall and not so tall, stooping and erect postures, hip forward....... the list could go on and on and I think what is a real eye opener is that there was not a single average, totally proportionate model in our group and everyone needed something adjusted -most often there were combinations of adjustments to be made. It was a great learning experience because of these challenges.

On top of the basic fitings, we have to deal with the styling and I think it takes years of practice to "get" the nuances that define the silhouette and the style lines of different periods of menswear. We managed to cover quite a bit of the twentieth century, and I think Lela is off to a good start, but it all takes time to practice.


All in all, it was a very productive if mentally tiring month, and as I have said before, very instructive for me as well....

I'm heading off in a week to another theatre to work with another junior cutter, so I'll be talking even more in the weeks to come.

As for next season, I've seen some of the drawings and I know the shows I'm assigned to so I'll be doing some research into the 1840's and the medieval periods before I get back to my regular job in January.

I'm going to take the rest of the day off to clear my head and get ready for the next week- have a cup of tea and stare at the snow that is still coming down outside my window.
(the big storm has missed us for once and dumped 1 metre of snow just west and south of us)

Cheers.


Sunday, November 28, 2010

Further Blue Book thoughts


I was going to title this "final thoughts" but that sounds:
a) too morbid and b) too final- there are always more thoughts.

On the left I have pinned out the excess length along the neckline. It is about 1" (2.5cm). That amount would need to be shrunk in to get the neckline to lay flat against the body. It does create a full chest which is the fashion of the day. I have concerns about being able to shrink that much in with the fabrics we usually are given to work with.

On the right, I have unpinned that dart and smoothed the neckline flat to show you what happens then at the shoulder. This of course throws all the excess fabric from the neckline into the armhole-(sorry, no picture). Not the best look either.

As I have said, I don't use this draft as a basis for my work but I wanted to show what results you can expect to get from it.
I think it is important to understand the mechanics of a draft and then you can make an informed choice about what you would want to use for a project. You may want to use it as is or you may want to adapt or modify it to work for you.

Further, thoughts/modifying options:

This basic draft is shown without a front chest dart, and I think that is a nice period look, but some of that excess in the front neckline could be transferred to a chest dart, which would be acceptable (front darts are indicated in the "novelty vest" section).
You could move the neck point closer to the centre front line, reducing the length along the front edge and opening up the armhole a bit. That would mean less shrinking required in the neck and maybe requiring a little shrinking in the armhole.
Or you could use a bit of both.

Whether you choose to use one draft or another, my purpose in teaching is to look at different systems of drafting, analyse their merits and deficiencies, and to look at the styles of the day.
I try to teach a bit about the mechanics of the drafts so that the student can understand and develop their own framework for drafting and apply it when interpreting costume designs.

On top of all this, just in case you think we've been merrily drafting away just for drafting sake, we've been drafting different period styles for our fitting volunteers and making up toiles and trying them on real live people.
I can't thank them enough for doing this- coming in and being measured and fit, standing there patiently while we fit and discuss their body shape and how to make the alterations required.
Thanks to Steve, Kon, Blake and Matty.


Saturday, November 13, 2010

Blue Book waistcoat


The Blue Book of Men's Tailoring- ahhh- one of those "go to" books for so many people.

Originally published in 1907 and reprinted in 1977 with the tag line "Theatrical Costumemaker's Pattern Book for Edwardian Men's Costumes" it seems to be one of the earlier republishing efforts directed specifically at recreating period dress, and as such seems to be held in high esteem by many people.

I like to look at it for reference to the pattern shapes, not for the drafting instructions, but I am revisiting it here for teaching purposes. I had heard of a menwear course somewhere that used it as their primary text and I was quite surprised and wondered if the students were successful, but that is another topic.

First thing to notice is that they measure the client over an existing waistcoat so you must allow a little more ease than a plain measurement just over the shirt. Little things like this are often missed because they are mentioned in the beginning of the chapter, so you have to read more than just the page containing the draft. It also helps to read the section on making up as well for clarification of other details. Details of ways of doing things that are often taken for granted in the book because a tailor of the time would have just known how and what to do. A little sleuthing in required when using most drafting references.

So I am using a size 108 (42) stand for my purposes and estimating a height of 176cm or 5'9"-5'10".
I've done it here in pen so it is a bit easier to see.
I just followed the draft as written, as most people are inclined to do, using some proportional measures from their charts for front length for instance, and we'll see in the next post what it looks like on the stand.