Friday, January 6, 2012

new and improved

New and improved white trousers. I was told they were breeches, but really they were trousers so I am making them trousers. The new fabric is much better quality, and not see through which is very important in my opinion when it comes to men's trousers and white ones in particular. On the downside, it is a bit spongy and thick which will mean a bit of a challenge on the placket.

Apologies for the picture quality. Sigh :/
Here I go, made a pattern, got it cut out, and made up the front placket while I waited for Steve from pro Sewing to come by and service all my machines.

I wasn't going to change the overall styling, which is why I didn't make a traditional underlap for the fall front. That entails a set of closures under the fall and in this stretch fabric it would show. Anyway it is good to try new things. This is what it loooks like finished from the inside.
I sewed a regular seam on the fall facing and pressed and stitched the seam allowances open to keep the centre front flat. The main seams will be serged together.
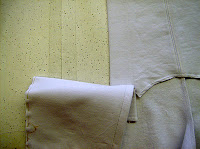
Interfacing is the trick here. I used a lightweight tricot to stabilize the fronts at the top of the waist and down the stitching area for the placket including the area where the final placket would be stitched. I also interfaced the complete fall facing piece, and added a strip of interfacing on the underlap to support the button stitching area.
This is pretty much the same as making a shirt sleeve placket. If you wanted to, you could make the underlap pattern piece wide enough to come all the way to the centre front and then fold back all the way to the side seam. Then you could have a button closure on the underlap.

This is the finished placket from the outside. It was a bit of a pain to do because the fabric was spongy, and I didn't want to bag out the shape with self fabric (too bulky). If I did it again, I would bag out the shape with a very thin piece of cotton. As it was I marked the placement of the triangle on the fronts, and folded the edges in and then edge stitched them down.
I made sure that the underlap piece was long enough to support the topstitching of the triangle. So there is interfacing, and interfaced fabric behind that topstitching.

Now, I just need to sege them together. I am using my domestic serger with four threads for this. Attach a waistband with inner elastic, choose some buttons and make some button holes.
Then they will be finished.

Tuesday, January 3, 2012

getting your money's worth

Well Happy New Year to everyone. I hope you had a nice holiday!

Now today I thought I should start to get back to work and I headed over to the studio to look at a pair of "breeches" that I was asked to reproduce.

A number of years ago Carol and I built costumes for this client. I built a cutaway coat, waistcoat and trousers and Carol built a lovely 1880's dress. These were well made and not cheaply done and I think the client had a bit of sticker shock initially, but they have used them for 7 years, and not even on the people they were built for. They have stood up to repeated wear and cleaning. So, I think they have had their moneys worth, as only the waistcoat has needed replacing after 7 years.
It turns out they had purchased other costumes which the "breeches" were a part of. Not sure when they were purchased, but it had something to do with a Napoleon costume.

I wasn't expecting what I saw when I opened the bag.


Ok you can call me a costume snob or whatever you like, but really, what a piece of crap.

This is Hallowe'en type costuming, and it pains me greatly to think that as a costumer, I may be lumped in with this kind of stuff.


My list of what's wrong:
1. They are made of cheap, see through polyester knit. I hope he had a coat that covered most of him.

2. They are badly sewn.

3. They are badly sewn even for what they are.

There is no stabilization in the front "fall" to prevent excess stretching at the waist.
The placket "points" haven't been turned at the point, they are just smushed. The placket points aren't even stitched down, no I lied, there is a handstitch on one placket holding only the inner layer of the placket to the front.
Look at the "waistband". The end hasn't been turned properly then the inner elastic has been twisted and caught when the button was stitched in place.
They were put together by serging and obviously the waistband and body didn't quite end up the same size.
There is no stabilization behind the buttons.

Even if you bash something out to make money, how can you send product out like this? It wouldn't take take much more to make them a whole lot better.

If you are getting costumes for your business, this is not getting your moneys worth, or wait, perhaps you do get what you pay for.

What a way to start the New Year!


Thursday, December 22, 2011

Merry Christmas

I apologise for not having much to say in the past few weeks!
The rituals of Christmas celebrations have kept me hopping.
Cookies to make, concerts to attend, cards to write, caroling parties, looking for work for next June, family to visit, and shopping -among other things.

I have been doing a bit of Christmas sewing- and I'll post a picture of that after I give the item to my daughter. I don't want her to peek.

I've been doing a bit of knitting- tackling a sweater for myself- the first one I have knit since 1988! I am having issues with the lack of shaping in the sleeve- last time I checked my arm was not tubular, it actually increases in dimension between the wrist and bicep, but this seems to be not allowed for in the pattern, so I am going to chart out a better shape before I knit the sleeves. Put it on the to do list and hope I get to it before the next decade!

Other knitted things are finished and already being enjoyed.


I have a small project to do in the new year and I planned on drafting a men's shirt and making one up for the blog before I head back to full time work on yet another season of shows.
It is amazing how the time has flown by.

Speaking of time, I have to go, so Merry Christmas and a Happy 2012 to everyone.
See you soon.


Sunday, November 27, 2011

interpreting measurements

Sorry for the long delay in posting, these past few weeks have been very intense and busy but now I am back home from my teaching gig, just in time to feel the Christmas rush coming at me!

I was spending this training time going over the drafting of body coats (tail-coats, frock and morning coats) and one of the first things we needed to do was measure our fit volunteer.
Thank-you, by the way, to all our fit volunteers- it can be a bit unnerving to stand there while we poke and prod and talk about you objectively.

Most of the time, we are given measurements that are taken by someone else, and could be quite out of date, so our job is often made more difficult by the lack of information.

Even if you yourself take the measurements, it is difficult sometimes interpreting them when making an individualized pattern or even modifying a block pattern. We are always pressed for time and it is difficult to spend time analysing the figure you are measuring in the 10 minutes we are allotted for measuring. That is where photos come in handy.

But we must press on, as we may be preparing costumes weeks in advance of actually having the person on site, so you must be a bit of a number detective to make your patterns.

Once the measurements have been taken, the issue of how to interpret the individual measurements is one that many people struggle with.

In this instance, the nape to waist measurement as taken was 18 1/4". OK, you think, so what? Well, when you are drafting you generally keep in mind some proportionate formulas such as the nape to waist measure is generally 1/4 of the man's height. In this case that worked out to 17 1/4". A full inch less than the taken measurement. The question was which number was correct?
The answer is that both are, but lets go backwards a bit.

I recommended drafting to the proportionate waist length to start. Then think about why the other number is longer. In this case, the contour of his back makes it longer. Why- well, like many men he is at the gym working out and the building up of the back muscles is a very common occurrence. The trapezius muscles are large and they bulk up easily.

So, to apply the extra measured length on the draft by marking the waistline at 18 1/4" from the nape, and drafting everything else in relation to that length of waist would be a problem. The length needed in the draft is above the scye line not below it. You have to put the fabric where the body needs it.

To demonstrate we just cut a proportionate coat and put it on him. What happened? The centre back waist stood away from the body. There were drag lines running from the blade toward the side waist and the front of the coat was pushing against the front waist area.
To boldly show how much and where the extra length in the back was needed, I had my student cut the coat straight across the upper back. Gently then, don't cut his shirt!
Lo, and behold, the coat dropped an inch at the centre back seam and a full 1/2" at the armhole.
We then pinned in a strip of fabric, so it was held together. The drag lines disappeared. The back waist dropped into his body, and the pressure on the fronts was released.

The other thing that happened is that slightly more width was needed across the back- I'm not sure the original measurement was accurate to begin with, but since the body is three dimensional, an increase in one dimension- length, corresponds to an increase in the opposing direction too- width.

It is always fun to do this. Of course you wouldn't just cut open a real coat and waste fabric, but for teaching it is the most direct method to illustrate the point!


Sunday, November 20, 2011

Multiples

designed by Richard Hudson
Cut and basted up in fabric for first and only fitting
The finished product- unfortunately these didn't make it onstage- cut by the choreographer before they were shipped! Oy!

I was thinking about how interesting and informative it is to do multiples of the same garment.

I don't often run into situations where I am making multiples, at least not usually more than two in the case of an understudy. I also usually deal with figures that are all over the place in terms of sizing, so if I have to make a second costume for an understudy it is usually because they won't fit into the original one.
The ballet gave me the opportunity to draft the same thing in different sizes but for bodies that are very similar. It was a good test of my draft for that particular style of doublet, good practice being consistent too.

In terms of the sewing, it was also interesting to do 6 of the same thing. We naturally gravitated towards each taking on all of one task, which made the work progress much more quickly.
I had help with the cutting- Lela pitched in to cut all the pieced skirts and cuffs- I figured out the sizing of the triangles and wedges for each size of skirt, and made patterns on cardstock with seam allowance included so they could be pieced without having to mark anything. There were about 180 pieces to be cut for the skirts and another 150 or so for the cuffs, so we made a good team once we had it figured out.
Denise figured out a way to secure the tassels from falling apart- and that is such an important thing to do for the dancers safety! then she hand sewed all 288 of them to the sleeves, in the grid pattern that I worked out and Susy marked.
Silvia made most of the body alterations, all the collars and applied them as well as all the underplackets. Susy made all the pieced sleeve cuffs and applied them to the sleeves.
After all the patternmaking was finished, I sewed all the belts for Lela to apply, and the sleeve detail bands for Susy to apply and sewed hooks and snaps onto the fronts.
It went surprisingly quickly and thankfully Susy and Denise sewed all the sleeves in (that is one of my least favourite jobs, I confess). We were just like a well oiled machine, we worked really hard to get these done for the deadline, as they had added two more to the four that we were originally making.

Anyway, we were very pleased with them, we enjoyed making them and the ballet my use them somewhere, sometime in the future.

I am off on a teaching gig for the next two weeks, so posting may be sparse, but teaching always brings up new and interesting topics to think about.


Wednesday, November 16, 2011

ballet videos

Off to the big city yesterday to attend the dress rehearsal for the ballet.

We had a great dinner with colleagues at Jules Bistro which accomodated a growing reservation list of the wardobe department with good grace. Not everyone came but there were still 25 of us at dinner, apologies to the other restaurant patrons because we were loud!

It was great to see a ballet again!
I am always amazed at the range of movement and physicality that these dancers have and the way they make those movements seem so natural and easy on stage.
The thrust stage that I am used to seeing performance on is so intimate and close compared to the proscenium stage that this ballet is presented on. I had forgotten what the scale of these pieces are like.
I am including a link here to a set of promotional videos about the process of this ballet, from set building to sword fighting to the ballet's costume shop.

Tuesday, November 8, 2011

back from the brink

Whew!
That was an intense few weeks. Our deadline was November 7th for 10 doublets. The ballet company was away on tour until October 12, so I cut right into fabric to get ready for fittings.

I did one set of fittings on October 14th and another set on the 18th. 15 minute fittings was what was scheduled!! They worked out fairly well, Took photos and notes and luckily the designer was happy with what I had cut.
Then.....
on the 25th of October, there was a complete change of casting! I had to remark what I could and hope the almost finished costumes would be able to be refit and altered by the ballet staff for the new dancers.

Then 2 costumes were added so there would be something to fit the bigger guys in the other group.

On Nov 1st we were told they were cut and those wouldn't be needed. On Nov 3 there was speculation that they were back in.
We finished at 6 pm on the 5th.
We were vibrating from working so hard. (Well it also could have been the wine we had in the afternoon).

Oh I forgot, the boiler in the building broke down, then the back-up boiler broke as well, so we had no heat. Luckily it wasn't too cold overnight, but we were sewing with our coats on and space heaters at our feet as it was only about 13 degrees in the studio.

Anyway, I have no idea if all of the costumes now are in or out. Only the choreographer knows for sure.
After the opening, I'll show you a few pictures of what we were up to.

Right now I am still recovering. I ventured back into the studio to draft my next job today. I didn't get too far, but it was a start.