Wednesday, March 16, 2011

another waistcoat

It is getting so busy that I can barely find time to take a few pictures as I work through the fittings and alterations. This is a nineteenth century waistcoat that I fit the other day. I went straight into fabric for this one, hoping the actor was the size his measurement sheet indicated.
Luckily he was and there weren't too many alterations to do to this waistcoat. It is in a very preliminary state, just tailor tacked, no pockets yet, a muslin back and the front edge and hems are just basted back.
It has a shawl collar that ends up with a very narrow stand and fall at the back neck.
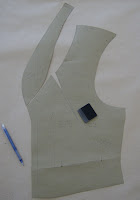
I made the corrections and have a nice clean pattern now. I will just take the waistcoat almost apart so I can mark the changes needed and cut all the bits like the pockets and pocket bags, the facing and the linings. This lapel breaks below the seam of the neckline, and when it rolls into position, will cover up the dart that is in the neckline. The facing won't have the neckline seam at all, it will be worked over the lapel in one piece to the inside where it will be caught down to the canvas.
The lining will then be seamed along the front armhole, turned , basted into place and then hand stitched to the facing. This gives you better results in my opinion, as you can be sure that there is enough ease allowed over the roll of the lapel and shawl collar. It is one of those tactile things that I love about tailoring.


Sunday, March 13, 2011

step vent

The back vent of all/most body coats are open and traditionally have a type of vent opening that I call a step vent.
For the first fitting, or for a toile, I usually ask for both sides the vent to be basted back on the CB line, so I can judge whether the backs are hanging correctly- if they are, the two edges will hang straight edge to edge. If they are crossing over in the back, or pulling apart I can easily see it and correct it at the fitting.

The vent from the outside looks like the photo on the left. The left side of the centre back is sewn to form a "step" that sits on top of the right back.
The middle photo shows the inside of the coat as the lining is being put in.
You need to clip the seam allowance on the left back to form the step vent but we don't clip the seam allowance on the right back as it makes that point much weaker. We press open the seam allowance from the neck down to a point a few inches above the vent, then gradually allow the seam allowance to fold and lay all in the same direction.

A note about the back lining ...for years, I always cut the back lining in one piece, but it is a more complicated technique to install it, so now it is cut in two pieces and it will have a short horizontal seam in the end. It makes much more sense to do it this way because it saves time, is stronger in the long run, and is easier to put in.

I confess that I have to be reminded everytime to cut it like this, because my automatic tendency is to do what I've always done. I just need a few more years practice for it to become my new "normal".

Tuesday, March 8, 2011

1830's coat

I had to put aside the medieval for a moment while we wait for the designer to return for fittings so I finally had time to alter my pattern for one of our 1830's coats and cut it out. I needed some time to mull things over because it will be made out of velveteen and I wanted to be sure I was approaching it the right way because I don't want to be altering velveteen very much if I can help it.
One thing the designer wanted to see was the neckline of the DB coat opened up and curved outwards to follow the waistcoat's neckline, and to keep the neckline of the waistcoat visible even when the coat is worn closed.
Usually a DB coat closes up the fronts a bit by virtue of the way the roll line travels from the gorge to the top button of the coat. To get the neckline to open up required what is essentially a dart running parallel to the roll line hidden under the lapel of the coat. The dart pulls the neckline into a curved shape rather than a straight line.
I also had a seamed on lapel which is very typical of the period so I needed to combine these requirements and all I can say is I am glad this isn't plaid.

Once I had the pattern to where I thought it should be, I cut a half muslin and tried it on the stand with the waistcoat it is worn with. I made a few additional changes and then I started into the velveteen, which I have to say is a wonderful weight to work with, and a low pile, so I have high hopes for the end result.

One thing I do when cutting heavily napped fabrics is to mark and cut the pieces singly. It does take a bit more time, but it is better than fighting with the two layers of fabric laying on one another.
Sometimes the top layer will look nice and flat but the under layer has either shifted or the naps are gripping each other. I think it also makes it easier for the tailor to mark- either with a line baste or with tailor tacks.

Tuesday, March 1, 2011

leather doublet pattern

One of the garments we are making this season is a leather (actually suede) doublet which I fit today. The pattern I made for it is shown here.
The doublet needed to have a soft rather than structured feel to it and it will be worn belted, but the designer didn't want a lot of excess material bunching up at the waist when the belt was tightened.
That meant that I needed to suppress the waist and I think that in leather, seams are so much better than darts. The seaming choice that I avoided because I really dislike it, is the men's version of a "princess" line, and I suggested to the designer that I could angle the seams off into the armhole, which is a bit more, well, angular and manly, if a seam can be manly.
The leather we are using is a good weight of sheepskin, sturdy enough to not require an interior structure to hold its shape, but soft enough that it doesn't look too rigid when belted.

People often think that leather is difficult to work with but I find it easier in some respects.
You do have to assess what the assets and pitfalls of the leather you are working with may be, does it stretch easily (control the seam before stitching) will you need a walking foot or teflon foot to sew it? (you don't want a line of stitching to perforate the leather) Can you take advantage of its non fraying quality and figure out ways of incorporating the raw edge (use a strip to bind an edge) instead of conventional binding or seaming? The possibilites are endless.

The hem will be "dagged" which again can be one of those design elements that are easy to get wrong. We need manly dags, not scallops like a 1940's window valance, something angular perhaps, so we will need to make up a few samples to see what works. The great thing about leather is that you can make use of its inherent qualities to assist in the construction, so in the case of the dagged hem, we will likely lay in a facing of interfaced leather behind, and then stitch the dag shapes through both layers and cut next to the stitch lines, leaving the cut edge as the finished edge.
Yes, you can interface leather and in some instances you just have to. This one will need a little help to stabilize it while stitching the dags. Another option is to glue the facing in place for stability and we will do a sample of that too, but we don't want a soft doublet with a rigid hemline, but we certainly will glue back our seam allowances and gently hammer them flat. we sometimes use barge but also use double sided rubber cement tape in some circumstances- just depends on what we need and whether the gluing needs to be more or less permanent over a period of time.

I barely got out of the fitting room before Karen had it back on her table for a minor alteration and to begin the process of finishing it. The whole team is in now and the work flow still hasn't stabilized from frantic to smooth, so I am barely keeping ahead of them.
Photos to come.


Friday, February 25, 2011

19th century waistcoats

I feel as though I am bouncing around through the centuries this week.

I had been working on the Edwardian tailcoat and then I spent half the week somewhere Medieval and the rest of the week deep in the 19th century.

I had a couple of fittings for the 1837 period show which were just toiles but they went very well and gave me an idea of the designers eye and the way he likes to work towards realization of his sketches.
We were able to corset one of the men we brought in for the fitting, and I had given the corset pattern making and building task to Lela who is training with me right now.
I should get her to write a guest post on her process....
Fitting the actor in a toile then made even more sense as we were able to reduce his waist size by 2" and that of course mean more shaping in the garments.
I still need to make patterns for at least five other men, but we were able to get started in the real fabric for one of the waistcoats. It is just in the beginning stages, but really, look at the beautiful matching of the welt pockets that Susy has done. I peeked at them while she was on coffee break this afternoon, and couldn't resist a photo.
This waistcoat will get a sewn on shawl collar with a contrast facing and hopefully next week I'll get an idea whether the waistcoat back will be linen or silesia or something else, because I will need it by Tuesday for Susy to continue the process.

We have one other gentleman who we hope will agree to be corseted and I made a pattern and cut a toile for him today too. I thought youwould enjoy seeing the pieces here. The design calls for a DB waistcoat with a CF seam, and a wide open neckline with a full lapel and collar. I'll get that together and see what it looks like on the stand on Monday. I was deep into making his coat pattern when I realized it was already the end of the day. I hope I'll remember where I left off on Monday morning.

Saturday, February 19, 2011

Edwardian tailcoat

I've been very, very busy these past few weeks and along with my regular gig, I have a small side project that involves making a set of Edwardian tails.
I finally got a chance to nail down the details and the measurements and fabric just arrived this week, so off I went to make a pattern.

First, I have a good number of visual references for this look but since I left them at work I will have to show you an image from a fairly popular book depicting menswear of the period.

This gives a good illustration of the ideal silhouette and gives me a lot of information about the detailing required for the period.
The trousers are flat fronted, cut with a high rise and are quite narrow at the hem.
I look at the waistline of both the figure and the garment to determine where the waist shaping is in the garment, where the front hem of both the waistcoat and coat sit in relation to the body's proportions. You always have to take into consideration that these are fashion illustrations, and then, as now, they can be disproportionate in order to show off an ideal look.
I will be making a DB white pique waistcoat with a deeply cut out front and a laid on collar.

These coats have a long low rolling lapel that can be cut on or grown on. The lapels are either fully faced with lapel satin or have an inset facing of satin (not shown in this illustration).
The tails also generally retain the "strap" at the waist. If you look closely, you can see a narrow horizontal waist section that is part of the tails. A remnant in my view of the time (1820's) when the tailcoats first developed a horizontal waist dart that later developed into a seam, before the seam was discarded in favor of the separate "tail" that does not have a horizontal component.
I also have a draft for a tailcoat that I think is quite similar to what I am after, so that also gives me an idea of how the shape in the pattern is created. This gives a good idea of interpretation of proportions for the period, so with all this in hand along with the design sketch, I have come up with a pattern.

It was difficult to get a photograph of the pattern on my cutting table, so I brought it home but between the distraction of the floor, the lighting, and the cat trying to sit on it, I could barely get an adequate shot, so this will have to do.

I am going with the cut on lapel and the strapped tail in my pattern. The sleeves will also have a seamed on cuff detail or else a trim applied to delineate a "cuff".

My pattern isn't quite the same shape as the one in the book because my client isn't the shape that the book uses as a standard to ilustrate the draft. Also, when I draft, I like to have seam allowances bigger than the 1/4" standard of the time (I prefer a full 3/8" or 1cm) and I like my armholes to have no seam allowance so that also changes the visual aspect between the draft and the pattern.
I have to cut this right into fabric for someone whose measurements I did not take, which makes me a bit nervous, but I tried a quick half muslin on the stand to make sure I was happy with it so tomorrow I will lay out the fabric and start cutting.
I'm hoping to have it all together for a fitting by mid March so I'll be posting its progress.


Sunday, February 13, 2011

in limbo

This is the time in the work process that is like being in limbo. It is not the "jump in the line, shimmy under the pole with a drink in your hand" kind of limbo.

It is the other kind, being held in suspension with a huge jigsaw puzzle of work to do and some of the pieces have fallen off the table and one is under the sofa. That is the one piece that is usually the key to joining large sections of your puzzle together.

My particular puzzle pieces are the overall workload, the budget, the designer availability, the actor availability (pre-contract) and keeping all the sewers on my team busy with meaningful work. We can only move forward so far with pattern-making and toiles before we have to have all of the pieces in our hands for it to come together.
In other words, the piece under the sofa is a fitting. I need to do some fittings!
Fittings at this point in time depend on an actor willing to come in before their contract starts at a time when the designer happens to be here and then we can get going.
Next week, luckily one show starts rehearsal and the designer will be here for two days and happily two actors in another show are willing to come in while the designer is here from New York. That should get us out of limbo.

In other news:
Happy birthday! One of our colleagues turned 70! and since she was not in the building, we had a little sing through the telephone moment that I recorded for her.
Speaking of birthdays, there are quite a few colleagues who turn a significant number this year, myself included. I think we are going to form a club with a clever name and pick a day to celebrate our collective birthdays. Someone suggested calling it the 'ought club. Works for me.


Sad news too this past week. Our circle of theatrical tailoring colleagues is quite small and we had shocking news of the sudden death of a very talented tailor who many of us have worked with for many many years.

Our world just got smaller.