Saturday, April 28, 2012

velvet smoking jacket

 Well, actually it is velveteen or cotton velvet. Much easier than rayon or silk velvet to work with when making a jacket.

I posted earlier about the inspiration behind this jacket here, and this is the version we are making.

I had cut right into the fabric for this, fit the basic shell, taken it apart and marked the alterations. I then cut the linings and facing, then the pockets and cuffs were made up and basted on. The sleeves are basted in and then we are ready to fit.
The binding trim that we got to work with is a knit! It is much wider than the original vintage trim, but so far it has handled well. I don't know about how you feel about velvet fabrics but they can be very tricky to sew. Not necessarily sewing two pieces of velvet together, because the naps grip each other,but sewing other fabrics to velvet. The depth of the nap can cause no end of slippage or bending as you try to machine sew linings to facings or trim to an edge.

The flat trim that is on the pockets will also bind the edges of the jacket, finishing off the lapels and hem. The cording is separate and will be zigged onto the edge of the flat binding.
On the sleeve cuffs we will probably attach the cording by hand, as it needs to go along the edge of the cuff, then form a clover leaf (which is outlined in white) on the sleeve itself then come back onto the cuff to finish off.


So we have a few alterations to make, dealing with a severely dropped right shoulder and corresponding sleeve length issue, then on towards finishing this for Thursday.  (it is sitting crookedly on the wrong stand)
I was sidelined Friday by some virus that was going around and I know that when I am back to work on Monday, there will be a line up of sewers with questions to answer and details to be finalized so I am off to get more rest.

Monday, April 23, 2012

sequined t-shirt and trouser

I realized I hadn't posted a follow-up to the sequined T-shirt post so here it is on the actor/dancer for a fitting.

The shirt needs to be slimmed in through the body, and have the sleeves shortened. We did put it on a dance brief that kept it from blousing up and out of the waistband as the dancer moved.

The trousers were Lycra and were able to be made without a fly opening. They had enough stretch to be pulled-on without excess fabric eased into the waist.
The leg length needs to be shortened. Again. One thing to note about using this type of fabric for loose hanging trousers is that without tension on the fabric around the body, the weight of the fabric causes it to lengthen more than you think it will. Having cuffs on them adds to the weight too. It also gets narrower as it lengthens, so that is another thing to keep in mind. Remember to cut the rise shorter than you do for regular wool trousers. (These are notes to self!) Of course who knows when I will have to cut stretch 30's trousers next? Could be years from now.

Anyway, if these were tights, you have tension in both directions and that lengthwise stretch is controlled and minimized. Of course it is difficult to predict so the only option is to cut them out and fit them to see.

Saturday, April 21, 2012

finished uniform

Here is our finished uniform, minus the belt, which was being worked on at the time. 
I should also correct myself regarding correct terminology. I should have said Aiguillette instead of Lanyard when describing the braided cording on the right shoulder.  I was reading through "A Dictionary of Military Uniform" to clarify it for myself, as Alix the design co-ordinator called it by the proper name. Aiguilette "is a plaited cord ending with needles, points or aglets." 
According to the dictionary, in the description of lanyard, it says" the cord around the arm and under the shoulder -strap may be single, double, or plaited".
Since this is plaited with needles, it should rightly be be called an Aiguillette.


Next up in our uniform making this season is a uniform of a different colour so to speak. More about this later.....

Saturday, April 14, 2012

Striped fabric and shoulder darts

One of the most difficult figure issues to deal with is the stooped figure. In a recent situation, I had made a toile jacket for an actor and I knew that his pattern required some modification for a stooped back and rounded sloping shoulders.
I hadn't made anything for this person for a number of years, and I was surprised to have to open up the back another inch to get the jacket to fit properly. That is a full 1 and 3/4 inches additional length in the CB!

This is also supposed to be Edwardian so I cannot mask it with extra large shoulder pads either. Now, in a plain fabric such as his black cutaway jacket, I can just lay the pattern out as is, but when there is a stripe, that must be dealt with differently.

The CB neck must be in the middle of the stripe pattern, and if I laid the pattern out as is, I would have quite a bulls eye effect in the upper middle part of his back. That isn't a suitable option. If I straightened the CB by opening up more ease into the shoulder, I would end up with too much for the fabric to handle and if I opened it into the armhole, I can't ease enough in to make enough of a difference, so the other option is a shoulder dart.
Shoulder darts are quite common in women's wear but I have to say that I personally have never seen one in a man's jacket. I was so happy to see a reference to darting the back shoulder in a post on The Cutter and Tailor forum a couple of years ago, and ever since then I feel like I have some back up when I am required to do it for difficult figures. Especially difficult figures and striped fabrics.
The trick as far as I can tell is to not interrupt the main stripes in the dart. The dart end on this one needs to be moved just a tidge to the left, to follow the stripe edge exactly, but overall you can see the effect. The dart really isn't that noticeable when all is said and done, and the benefits outweigh any negatives as far as I am concerned.

You would not know this just from looking, but I will tell you, the other issue I had to deal with here, is the fabric. It actually is a one way design. As woven, the white stripes are on the one side of the stripe right across the width of the fabric. I had to make a choice. Either the stripes would travel around the body, always to the left for instance, or I could fold the fabric end to end and make it symmetrical, which is what I did. Great, so far so good, except when it comes to the collar. The collar is one piece, no seam at the CB. So the stripes travel one way only. Merde!
So unless I seam the top collar CB that is what will happen, and I have to decide soon.
Any thoughts?
............
We are probably the only ones who will notice or know. The stripe is subtle, and if the audience is that engrossed in the stripes on a jacket, then the play needs some help. I won't be putting a seam in the top collar.

I'll post the pattern modifications in a future post.

Thursday, April 12, 2012

DB uniform tunic


We are so close to being finished with this uniform, I couldn't resist taking a photo.
What is left to do?
I need to make sure the lanyard can be worn like this, I have a lot of reference for SB uniforms with lanyards that attach to a CF button, but I'm not sure of the DB protocol. Of course these are not specific copies of any particular uniform or regiment so we have a bit of freedom in what the designer wants to do. (People do write in on occasion to correct us in certain circumstances).
The "medals" need to be sewn in place. We usually thread mark the placement so they can be removed for cleaning and restitched later.
The epaulettes screw down, and the fittings come with a screw that needs a button or something like that to be epoxied or soldered to the top of the screw head. Normally the posts would be inserted through a hole in the shoulder, but we stitch them on the shoulder instead, so that in another season they can have different epaulettes and we don't have random holes. The same with the belt hooks. They are often poked through a hole so that the main part of the hardware is inside the jacket, but again, we need to have future flexibility of use.
I still need some kind of insignia for the collar, and I think that is it.
Made of heavy navy barathea, for an actor who is 6'4" tall, with a 10" drop (chest to waist size), worn with a leather belt and sword as well. Maybe a sash too. I'll have to confirm it with our designer.
Now, just another few days and a few more pieces to finish (like the cutaway behind the uniform) before Tuesday when the show will tech onstage.

Saturday, April 7, 2012

random photos of costumes in progress

Oh, it has been very busy the past week or so. It is like the train we are on has picked up speed and we're on for the ride, no braking for the next little while.
I had first fabric fittings for two gentlemen this past week, and our deadline is the 17th. They have between them 11 pieces plus a pair of spats so that is 2 cutaways, one jacket, 4 waistcoats and 4 pairs of trousers. Those pieces are in addition to finishing up the rest of the workload on the show which at last count was 4 uniform tunics, 4 prs uniform trousers/breeches, another cutaway, two waistcoats, two trousers and refurbishing 4 other uniforms. I also have to work on the smoking jacket and another uniform for the next show, arrange understudy fittings for the last one and get a head start on the show in late May.
Phew, I'm exhausted thinking about it!
So, this post will just be a few photos of some pieces currently being worked on in the shops.
Enjoy.

Wednesday, March 28, 2012

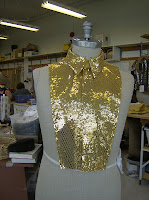
sequined shirt fronts


The last minute panic has set in! Since I seemed to be finished with this show, when something the designer had hoped to purchase was delivered in the wrong colour, I got the assignment. Last week Friday.
Help! we need eight faked shirt fronts made in a week. In sequined fabric, in four collar sizes, to be worn under costumes that were being made elsewhere.

The sequined fabric was ordered last Friday afternon and landed on my table this Monday afternoon. The backing fabric came yesterday, so we are up and running.

I have to say that making a faked shirt front is almost like making a whole shirt, it is just the sleeves and cuffs that are missing. Therefore they do take some time to put together.

Most people, including some designers, management and the general public really haven't thought about how many pieces need to be cut out for just one garment. Then it all has to go together, and be quick changed up the back just to complicate things a little.

Anyway, onward....
The backs won't be seen so I am not covering that area with sequined fabric. The same with the collar stand as the only visible area is at the front, and that is covered by a big bow tie. Besides there only so many layers of sequins that you can work with.

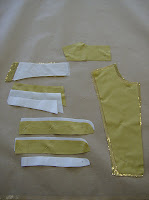
Here's the list of pieces that need to be cut for each one:
base fabric for fronts (2)
interfacing for CF of fronts (2)
sequin fronts (2)
base fabric backs (2)
interfacing for backs (2)
base fabric for collar stand (4)
interfacing for collar stand (4)
stiff interfacing for collar stand (2)
base fabric for collar fall (2)
interacing for collar fall (2)
stiff interfacing for collar fall (2)
sequined fabric for collar fall (2)
interfacing for sequined fabric collar fall (2)
velcro to close at CB as this is a very quick change costume, otherwise I would use snaps.
bias binding to finish the outer edges

Luckily I was offered a junior seamstress to do the sewing, so I cut two out, one for her and one for me and I spent part of the day today, taking her through the construction, step by step, working out all the details.

I find that I am much better with the fabric in my hands, showing the steps as we go rather than just verbally going through it- and by the end of the day, she/we had two complete and the third part way except for binding around the edges, which we will do when they are all done. I left her to do the finishing on mine while I went back to my regularly scheduled work which now feels like I am behind on.
Oh well.....I think she will be able to get them done by Friday, but I still have to cut them out for her!