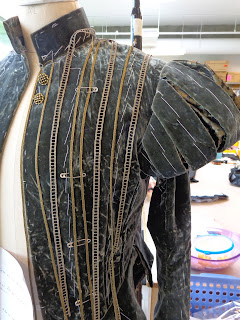
One thing I find challenging in building period costumes is how to deal with multiple layers and the resulting bulk in seams.
In this mock up of a doublet I had to figure out how to deal with the bulk of seam allowances that could end up in the armhole.
How much bulk is too much- when does it get difficult to sew and more important irritating to wear? Lets talk about the armholes first.
We have the body of the doublet which is a sturdy cotton duck with velvet flat mounted over it. The doublet will also have a lining in it. Three layers in the body armhole.
There is a long under sleeve that will be in velvet. It needs to be flat mounted on a lightweight cotton to keep it stable, as it will get trim. There will be a lining in the sleeve as well. Three layers in the under sleeve.
The small puff sleeve goes over top of the long sleeve and it will remain unattached on its bottom edge-
This puff consists of a base shape in cotton, onto which we sewed a few rows of gathered netting to create the rounded shape. Over the netting, there is a gathered layer of fabric- lets call that the pouf.
Then, over the pouf are panes, each of which consist of a base layer of cotton silesia, then a piece of fusible cut to the finished size of the pane. The velvet will get flat mounted on top of this. Each pane will have a trim applied to the long edges, and then each pane will be lined.
So that is two layers for the base and pouf, then panes have silesia, velvet, and lining, plus trim.
So that is a lot of fabric into an armhole.
I went on a bit of a search at work and saw a number of different techniques dealing with this issue. On some ladies garments with paned sleeves, the panes were bound off with one continuous binding, and the binding was hand sewn to the outside of the armhole. This kept quite a flat profile to the top of the sleeve as the panes do not have to curve up and over.
I liked that but thought it might be not strong enough for this costume, but it did give me an idea!
Here is my idea sample:
What I did was cut a piece of bias and sew the panes to it by machine. I then wrapped the bias around the seam allowance of the panes and stitched it down.
Turn this around and lay it over the sleeve and you get this:
So, now I have eliminated all the bulk inherent in the panes from going into the armhole. Yay!
The bias was cut from the same material as the pouf, so the binding will just disappear. The bias is stitched to the sleeve base along the sewing line. This does not mean that sewing this sleeve in will be made any easier, because it must be carefully stitched right up against the edge of the binding, but it does eliminate bulk.
Just a look at the sleeve from the side.


Wow, this is just a marvel of construction smarts! I've only seen the trim over the raw edges of the pane solution, but this is way more elegant. That doublet, by the way, is just gorgeous. Thanks, as always, for the helpful posts,
ReplyDeleteBest,
Nancy N
This is so interesting! Thank you!
ReplyDeleteThis is a great idea, Terri! I also love that it makes the sleeves/shoulders/side seam even that much easier to alter in the future without having all those panes just "fall out" individually.
ReplyDelete