Tuesday, April 16, 2013

Ruff- moving onwards


 The ruff continues..........

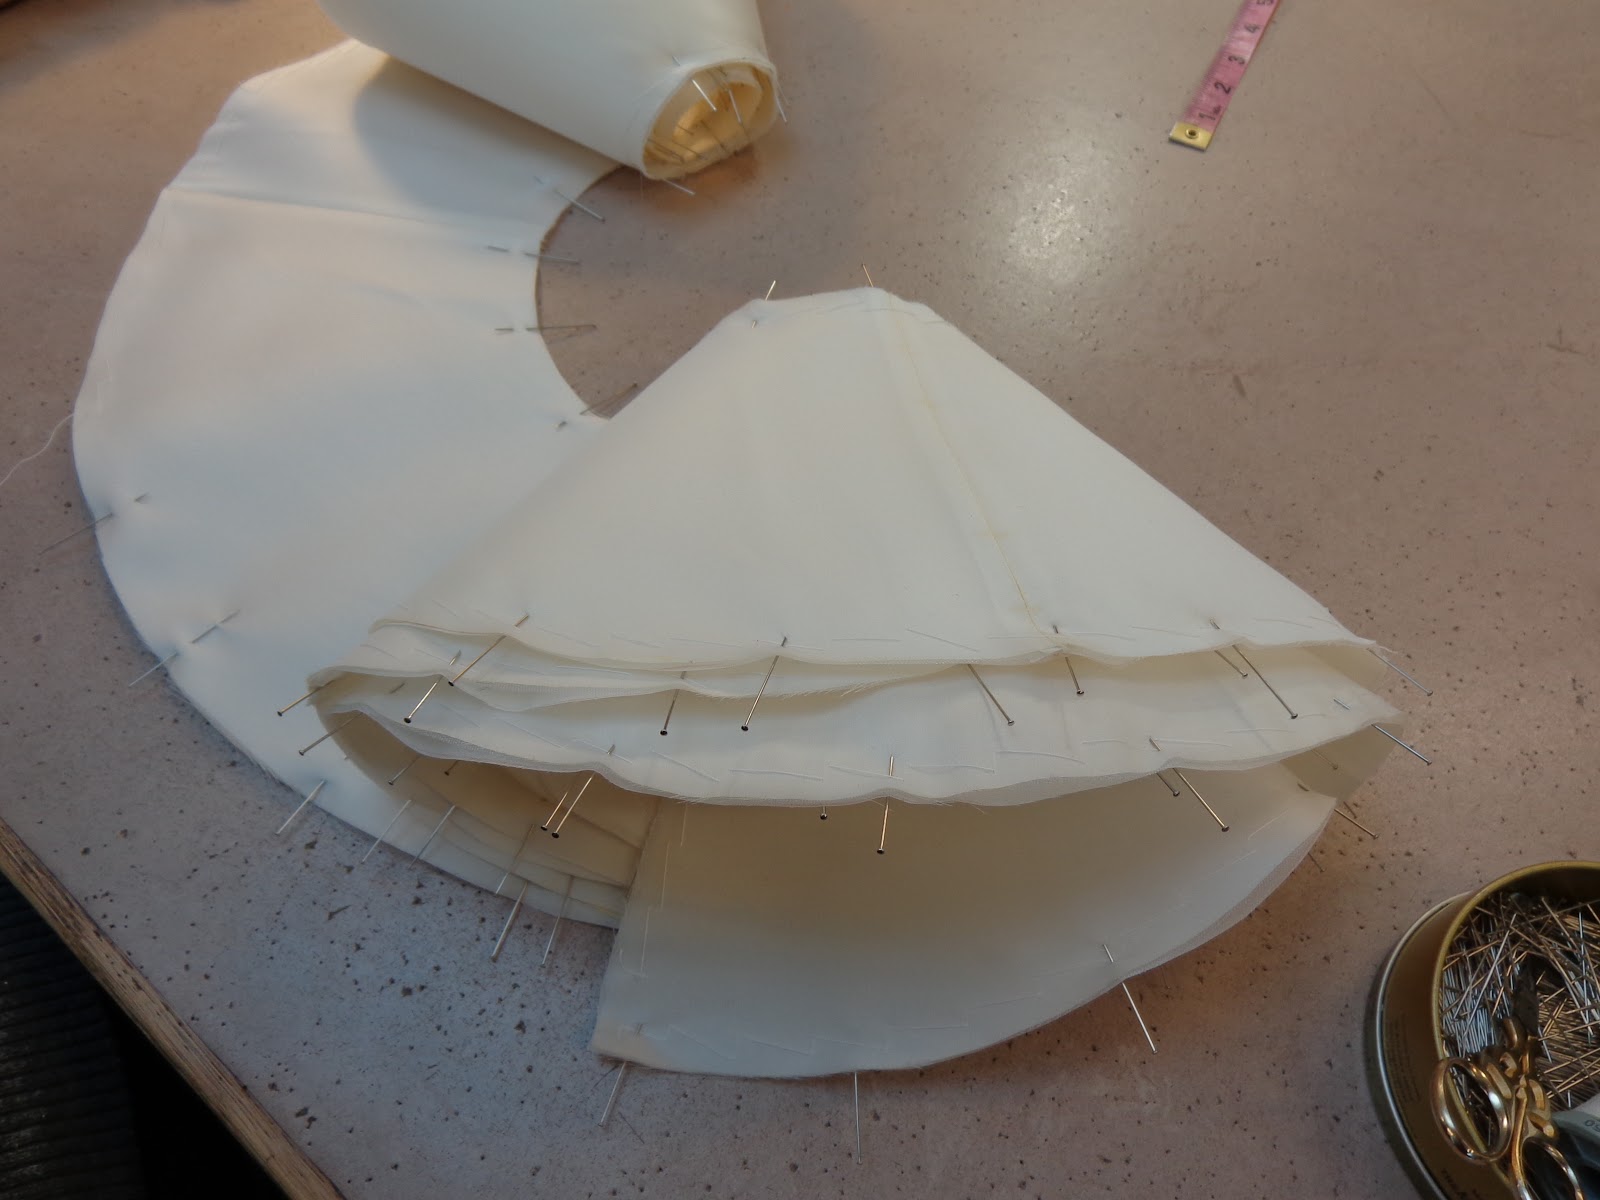
Jumping ahead! The sandwich of silk and crin was basted together, then machine stitched to hold all the layers securely.
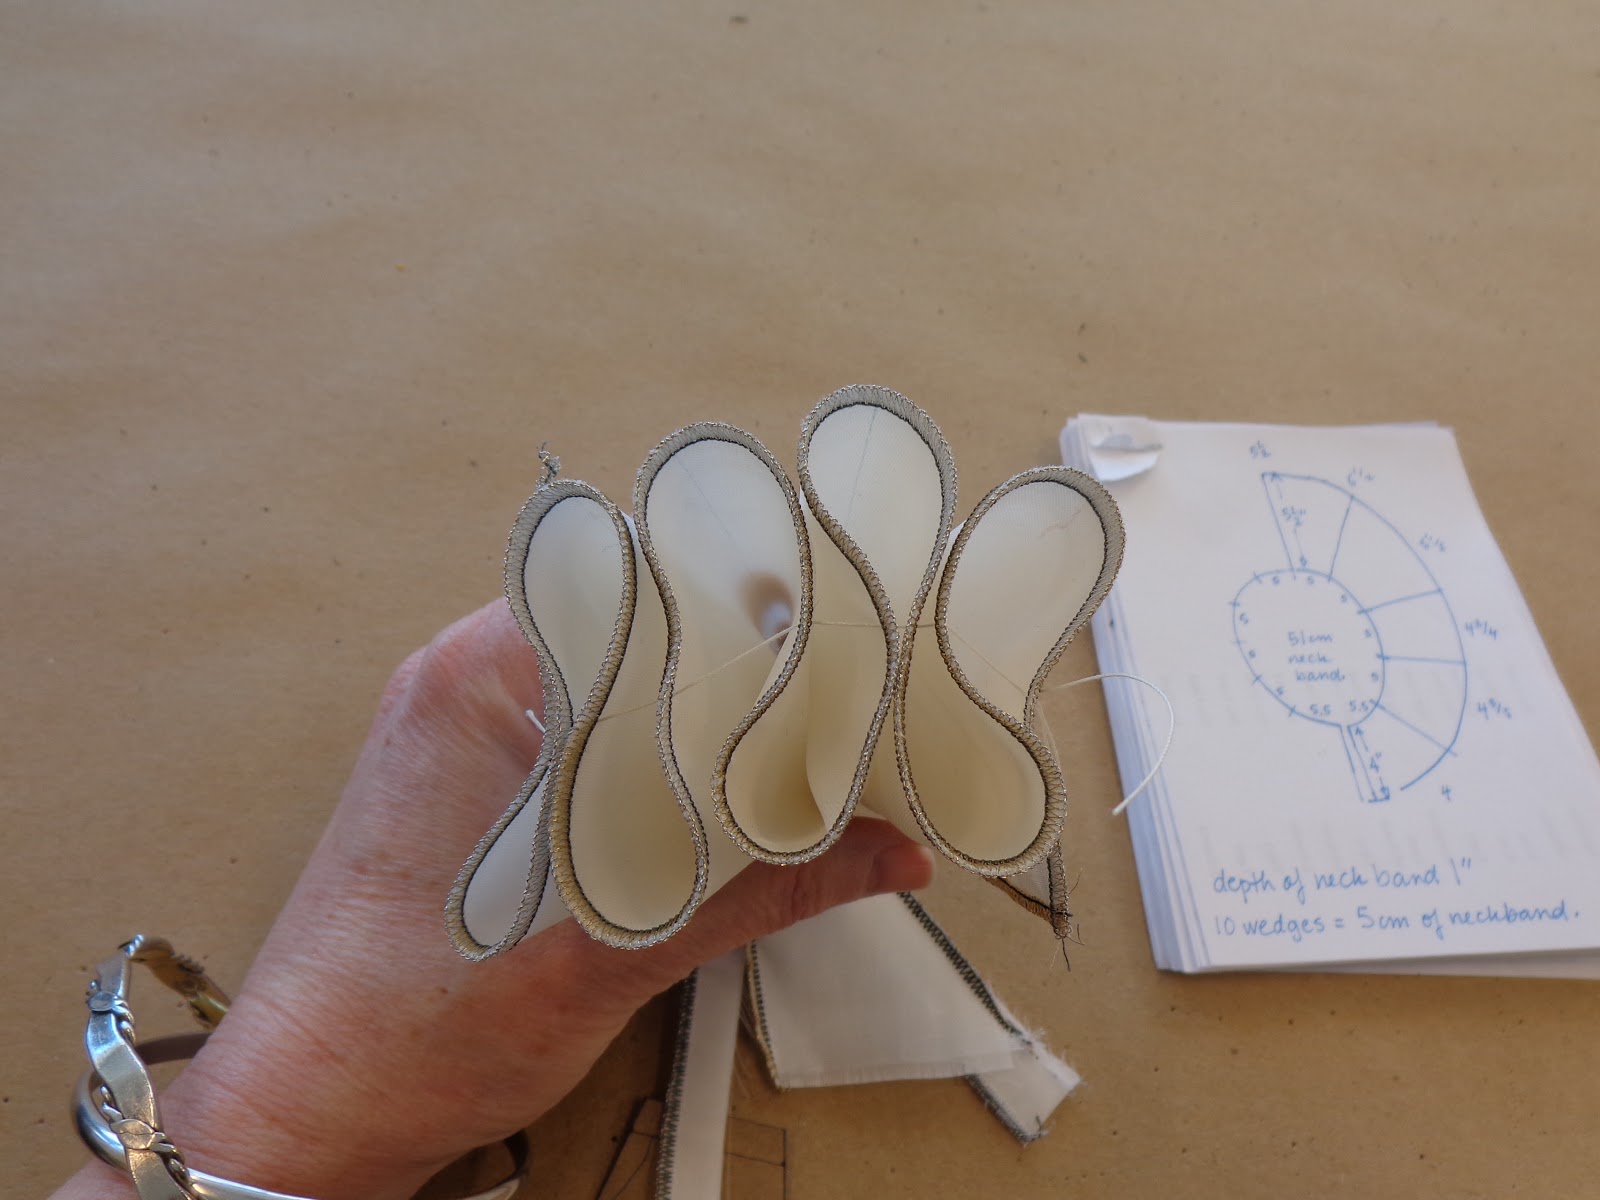
The outside edge was finished with a baby lock edge in metallic thread, silver on one side and gold on the other. The 1/4" seam allowance on the outside edge was cut off in the process.

The inner edge of the circle is not happy to be serged, and believe me, we tried. It was easier to use the industrial zig, and sew a very close zig over the machine stitch, then cut off the seam allowance by hand. A bit tedious, yes, but less
tedious than fighting with a serger!

After the edges are finished, marks must be made for gathering the edges into the figure eight formation. For this ruff, we knew that each section was cut to be 10 wedges, so the sections were remeasured and compared to the original pattern. The outer edge had stretched ever so slightly as may be expected with circles (bias). We decided to divide the sections into ten to maintain our plan, and marked both the inner and outer sections accordingly. Then, by hand with a strong thread, pick up those marks and create an accordion fold of fabric. Secure the thread, set aside and admire!

The next step is to prepare a neckband. We used two layers of grosgrain ribbon so it had some inherent strength. This is also a good time to sew snaps to the neckband, because it is irritating and awkward to sew them on later.

Once that is prepared, mark the neckband top and bottom edge every 1cm ( that is our chosen spacing), offsetting the marks on one edge by half.
For this particular ruff, K started setting the ruff to the band at the centre back. I had cut an extra four wedges at the front as insurance and I wanted the ruff to be symmetrical from the back. once we fit it to the garment, we could remove any extra.
 In even sized ruffs- that is with a single depth overall, you can start at one end and make your way to the other, but a good rule of thumb is to cut just a bit more than you think you need, because it is nothing to cut away excess, rather than trying to add more in.

Almost done by this point!

Thursday, April 11, 2013

Ruff, second post

 I have to say that it is difficult to get photos of the ruffs being made. I get something cut, then voila, it is being sewn together and I am cutting something else.

Here, I caught a quick photo of K- sewing together the Crin interlayer of the ruff.  This is the substance that will give the ruff structure. The Crin and the silk are cut exactly the same, there is a 1/4" seam allowance left on the inside and outside of the circles, that will get cut away as the edges are finished.
 The Crin is seamed by overlapping the seam allowances and stitching through the layers, just to keep it as flat as possible.
The silk layers are seamed together with a scant 1/4" seam allowance. The joins between the sections are carefully marked to prevent confusion.
Once all three layers are seamed together, the task of sandwich making begins. I was careful to make sure all the sections had matched grain lines, so the circular aspect was maintained.
The three layers are pinned, then basted together by hand. You can see the basted section being rolled up as K bastes. It is very important to keep the length under control while you are working on it.
After they are prepped, K will overlock the outside edge with metallic thread, and satin zig stitch the inside curved edge which is what will be sewn to the neckband. The inside curve is zigged and cut away by hand. We tried numerous samples trying to overlock the inside edge, but it wasn't working very well, so zigging was the next obvious finish.

Ok, off to cut something else, actually another ruff, then a cape, and some sleeves and a waistband, a collar, as well as some pockets for a variety of items, and talk to boots and shoes about sword belts ....well, you get the picture- it is busy!


Thursday, April 4, 2013

Figure Eight Ruff

 One of the things on our to do list is making a large figure eight ruff.
 It has been a few years since we made one, but luckily Susy had kept samples from the last time as well as notes that she took during a mini course with a colleague. We actually have three figure eight ruffs to make, all slightly different, from black linen with a piped edge to this large graduated one.

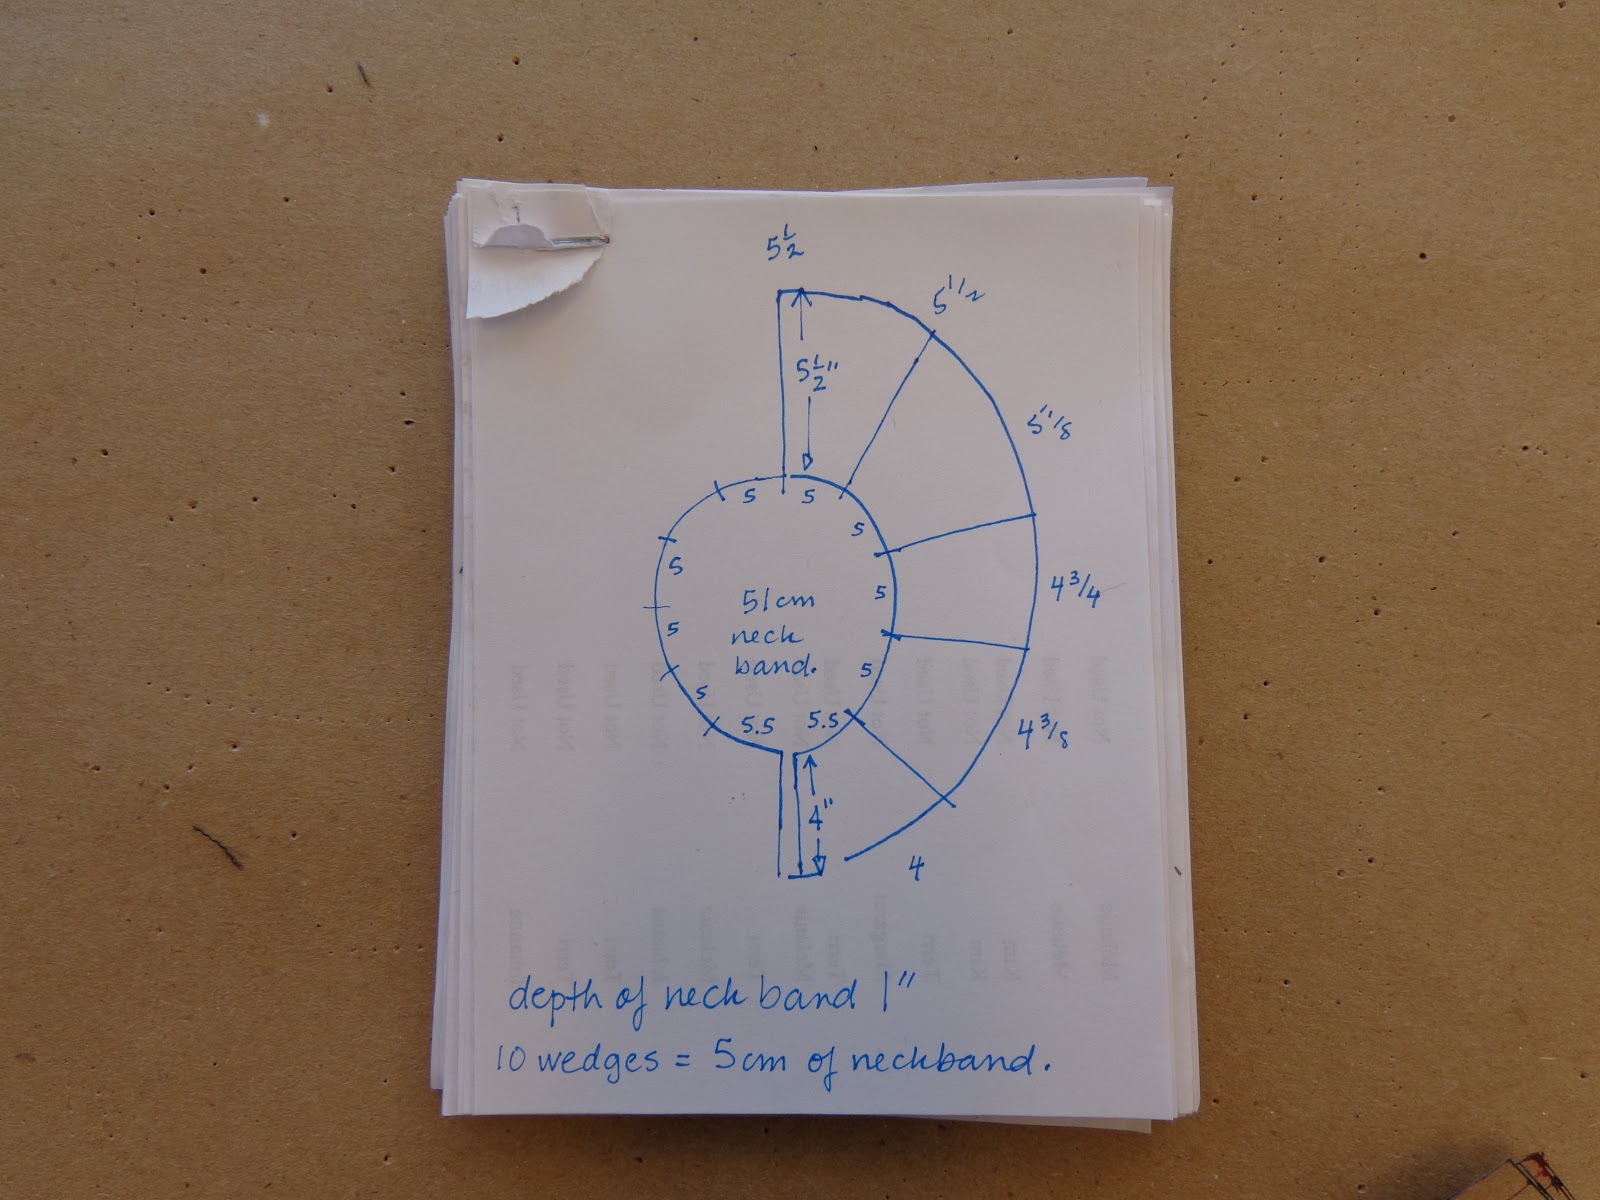
This particular ruff was requested to be made specifically to these dimensions. The size at the neckband should be 2.5cm. The size on the outer edge (the figure eights) should be 7cm. The depth at the front should be 4 inches and gradually increase to a depth of 5 1/2 inches at the centre back.

The edge was to be baby locked in metallic thread.
The fabric is a satin weave silk organza. For structure, Susy made a sample with  an inner structure of heavy nylon crin. Odette 611 from Fucotex to be specific.

So I divided the neckline into sections and determined the depth of each section. I made five different "wedges" to correspond with those depths. I then figured out how many wedges would be needed to fit into each section of the neckband and drew them out as partial circles.
Once that was done, I taped the sections together and modified the outer edge so the 4 inch wedge section would blend into the  4 3/8" wedge section gradually, all the way to the 5 1/2" section. In other words when it was all taped together it was a spiral.
So far so good. Triple check everything. Once you start there is no going back.
Well there is, but it is messy, disheartening and time consuming. So I walked it through with the team, asked them to ponder anything I might have missed while I went to lunch before I started cutting out all the layers.
First- cut all the structure fabric, which is stiched together into a spiral. Then cut all the fashion fabric- double- a layer for the top and one for the underlayer. They will all be stitched together,  into spirals, before they are all sandwiched together.
Pictures to come.


Friday, March 22, 2013

Costume designer: job description

It has come to my attention that a description of the various jobs in the theatre wardrobe is in order.

I am referring to the large theatre setting and to some degree regional theatres in Canada. There is likely some difference in other countries, and some differences for film and television work.

So, lets start with the costume designer.

Contrary to what most people may think, the costume designer doesn't make the costumes.


The costume designer is most often chosen by the director of the particular show. Designers may be suggested by an artistic director or production manager, based on the designer's previous work or a designers affinity for a certain style of design that may be just the right thing for the show in mind.
As such, the designer has to be a conduit for the director's vision for the show.

People Skills. The deigner must have good interpersonal skills to work with many people; from the director, the actors, stage management, publicity, the wardrobe, to the fabric store employee.
Research.The designer must be able to read the script, making note of all the different characters and their possible costume changes and requirements in accordance with the directors vision, the plot, and the budget.
They also must research the era the play is to be set in, the clothing styles, the social etiquette, the historical goings on that may need to be reflected in their design.
Drawing. A designer needs to be able to convey the idea for each character in the show in a sketch. It is how they communicate all of the research and discussions that they have done up to this point. This sketch is what they will present to the director to illustrate how the characters will look and fit into the overall vision.They need to present colour drawings or swatch fabric samples to illustrate the colour palette.
The drawing is also what is given to the costume cutter or tailor so the design is interpreted into a pattern which can then be made up.
They have to make decisions not only on the main costume pieces but also the trimmings, undergarments, shoes, hats jewellery, eyeglasses, hairstyle, and makeup.
Sourcing. Designers need to be able to find fabrics for costumes to be built, purchase clothing online or in stores, or find rental costumes. In some cases, designers must also know a variety of costume makers who can work on their project, if there is not an in house team. If they are purchasing fabrics they need to have some feel for how fabric handles and what kinds of fabrics are suitable for different garments.They need to have a basic knowledge of yardage requirements for different garments.
Fittings. Designers need to be able to make decisions in fittings with the cutter in regards to style lines and proportions, or if using stock or bought pieces, be able to decide if they fit into their overall plan. They have to choose shoes, accessories, trimmings, jewellery etc.
They also need to be able to interact at the fitting with the actor and be able to convey the vision of their design and speak to any concerns the actor may have.
Rehearsals.  Designers often attend rehearsals so they can monitor any changes the director may be making or if the staging will require a change in their design. They will watch the dress rehearsals and give notes afterwards for any changes that need to be made.
Budgets. Designers usually have to keep track of the money they spend, both in materials and sometimes labour costs as well.
Organization and time management. Designing a show is a lot of work, and the more organized a designer is from the start, the less stress getting to the end result. There are always delays and setbacks, which cannot be anticipated so organization is the key to keep from getting bogged down or impeding the process.

Hmmm.....I am sure I have missed a few things so I may add them in as I think of them.
The next job description will be that of the Cutter.


Saturday, March 9, 2013

Designer decisions

In the early days I thought I wanted to be a designer. I guess that is because no one talks about all the other jobs like seamstress or tailor or pattern maker or cutter, so they are invisible. The designer gets all the glory!
It is a very collaborative process and as I discovered, I was much more suited to the technical side of things.
So, even if the designers get all the glory and recognition, they also have to make a lot of decisions that the very same public never think about because the process is so hidden.
In the case of a period show, the decisions increase at an exponential rate. It isn't enough to just choose the fashion fabric and a lining anymore. Some designers are very specific about all the details in their drawings, others are not.
Take for example this doublet. I cut a half in muslin to illustrate some of the answers I needed to move forward.
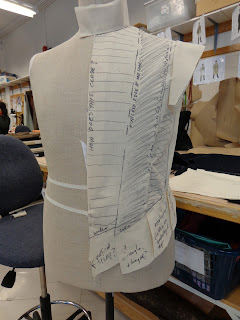
 It is supposed to look like two garments but really is one. When I first talked about it with the designer, I made a few notes but didn't have much time for in depth thought about how it all would work, but once I started into making the pattern, I had a lot of questions.
So,
1. how does this garment close?- it wasn't indicated. options are CF meets edge to edge and it closes with hooks and loops, it has functional buttons (need buttons) and holes, or it has a faked closure like a zipper underneath and a decorative placket (need decor trim or such) to disguise the zip.
2. the centre front panel will either extend fully under the front or will just attach into one of the vertical seam lines- I think less bulk is better, so into a vertical seam just in front of the armhole.
3. that means the second panel has a free edge so that means it needs to be lined in something(need lining choice), and what about its finished edge? Does it need something like a trim or a piping (need trim or fabric)to help define the edge and further give the idea that it is a faked separate garment?
4. speaking of vertical seams, the fabric is a brocade. Those requested vertical seams are going to get lost. So I mean if you are making a design feature of them, they need some definition- and what is it? piping?(need fabric) if it is trim, has it been chosen?
5. that leads to the tabs at the waist. They need a lining fabric. How are they to be finished? Plain and bagged out? piped (need fabric) or bound edges(need fabric)
6. do the tabs overlap at the waist or meet edge to edge?
7. is there a centered tab at the centre back or do two tabs meet?
8. Do you want the body seams to co-relate to the tabs? that decision dictates the seaming position on the body.

9. if the over garment doesn't come right up to the neck point, as it didn't in the sketch, I have to show a bit of the under garment fabric at the back neck area. I also have to be able to attach the two things together somehow, so that means either making the underpiece like a yoke that I can attach to the seaming or I have to attach it around the neckline so something like a piping edge would be useful (see point 3)
10. the shoulder wings- are they short like this or do they continue all around the armhole as they sometimes do?
11. Do the wings get any kind of edge finishing? Same as the waist tabs?

Have I missed anything?
oh yes, things I don't have pictures of
12. sleeves-do they have a decorative treatment on the seams? (need decor)
13 do the sleeves close with buttons(need buttons) or a plain placket.
14. are there decorative cuffs? (need fabric) do the decorative cuffs have any lace trim?(need lace)
15. is there a decorative collar or ruff? (need fabric, and possibly lace)
Wait!
16. a cape too. With a collar. Is it lined?(need fabric). Need ties (find cord of some kind)

After I get all these decisions, I still have to make and fit a mock-up, make fit and stylistic changes to the pattern that are required, then determine the support needed for the fabrics the designer chooses, all before cutting it out and having it made up.

So it isn't as simple as it looks and you can multiply these decisions by X number of costumes and then some as the ladies wear will often have a few more decisions to be made concerning understructure to give the correct silhouette and  probably more decoration.
Then there are decisions to be made for wigs and millinery, footwear and jewellery and somehow blending in stock costumes to the design.
This can be overwhelming, especially to designers who have never dealt with a large period show.

They work hard for their recognition and glory :) wouldn't you say?


Monday, February 18, 2013

Both ends of the size spectrum


Last week I was able to get a couple of fittings on the Bekishe coats that we are making.
These are traditional long coats traditionally worn at weddings.
The designer wanted very soft construction and not necessarily a perfect fit, so these will get some breakdown later. They have only a single layer of hymo for support, no shoulder padding and they will only get a half lining to keep everything soft.
I was happy that they worked out so well. though one could argue perhaps too well, since the fit was pretty spot on.

We have four of these Bekishe and two of the Kapoteh to make in sizes from 36" chest to a 52" chest.

When I am cutting multiples, I prefer to have one prototype fitting to see if I have interpreted the style to the designer's satisfaction. Unfortunately, we didn't have that opportunity, so I was cutting right into fabric hoping that both the fit and the style were OK.

I don't grade my patterns up or down to get the different sizes. I just draft each of them as I go. Grading isn't a skill that I really have- I understand the premise but I really don't have practical experience with it. I tend to draft one pattern in which I work out the proportions I think I will use on the other sizes, ( the amount of waist suppression, the size of the panels at the waist, overall length, the amount of flare in the skirt) make notes and then draft each one separately. Drafting new takes less time than trying to teach myself a new skill set that may or may not be the best choice in the situation.


In the top photo, I am dealing with the smaller end of the size range and the bottom photo shows the larger.
The gentleman in the top photo I had never seen before, I just got his numbers and a photo to work from so I felt very gratified to have such a good fit.
In the bottom photo is someone I have made for before, but hadn't done anything like this for him. 
(you know, I keep certain patterns but honestly I rarely get them out and use them again, not that an eighteenth century coat pattern would have made life any easier)

The challenge for me was to try to quantify my draft in a larger size. 
Most drafting systems are based on a 5'8"tall man with a 36" or 38" chest and as you draft for sizes past about a 44" chest, the formula starts to go wonky. Things like the depth of the armhole and the width of the back neck.
That's when I think it comes in handy to be willing to adapt and adopt bits and pieces of knowledge as you go. It also helps to have a lot of experience, to lessen the worry when cutting right into the fabric.

I do wish I had more time to analyse things like this while at work, but for now I just try to scribble notes on the pattern as I go and hope that at some future time I can go back and look at it, and it will make sense. 

Tomorrow I have one more to cut out in fabric, and the linings and bits of the three I fit this week to cut so they can be finished. 
Then I can start my patterns for the next show. Onwards!


Tuesday, February 5, 2013

Shirt Rant


Shirt Rant
I have been lurking for a while in an mens internet clothing forum and it is an eye opener in many ways.
Since I am concerned in my day to day work with theatrical tailoring, most of the styling I deal with is more period than current. 
That isn't to say that I have had my head buried in the sands of style.
I have been watching the modern suit and it's changes.

How short can they make those jackets?  How narrow can they make the trousers? How ill fitting are most of these suits on your average guy?

It isn't limited to the suit either. The shirt, once a comfortable garment is now tightened and modified without consideration to the person wearing it or its function. Worse, it is marketed  as something you can custom order to your own measurements. Just fill in the handy chart. Now there are masses of guys who have been measuring themselves (a bad idea) and sending in orders for slimmer and slimmer fitting shirts only to find they cannot bend their arms or wonder why there is still some excess fabric not plastered to their bodies.
On the plus side, the trend of the suit and learning about fit and clothes that go beyond a pair of sweats or jeans and a t-shirt is commendable.
But, these guys have little idea how a garment should fit, no idea of the limitations of fit especially in the online MTM business, yet they order anyway only to bemoan the ill fitting product they receive in the mail. They just don't know what they don't know. If you know what I mean.


I have been tempted to put in my two cents when I see things like this, but I just don't think I have the time to try to explain and enlighten the masses. Heck, I can barely find enough time these days to post on my own blog! 

So, shirts:
A shirt is a washable garment to wear next to the skin that, historically speaking,  that acts as a buffer between the body with its oils and perspiration and the more expensive and less washable over garment.
It provides both coverage and style. 
A shirt should have ease through the body. (A shirt is not a fitted bodice)
How much ease? Well a close fitting jacket is typically 4" larger than the chest measurement overall, so a shirt should have more ease than that. I have seen drafts with as little as 6" of ease total to 10 or 12" and more of ease.
The depth of the shirt armhole is generally lowered to allow for an easier fit. 

The rule is:
The smaller a garment gets, and the less ease it has, the  more it needs to be shaped to follow the three dimensionality of the body.


The shirt has limitations in fit.
 The fit is achieved through the seams and occasionally, vertical darts in the body. The front of a shirt is straight. The neck point therefore is much closer to the CF line than a jacket neck point is. In a jacket, the shifting of the neck point away from the CF is basically creating a dart in the front. This, among other things, allows the armhole to be closed down in size, and be shaped more like the body it is on. 
Simplistically speaking, in a shirt, some of the armhole size at the front  is reduced by sloping the shoulder  but there is a limit to how much can be taken out before it causes a problem fitting the actual shoulder. Surplus fabric could be taken out below the pecs by a vertical dart, but unless there is a dart or a seam going either into the armhole or up through a front yoke or bib front,  a shirt will naturally have some excess fabric in the front armhole.


This is generally not a problem until you start reducing the chest ease excessively, and raising the armhole.

The centre back of the shirt is cut on the straight. There is usually a yoke that allows for some shaping in the back over the blades. The armhole can be reduced in the back by shaping the yoke seam, as well as by some slope of the shoulder. There is a limit to the amount of fitting and armhole reduction here as well, because in men, the upper back is often more developed than the chest. There is also a range of motion that must be accommodated . Movement of the arms is generally forward, expanding the muscles of the back, and this needs to be allowed for.
A shirt will naturally drape off the upper back and the fabric will not sit sucked up against the body at waist level.
A shirt can have vertical darts under the blades to reduce excess fabric in the body and provide a cleaner fit. I have read over and over the advice to just take in the side seams. This is not going to do it, especially if you have prominent blades or a developed upper back.

The last seams available for shaping on a shirt are the side seams.  You can use them to reduce from the circumference of the chest to the size at the waist but again, only to a certain degree. You have to increase back out over the hip though. If the hip is too tight, the shirt will naturally ride up and blouse out at the waist.


What about armholes and sleeves? Traditionally, shirt armholes were straighter than jacket or vest armholes and the  sleeves were cut with a flatter and wider sleeve crown. 
A shirt usually allowed the arms to be raised close to horizontal without pulling the sides up.
If the ease in the body is reduced, the armhole is both smaller and more shaped. When this is combined with an attempt to reduce the armhole size by other means, the sleeve is now in a dilemma. It still needs to be wide enough to encompass the arm and the expansion of the muscles in movement.  It still needs to allow for some raising of the arm so it still needs a relatively flatter crown to go into an increasingly un-shirtlike armhole. What happens then is that the sleeve looks strangely bunched up when in a resting position. If the sleeve shape is modified to be more like a fitted bodice, or jacket, you limit the easy raising of the arms. 
It just feels like a no win situation doesn't it? I don't think the MTM shirt sellers can really be totally blamed because they are just working with the numbers the well meaning customer inputs into the system. You just can't manipulate the pattern randomly either, it is much more complex than for example reducing the size at any one point. Perhaps they should be defining the fit parameters and what they can modify to an individual and maybe avoid the returns and remake requests they must get on a regular basis. 


My thanks to the anonymous photo donors for their willingness to ask for advice online. 

End of rant.