Saturday, June 29, 2013

A morning's work drafting

 We had a late addition to my workload, so I headed in to work this morning to do some drafting.
I get so much done when I am alone in the room.
No interruptions!
I started the trouser pattern late yesterday afternoon, and finished it up before I started in on the waistcoat and jacket pattern.

I started with my basic grid set up, and draft to the measurements I have- then I modify where I think it is needed. In this case I am dealing with an eight inch chest to waist drop and a drop of five inches waist to hip. So a bigger broader chest and slim hip size. I made a little modification in the back   length as well splitting  the back and opening it up for a bit of a forward head/neck.

The jacket starts with my grid set up as well- and I made a mistake  in my set up, forgetting in a moment of thinking too fast that I had added seam allowance. So something looked odd.  I say it over and over to other cutter's apprentices and stitchers that if something looks wrong it probably is,  so stop and retrace your steps.
I was drafting in pen to try to make it visible in photos, so you get to see the mess I made!
A bit further into the process, I think on paper, at this stage I change my mind and the lines as I make adjustments on the fly.
I made a further adjustment after getting the pattern cut out, I needed to create a bit more breadth in the upper chest area only.
I had to leave at noon, so I left it to percolate around in my head for the rest of the week end. The fabric should arrive Tuesday morning and I need to put the scissors to it right away.

Sorry about the photo quality, had to be quick about it all and of course the camera battery chose today to run low!

More later.....

Thursday, June 27, 2013

Not only suits being made

 Well, things have been very busy at work and we are not just making suits, we have some period costumes to put together or refurbish from stock.
These are some of the costumes we've been working on.
A pair of suede trunk-hose. These are built on a fitted under base of twill. This year we are trying a few new techniques for putting these together. The lower leg or canion of suede is flat mounted onto the twill pieces before the legs are put together.   We constructed the fly completely into the under trouser, which allows us to construct the upper suede pouf separately. The pouf is attached to the thigh first, then brought up and attached to the waistline before the waist band is sewn on.
 The centre front opening in the suede is faced back to the fly notch with a cotton twill tape, and that will then be slip stitched to the fly opening of the under trouser at the end. We figured that by doing it this way, we can remove the pouf if required, make changes to its size, add under structure if needs be without too much trouble. So far so good.
We are also making a doublet that has suede sleeves. These are in cowhide and have decorative ridges sewn down the top and under sleeve. We were able to create a similar look on the seams themselves by stitching a regular seam , pushing all the seam allowance to one side then top stitching a quarter of an inch away- like flat felling- then opening up the original stitch line so creating a similar ridge effect. Luckily we have access to boots and shoemakers and their equipment, because the last seam had to be done on the post bed machine. It makes top stitching inside the tube of the sleeve possible.

Lastly, what is a season without a large robe? It seems I get one every year. Last year was the velvet robe completely lined in fur. This year we have a large scale silk damask, lined in silk duppioni. What isn't in the photos is the waist length capelet of the same fabric lined in....you guessed it, fur.

It is time consuming and sometimes stressful cutting out these large garments. Often I have made a pattern and done a toile fitting without knowing what the fabric will be. So without knowing the fabric width or the size of the repeat, I often have to alter the pattern to fit the yardage I get. 

Anyway, I guessed pretty close as I didn't have to modify the pattern, but it takes a good amount of time to lay out the pieces and make sure that the pattern placement overall is good and the pattern matches at the sides, and that you will have enough yardage overall. Garments like this have to be cut in a one way layout as there is a definite up and down to the pattern. This produces a lot of waste as you cannot top and tail the layout. I also lose a half vertical repeat when I cut the yardage so I can lay the fabric right sides together to cut. This fabric is meant for drapery so it is woven with a half of the pattern ending right at the selvedge edge. I prefer to not use the selvedge as my seam allowance, so I lose then lose a half repeat horizontally, as I lay the centre front and centre back in the middle of the next pattern repeat from the edge. Hope that makes sense.......


Under the cape is an under gown of red velvet brocade with a really nice hand. It is a little bit tricky sewing it together and trying to match the pattern as the velvet pile comes and goes along the seam. I think it is easier to sew plain velvet.
The trick according to Denise is triple rows of pinning. One row of pinning on the sewing line and a row either side to prevent shifting. Oh, and using the narrow velvet foot on the machine. Even then it can be a challenge!


This will be fit tomorrow, so I will try to get a photo of it all together next time.


Thursday, June 6, 2013

Back to making suits

I had been working on a post to describe my job, but I was having a hard time writing it down in some kind of blog friendly manner. I think it will have to work on it a bit longer. The working title is "There is no Formula". I think I should get a plaque that says that and mount it on the door to our workroom. :)
Anyway, I haven't given up on writing it, but it will take some time to do.


So, instead, I will show you what I have been up to lately.
I am still in the land of the 16th century and making doublets and trunkhose- a pattern for a doublet toile is in the top photo.  We had a fitting of the toile and I am in the middle of marking the pattern alterations. This one will be made in leather- just waiting for the designer to buy it.


In addition to the 16th century, I get to jump ahead to the 20th century and make a few 1930's suits.
Hurray!
I have some great style and cutting references for this period in my collection, and I was happy to put them to good use.
We will be making seven suits for three different gentlemen, and the first one off my cutting table is this one in linen.

This is the real fabric, basted together like toile- so the pockets are not in, (I usually just thread mark the breast pocket placement, but Susy put together a little fake welt) the patch pocket is just a sample where Susy tried out different thread colours for the possibility of a machine topstitch detail.
The lapels are just quickly basted to the chest canvas, and there are generous inlays left for possible alterations. Luckily, I measured this guy myself so I was quite sure of the numbers, and it all went well in our fitting- not many changes at all.  The sleeves need to be lengthened, and the designer wanted a peak lapel, instead of the notch lapel I was trying to sell her. Other than that, we are good to go ahead, finish this one and get started on the other three for him.


 The trousers are high waisted, double pleated, with slant pockets, a grown-on waistband, and cuffs. They are lined in the fronts to just below the knee, and still need back pockets installed. For some reason I marked them an inch lower than they should be- slip of the ruler I guess- good thing we didn't put them in!
They look tapered from this camera angle but they are about 19  inches at the hem, wide, but not overly so. The hem width needs to work with the person's height and shoe size as well as the style of the period.


Sunday, May 12, 2013

A few finished doublets

 Before I get going on this post, I have to say something about the weather. It snowed today.
Last week the temperatures were in the mid to high 20's (Celsius), and today was a high of 3, with flurries. I am not amused.
 
                                                        I have also been very busy at work, which has tired me out and  on top of that we had a vehicle fire and have lost our VW Westfalia, which has not helped in the staying positive department!
But enough of that talk.

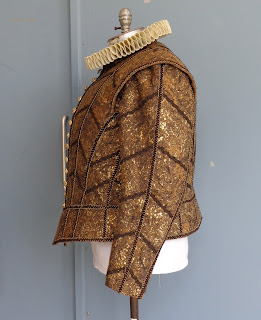
I thought I would show you a few finished items today, two doublets and a variation of trunk hose that I am quite happy with.
The brown doublet is quite a large size, I think a 52 chest if I remember correctly. I wasn't expecting this trim as it was not indicated in the drawing I was working from, so it was a surprise when the designer wanted it.
I had already cut the body out when that happened and I was fortunate to be able to accommodate the trim placement in the existing body panels. The unfortunate part for the budget was that it had to all go on by hand, for a few reasons- One: the backing and structure under the fashion fabric was boned and the fabric had already been mounted to the backing, - Two: the trims were wobbly and needed to be basted in place over a ham so they wouldn't be too tight- Three: one trim was quite open and the other was velvet that crossed over the other, and machining looked like it was going to get tedious. The original though was double lines of trim, but that would have been almost 75- 80 metres of trim, so instead it has single lines and 35 -40 metres of hand sewing. Denise and Karen's fingers were very weary by the end of it all. The sleeves eventually got small ruffs as well- sometimes the opportunity to get a picture of anything totally completed eludes me!

The "trunk hose" that goes with the doublet is an interesting adaptation from an idea that another cutter had on a stand. Instead of building separate panes for the trunk hose, the paned look was created from the main fabric. I marked out the "pane" placement, and cut felt in the shape of each pane. The felt pieces were laid on the fabric and the edges were wrapped and top stitched. The fabric in between the pane area was then gathered and distributed behind the panes which creates the effect of depth. It was very lightweight and effective as well. They are built upon an under structure trouser of lightweight drill, that I fit first. The fabric on the canions was applied first, then the paned piece was stitched on at the lower level, along with some shape support (gathered crin), before being brought up to the waist, where the waistband was stitched on through all the layers. That was a very short description of a complicated process!

Next, we have a suede doublet with contrasting sleeves of striped silk. This was a fun project, marking in all the detailed slashing lines. The suede is a bit soft for this kind of project in my opinion, so it will be interesting to see what it looks like after being worn for six months. We opened up the slashes a bit by stretching one edge with our fingers, like fluting pie crust. The sleeves are bound off separately and then attached into the armhole which is finished with a clipped binding and a second clipped piccadil style wing.

This last doublet is the finished result of the muslin I posted about here. It was supposed to look like two garments, the front edge of the grey is loose and the two are sewn together along the piped seam. It also needed a pocket for a letter, which we found out as we were well into the finishing stages, so on the left side we opened the seam between the two "garments"and added a stay piece of cotton that connected with the side seam and also enabled us to create a pocket bag there, without compromising structural stability.

Whew!


So, what is next you ask?
I have a couple of doublets and breeches to make for understudies on a show I didn't work on in the first place, so that is well underway, and later on I should be starting some suits! Hurray! some regular (1930's-40's) tailoring, and I am looking forward to it.
There may be a doublet or two thrown in for good measure, but I can't wait to make some suits.

Saturday, April 20, 2013

More ruff construction


I have been grabbing photos here and there during the construction of the ruffs.
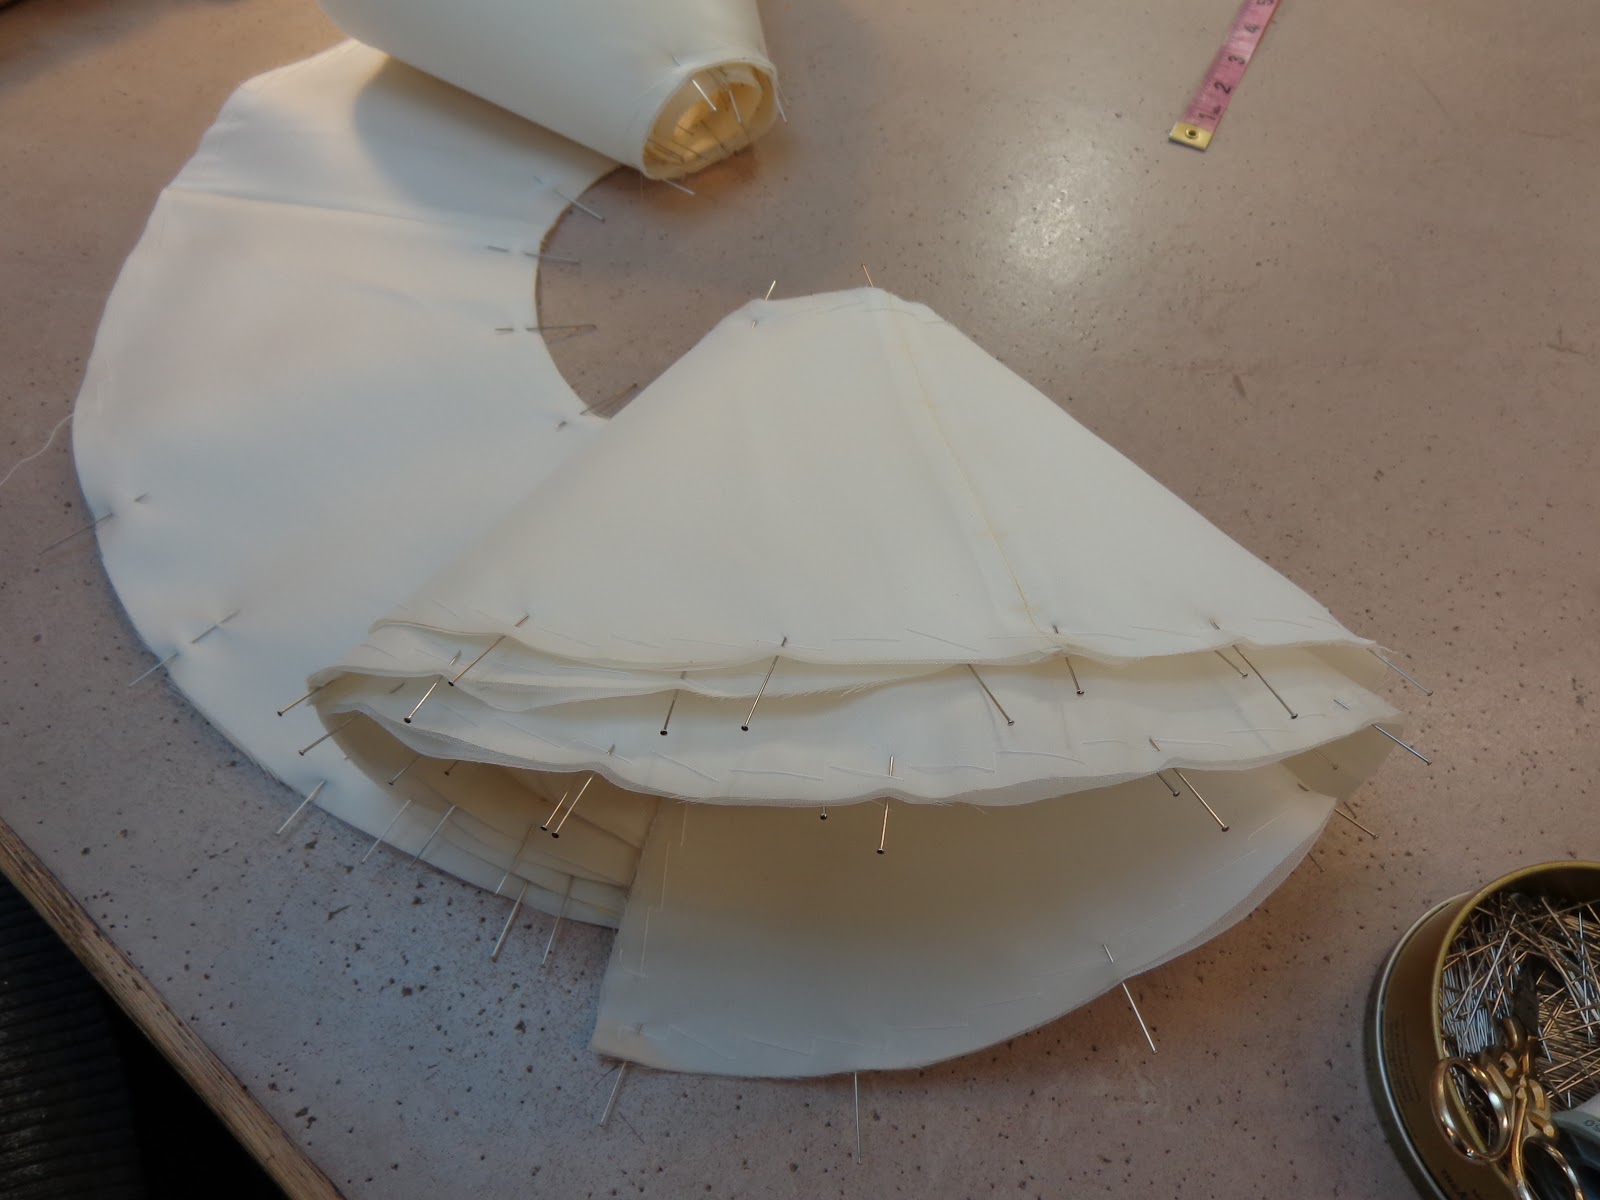
The top photo shows another ruff being laid out on the original pattern so that the markings for the folds can be made. Once all the circles have been marked (I think I cut 11 circles for this ruff), the next step is to thread a needle with a heavy thread- we use a button thread (Coats and Clark  Dual Duty Plus) and stitch down through one mark and up through the next to accordion pleat the ruff.
Tie off or wind the thread ends around a pin and then start sewing the inside edge of the ruff to the prepared neckband. You can see the stitches in the second photo. Sorry, I didn't get sewing action photos during the construction of the ruffs.


The third photo is another circular ruff we made. This one is in black linen with the same crin as a support structure. The difference here is the edge finish. This one has a piping edge, so that entails finding a fine cord - we ending up using yarn- inside a folded bias to make the piping first. The crin was stitched to one layer of the linen, then the piping was sewn to the edge, then the second layer of linen was used to "bag out" the outside edge. The tedious part of this process is the trimming and the pressing of the seam allowances along the outside edge, and then edge stitching the seam allowances down before you can join all the layers on the inside edge. You need to be careful to cut the one set of circles that form the top layer just outside your drawn line thereby making them just slightly larger, because you have to allow for the turn of the cloth taking up an incremental amount of the fabric.  The piped edge does make a beautiful finished edge to the ruff, but it also adds almost a days work compared to the sewn edge finish. The bottom photo is our spiral ruff in place on the doublet. I think I may need to provide a little supportasse at the back to make sure it doesn't ever flop downwards at the back due to its size.
The ruffs are snapped to the collars of the doublets so they can be removed for dry cleaning and other maintenance such as make-up removal.
I have also made straight ruffs that had a softer fabric sewn to the inner circle to allow them to come from the inside of the doublet collar, so there can be many variations on the theme.

Tuesday, April 16, 2013

Ruff- moving onwards


 The ruff continues..........

Jumping ahead! The sandwich of silk and crin was basted together, then machine stitched to hold all the layers securely.
The outside edge was finished with a baby lock edge in metallic thread, silver on one side and gold on the other. The 1/4" seam allowance on the outside edge was cut off in the process.

The inner edge of the circle is not happy to be serged, and believe me, we tried. It was easier to use the industrial zig, and sew a very close zig over the machine stitch, then cut off the seam allowance by hand. A bit tedious, yes, but less
tedious than fighting with a serger!

After the edges are finished, marks must be made for gathering the edges into the figure eight formation. For this ruff, we knew that each section was cut to be 10 wedges, so the sections were remeasured and compared to the original pattern. The outer edge had stretched ever so slightly as may be expected with circles (bias). We decided to divide the sections into ten to maintain our plan, and marked both the inner and outer sections accordingly. Then, by hand with a strong thread, pick up those marks and create an accordion fold of fabric. Secure the thread, set aside and admire!

The next step is to prepare a neckband. We used two layers of grosgrain ribbon so it had some inherent strength. This is also a good time to sew snaps to the neckband, because it is irritating and awkward to sew them on later.

Once that is prepared, mark the neckband top and bottom edge every 1cm ( that is our chosen spacing), offsetting the marks on one edge by half.
For this particular ruff, K started setting the ruff to the band at the centre back. I had cut an extra four wedges at the front as insurance and I wanted the ruff to be symmetrical from the back. once we fit it to the garment, we could remove any extra.
 In even sized ruffs- that is with a single depth overall, you can start at one end and make your way to the other, but a good rule of thumb is to cut just a bit more than you think you need, because it is nothing to cut away excess, rather than trying to add more in.

Almost done by this point!

Thursday, April 11, 2013

Ruff, second post

 I have to say that it is difficult to get photos of the ruffs being made. I get something cut, then voila, it is being sewn together and I am cutting something else.

Here, I caught a quick photo of K- sewing together the Crin interlayer of the ruff.  This is the substance that will give the ruff structure. The Crin and the silk are cut exactly the same, there is a 1/4" seam allowance left on the inside and outside of the circles, that will get cut away as the edges are finished.
 The Crin is seamed by overlapping the seam allowances and stitching through the layers, just to keep it as flat as possible.
The silk layers are seamed together with a scant 1/4" seam allowance. The joins between the sections are carefully marked to prevent confusion.
Once all three layers are seamed together, the task of sandwich making begins. I was careful to make sure all the sections had matched grain lines, so the circular aspect was maintained.
The three layers are pinned, then basted together by hand. You can see the basted section being rolled up as K bastes. It is very important to keep the length under control while you are working on it.
After they are prepped, K will overlock the outside edge with metallic thread, and satin zig stitch the inside curved edge which is what will be sewn to the neckband. The inside curve is zigged and cut away by hand. We tried numerous samples trying to overlock the inside edge, but it wasn't working very well, so zigging was the next obvious finish.

Ok, off to cut something else, actually another ruff, then a cape, and some sleeves and a waistband, a collar, as well as some pockets for a variety of items, and talk to boots and shoes about sword belts ....well, you get the picture- it is busy!