Showing posts with label workload. Show all posts

Tuesday, October 5, 2021

18th Century costume getting to the fitting stage

 Getting to the fitting stage.

I was going to get one fitting for this costume. 

Seven years ago I made mock ups for the first fitting because a lot of decisions get made at that stage, ones I could not anticipate, and it is much easier to correct for fit and allow for design decisions when you aren't cutting into expensive fabric. 

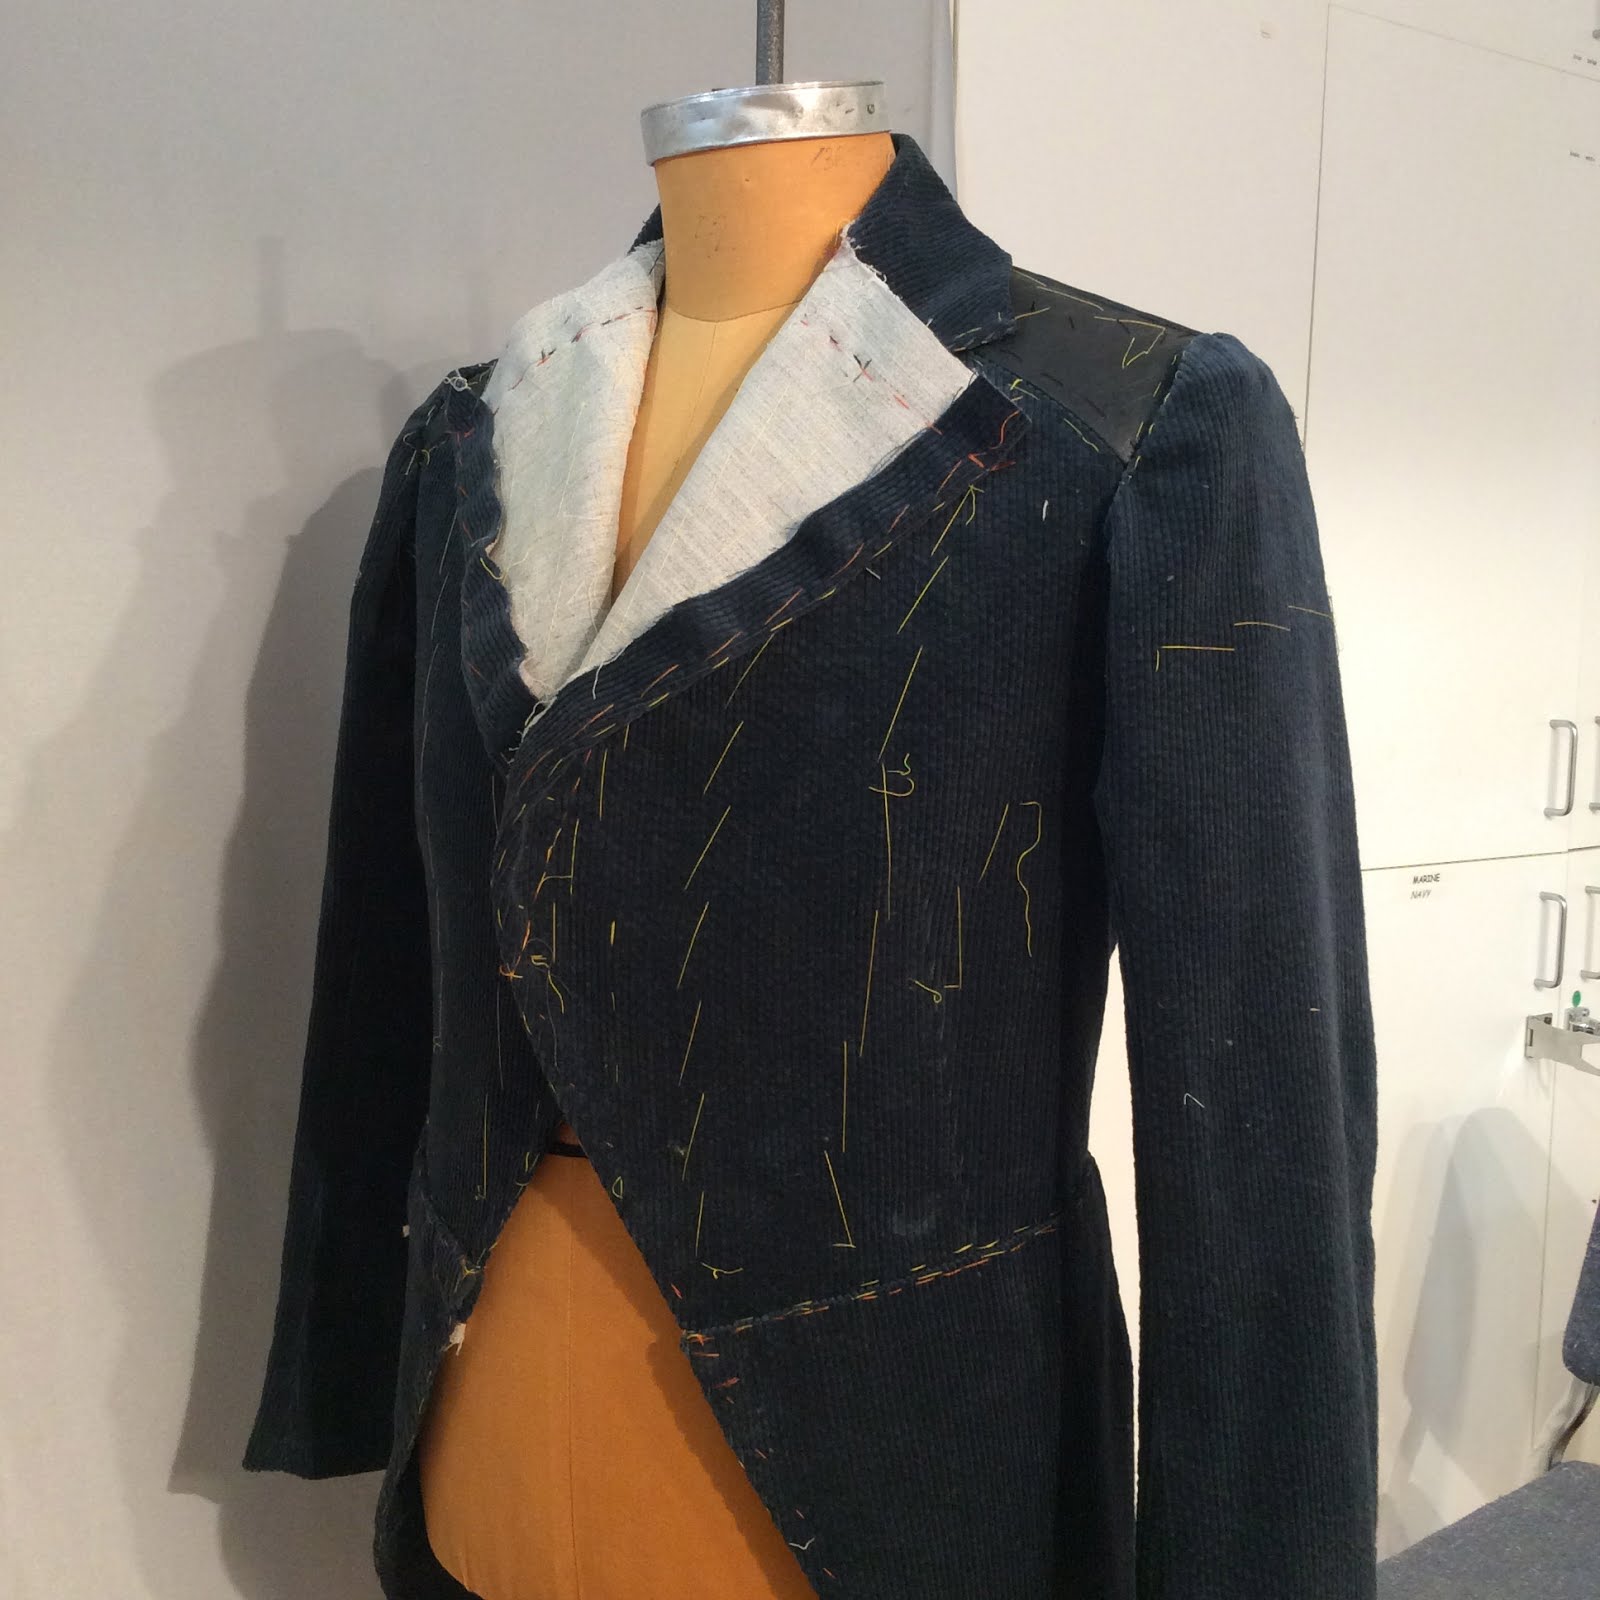
Mock ups save time- mostly in sewing time, because putting together a mock up in a cheap muslin means you can prepare it faster.  If you cut something in the real fabric for a first fitting, you need to mark everything carefully, allow inlays in areas where you may anticipate changes for fit, and sew it together so that you can take it apart after the fitting.  All of the interior structure needs to go into the garment right away as well. For instance, in a mock up I might just apply some fusible to the fronts of the coat, but for this coat, the chest canvas was basted in as well as all the interfacing to support the full skirts of the period. In the fitting, you also need to know where and how to adjust for fit, and mark changes with chalk and pins (rather than sharpie on muslin). In a mock up I might feel more free to clip into certain areas or keep seam allowances narrow, but in the real fabric, you have to be much more careful.

What mock ups don't do is allow the designer or director a chance to see the real fabric in action early on. With only one fitting, cutting into the fabric was going to give the director a better idea of what the final costume would look like.  

So, one other thing to consider in saving sewing prep time with a mock up - you can get to the fitting stage faster - but you do then have to allow time as the cutter to alter your patterns and cut everything in the fashion fabric after the fitting. 

With two weeks from fitting to delivery, I didn't feel there wasn't enough time to make that happen.  

So I cut right into the real fabric for all of the pieces. Shirt, waistcoat, coat and breeches/tights. I passed off the shirt to a colleague to prepare, I sewed the waistcoat shell and breeches/tights and another colleague put the coat together for the fitting. It did help that I had a handle on the design, and from what I could tell, the measurements didn't indicate any big challenges, but still, it felt a little daunting to go out on that limb. 

All that being said, the first thing I looked at was the fabric itself. The coat fabric was a pretty brocade lamé without much substance. The waistcoat fabric had a bit more heft but it was unstable, the shirting was a somewhat sheer poly chiffon type fabric. The fabric for the breeches was a stretch velvet.

The coat and waistcoat fabrics both needed support, and the best thing I could do was to block fuse both of them. The coat was block fused with a product I know as "wool fuse" which gave the fabric a bit more body, and the waistcoat fronts were fused with a product called "sewer's dream" which is a very light almost sheer fusible.


"Sewer's dream" on the left and "wool fuse" on the right just to give you an idea of the differences in the two interfacings


The iron and table set up I use. This is an older Sheldon steam boiler and iron. It will give me 30 psi of steam when it heats up fully. I should know what the temp of the iron head is at but I don't so I  will put that on my to do list!


The coat fabric had a paisley woven design and to block fuse this meant I had to set myself up at my iron with a metre stick and square so I could keep the fabric squared up while fusing. My iron table is 24 inches by 62 inches, minus space for the boiler so I could only fuse just over half the width of the fabric as I went. 

First, press the coat fabric - all 8.5 metres of it and test for shrinkage. Then assess how much you need to fuse; I fused 6.5 metres. Cut the fusible, making sure it is on grain.  Set up at the iron table, with the fabric at your feet, the fusible carefully folded and ready to be laid on top. Bring the fabric it up onto the table,  square up the pattern in the fabric up with the metre stick and square, lay the fusible in place and fuse a section. Shift the fabric forward, do it all again, aligning the grain as you go. I tried to be thorough, but I knew that I just needed to stabilize it as best as I could and if there were areas that needed a bit more attention with the iron I could do that after the pieces were cut out.

Hours pass......

But finally the fabric is ready to be cut!


Monday, October 4, 2021

18th century costume and wow how time flies!

Isn't it funny how when you are busy you can find more time to do things than when you are not busy?  

Four months flash by.....I was working, but boy things feel strange theses days. 

I need to get back to my posts about making my coat and my thoughts on pattern drafting for women. but I am ignoring that right now and talking about something new.

Anyway, onwards and upwards.

I received a call mid summer by the designer asking me if I could reproduce an 18th century costume I had cut way back in 2014. It was to be for a filmed version of a new Opera piece. The AD loved the costumes we had made and wanted a new version for another singer. 

Of course I could! (confident that I still had the patterns handy, because I keep a lot of my old patterns.)  In the cold light of the next day, I went looking for those patterns only to find out that during my covid cleanup at the studio, I had thrown out those seven year old patterns, because I figured I wasn't going to need them again.

Isn't that always the way?

Merde!

Nevermind....

I proceeded to redraft, to the new singer's measurements: luckily they provided me with the originals to look at so I could jog my memory, and meanwhile the designer went shopping.


It was like Christmas unpacking all the bags of lovely fabric and trim and buttons. He had made me a bit of a map as well, which was essential as we were not going to be able to work in person on this. 
I was in one place and he was going to be eight hours away working on another project. 

The other complicating factor was time, as rehearsals didn't start until September 7 and delivery needed to be by the 22nd. 
This only left a two week window after the fitting to get it all done. I know that sounds like a lot of time, but for an 18th century costume, it is not a lot of time. Luckily I had a couple people on board with me to help out. 

first step- drafting patterns
second step- prepping fabrics and getting everything cut out ( right into the real fabric!) 
third step - putting it all together for the first and only fitting.

More to come..... 


Tuesday, January 12, 2021

Keeping busy?

      In March of 2020, when everything shut down,  I was up to my eyeballs in work. It was quite astonishing how in the previous year and a half we had gone from worry about not having enough work being available, to way too much work, and then absolutely no work at all.

At the time of shut down, I had a large ongoing project for the new Swan Lake for the National Ballet of Canada, I had a project for a suit and overcoat for a tv show, and I had started back at the Festival. (once those projects get onstage or onscreen I will share, but for now I cannot)

On paper, and in our most positive outlook, it was all scheduled to pan out properly but of course it didn't. Unexpected delays, fabrics or fittings unavailable pushed all these projects upon each other. It is exactly the kind of situation that I try to avoid.  

When we were sent home from the theatre two weeks before the tech dress, I frantically used the strange gift of time we had been given to get everything back in order. Ballet costumes done as far as possible, check! Overcoat and three piece suit finished?Check!

Then what? If you work in this business you get used to deadlines and gearing up to the finish line, but the finish line became a distance blur.

We made masks, yes, many masks. When the call came from the local hospice, we were a well oiled machine of co-operation, organizers, cutters and sewers.

then what?

Well, we (myself and Lela- with whom I share the studio space) started creating projects with deadlines for ourselves! Honestly! Old habits die hard.

The first project was stretch wear- specifically bathing suit drafting and construction. Luckily for us, Pattern School Online run by the amazing Stuart Anderson had resurfaced from the depths of neglect on the internet, and it proved to be a valuable learning experience.

I made three bathing suits, and not only did I finish them, but I am very happy with them. The first was the trial run and mock up of a basic rather modest pattern. Cheap and cheery too. 


I went on a shopping expedition. I found this basic floral print fabric and I found something to use as lining- not marked as bathing suit lining per se, but something I felt would perform well as a lining. Since I was making a trial garment that I hoped would be wearable, I went old school and hand basted in the lining, and left a fair bit of seam allowance for alteration purposes. It was zigged together and tried on, then serged using a domestic four thread serger for the main seams and an industrial three thread serger and domestic zig for elastic application. I think I found patience to be a virtue in this endeavour especially with the elastic and how the machines handles the fabrics.

I think the calculation for elastic was the most challenging and most interesting part of the process. I really appreciated delving into the why and how of it all. Stuart does an excellent job of examining and explaining how stretch works (or doesn't). 

By the time I was ready to hit the beach, there were shutdowns at the lake due to overcrowding, so this piece had its debut at a friend's pool! My daughter thinks it is matronly looking but I don't care. The next one has a lot more flair!

That will be next.


Wednesday, December 13, 2017

paned breeches updated and finished

Home again home again jiggity jig.
That month away felt so long, yet went by so quickly if you know what I mean.

It is refreshing to go to Montreal. There were so many wonderful cultural experiences to see and do. Here are some of the things I did while there.
AURA amazingly breathtaking! watch the video!
Leonard Cohen exhibit at MAC , Centaur Theatre,  Boys with Cars , McGill music concert , Redpath Museum , Souk à SAT , Cité Mémoire , Salon des Artisans Récupérateurs, Beautys, wandering the old town of Montreal and Griffintown, watching the Grey Cup with friends down in Lasalle, shopping, restaurants, Loving Vincent and The Other Side of Hope

I did work too. Really! No wonder I am a little tired!

so a few work photo updates
the paned trunk hose.
This is what I did with the tulle/net to create the shape under the "paned" layer. I forgot to take photos of this.

After applying the netting, sew the base layer up. 
I had already created a zip fly in the base layer before I applied the netting, so my fronts were actually joined together as I applied the net. Sew the inseams, then sew the centre front/centre back seam.
Sew the CB seam completely up before applying the waistband. The next steps can be modified, but this is how I did it, as I needed to have a fitting before finishing. I am also trying to think ahead as to how alterations could be easily made after the fitting, or in the future.
I interfaced and applied the base waistband (just a single layer), sewing it on so the seam allowances are facing outwards. This will make sense, I assure you. I turned the top edge of the waistband and pressed it.

Next, sew up the paned layer, inseams first, then cf/cb leaving the fly area open. Sew the waistband(single layer of fabric) on as usual. You now have two pairs of "shorts"
Slide the paned layer over the base layer. Baste the CF fly opening to the base layer.
Finger press the waistline seam allowance open, pushing the seam allowance of the panes downwards and baste the waistband seam allowance of the pane layer to the waistband seam allowance of the base layer. Machine these together close to the seam.
Slip stitch the centre front fly of the paned layer to the base with a permanent stitch. 
Baste the leg openings together flat.


Fit
make any alterations- I had to take a few small tucks in the back under the seat towards the inseam. I put the tucks in the base layer and gathered the paned layer to the new size.
Finish them!


I used premade bias tape to finish the leg opening. I sewed it on, cut my seam allowances down, wrapped the bias to the inside as a facing, and slip stitched the bias to the base fabric.
joined the waistband layers together on the top and front edges.
Sew on hooks and bars.
Voilà. 

Production photo credit Maxime Cote

Sunday, December 18, 2016

padding up!

I thought there was an extra week in November and I was really disappointed to find out I was wrong!
I have been very busy and the phone has been ringing off the hook, in fact I turned down a project because I just couldn't add one more thing to the list. Anyway, I am trying to keep up with blogging.

So,  I recently made a toile for an opera costume and fit it. It is quite a challenge to fit disproportionately larger body types for a number of reasons. One is that people do not get larger with any kind of controlled change. Each person gets larger in their own unique way.
I have to rely less on standards and more on modifying my basic drafting to interpreting the person's
shape from photos that are provided. One other challenge is the pattern shapes change in ways that you may not be used to: the pattern no longer looks proportional. I often find too, that men's wear gets a bit more challenging because there are fewer accepted style lines and darts than in women's wear.

This project reminded me of something I made earlier this year: a body padding for Falstaff.
It is never easy to make a body padding nor to wear one.
The actor and designer had a definite take on the shape they were after, and what they didn't want, and it was my job to create something. (in much too short a time, I may add)

They wanted a more realistic take on what had been done here in the past.
Right.

What has been done in the past? Well, everything from layers of batting hand stitched layer upon layer to an inner base, which could be as simple as a t-shirt with a small "belly" added, to a full unitard with combinations of rigilene frameworks and small crescent shaped bags of Lycra filled with styrene or plastic beads.

They wanted the padding to act like real flesh, compressible to an extent and be more realistic looking.
OK.

I decided to try to work with memory foam. I had never worked with it before and we had a difficult time sourcing what we needed in a short time frame.
I wish I had taken photos of the whole process, but it was so busy and this show had a very "organic" approach to it, that I barely had time to think at all. Sigh.

I started with a base of fine power net/Lycra.I knew I was going to have to build up the arms and legs, so I made a pattern for a close fitting bodice and a shorts. This way I had a waist seam where I could adjust the fit if needed.  I fit the base on the actor first. In the fitting the designer and I drew on it indicating key areas that I could reference once I was back at my table. I took quite a few measurements as well, and we tried to establish a final chest and waist size to aim for.

I returned to my room and then adjusted a stand to be more like his natural shape so that we had a reference point from which to build on. This was so important because we couldn't be making major changes in the actual fittings with the actor.

I began with my own sketch of a body shape, and figured out what attributes of that shape I could try to reproduce. I have to say that this is where my early training in life drawing painting and sculpture comes in handy.
I started with the belly, using some air conditioner foam to build up a bit of solid understrucure.
I then built up and created rolls of fleshy areas with memory foam. We punched holes in the foam wherever possible to allow a bit of air flow through to his body.  These areas of foam often consisted of two or three layers or blocks of foam that had a larger piece laid over top and wrapped to create three dimensions. We glued the under blocks in place as well as the wrapped edges with plain old white glue which seemed to do the best job of the many glues we tried.
Those foam shapes were then were covered in another lightweight power net/Lycra which gave  us the means to attach the rolls to the base layer or to another roll. The pieces were kept separate to simulate how I thought real flesh would behave. So, there is an overhang/apron of foam in the abdomen and another at the waist. this allowed the actor to wear his trousers waist up under the belly roll if he wanted.  The chest padding was separate as was the shoulder blade area. The arms and legs and seat were also padded up.
It took a lot of time to figure out and make, as I was also busy with the rest of the show and finishing up the previous shows. We proceeded in stages, I would figure out a shape, hand it off to Karen to glue and cover. Sometimes the shape is not quite right and we had to modify the chest by adding in a piece of foam covered separately, as we didn't have time to re cut and recover that section.

Once the padding was finished, we could then start on the clothes.
I confess that I just draped the clothes right on the stand rather than try to draft and work it out as a flat pattern. Draping just seemed more immediate and time was of the essence by then.
I found out in a fitting after it was finished that they wanted him to appear in a set of long underwear over this padding and I just about fainted! I mean the foam we were able to get was green and pale blue, and what was that going to look like? would it show through? Could we get long underwear on short notice that covered the padding properly? Of course we ended up making a set of long johns and Henley.  At that point the actor wanted some "anatomy" made for realism's sake, which needed to be removed at one point (they gave him tight jeans to wear at one point and there wasn't enough room) so we made him a "package" using the Lycra and styrene beads, and it was a complicated bit of business figuring out how to make that work.
Oh our work is never dull, I tell you!


Sunday, May 1, 2016

checking things off the list

Today I got to check one big thing off my list!

The studio has been moved. Ten adults, two kids, two truckloads and 4 and a half hours later, done. Thanks to all my friends who helped.  Terry for providing a truck and Jeff who fixed the hydraulic lift switch at the new place, so unloading was a breeze. The kids had what is likely a fairly rare opportunity to ride up and down on a very old freight elevator- the ones with the pull down wooden gates and the kind where the operator (me) has to manually stop so the floor levels are even.

Of course the new space is not set up, and we need to do some work on it first, so everything is stacked and under wraps for now.
But one thing is off the list.
Now we can pack up the car with our daughter's belongings and move her tomorrow. I am missing a day of work but there are only so many things you can do on one week end.

I had a tech dress yesterday until 7pm and thankfully they got through a very technically demanding show. That is one more thing to check off my list as well.

I don't often list my workload here in full, but all of this list making makes me think I should let you in on how much work we have produced since mid January. This is me pattern making and with four tailors plus one extra set of hands for three weeks.
so here goes
Show 1: 1940's plus fantasy costumes- (all this built from scratch)
9 jackets
6 waistcoats
5 trousers
1 pair pleated shorts
5 long sleeved shirts
3 unitards
2 medieval gowns
2 velvet capes
2 fur capelets
1 wolf in fake fur including a tail and all supports structure
2 centaur costumes
1 bodice for a tree
1 pair of trousers for a tree (stilt walker)
1 lion cape
1 lion cowl
2 sets of leather spats with fake fur trim
2 sets of protective gear for wearing a prop
1 cowl and hood
a variety of stock costumes including 3 trousers made into shorts, 4 wraiths, a witch's footman, shirts collars, and more that I cannot think of right now.

Show 2: 1940's (all this built from scratch)
2 three piece suits
2 shirts
1 two piece suit
2 pair trousers
altering a variety of stock jeans t shirts and puchased clothing

We are already behind for the next show, so I am not sure how much spare time I will have in the next little while to post but we will see.


How often do you get to make a tree? A theatrical tailor's life is quite varied for sure!
Kudos to Heather in props who really made him into a tree. Great work!


Sunday, April 10, 2016

a man in wolf's clothing?

It has been quite hectic here with all that is going on. I think I say this a lot don't I?
I mentioned in a reply to a comment that everything is happening April 30th!
We need to assist our daughter to move out of her university digs and into a sublet in the city she is in, and I have a tech dress rehearsal on the 30th too. I guess my studio is moving on May 1st, and therefore my dear husband is on his own for the big city/daughter move. Whew!

I believe that I have been able to secure a new spot for my studio -knock on wood- but I am waiting for confirmation and a few more small details to be worked out. It is a relief, and just in time because I have more than enough stress with work and life in general.
I still need to hire a truck and finish packing up in preparation. I will also need to do some painting and flooring work before I can set things up, so I don't think I will be set up and functioning right away. Oh well, at least there is a light on the horizon.

So I actually have two shows going into tech in three weeks, one on the 28th and the other on the 30th. Then I have a small window to get a show together for the mid May period. The pace is not going to get slower for a while yet.

Here's one of two costumes that I fit yesterday, which I am quite happy with. This is an example of what I term "there is no formula" for doing the work we do. Trial and error  experience and adaptation. Or flying by the seat of your pants way of working!

This is the wolf.
This has been in limbo for a few weeks while we were backed up with other priorities. The tail was ready though! There was a lot of pattern making to do for this costume.

The base layer to this costume is a stretch legging and a long sleeved stretch top that zips up the front.
I think it should have been a unitard and it may still get joined together but for now it is two pieces.
Pattern number one and two- actually, I had to redo the patterns as I was given a fabric to use that had a different stretch factor, but there wasn't enough of it in the end to make the whole costume. So ditch those patterns, get new fabric, recalculate the stretch and make new patterns!

We also needed a pattern for the basque that supports the tail. That pattern I developed from a skirt draft. ( I am not actually following a specific draft, merely the concept of it here).

The next set of pattern making involved the fur layer.
The fur does not stretch. We have a few hanging stands in the wardrobe, but the one with a good size for the torso has legs only to above the knee, and the stands with full legs have short stocky bodies.  I decided to trust my flat pattern making skills to figure it out rather than draping something on a stand.

I then needed to draft for the fur layer and figure out how it could be manipulated to fit closely in the body and allow the actor full movement. He demonstrated some of the fight choreography (full lunges in armour) in the first fitting, so that informed my subsequent thinking.

The fur on the wolf's tail was applied in sections to allow movement, and I applied the same principle to the leg area.
I drafted up a trouser pattern outline, and then modified it to be closer fitting, then I figured out the areas of overlap.

My actual pattern is so marked up with thinking lines that I drew a little diagram of what I did.

I didn't need to cover the areas of the body that are covered with armour, such as the lower legs which have greaves, and a knee piece - what are they called?   Poleyns, I believe.

The thigh area fur is cut in four pieces. It is seamed up the back of the leg and shaped to follow the contours of the thigh and buttocks. It has an inseam and outseam, and a seam up the front of the leg where I left adjustment room- extra seam allowance.

The over layer is like a pair of short shorts.
I reduced the girth a bit as I am working off a trouser draft, which is too roomy in general. I also darted out from the CF and CB lines to the hem of the shorts in order to get a closer fit there.

The basque was made of duck and corseting and is heavily boned with spiral steels in order to support the escutcheon for the tail.
We found out that we need to shorten the spring inside the tail as you can see! Move the escutcheon piece upwards as well.
The escutcheon piece has holes drilled in it so it can be sewn on. It needs to have some kind of keeper as well, because the tail is very bouncy and popped out of the holder. Well that is what the fittings are for- figuring stuff out- what works and what doesn't.
We will then cover the basque with fur.

In the course of talking this through with Susy- who put it all together, we found that we could sew an elastic to the edge of the fur, and use that elastic as a means to attach the fur to the leggings. That means the thigh piece can be a little bigger than the thigh measurement, we can ease the fur to the elastic, and when it is attached there is still some give for muscle expansion.

The same principle with the shorts- the lowered waist can be eased onto elastic then attached to the stretch legging. This leaves the fur shorts free to move independently from the fur on the thigh. and also still be a pull on garment.
I had a lucky guess in how nicely the pieces worked together. The fur is bulky so the over layer needs to be bigger than you might think, and all our layers worked well together. you couldn't tell they were actually two pieces.

We did a similar process with the chest and armhole and sleeves. The fur elbow to upper bicep in one piece, the fur upper sleeve attached to the fur armhole facings/chest area, but left loose over the upper arm piece.
We will leave the armholes and sleeve of the stretch and fur separate so the fur pieces just float over the stretch. That should allow the most freedom of movement-  I hope it does anyway. Seemed good on the day anyway.

The other fitting was for a suit- which I guess i will talk about later as this post has gone on and taken me most of the day to get together.

Later....


also
Goodbye to our friend, Paul "eggs" Benedict, sound engineer extraordinaire, and all around lovely person.
2016 has been difficult- losing so many people we have had in our lives.


Thursday, December 17, 2015

Cutaway variation

Another body coat that I cut in Montreal.
This is a variation on a cutaway that I cut and sewed while in Montreal.


The student designer chose to have a modern twist on an 1870's inspired cutaway coat with inspiration from jeans jacket and motorcycle jacket styling. One of her first ideas was to have an asymmetrical zipper opening as in the motorcycle jacket, but keep the body shaping of a traditional tailcoat. I don't know why she ditched that idea, as I think it could have been quite fun, but in the end she came back to me with the DB 1870's inspiration and the leather yoke.
The back seaming was modified from the traditional so the seams run vertically into the yoke like a jean jacket in a way.
The corduroy for the jacket was luckily (for budget reasons) found in stock and she dyed it this colour. The leather (also found in stock) was a perfect pairing.

She wanted the collar to have quite a tall stand, and a few different inspirations, one of which was a type of modern convertible collar and the other more of an 1830's style. We ended up with more of the 1830's in feel.
I think it is difficult for students and new designers who don't really know how things are constructed to parse out what they really want. They see many pictures but don't quite "get" how particular details work or don't work or whether they can be incorporated successfully.
It is also difficult for me to describe the options of the variations and how they work without making the poor student's eyes glaze over because they really don't understand half of how things work.

In a situation where you are building a show in less than a month, there isn't a lot of time for experimentation either.


Over the month, for the men's wear, I cut and we built the cream frock coat and large described earlier, this cutaway coat, a suit jacket styled vest, a wrap skirt for a man, an asymmetrical tunic in waffle cotton with a period stand collar and strap and buckle closures. There was also a cape that incorporated a pair of exaggerated 4 inch deep pointy shoulder pads with a tulip collar trimmed in feathers, a pair of 1820's style pleated trousers, a pair of drop crotch riding breeches, a pair of ethnic inspired drop crotch trousers, plus alterations to an 18th century coat, a military jacket, and a few other bits and pieces.

We were very busy indeed!


Friday, November 6, 2015

tuxedos and tails

Ahh, this post will be a bit rambling! I feel quite tired!

What have I been up to lately?

Well it seems formal wear has figured prominently this fall. I had a call from a friend who was working on a tv show, and they needed a tailsuit in about two weeks, could I do it?

I already had commited to making some skating costumes but I did not have designs or fabrics yet  and you know what happens once you say yes to one thing, then all the other things suddenly start to happen!

So I said yes and the fabric arrived two days later. I started patternmaking, then cutting and then we made up a period tailsuit - waistcoat, trousers and coat, using very inadequate measurements, no fitting and crossed fingers.
Rush job number one!
Of course part way into the process, I received designs and fabric and the deadline info for the skating costumes. Yikes!
These had to have a fitting- just time for one fitting mind you- and the only time that everyone was able to be together- skaters, myself, and the designer, only left us a window of 5 days to finish and deliver.
That was rush job number two.

It had its share of challenges stretch fabrics for a tuxedo, non stretch for a sweater like garment....which I hope to get time and inclination to organize my thoughts so I can post about it!

A big sigh of relief when I received messages that everything was great and off they went to compete, and they won! Hurray!
Three days later I get an SOS message, and it turns out they needed to change their program completely and they had two weeks to pick new music, do new choreography and have new costumes made. Could I do it?
What can you say?  How terrible for them to be put in such a position!  I said yes.
So the change was to a tailsuit, with a nod to the Edwardian era, and with a bit of ambassadorial splendor.
So trousers, waistcoat, bow tie, order and medal, sash and a tailcoat. The fabric arrived Friday morning. I cut all day Friday, we sewed Saturday, fit it on Sunday and finished it on the Friday.  They tried it on ice on Sunday, and flew to their next competition Tuesday.
Rush job number three.
Oh, they won by the way! yay!

Then I got sick. Of course- too much stress and your body kicks you when you are down.

I leave tomorrow to work for a month in Montreal.
Four weeks to cut and make a show- which compared to what I have been doing, seems like "bloody luxury" as we say -but I am sure it will have it moments of being a rush job too.

Here's a photo or two for good measure. They were taken from their tumbler site. No photos of the tails for the tv show- I don't know if it has aired yet....

These two - Andrew Poje and Kaitlyn Weaver are just wonderful - as athletes and as people- they are as lovely as they look.


 That's all for now, I have to go and pack.

Thursday, June 25, 2015

Trunk hose: the outer fabric layer

It is very difficult to stop and get photos of the process!
I have a lot of cutting to do and it is beginning to feel like not enough time to get it all done!
This is a very familiar and unwelcome bit of stress. Sigh.

Well, the under structure for the large trunk hose was discussed in the last post, and, to recap, I am building an under trouser base, onto which is attached the structure that will give the finished garment some shape. Then we will construct the outer fabric which will go over the structure and then marry the layers together.

These trunk hose need to be very large, and one of the challenges is to reduce a large amount of fabric to fit the leg, just above the knee. My pattern is approximately 100 inches from front to back fork.
I need to reduce it down to 18 1/2 inches or so. One way to reduce volumes of fabric is to cartridge pleat it. This technique is very similar to how we make our figure eight neck ruffs.

I calculated 3/4 inch pleats to be stitched at every 1/4 inch so that means every inch of finished pleating uses up 6 inches of fabric. If I made it 1inch pleats, stitched at every 1/4 inch then that would use up 8 inches of fabric.

I set up the pattern to have 84 inches of fabric to be pleated into 14 inches, and the remaining fabric to be gathered to fit the leg.

Here is the pattern being laid out.

You can see a dart here that marks a transition point between the cartridge pleated area which must be a straight line, and the area that will be just gathered.

I am using double faced silk satin here, and it will also be "pinked" or cut full of holes to show another colour of silk through the cuts.

I will leave a 3 1/2 inch fold over for cartridge pleating. The fold will be stabilized with a bit of lightweight bias wigan. This fills out the silk and also gives a sturdy edge when stitching the pleats down.
This 3 1/2 inch fold over also gives us a seam allowance to attach the coloured silk to.


I can't fit the whole leg into the picture frame!
In this photo you can see the silk attached and the 2 parallel rows of stitches for the cartridge pleats.


You must use strong thread here, and mark your stitching points accurately. you stitch down on one point and then come up through the fabric at the depth of your pleating, so ours is spaced at 3/4 inch.
We got this far in preparation before we were able to get an answer regarding the pinked cuts to be made in the black outer layer. Once we had our answer, we peeled back the yellow silk and marked out the grid of cuts to be made.
Here you can see the leg from the right side, with the pinked cuts (cuts on the bias), as well as the effect of the dart which helps the fabric turn the corner toward the inside of the leg.


After this the two fabrics are joined together as one in along the seam lines. we then serged them together to keep everything from fraying.

Next up is the pleating, and making them into a wearable garment.

Just a note of thanks to Shona for her hard work and willingness to think through the process with me!

Saturday, May 30, 2015

week 19 and 20, so far so good.

I think all my "get up and go",  got up and went!

Here we are at the end of week 20 and I have fallen behind in my posting.


Well the table still looks tidy in week 19. The sample modern suit is still hanging around, and I have someone working on the one I cut, getting ready for a fitting. We were just finishing up our understudy costumes, so many fittings were still happening. Sometimes another actor is just the right size to wear someone else's costume, and that saves us time and money when that happens. Occasionally the understudy is no where near the same size as the original actor, but luckily we have 60 + years of stock costumes to find something appropriate. On the rare occasion that nothing fits and nothing is found to be appropriate, we build an understudy costume.  I have been lucky so far this season and nothing has to be built from scratch for the understudy.

That being said, we were still working on the Naval uniform which is the actual costume that will be worn in the show. The actor has a stand in uniform that will do for pre-views until we can sub in the new one.
Here it is in process.


I don't think I got a final photo of this one, so I will have it sent back next week to do so. I was trying to take some pictures of the patterns as well, so in the fall I may have a bit of a pattern show and tell.

I have also started on one of my next shows which is set in the mid 1600's, and here is my table in week 20.


I confess I feel a bit battered by bouncing back and forth between the centuries sometimes. 
I had the 19 century going on with the Naval coat, still doing fittings and notes on the 18th century show, plus I have a modern mid 20th century suit to make and now the mid 17th century plus an Elizabethan show to start next week.

Enough for now, it has been an intense few months of work and a few more months are coming before I will be taking a well deserved break- of course that means I will be unemployed! 
such is the life I lead.
Take care, and  enjoy your days off when you get them.


Sunday, May 17, 2015

week 18 begin again

This is the time of the season where you find youself dazed after pushing through with that last show only to find that the pressure suddenly ceases and you wonder what happened. It can feel like racing towards a brick wall and then hitting it in full stride! Hey you made it!
This is also the time when we try to get the understudies fit and start on another show or three.
Here's what is on the table this week-
Slightly tidier! 
I haven't really sorted my patterns out completely as I needed to make a suit mock-up for a fititng this week. I rarely have to make really modern present day suits and when I look at a modern rtw suit jacket just to check out details, I am often astounded by things. Armhole size for instance. I am accustomed to cutting a small and high armhole. I don't think it is excessively small, but in comparison to modern rtw it is. Of course I am cutting one offs to fit an individual -not the masses- but the modern Brioni jacket that I got to look at after the fitting had an armhole that measured 60cm for a 40R size. That was 7cm bigger than the armscye measurement on my pattern. It was also very broad across the back maybe almost 18 inches if I recall correctly and the shoulder point to shoulder point measured 18 1/2 inches, yet the fronts measured a scant 15 inches across. Very interesting.

Most of the fabrics have been returned to the cage, the dresser bags- which consist of repair kits of fabric, buttons and trims have been made up and delivered to the heads of the maintenance crew. I also had meetings for the two other shows that I need to start right away, and while doing that I will be dealing with 7 outstanding understudy fittings and building a Naval frock coat. 


Speaking of the Naval frock coat, I cut directly into fabric for this, and the whole team took part in getting it basted together for a fitting. I have never built anything for this actor, so I was a bit apprehensive about cutting right into fabric but I did it anyway. 
Here it is after the fitting.
He is a rather portly gentleman, and the stand isn't padded out for his belly, so this photo isn't a great indication of fit. 
I had to lift the skirt at the waist where you can see the pins, (it was falling in towards the body slightly) and I took in the side back area about a full 1/2 inch on each side of the body, and 3/4 inch at the waist. It needs to fit tighter than you might imagine because he will wear a belt (and sword) and as soon as a belt goes on and is fastened tight enough, you almost always need to snug up the fit at the waist. 
I need to flare the skirt a bit more, and adjust for the CB skirt overlapping slightly at the hem. I also need to adjust the run of the waist seam slightly to hide the seam underneath the belt he will be wearing. We debated about leaving the waist seam at the bottom of the belt which is where it lay in the fitting, indeed in some references there is a visible button beneath the belt, but that was a bit later in period.
What else?....Oh I misinterpreted the lapel shape so I will change that and the sleeve flashes are a bit big, so a slight reduction there too.
Now to rip it down, mark the alterations and get it trimmed and finished.

We are all a bit tired at this point in the season, but we have a long week-end to rest and gather our wits about us as we head into the build period for the later openers.

Today, I was hoping to go to the lake and do a bit of beachcombing and wandering about, but it is raining! nevermind, sometimes that is the best weather for it, so off I go....


Sunday, May 10, 2015

week 17 = relative calm?

Well that was a crazy couple of weeks! Those coats that were lined up in front of the table have finally  gone to their place in the dressing rooms. Even the cape that was standing sentinel for weeks made it to the dress rehearsal. It had a bit of basting left in it and needs some finishing, but it was wearable. I even had time to clear up some of the mess and I have found my table top again!
Friday was particularly hectic as I had three fittings, a quick change rehearsal at another location, and a tech dress in the afternoon. After the rehearsal we went out for a well deserved beer and some food, then home where I immediately sat down and fell asleep.
I think everything went well apart from a pair of breeches in a horrible ultra/fake suede. I don't know if you have ever fought with a fabric but I sure did with that one. I think we will be making a replacement pair  this week!
in case you were wondering, this ultra/fake suede is likely upholstery quality- it has absolutely no give, it is extremely bouncy and resistant along the weft, so much that you cannot gather it- it just fights you- yet along the warp it will fold completely flat. If it is cut as you normally would, it looks like you are wearing a barrel, and cut the other way, well, lets just say that the seat of the breeches was odd looking! It also has horrible static cling, so the legs kind of clung to the actor in odd ways. Not good.
Note to self- just plead for real leather or suede!


Here was my table on Thursday- I was trying to organize some paperwork and also to draft up a pattern for that Naval frock coat you can see in the sketch.
It is a tale of woe, and a mistaken belief in Internet purchasing to solve budget crunches that leads me to be drafting again for our 19th century show.

Beware you who think that you can order quality costumes off the Internet to save money.
Give your head a shake too if you think that anyone will even look at the measurements you send even though you think you are getting a "custom-made" product.
The "thing" that arrived (on the day we were onstage) was so bizarre that I couldn't believe what I was seeing. It wasn't just the fact that it did not fit the actor, nor had any proper shaping, or proportions that related to the human body, and it was not a full skirted frock coat but a weird tailcoat like thing.  The skirt was a strange one piece apron of fabric, bagged out with coarse cotton duck as a lining with no centre back vent opening, no relation to anything that it should be.
We dubbed it the "manatee" perhaps because it reminded me somewhat of Tenniel's drawing of the walrus from Through the Looking Glass by Lewis Carroll.

Suffice to say that I am making one now.

That is for tomorrow though.

Friday, May 1, 2015

week 16 with trim!


This was the view on Monday at the front of my table. Three of the five coats for the 18th century show are prepped after the fittings with their respective trim and buttons. That pesky cape is still there, and honestly, it was still in the same position on Friday. This show is on stage a week from today so I have to get someone to work on it next week- it has just come down to the wire.
Now the view from the front looks in control but the view of my table is not.
Bags of trim and buttons for all five coats, waistcoats and breeches were in the process of being dumped out, pinned on, discarded, confirmed, mixed up, reassigned, organized and kept track of all through the day. I did finally get some space cleared to actually cut something- it took a concerted effort to make sense of it all, go to other fittings, answer questions, and get out 19th century show on the racks for Wednesday. 

Do you ever get to the information overload point? I sure did this week. At the end of the day I just felt the I couldn't make another decision- I was just out of answers. On that note, I am taking the week end off, and recharging because this coming week will be very busy. More on that later.


Thursday, April 23, 2015

Counting the weeks:14 and 15 with an overcoat update

It was getting kind of crazy around the work table over the last two weeks. I put in many more hours than I would have liked to, but the work has a deadline and we do strive to make it work!

That cape in front- will it ever get worked on, and will it ever get out of my line of vision? Soon, I hope someone will be free to work on it.


I included a shot of the wall behind my table just to give an indication of how many patterns I have churned out in the past 14 weeks. I don't make separate patterns for linings or facings so these are just the basic pattern pieces. 
For the 18th century show, I have to cover the builds and stock costumes for 8 different actors. I have 5 skirted frock coats, 6 pairs of breeches, 5 waistcoats, one shirt, 2 capes, one sleeved casaque style cape, and cut, make and finish 9 stocks/cravats. Repair and or renovate three coats, 3 pairs of breeches, 3 shirts, 2 new waist coat backs on old waistcoat fronts, reline a old cape and sundry other things like changing buttons, repairing linings, adding pockets...... washing and ironing 5 new shirts.....it does go on!
Anyway, it adds up in the pattern drafting department!    

Here is an overcoat update. I documented the toile version of it here along with the waistcoat, which has turned out quite nicely. The coat is going to get a removable capelet, and I still need to tweak the set of the sleeves but it is turning out very well- We have also constructed it slightly differently than usual, and I will get some more photos detailing how it was made this week.

That's it for today. 
I have to switch gears and get a pattern for a 1970's "ish" suit drafted up and to be honest I need a day to wrap my head around the change from 1760 to 1970! Maybe I will do that on Saturday when I will have fewer distractions at work.

Saturday, April 11, 2015

week 13 going on 14

The weeks are starting to feel as though they are running together!

We made it to our first deadline easily, which for the first show, is the quick change rehearsal.

We were able to get our actors changed from one costume to the next in a matter of 90 seconds at the rehearsal, and it usually gets faster as the season progresses. Yay!

Sometimes though, at QC rehearsal, it can feel like bedlam backstage- especially when you have many actors changing at the same time. I have seen traffic jams of chorus girls, who all entered a dressing room to change, only to get stuck getting out because their costumes and headdresses took up so much room.

The next deadline after quick change is rack check, and for this show I believe there were 10 or 11,  8 foot long rolling racks of costumes. The dresser sheets contain every actors track, detailing their costumes and the changes they make through the show. Two people from the running crew come in and check off every item of clothing for every actor and every costume change.
A sheet for an actor would read something like this:
white t-shirt, nude dance belt or underwear, black dress socks, formal wing collar shirt with quick change front, black wool trousers, white pique waistcoat, black wool tailcoat, white pique bow tie, gold wedding band, onyx cuff links, black patent lace up dance oxfords.
They would change into:
white singlet, underwear as in #1, navy blue argyle socks, blue and white striped dress shirt, blue wool trousers, blue wool waistcoat, blue wool SB jacket, navy and red striped tie, grey overcoat, gold wedding band as in #1, silver cuff links, watch with leather strap, oxblood lace up brogues, dark grey fedora, chamois gloves, grey woolen scarf.

So it takes two people four hours to get through the rack check. Then there is always the list of what is missing and when it will be ready and after all is accounted for, we get to watch our work onstage at the tech dress rehearsal. This is the first time the actors will run their show with all the technical elements together, so there is a lot going on.

Back to the table though. I have a new show to discuss with a designer on Tuesday and although we are in pretty good shape with the next show up, I feel very behind for the third show. That is our 18 century show, and you can see that I am cutting one of the coats in the top photo and after a long day yesterday with the tech dress, I was in this morning cutting another coat out for that show, and piling up the work in baskets on my table.
I like to feel that I am ahead, but it worries me when costumes sit there in pieces for more than a day or so.
Monday then, I think we will make a group effort to get at least one of these put together and that will give me a sense of relief.