Showing posts with label tailoring. Show all posts

Thursday, October 14, 2021

Collar structure and the importance of ease

     In some areas of a garment we may want substantial support and we need to figure out a way to create that structure with interfacing. We want that structure to not compress, squish down or lose its shape over time.   We don't want that interfacing in the seam allowances though because that will make them thick and bulky.  

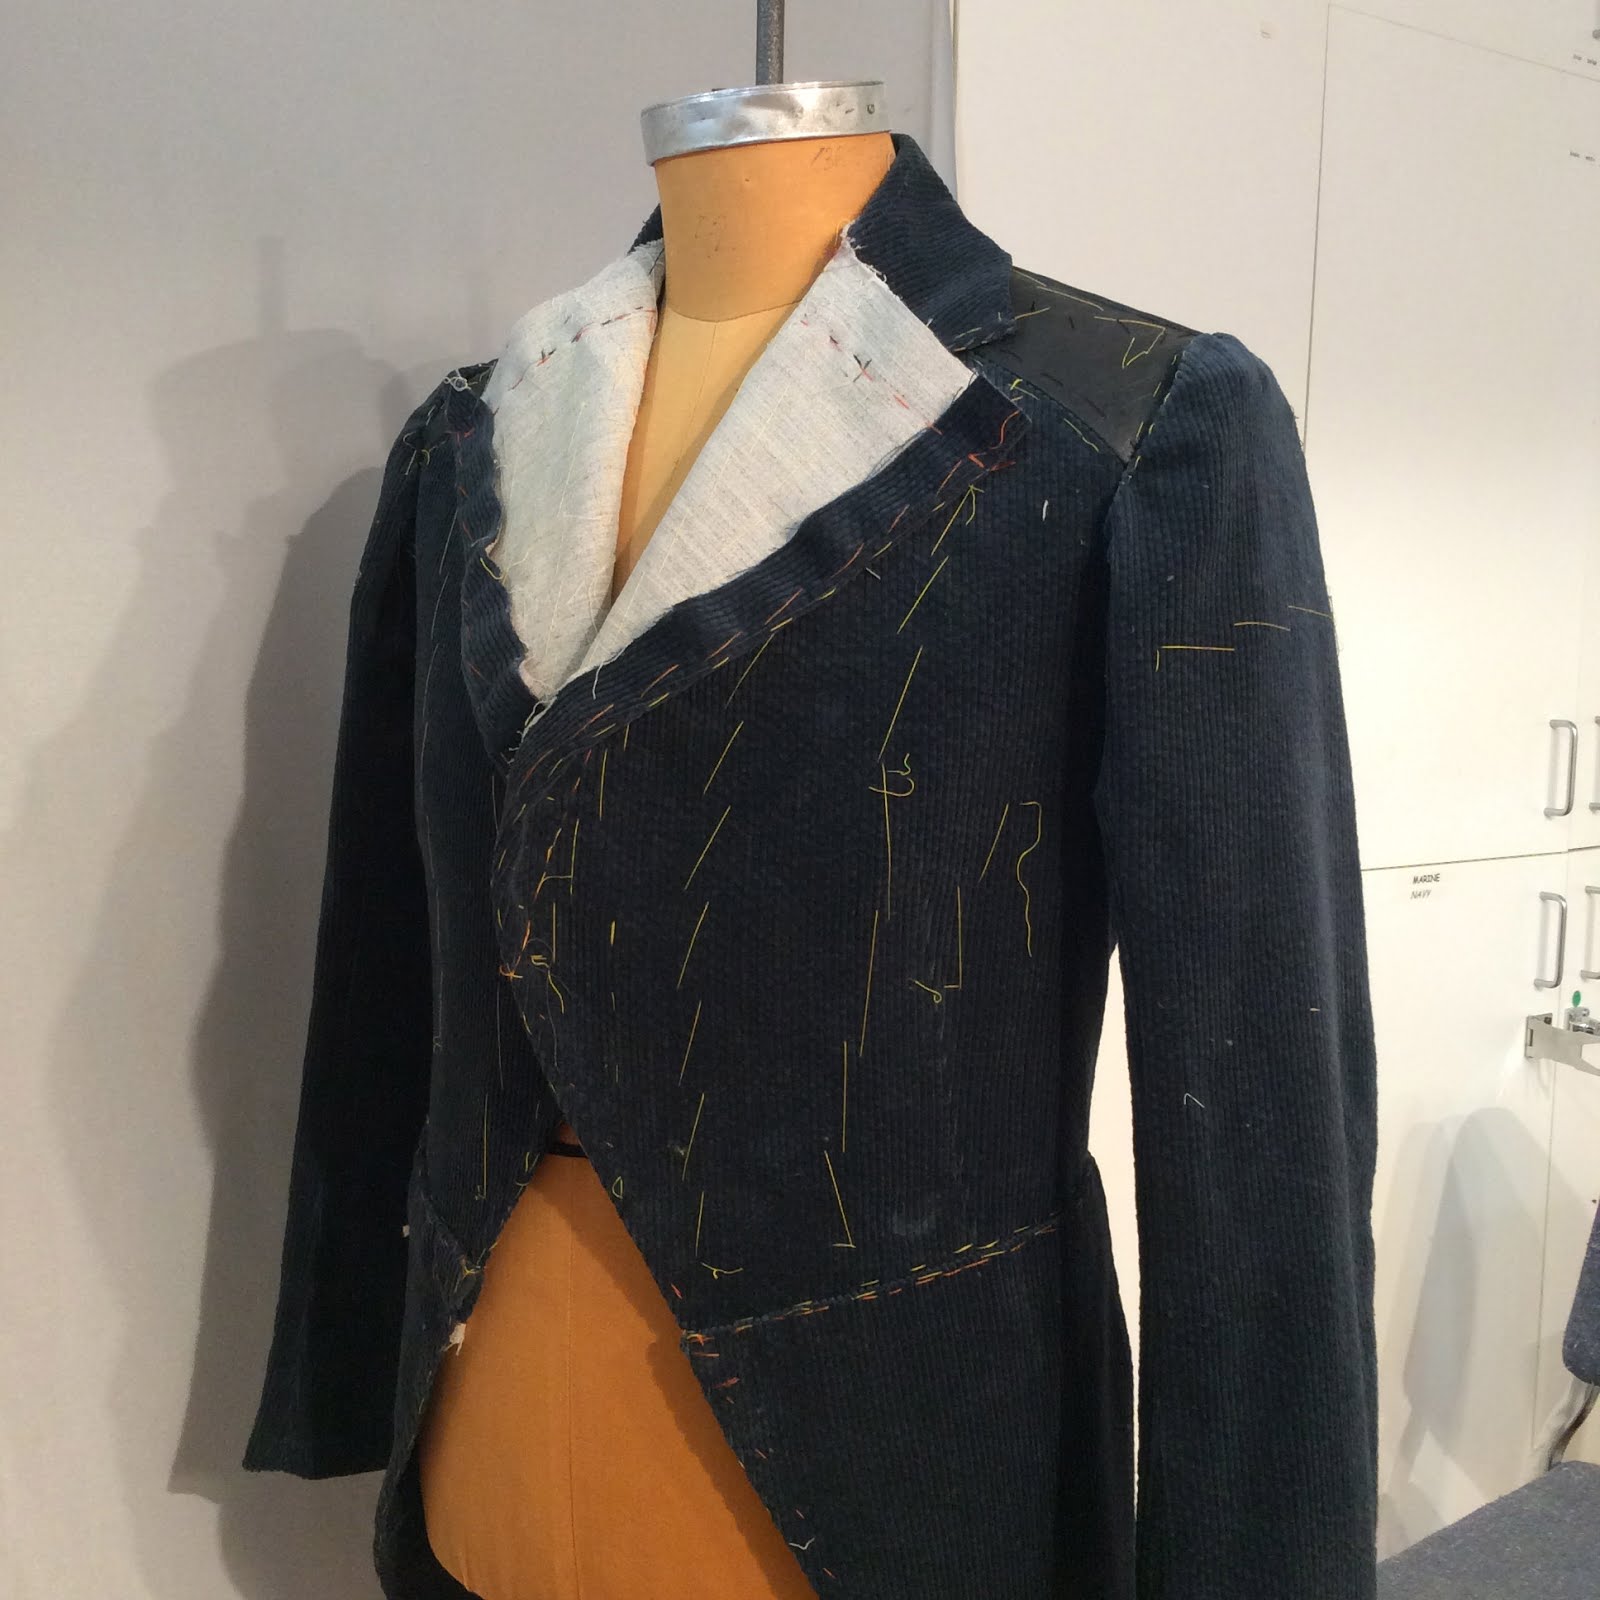
The choice of structure in a collar for instance, could be something as heavy as buckram or multiple layers of collar canvas ( sized linen ) put together with or without a "glue" to hold the layers together. 

Here I have made a rough sample of one layer of linen collar canvas fused (with stitch wichery), to one layer of hair canvas. This may or may not be enough for your purposes,  you need to sample different materials to get the right combination.

If you use multiple layers laminated together with a fusible you should stitch through the layers to ensure they will not de-laminate over time.


Cut the laminate to the finished shape and size required - no seam allowances.


Laminate and cotton ready.


Stitch through the layers to hold the laminate together permanently.


Cut a piece of thin cotton larger than the laminate  

stitch the laminate to the cotton, stitching through all the layers again. 


Trim the cotton leaving a seam allowance beyond the edges of the laminate.


Cut your fashion fabric leaving ample seam allowances 


Baste the fashion fabric onto the laminate/cotton. *


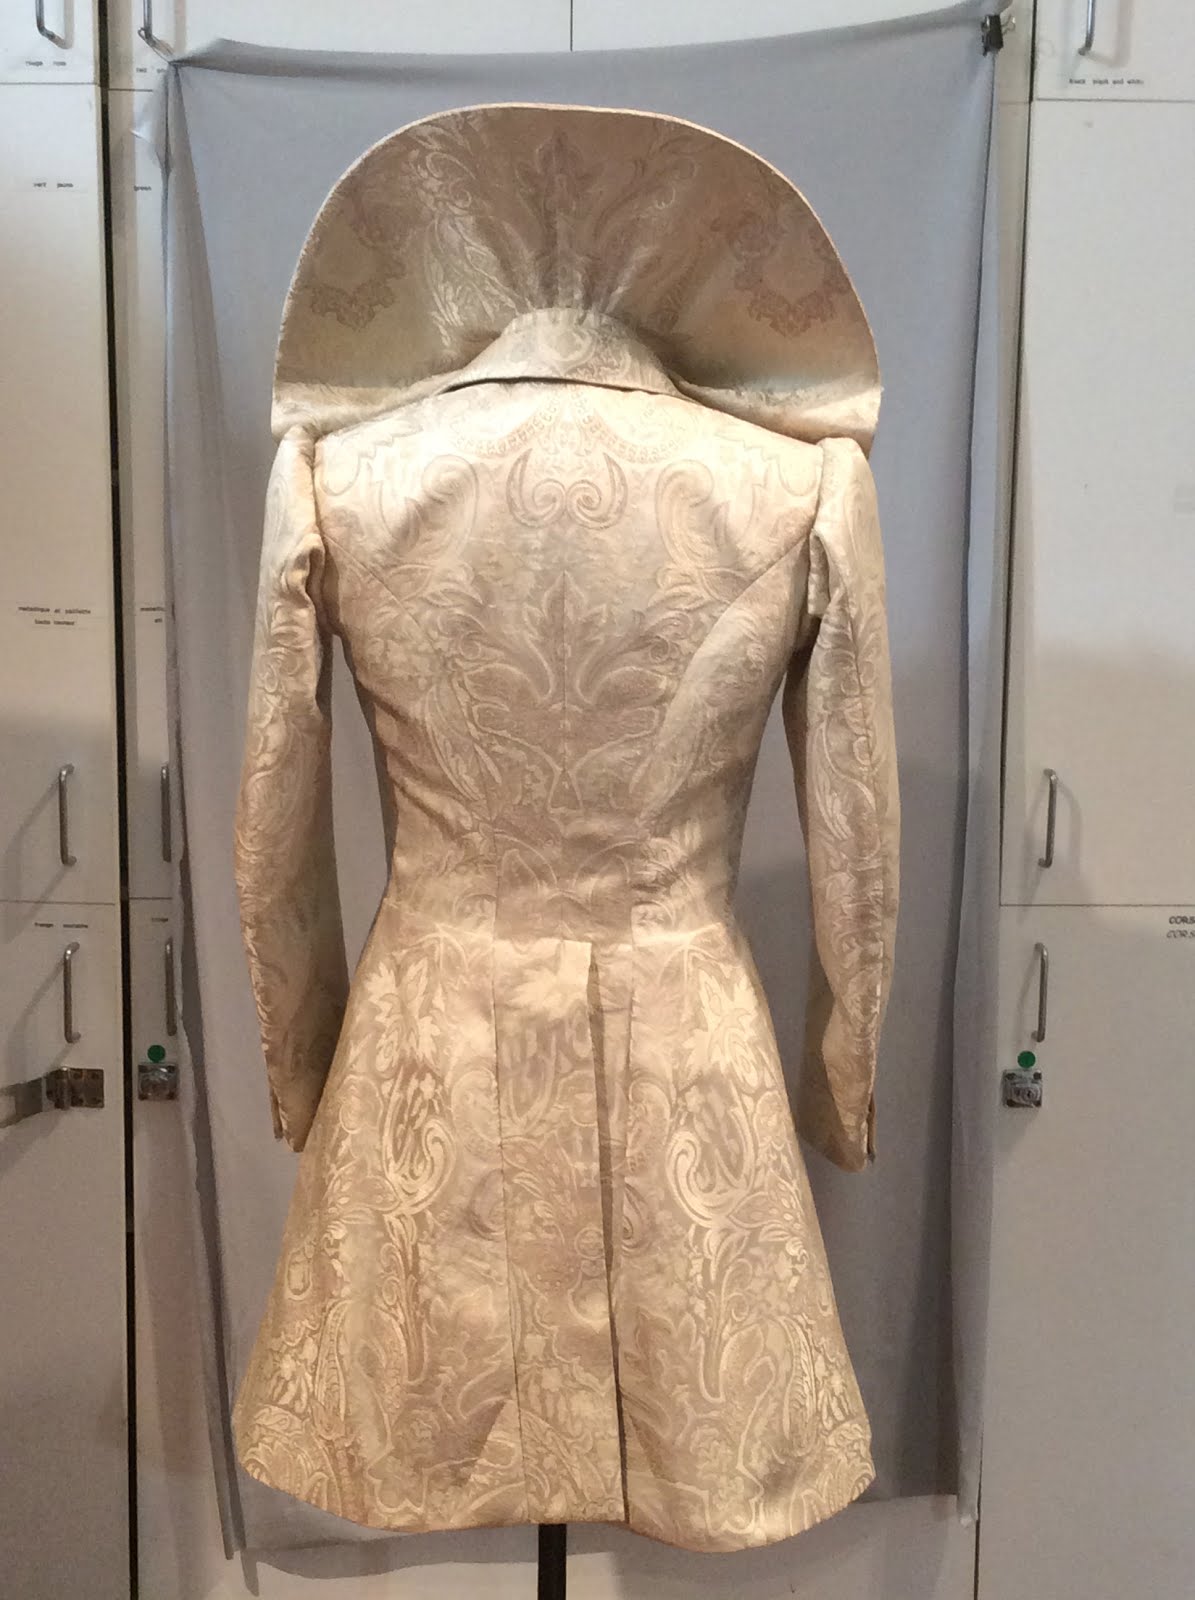
* This is important- Baste the fashion fabric to the laminate/cotton over your hand, or a ham or tailor's egg to give it shape. A collar is going to go around the neck, so think of it as a partial circle. The outside of the circle is larger than the inside of the circle so the fashion fabric needs to be slightly bigger. If you just apply it flat on the table, it will resist being forced into a curve and will spend the rest of its days trying to lay flat again, and it will be trying to do that while attached to your jacket! 

The fabric thickness should be accounted for as well. Don't forget about turn of cloth! It takes a bit extra ease and seam allowance to wrap a thick fabric around the interfacing to the inside than a thin fabric. 

join the laminate to the fashion fabric by stitching about 1/8 inch away from the edge of the laminate through the layers.

Lay it flat on the table- see the slight ripples? You need this ease in the fabric to make a successful collar.


The same technique is used for the cuffs which are actually joined into a circle. Once you sew the cuff seam creating a cylinder you do not want to see any buckling of the structure.


Friday, April 2, 2021

lockdown project- a coat for myself

It seems that spring is here, and it is time to switch out the winter clothes for something slightly lighter. That makes me remember that I had another lockdown project I can tell you about. 

I made a coat for myself. 

I still have the first coat I ever made for myself, way back in the early 1980's. It was a Vogue pattern, I believe, I bought the fabric at Duthler's in London Ontario- they had nice fabric in the day! Sigh.

It was a classic cut, DB camel coloured tailored coat. I haven't worn it in decades, I did love it, but, it was time to make a new coat. 

First-design- I had to pick a style. Oh gosh, I had so many pins of women's overcoats on Pinterest that I liked but I couldn't decide on any of them. Then, I saw an online ad for a winter coat at the Bay, and I liked it enough that I thought I could use it as a jumping off point. 


I did a little drawing first. 


Then I got out my base/block pattern that I drafted and fit on myself last year.


I made a pattern, started a mock up and realized it had way too much ease allowance, so I started over,  made a new pattern and cut right into fabric. I figured I would baste it together and try it on as I went and make adjustments to the style and fit on the fly.

Maybe not the best decision, but in my defense, I had what I will call "Covid Brain",  very fuzzy thinking, and I had the time to spend. 

This project also provided something I had been lacking since the lockdowns, and that was a deadline! I planned to have it finished in time for my working gig in Montreal.

I muddled through. I am sure Lela thought I was crazy at times when we were working in the studio together but it all worked out in the end and I got a coat out of it.

I will show you some of the stages in the upcoming posts.


Friday, March 12, 2021

Drafting on the computer

     I have been trying out some new things this past year of Covid woe. For someone like me who is used to having problems to solve on a daily basis, this year has been a challenge in the absense of a sense of purpose and accomplishment.

    One of the things that I am using for a brain exercise, is learning some new things on the computer. I have been seeing so many patterns by Indie designers out there available for digital download, and I wondered what software some of these people were using.

    I thought that I could learn to draft patterns with the computer and started a search for software (affordable) with which to do this. 

    I have no experience using the computer for this task and I love, love, love, drawing patterns on paper, so I am not likely to give that up by any means.

    I started this journey with Inkscape, and began teaching myself some of the tools of that program. It was quite enlightening, I learned a lot - much of which may not have lodged firmly in my brain, but it opened up a door to a place I had never gone before. It was interesting and there are so many helpful YouTube videos out there that made the steep learning curve ever so slightly scalable- hats off to Logos by Nick for an excellent set of tutorial videos, even though I had to stop and start constantly because at his slowest I still was struggling to keep up.

    I decided that Inkscape was not the pattern making solution for me.  I am keeping it in my back pocket but decided to look further afield.

    I encountered a program called, Patternmaker Pro (closed down recently)which also did not work out for me- I could hardly get started and I was not looking for plug and play solution. I want to be able to control the parameters of my own drafting.

That then led me first to Valentina and then Seamly2D

    I am still learning the software and the tools with in it, but I have been encouraged by my progress so far and also by the welcoming and helpful forum of users.

Here is a little learning exercise I did recently.


This is a replication (just as written) of a vintage waistcoat draft.


It is a challenge for a paper and pencil gal to adapt, as following the process as written works well with paper, but isn't in the best order of operations for the computer.  I do like a challenge and this has been a lot of fun to do.

I don't necessarily have a plan beyond learning right now, but who knows, this may come in handy in the future.

I might become an indie pattern designer of period menswear😉

What do you think? Do you use a drafting software? Any advice?


Friday, January 1, 2021

Well, shall we get back to it?

 Good Question. Shall I get back to it? What is it I want to get back to? Not to make this tailoring blog  a confessional, but these are questions that I am asking myself.


Where do I go from here may be a more pointed question. The past three years (that is shocking!) since I last posted seem have flown by in a mishmash of illness and stress and just carrying on as best as I could. The past year has hit our industry particularly hard and I have friends and colleagues around the country reeling from the blow. Almost all avenues of making a living as a theatre professional have disappeared, although film and tv work is continuing on, not all of us are able to, or desire to tap into that side of the business in a full time manner.

So, standing at the edge of 2021, looking over the edge, I think that I need to come up with a plan, and I hope that I can come back to the blog and perhaps with a few adjustments, move forward with learning some new things and bringing you along on the journey.

I wish you all the best in the year to come, stay safe, be kind.

Cheers.

Art installation  Entre Les Rangs  by Kanva architecture at Place des Arts/Quartier des Spectacles Montreal


Thursday, November 3, 2016

mid 1950's references

I posted photos of the mid 1950's jackets that I recently made, and I thought it might be interesting to show some of the references I used to make my patterns.

There were the sketches and visual reference provided by the designer, but I like to research a bit more in order to make the patterns. I like to look at various drafts of the period I am trying to recreate but I don't actually use them because I don't have time to find out if they do or don't work on someone else's dime. I use my basic drafting set up and modify from there for fit and style.

I have a small collection of reference materials to use, and here are a few things that helped me.
I have had some opportunity to make 1950's  suits before but I think I really was not successful in getting the silhouette right. I was determined to do better this time.

One thing I found was a chart showing proportionate back widths for jackets- you can see they offered three distinct widths for each chest size, depending on the style of jacket the customer wanted-
1. regular
2. modified drape or wide shouldered young men's
3. drape coats or lounge coats


You can see that for a size 38 the back width could be between 8 1/8 inches  and 8 3/4 inches

Compare that to the standard proportion of  approx 7 1/2 inches for a size 38 across back.


We wanted a more extremely young men's shape for these jackets and in looking at some of the period photos of these musicians, and other people of the period, the jackets were quite roomy, boxy and slightly oversized, and long. The waist shaping was minimal, the visual waistline was lower than the natural waist and the hip was quite slim. The shoulders were wide and quite square, buttoning point was lower, hence longer lapels, and pocket placement was lower as well.


These pages give an indication of the body silhouette, shoulder width, waist shaping, and overall jacket length.

These jackets were for young men so you can see that the studio style is longer, has lower set pockets and less waist shaping.

The length for someone 5'10" is 32".

Suit drafting uses a formula to determine length and a basic jacket length calculation is half height minus something- minus 4 inches or 1/2 h minus 1/16 of height.
If the actor is 5'10" (70") /2 = 35 minus 4= 31 inches
in metric which I prefer to use
178cm/2 = 89 minus 11.125cm = 78cm (30 3/4")

So these jackets are longer than that.
for 5'10" 70/2 = 35 inches so 35 -3 would give us a 32" length.
for 6'2"   74/2 =37 inches so 37-3 = 34 length


I started then with this information in hand, set up my drafting as I usually do, and made modifications until I though I had a good idea of where I was going.
I then cut out a half jacket in some cotton I had and put it on my stand. I photographed that and sent it to the designer for his input.
Once that was done, I took an idea from my colleague Evan and I drafted in half scale to show the changes and modifications to my basic draft. This is what I then referenced in making the subsequent drafts for the other jackets.
That half scale draft is now tucked away in my files for future reference.

Thursday, December 17, 2015

Cutaway variation

Another body coat that I cut in Montreal.
This is a variation on a cutaway that I cut and sewed while in Montreal.


The student designer chose to have a modern twist on an 1870's inspired cutaway coat with inspiration from jeans jacket and motorcycle jacket styling. One of her first ideas was to have an asymmetrical zipper opening as in the motorcycle jacket, but keep the body shaping of a traditional tailcoat. I don't know why she ditched that idea, as I think it could have been quite fun, but in the end she came back to me with the DB 1870's inspiration and the leather yoke.
The back seaming was modified from the traditional so the seams run vertically into the yoke like a jean jacket in a way.
The corduroy for the jacket was luckily (for budget reasons) found in stock and she dyed it this colour. The leather (also found in stock) was a perfect pairing.

She wanted the collar to have quite a tall stand, and a few different inspirations, one of which was a type of modern convertible collar and the other more of an 1830's style. We ended up with more of the 1830's in feel.
I think it is difficult for students and new designers who don't really know how things are constructed to parse out what they really want. They see many pictures but don't quite "get" how particular details work or don't work or whether they can be incorporated successfully.
It is also difficult for me to describe the options of the variations and how they work without making the poor student's eyes glaze over because they really don't understand half of how things work.

In a situation where you are building a show in less than a month, there isn't a lot of time for experimentation either.


Over the month, for the men's wear, I cut and we built the cream frock coat and large described earlier, this cutaway coat, a suit jacket styled vest, a wrap skirt for a man, an asymmetrical tunic in waffle cotton with a period stand collar and strap and buckle closures. There was also a cape that incorporated a pair of exaggerated 4 inch deep pointy shoulder pads with a tulip collar trimmed in feathers, a pair of 1820's style pleated trousers, a pair of drop crotch riding breeches, a pair of ethnic inspired drop crotch trousers, plus alterations to an 18th century coat, a military jacket, and a few other bits and pieces.

We were very busy indeed!


Friday, December 11, 2015

Montreal and more formal wear

Oh, It has been quite a while between posts!
I have just returned from Montreal where the formal wear trend continued.
It must be in the air, or maybe the water, who knows?

First a lovely early morning view from my window. I admit to having a bit of culture shock coming home- where have all the buildings and the people gone now that I am home?


One of the costumes I made happened to cut was this frock coat in a lovely brocade.
It was a good learning experience I think, for the design student. She bought 4 metres of fabric, all that was available in fact, and then we worked it out. I did make a mock up, because I knew there would be no room for error or major changes.

It does not fit the stand quite like it fit the actor, I assure you! He has a much more erect posture hence the extra length showing in the front. The single low button doesn't give a lot of support either. He also wears a Farthingale over it as the Queen, which does complicate things a bit!


The big "collar" is used when the actor appears as "the Queen" and is removable.
It has an inner harness of sorts that stabilizes it on the body, then it snaps into the frock coat to make the two pieces act as one. I should have wired the edge but I didn't want to use hat wire as it can be too easily bent. What I would narmally use is heavy duty fishing line or whipper snipper cable zigged onto the outer edge. I hope it holds up for the run!


It all turned out well in the end, and I just squeaked it all out of 4m of fabric while keeping the patterns matched too!

Friday, November 6, 2015

tuxedos and tails

Ahh, this post will be a bit rambling! I feel quite tired!

What have I been up to lately?

Well it seems formal wear has figured prominently this fall. I had a call from a friend who was working on a tv show, and they needed a tailsuit in about two weeks, could I do it?

I already had commited to making some skating costumes but I did not have designs or fabrics yet  and you know what happens once you say yes to one thing, then all the other things suddenly start to happen!

So I said yes and the fabric arrived two days later. I started patternmaking, then cutting and then we made up a period tailsuit - waistcoat, trousers and coat, using very inadequate measurements, no fitting and crossed fingers.
Rush job number one!
Of course part way into the process, I received designs and fabric and the deadline info for the skating costumes. Yikes!
These had to have a fitting- just time for one fitting mind you- and the only time that everyone was able to be together- skaters, myself, and the designer, only left us a window of 5 days to finish and deliver.
That was rush job number two.

It had its share of challenges stretch fabrics for a tuxedo, non stretch for a sweater like garment....which I hope to get time and inclination to organize my thoughts so I can post about it!

A big sigh of relief when I received messages that everything was great and off they went to compete, and they won! Hurray!
Three days later I get an SOS message, and it turns out they needed to change their program completely and they had two weeks to pick new music, do new choreography and have new costumes made. Could I do it?
What can you say?  How terrible for them to be put in such a position!  I said yes.
So the change was to a tailsuit, with a nod to the Edwardian era, and with a bit of ambassadorial splendor.
So trousers, waistcoat, bow tie, order and medal, sash and a tailcoat. The fabric arrived Friday morning. I cut all day Friday, we sewed Saturday, fit it on Sunday and finished it on the Friday.  They tried it on ice on Sunday, and flew to their next competition Tuesday.
Rush job number three.
Oh, they won by the way! yay!

Then I got sick. Of course- too much stress and your body kicks you when you are down.

I leave tomorrow to work for a month in Montreal.
Four weeks to cut and make a show- which compared to what I have been doing, seems like "bloody luxury" as we say -but I am sure it will have it moments of being a rush job too.

Here's a photo or two for good measure. They were taken from their tumbler site. No photos of the tails for the tv show- I don't know if it has aired yet....

These two - Andrew Poje and Kaitlyn Weaver are just wonderful - as athletes and as people- they are as lovely as they look.


 That's all for now, I have to go and pack.

Sunday, July 21, 2013

Suits: the finishing details


Well, we are reaching the finishing stage for our suits. I thought I would share a few photos of the finishing details here.


Marking the lapel buttonhole, ready to go to the machine. You can see the way the under collar has been hand stitched onto the jacket and how the collar end has been finished
Here is a view of the inside of the back neck. I cut two piece top collars nowadays because a lot of the fabrics we use don't respond to being stretched and shrunk. This one actually is a stretch wool! A challenge to work with, but if carefully handled you get results like this.


A close up of the finished jacket front.
Here is a view of the top collar of a linen jacket, nicely matching at the centre back. This one had top stitching details on the patch pockets and the front edges.
Front view


Back view.


Here is a silk, linen and wool windowpane check jacket with a notch collar and patch pockets.
This one turned out very nicely. I am not sure how well it will stand up to wear and tear, but for now it looks great.
This one needs a final press and we don't have a stand that shows it well. Wait! did I forget to put the lapel buttonholes in?
No, I think they're in, just very subtle. DB in a tone on tone stripe wool. I guess I will check the jacket tomorrow just to be sure.
This one is one of the last minute additions, in the fitting it went from a two button to three ( good thing we hadn't taped off the roll line and had the front edge still basted! ) a ticket pocket was also added at that time. This is a black wool tone on tone herringbone stripe. These shoulders have a flatter look that the other jackets, the seam allowances have been pressed open at the shoulder/crown of the sleeve, to give less shoulder expression. They have just a little sleeve head of soft lambswool instead of a canvas sleevehead.


Tomorrow, we have to get the last jacket wearable for Tuesday, finish a couple pairs of trousers and get back to finishing our doublets and robes which need to be loaded out by Friday. It will be another busy week, and I am looking forward to the deadlines being over!

Friday, July 5, 2013

The best laid plans or where is my fabric?

Tuesday morning arrived, and I was ready to start right in on cutting that three piece suit that was added to my workload.
Well, you know how things go when you are under the gun, not much time left....of course the fabric that was shipped was not what was ordered.
Change of plans for Tuesday, so the fabric was reordered, and I changed focus to the period costumes that  needed my attention. Wednesday came and went. Thursday at 2 p.m. the correct fabric arrived! So off it went to be pressed and bolted and I started cutting. At the end of the day I had the trousers and jacket cut, today I cut the waistcoat and the little bits like pocketing and welts and the like, and by the end of day Monday, we will have the suit basted up and ready for a fitting. A bit of teamwork makes it all possible: someone makes up the sleeves and back, someone else the fronts, someone else is making the trousers and a fourth person is basting up the waistcoat. Once the fitting is over, one person will continue with the jacket, one the waistcoat and a third on the trousers. Then I will also be able to cut the second suit, and hope that after the first one, I should have minimal alterations.

In the meantime, I had a couple of fittings and we can now go ahead and finish many things, such as these trousers. They have the main components installed, but the waist, hems and CB seam are just basted for the fitting.

 There's a lot going on in these trousers.
They are double reverse pleated, with slanted or quarter top pockets, with a grown on waistband. They have two back pockets, and they finish with cuffed bottoms. They will  also get belt loops, set down from the top edge by a half an inch for a narrow belt.

It is interesting what the camera picks up, and I can see that the left pocket edge is smooth and the right side shows ripples. It wasn't apparent to me in the fitting, but I can guess that it is the effect of directional stitching. On one side the stitching was done from top to bottom and the other from bottom to top. In a twill fabric like this, it can be just enough to cause this effect. I will have to hang them vertically to see if it shows up then.

A quick peek on the inside reveals the back pocket bag finishing as well as the inside waistbanding.We finish the waistband and centre back of trousers differently than commercial trousers to make it easier to alter when pulled from stock. After all, once the show is down, they go into stock and may be used over and over on different people.

Thursday, June 6, 2013

Back to making suits

I had been working on a post to describe my job, but I was having a hard time writing it down in some kind of blog friendly manner. I think it will have to work on it a bit longer. The working title is "There is no Formula". I think I should get a plaque that says that and mount it on the door to our workroom. :)
Anyway, I haven't given up on writing it, but it will take some time to do.


So, instead, I will show you what I have been up to lately.
I am still in the land of the 16th century and making doublets and trunkhose- a pattern for a doublet toile is in the top photo.  We had a fitting of the toile and I am in the middle of marking the pattern alterations. This one will be made in leather- just waiting for the designer to buy it.


In addition to the 16th century, I get to jump ahead to the 20th century and make a few 1930's suits.
Hurray!
I have some great style and cutting references for this period in my collection, and I was happy to put them to good use.
We will be making seven suits for three different gentlemen, and the first one off my cutting table is this one in linen.

This is the real fabric, basted together like toile- so the pockets are not in, (I usually just thread mark the breast pocket placement, but Susy put together a little fake welt) the patch pocket is just a sample where Susy tried out different thread colours for the possibility of a machine topstitch detail.
The lapels are just quickly basted to the chest canvas, and there are generous inlays left for possible alterations. Luckily, I measured this guy myself so I was quite sure of the numbers, and it all went well in our fitting- not many changes at all.  The sleeves need to be lengthened, and the designer wanted a peak lapel, instead of the notch lapel I was trying to sell her. Other than that, we are good to go ahead, finish this one and get started on the other three for him.


 The trousers are high waisted, double pleated, with slant pockets, a grown-on waistband, and cuffs. They are lined in the fronts to just below the knee, and still need back pockets installed. For some reason I marked them an inch lower than they should be- slip of the ruler I guess- good thing we didn't put them in!
They look tapered from this camera angle but they are about 19  inches at the hem, wide, but not overly so. The hem width needs to work with the person's height and shoe size as well as the style of the period.


Friday, May 25, 2012

shoulder dart in suit pattern

 A while ago I posted about putting a shoulder dart in the back of a suit jacket and I finally took a couple of quick pictures to show you the changes to the pattern.
You will have to forgive me for the rough state of the patterns. They are working patterns, encompassing my thinking process as well as the changes that come from a fitting. I rarely have time to correct my patterns after the fact. I make the changes on the cloth and sometimes make a few notes if I can. I just don't have the time to redraw and cut out clean versions.
Anyway, we made two jackets for this individual. One was a black barathea cutaway coat and the other was the fine grey beige striped wool. On the top you can see the the back pattern for a black cutaway coat and on the bottom the changes I made to the pattern for the striped wool.


Men's jackets generally have a hidden dart in the shoulder seam.
This means the back shoulder is longer than the front shoulder. The jacket must be big enough to go over the prominence of the blade. Above the blade, you then have excess fabric that need to be handled somehow. What do you do with it? Well, usually some of it is taken care of by easing it into the shoulder seam. Some goes into the armhole where it could also be eased a bit or filled by shoulder padding.
The amount of ease depends on the figure, the style of the jacket, and the particular fabric you are using.

In this particular case, I was dealing with quite a stooped figure, and rounded blade and shoulders. The period (Edwardian) didn't call for large shoulder pads, so I had a larger amount of fabric to get rid of over the blade in addition to the stooped back.
In the top picture, for the cutaway coat, you can see that I transferred some of the excess shoulder ease into the curved frock seam, and since the fabric was plain black, I could keep the curved centre back seam and no one would notice.
In the bottom picture, which was for the striped fabric, I made changes to the pattern to straighten the CB seam, and in doing so created even more ease in the back shoulder seam, which had to be turned into a dart.
This dart was placed alongside a major stripe and is much less noticeable than the bulls eye effect that would have happened down the centre back seam if I left it like the pattern for the cutaway. I did gain a bit of extra length over the blade in this manipulation, but it seemed as though that particular fabric needed it.

Saturday, March 10, 2012

Hand worked Buttonholes


Hand worked buttonholes are a hot topic these days on the discussion forums.
A sign of bespoke craftsmanship and a badge of honour to many, and subject to discussions of technique and materials to use, from needle size to which brand of silk thread and gimp.
Obviously, buttonholes needed to be made by hand before the invention of a machine that could make them and even then, the machines were, and are, expensive and generally limited to factories which could justify the expense.
Many people who are interested in the craft of tailoring are keen to learn these hand sewing skills and all the power to them. I too, learned the art of the hand sewn buttonhole and was equally enamoured of it.
I think for me the pleasure wore off after a time, due to the volume of buttonholes we were making at work because we didn't have a machine. Hours and hours spent on the buttonholes(always under time pressures too). Some people made them more beautifully than others and there were debates about the nicer form, whether an elongated teardrop shape or a pronounced keyhole was better, but I have to admit that some of the nicest ones you will see are found on vintage coats.

One of these vintage coats appeared in a fitting the other day, to be used in a show. It was a cutaway coat, I'd say from between 1910 to 1920 anyway, and look at these buttonholes.
Not bad for their age, don't you think?

We got a Reece industrial buttonholer at work around 15 or so years ago and to be honest it was a relief to have it. If you are good making them by hand, you can do one in 20 minutes, but now it is maybe a minute each including the prepping before going to the machine. If you have 90 buttonholes on a period costume, or even just a dozen or so on a suit, the time saved is enormous.
Some may say that hand sewn buttonholes aren't needed on costumes, and that may be true if you have options. We didn't, but now we do. The downside is that some of my colleagues have never made a hand sewn buttonhole, so that isn't good for maintaining traditional skill sets. The upside is that it is a skill that can be learned and there are people still interested in having that finishing touch on their garments.