Tuesday, December 19, 2017

Quilted jerkin

I am off and running on the next project which is a quilted jerkin.
this is for a gentleman with a size 56 chest, and I will not have a chance to fit him.
I made my pattern block, then padded up a stand at work to his shape using a variety of photos as reference.
Once I corrected the pattern, I marked it onto the base fabric. I also drew out all the quilting lines and sewed the darts.


On the outside of the base, I basted the batting in place over a ham to keep the shape from being flattened. I then cut away one of the batting layers to reduce bulk in the seam allowance.


I transferred the vertical dart I used in the base to a new horizontal position that will align with a quilting line.
Sew the dart closed than baste the silk fabric to the base matching the dart with my quilt line position.


Then I sewed the first quilt line along my dart by machine from the inside.
Once that was complete, I basted the vertical curved quilting line and then sewed it by machine as well.


The next step was to quilt upwards from the first line. Then downwards towards the waisr, and then the remaining vertical quilt lines around the armhole.


Do the same process to the other half of the back. Bind off the armholes and bottom edges. The CB seam allowances had a hong kong bias finish, then I joined the centre back seam.
Then I will bind the neckline with bias so it looks like the armhole finish.
Then I am onto the fronts.

Its a very nice red, quite seasonal in fact!


Wednesday, December 13, 2017

paned breeches updated and finished

Home again home again jiggity jig.
That month away felt so long, yet went by so quickly if you know what I mean.

It is refreshing to go to Montreal. There were so many wonderful cultural experiences to see and do. Here are some of the things I did while there.
AURA amazingly breathtaking! watch the video!
Leonard Cohen exhibit at MAC , Centaur Theatre,  Boys with Cars , McGill music concert , Redpath Museum , Souk à SAT , Cité Mémoire , Salon des Artisans Récupérateurs, Beautys, wandering the old town of Montreal and Griffintown, watching the Grey Cup with friends down in Lasalle, shopping, restaurants, Loving Vincent and The Other Side of Hope

I did work too. Really! No wonder I am a little tired!

so a few work photo updates
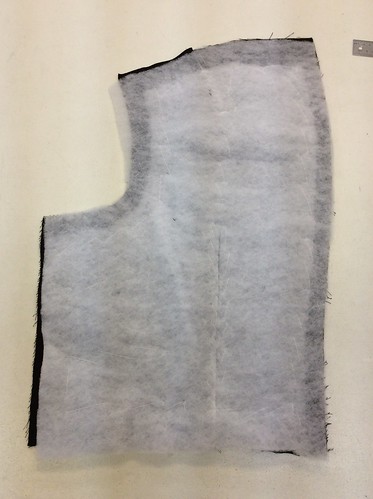
the paned trunk hose.
This is what I did with the tulle/net to create the shape under the "paned" layer. I forgot to take photos of this.

After applying the netting, sew the base layer up. 
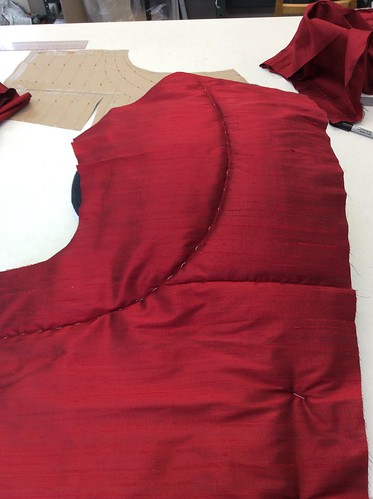
I had already created a zip fly in the base layer before I applied the netting, so my fronts were actually joined together as I applied the net. Sew the inseams, then sew the centre front/centre back seam.
Sew the CB seam completely up before applying the waistband. The next steps can be modified, but this is how I did it, as I needed to have a fitting before finishing. I am also trying to think ahead as to how alterations could be easily made after the fitting, or in the future.
I interfaced and applied the base waistband (just a single layer), sewing it on so the seam allowances are facing outwards. This will make sense, I assure you. I turned the top edge of the waistband and pressed it.

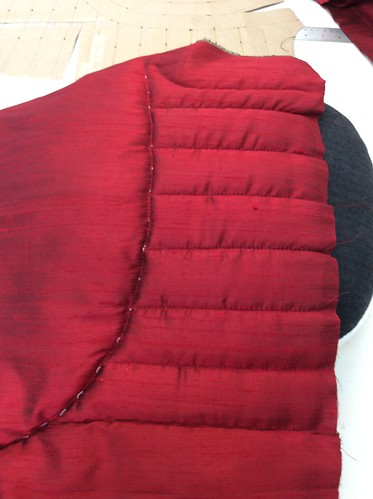
Next, sew up the paned layer, inseams first, then cf/cb leaving the fly area open. Sew the waistband(single layer of fabric) on as usual. You now have two pairs of "shorts"
Slide the paned layer over the base layer. Baste the CF fly opening to the base layer.
Finger press the waistline seam allowance open, pushing the seam allowance of the panes downwards and baste the waistband seam allowance of the pane layer to the waistband seam allowance of the base layer. Machine these together close to the seam.
Slip stitch the centre front fly of the paned layer to the base with a permanent stitch. 
Baste the leg openings together flat.


Fit
make any alterations- I had to take a few small tucks in the back under the seat towards the inseam. I put the tucks in the base layer and gathered the paned layer to the new size.
Finish them!


I used premade bias tape to finish the leg opening. I sewed it on, cut my seam allowances down, wrapped the bias to the inside as a facing, and slip stitched the bias to the base fabric.
joined the waistband layers together on the top and front edges.
Sew on hooks and bars.
Voilà. 

Production photo credit Maxime Cote

Friday, December 1, 2017

More from Montreal

First, a little photo from this evening as I was walking home after work!
I love the light installations here in Montreal and especially these illuminated teeter totters at Place des Arts. They also make sounds as they are played on.
It is so much fun to see so many people enjoying them.
There was a Christmas craft show at the maison Durable, vendors there were selling crafts made from recyclable materials, a Christmas Market at Place des Arts, with outdoor vendors of crafts and food, and the souk à SAT across the street from us with local craft and food and artisans showing their work. It is all very festive.


I am going back from the last post to show you the base pattern for the short trunk hose. I need to take out some fabric below the seat in the back, either by gathering or darting ( I am already into the fabric so I have to make it work from where I am at now)


This is the base, with some netting applied and the paned pleated fabric draped over top, and put together for a fitting. 
I basically constructed an inner trouser base, and an outer trouser, and melded them together. I slip stitched the paned layer to the base at the fly front (yes I put a zip fly into these) I made sure the waist seam allowances of the outer layer turned down at the waist so the waistband itself is nice and flat. The two layers are then caught together at the leg opening. I need to make an alteration, reducing extra fabric at the hem/leg line so I will probably gather that edge on both layers.
Then I think I will face the leg opening back with bias as a finishing technique.

I am struggling with posting using my ipad, so forgive the short posts and any horrible spelling mistakes.
I will post a fitting photo soon.
Cheers!