Tuesday, January 31, 2012

déjà vu all over again

Well, it has been a very busy start to a new season of work. I have some nice 1880's Victorian work to do, some 1930's, and some Edwardian as well, so I am looking forward to it!

There has been a lot of concern with the economy as we are a business to a large degree dependent on our patron's disposable income.
We are often asked whether we reuse costumes, and the answer is yes, we do. Most shows use at least some pieces from previous productions and because they are made well, they last, and are able to be refurbished, and reused.
This year, one of the things that are being reused are uniforms that we built in 2008.

We refit some of these already, and found to our shock that someone had removed the trim from the sleeves of one of the uniforms! Arggh! These were not supposed to be rented out so it is a mystery why it was done and for what reason. Luckily we had some of the trim left in stock, and since the sleeves were too long for the actor who is now going to wear it, we can shorten the sleeves and retrim them.
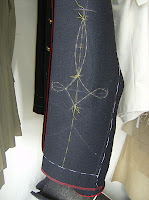
I did spend a frantic few minutes searching through boxes of patterns that I kept, hoping that I kept a copy of the sleeve decoration pattern so I didn't have to rethink and redraw it.
Luck was with me and I did have it stashed away. Whew!
I can't keep everything, so I throw lots of patterns out, and you know, everytime I throw them away, I have that nagging feeling that as soon as they hit the recycling bin, I will need them within the next 24 hours. I don't think I am alone in this feeling.

So, then it turns out that we are going to be making a couple more of these uniforms to add to the collection, so now we are on the hunt for more trim. If the trim had not been removed from these sleeves we might have had enough to trim for the two new uniforms, but not now.
And so it goes.......


Saturday, January 14, 2012

my jeans pattern


As requested, here is a picture of my pattern for the jeans I made for myself.

I have tried over the years to draft women's trouser patterns from a variety of sources, just out of curiousity, and none of them were satisfactory to me and they didn't get beyond the toile stage. I guess I just didn't want to fix the draft- too much work in most cases.
I also know that I have a tendency to abandon ship on projects for myself- especially if things aren't the way I want the first time. I don't want to talk about the leather jacket under my table or the riding jacket there either. Confession time: one has been sitting there for close to 20 years!
The drafts I used were from Pattern Making for Fashion Design by Armstrong, and Metric Pattern Cutting for Women by Aldrich and I think I even tried the trouser draft from Natalie Bray's book Dress Pattern Designing. I even tried copying trousers I bought. I used to have a great Burda trouser pattern but it was very 1980's. So this has been going on for many years in a half hearted way, and to be honest I didn't keep notes about what I didn't like.

Generally though, for jeans, the drafts were too loose fitting in the body, sat too low at the back waist, or the darting at the back wasn't enough. Sometimes I thought they were too closed in, in the legs, and I think jeans should have a more open leg cut. The CB seam was often too straight as well, and I think jeans should be more on the bias there.

This time, I just drafted them using my general draft for men's breeches/close fitting trousers. This is a draft I have put together over time, taking elements of drafts I like, proportions that seem to work, and just using my general experience and common sense. I had to alter the front fork/ CF curve because I drew it as I would the men's, and there was too much fabric there.

These are cut to fit closely at the thigh but not too tightly, sit below the natural waist, and I wanted them to cover my butt at the back, especially when bending down in fittings- something that I wish the commercial manufacturers would fix! I also didn't want the back waistband to gape- another thing I wish the commercial manufacturers would fix. I'm sure I could go on and on about how difficult it is to find trousers or jeans that fit, and I'm sure you could too.

Should there be a list of complaints? The sad thing is that I am kind of average in size- bigger than I used to be and a bit out of shape :( but a commercial size 6. How difficult it must be for plus sizes for instance. Women buy badly fitting jeans all the time- do they not see it or do they just give up?

I had a dart in the back, which I closed out to make the yoke. The little bit of the bottom of the dart that was left, I eased into the yoke seam. I think that it helps to shape over the seat.
I want to reposition the yoke seam on the next pair, but I will wear these for a while to see if anything else needs modifying. I don't want to rush into anything! I'm almost overwhelmed with myself for actually finishing them.


Thursday, January 12, 2012

new jeans for me

I made these this morning! It only took me 4 hours of unfocused sewing (chatting with Lela while I sewed). They aren't quite finished- I need a button and buttonhole, I need to stitch the back pockets on, add some bar tacks, and then to hem them.
They are ok. I don't like the size of the yoke though. Too deep at the back and I think I could drop the waistline at the CB by 1/2". I hate trousers that don't sit high enough at the back, or gape at the back waist and these don't!

My own draft. I have to say that I had tried following a jeans draft for women in a couple of different books and was never happy with the pattern. After a while, I just thought I should draft them as I normally would using the basic draft I have in my head. So I did. I sewed them together, fit them on myself (generally not recommended because you can't see how bad the yoke is!) , took them apart, and recut them with the changes I felt necessary. I will fix the yoke on the next pair.
The denim is not the best quality- just something the local store had for sale.
Nothing like the bad quality of self timer photos is there? Or seeing yourself in bad photos. Oh well. Tomorrow the coat alteration and some repairs/hems to do.

Wednesday, January 11, 2012

finished trousers

I finished these up a few days ago and sent them off. In the picture on the left, you can see the new pair on the left and the old pair on the right. Better quality fabric makes a huge difference. In the picture on the right, you can see the finished product. They have an elastic inserted inside the waist to be adjustable for whoever will be wearing them, which explains the rippling of the waistband.

So, now that is out of the way, I have to spend the next few days getting ready for work next week and finishing up a couple of things left on my table- one being a pair of jeans I decided to draft for myself, and there's a coat alteration, and the shirt project I want to get going. I should be doing a bit of research on the 1930's and the 1880's but maybe I will wait to see the workload on my table before getting into that. I also have a sweater half knitted that needs the sleeve pattern altered and I have to finish a sock so I have a pair, and I wanted to look into glove making and try that too.
There's just too little time to do all these things, but I am going to try to be disciplined and get on with it!

Friday, January 6, 2012

new and improved

New and improved white trousers. I was told they were breeches, but really they were trousers so I am making them trousers. The new fabric is much better quality, and not see through which is very important in my opinion when it comes to men's trousers and white ones in particular. On the downside, it is a bit spongy and thick which will mean a bit of a challenge on the placket.

Apologies for the picture quality. Sigh :/
Here I go, made a pattern, got it cut out, and made up the front placket while I waited for Steve from pro Sewing to come by and service all my machines.

I wasn't going to change the overall styling, which is why I didn't make a traditional underlap for the fall front. That entails a set of closures under the fall and in this stretch fabric it would show. Anyway it is good to try new things. This is what it loooks like finished from the inside.
I sewed a regular seam on the fall facing and pressed and stitched the seam allowances open to keep the centre front flat. The main seams will be serged together.
Interfacing is the trick here. I used a lightweight tricot to stabilize the fronts at the top of the waist and down the stitching area for the placket including the area where the final placket would be stitched. I also interfaced the complete fall facing piece, and added a strip of interfacing on the underlap to support the button stitching area.
This is pretty much the same as making a shirt sleeve placket. If you wanted to, you could make the underlap pattern piece wide enough to come all the way to the centre front and then fold back all the way to the side seam. Then you could have a button closure on the underlap.

This is the finished placket from the outside. It was a bit of a pain to do because the fabric was spongy, and I didn't want to bag out the shape with self fabric (too bulky). If I did it again, I would bag out the shape with a very thin piece of cotton. As it was I marked the placement of the triangle on the fronts, and folded the edges in and then edge stitched them down.
I made sure that the underlap piece was long enough to support the topstitching of the triangle. So there is interfacing, and interfaced fabric behind that topstitching.

Now, I just need to sege them together. I am using my domestic serger with four threads for this. Attach a waistband with inner elastic, choose some buttons and make some button holes.
Then they will be finished.

Tuesday, January 3, 2012

getting your money's worth

Well Happy New Year to everyone. I hope you had a nice holiday!

Now today I thought I should start to get back to work and I headed over to the studio to look at a pair of "breeches" that I was asked to reproduce.

A number of years ago Carol and I built costumes for this client. I built a cutaway coat, waistcoat and trousers and Carol built a lovely 1880's dress. These were well made and not cheaply done and I think the client had a bit of sticker shock initially, but they have used them for 7 years, and not even on the people they were built for. They have stood up to repeated wear and cleaning. So, I think they have had their moneys worth, as only the waistcoat has needed replacing after 7 years.
It turns out they had purchased other costumes which the "breeches" were a part of. Not sure when they were purchased, but it had something to do with a Napoleon costume.

I wasn't expecting what I saw when I opened the bag.


Ok you can call me a costume snob or whatever you like, but really, what a piece of crap.

This is Hallowe'en type costuming, and it pains me greatly to think that as a costumer, I may be lumped in with this kind of stuff.


My list of what's wrong:
1. They are made of cheap, see through polyester knit. I hope he had a coat that covered most of him.

2. They are badly sewn.

3. They are badly sewn even for what they are.

There is no stabilization in the front "fall" to prevent excess stretching at the waist.
The placket "points" haven't been turned at the point, they are just smushed. The placket points aren't even stitched down, no I lied, there is a handstitch on one placket holding only the inner layer of the placket to the front.
Look at the "waistband". The end hasn't been turned properly then the inner elastic has been twisted and caught when the button was stitched in place.
They were put together by serging and obviously the waistband and body didn't quite end up the same size.
There is no stabilization behind the buttons.

Even if you bash something out to make money, how can you send product out like this? It wouldn't take take much more to make them a whole lot better.

If you are getting costumes for your business, this is not getting your moneys worth, or wait, perhaps you do get what you pay for.

What a way to start the New Year!