Friday, December 11, 2009

Fitting and pattern progress


I fit this muslin this week. I was fairly pleased with how it turned out, all things considered.
The trousers needed a few changes- mostly in the back as you can see by the pins from the fitting.

I cut the back with a bit too much seat angle and the back fork/crotch extension was too long. Easy enough to fix.
As you can see, I pinned out the excess of fabric which had collapsed below the seat as well as a small amount of excess length just below her waist. I pinned out about an inch of length in the back fork extension which you cannot see here.
The resulting changes mean that the seat angle is straighter now, the excess length has been removed so the back waist is lower, and removing some fork length means the overall thigh size is slightly reduced as well. I narrowed the hem a bit, but I was afraid that tapering the leg too much was only going to accentuate her pear shape.

I also fit the jacket from my previous posts and I was pleased with it. They were happy and really didn't want me to fuss with it. I think it could still use a bit more out of the hem below the belly, which opens up the dart into the pocket even more, which is quite large already.
I wasn't really happy with the sleeves so I will do a bit of tweaking to the pattern.
I have to be aware of his limitations in movement because of his shoulder problems. I cannot fit the body and armhole as closely as I would like to- he is in discomfort if not outright pain just by the actions of putting the jacket on, so I cannot make it more difficult for him.
I can however suggest different styles- hmmm, maybe something with a waist seam! Perfect for the figure with a belly, maybe just a bit out of style though.
Pictures may be forthcoming with permission.


Saturday, December 5, 2009

ladies trouser draft


I don't usually do women's patterns but here I was agreeing to do make a trouser draft for a woman I know. She also has a difficult time buying off the rack, as many of us do, no matter our size and shape.
Her waist is around a size 12 but her hips are in the size 18 range.


Here are her measurements just for the record.
Height approx 5 feet tall
waist 27 1/2 "
Upper hip 37 1/2"
Lower hip 43 1/2"
rise to natural waist 12"
girth from CF waist to CB waist 33 1/2"

I took photos of her from the front, side and back which I find helps a great deal when looking at the numbers, then I made a little sketch to outline her shape and the areas of disproportion.

I am going to make a pattern that fits her to her natural waist - which is much higher than the usual trouser waistline- just to allow the greatest leeway when we talk styling.

Obviously the pattern must be big enough to go around her at the fullest area- which is her lower hip- then the issue becomes how and where to reduce that hip size to the size of her waist. In her case she is very pear shaped so there can be a fair bit of shaping on the side seams and the centre back, and they need to be augmented with adequate shaping at the centre front and with darts in the front and back waist. There is also the issue of how much shaping in the outseam of the leg will be required but I didn't make it too shaped at this time.

I didn't really have a specific draft that I wanted to follow, although I did have Metric Pattern Cutting for Womenswear sitting around so I referred to that off and on. I have found that those systems of drafting rarely translate well for disproportion so I am just as well off doing my own thing, so I just proceeded in what I think was a logical matter. The only area that I was wondering about was how long to make the back crotch extension. The draft in the book was really short so I lengthened it. Better too long than too short- better slightly too large than too small- it is so much easier to pin out excess than guess at how much more you need.
As you can see below, I often start my pattern and write notes to myself as I am proceeding.
In this case I went away and had lunch, came back and looked at the notes and pattern again with fresh eyes, and changed it, reducing the shaping on the side seams and increasing the darting into the waist.
I cut a toile in muslin and sent it off to be made up and I will fit her on Tuesday. I will be fitting the jacket on Tuesday as well, so it will be a busy and informative day. It is good to get as close as you can with the pattern but I think that it is during the fitting that it all comes together.


Monday, November 30, 2009

deadlines


The deadline has been met.
We're finished.
Everything is boxed and on its way to its final destination. The project that I have been negotiating since May has been completed and after 8 weeks of intense work it is over.
Six cutters, 4 stitchers and 30,000m of thread.
I'm not sure if I feel relieved or shell shocked!

Sometimes I wish the work I do was not as deadline oriented - but it is.

When this project is released to the public I will be able to share what I have been up to, so until then, I better get on with some of the other things on my list.

This week I will speak at my daughter's school for career day. One the one hand, I want to let people know that this job and all the supporting jobs exist, but on the other hand- will they be interested in jobs that don't fit into the usual slots?
What about training? I have trained one apprentice cutter so far - most of the skills are learned on the job- but businesses are hard pressed to fund training. Fashion degrees don't quite cover what you need and costume studies programmes don't really cover it either. The time that I spent with my apprentice still isn't enough to cover all that we need to know.

Everything changes, so I don't know if the path I followed will be relevant to them.
Who knows?
All I can do is let them know and they will have to take it from there. Better get ready.
Hey, that's another deadline!!


Sunday, November 15, 2009

corrected jacket pattern


I took a day off from my other project in order to proceed with correcting the jacket pattern from the toile fitting.

I usually put the toile on a stand- sometimes padding it up if needed to be able to see it hanging as it did in the fitting.
I measured and transferred the alterations to the pattern. (Sorry I forgot to take a picture of that)
In this case, I then made a clean pattern from the rough one I created for the toile. Checking and rechecking, to make sure the resulting shapes look good, grainlines are indicated, and that the seams will sew together correctly resulting in smooth flowing lines.

At this point I can cut a jacket in their choice of fabric- which I have and yesterday delivered it back to Silvia for construction. There will still be minor changes as every fabric behaves differently and a shell fitting doesn't exactly replicate what the final jacket will be, but it hopefully will have fewer alterations to deal with now.
They want something soft for this first jacket, so I was given a dark charcoal wool- a bit too light weight I thought, but it was something they could afford and it will give him a jacket to wear before Christmas.

Now I return to the other project which is coming along on, and needs to be delivered in two weeks or so.
In the meantime, my to do list:
Speak with a couple of other people who were interested in having suits made
Try to get a trouser pattern made for a lady client
Prepare for a career day talk at the local high school
Look at some fabrics for work next year
Deal with my landlord and a leaking roof at my studio space
Fit the jacket I've posted about
Gather my remaining wits about me
Relax?


and finish painting my kitchen!

Friday, November 13, 2009

jacket toile


I cut a toile (mock-up) of the jacket in an inexpensive wool blend fabric I found at a local shop. It needed a bit of support so I interfaced the fronts with some leftover suit fuse that I had in stock.

Silvia put it together ready to fit. It's only a few hours to put a shell like this together- which I feel is time well spent when dealing with more difficult body shapes.
The front edges were just turned back, the collar was literally just a bias cut collar of the same fabric with the suit fuse for some stability. The sleeves were made up from a stock pattern that I already had in the approximate armhole size, but not basted in. Very thin shoulder pads were tacked in place.

The purpose for this was to just get a shape together to fit and make pattern adjustments. The clients hadn't even looked at fabrics, or thought much about the styling they were after except that it be single breasted and have a vent in the CB. I like to be able to pin on a pair of sleeves after I fit the body- just to give the client an idea of what it will look like- many people find it disconcerting to try to envision a final product without sleeves.

Obviously from the pinning you can see that I had to pin out at the shoulders(sloping).
I had a bit too much length through the front( as I suspected).
I needed to pin out a dart of about an inch of excess width at the front hem that terminated just below the chest. The back of the jacket seemed to sit well although I had to reduce the cross back width that I had allowed for. I will reshape the armhole all round.
The only other issue was his regarding his left shoulder. Due to a deteriorating shoulder, the ball of his shoulder was protruding in front and I will have to make allowances for that to be accommodated.

Next stage: pattern corrections from the fitting.

Wednesday, November 11, 2009

custom jacket pattern


OK, I wish I had more time.
Ten weeks of kitchen renovations and cooking outdoors takes a toll on time to blog.
A big project that involves administration, buying, cutting and sewing at the same time takes a toll on the time to blog.
What else? well how about sewing tests - I do the sewing tests for prospective employees which involves cutting bodices and then guiding the candidates through an afternoon of sewing, instructing, correcting, taking notes and rating their performance for management. More time.

Add in a private client and I have barely time to function.

Oh well,
I have had the pattern made for a while and have had a fitting in a mock-up and I am at the point of correcting the pattern and cutting in the real fabric, but I still haven't had time to sit down and write something intelligent to explain the pattern making process for this gent. It is generally so much easier to do than describe how to do things! but I am going to try with the few lucid thoughts I have available right now.


The back is a fairly standard shape-FYI: this version of the pattern doesn't have any seam allowance on the shoulders or armhole-I'll explain later.

There are many ways of approaching the front to accommodate this man's shape- I know- and this is just one way of thinking about it.

I have drafted the front, raising the neck point and shoulder equally above where they normally would be. How much? Well, I use the nape to CF waist measurement I took on the client. I rough in the normal front shoulder line in the draft to start.

The natural waist on my pattern is about 1 inch to 1 1/2 inches below the drafted waist line. I measure the back neck, then place that amount on the natural waist at CF and measure up the full amount to the position of the neck point. This gives the extra length in the front which is needed. I construct the new shoulder line in parallel to the "normal". I continue with the gorge line and lapel from there.
I don't however, need all the extra armhole size, and I can remove some of the excess now in the armhole by darting into the gorge line, as well as down through the body as I close out the excess in the armhole.
I measured the waist of the pattern and decided that I still needed to add width for his belly, so I cut open the pattern from hem to mid lapel and added more.

The problem with dealing with a belly is, as you add width where you need it, you gain an excess of fabric below the belly which needs to be reduced- hence the dart into the pocket. I cut into the pattern at the pocket line, then took out the excess (determined by eye) at the hem, thus opening up the pocket line into a rather large dart. (Plaids would not be good here)
I knew from fitting one of his own jackets on him, that I could pin out a good inch at the pocket to correct the hang of the jacket, and I have at least that in the pattern above. It may prove to be too big a dart for its length, but I will leave it for now.

I think I may have been a bit generous with the front length, (and I was proved correct in the fitting) but I went forward into the toile thinking that it is much easier to pin out excess, rather than either guessing how much more is needed or undoing the shoulders to drop them at the fitting.

Next, the toile.


Saturday, October 10, 2009

jacket pattern

I will start by giving you the information that I have to make a pattern for this client.
Firstly, he is of retirement age.
Height 4' 11",
neck 14 1/2"
chest 36 1/2"
waist 37 3/4"
hip 38 3/4"
XB 13 3/4"
nape to CF waist 22"
back length 15"
nape to wrist 30 1/2"

So, as you can see, he is not of average proportions, he has a belly by virtue of a health issue- nothing more- he has had serious shoulder surgeries.
He has a difficult time buying anything that fits. He had a suit "custom made" not long ago in Toronto, which sort of swamped him, and did not have enough correction for his belly.

To begin with, I drew a little sketch of what need to be changed from the "average" suit draft.
(I have to post photos because I can't hook up my scanner to this computer.)

One: most modern styled drafts will produce a wide back and shoulders. I measured his custom suit which had a cross back measurement of 17 1/2" yikes- no wonder he looked a bit swamped in it.

Two: his waist measurement- he has a belly that is bigger than his chest measure. The suit jacket he tried on billowed below the belly- I could pin up at least an inch of body length at the back of his hip pockets.

Length: I like to get a measurement from the nape of the neck to the CF waist on the person. I use it when drafting to ascertain the placement of the front neck point above the back neckline- this affects the balance of the coat.

People are three dimensional- whenever you encounter increased size around the body it corresponds with an increase in length. Period. You have to allow for it otherwise you will have a problem with the balance of the garment.

I am going to work through this and you may think that I am going about it in a strange way- but it is the way I am going to approach it. I like to understand why things are the way they are, so I confess that I tend to alter and adapt systems that tell you what to do but don't explain the reasons for doing it.


Wednesday, October 7, 2009

goodbye Douglas Campbell

This autumn has been too full of deaths of people of my friendship and acquaintance.
Today we say goodbye and farewell to an icon of Canadian theatre, Mr. Douglas Campbell. His image stares out at us at work from a variety of photos over the years, from arriving on the train with his wife and children to the cricket team's annual photo.
I first met Douglas in 1990 when I went out to Theatre New Brunswick to work on A Christmas Carol. Douglas was Scrooge, and what a Scrooge he was! What a voice and presence.
He was frightening in his gruffness and BAH humbugs then was utterly transformed as he was redeemed at the end, childlike, gleeful and mischievous.
I had many opportunities in the intervening years to work with him as he acted-and directed. Most notably to me, I worked on Oedipus Rex, a role he performed in 1954 (I believe) and then directed in 1997 with his son as the lead. Tanya Moiseiwitsch designed the original and at an advanced age returned to guide the design through the remount. I have some cherished Polaroids of Ben in costume as Oedipus with Douglas directing at the photo call, with Tanya in a wheelchair off to the side watching over it all.
That year,1997, he lived next door to us, my daughter was not yet a year old - she found him very amusing- and we got to know him a little more- a kind hearted soul who once even brought in our laundry while we were at work and rain was threatening.
A legend of Canadian theatre has gone and will be missed.

Tuesday, October 6, 2009

Back at it


Well, It has been an eventful time since I finished work in August.

I finished packing up the main floor of my house for extensive
renovations so I could be warmer in the winter, get more light in year-round, and move the kitchen to the middle of the house to better use
the space I have.


I spent a week (not enough time) at a wonderful cottage on Manitoulin Island, walked the cup and saucer trail, (in the picture above) sat on the dock, did puzzles and read a lot.
Got back, and I've been immersed in home renovations and arranging some work for this fall. This work project has required that I step into the role of organizer for a group of cutters, so I've been arranging rental space and insurance and thread and all the little things that eat up your time but don't give you many tangible results at the end of the day.
Finally, we are ready to move onwards from the seemingly endless dust and noise of renovation and progressing from emails and designs to costume making.

In addition to the big project that I am working on, I am going to make a jacket pattern for a client I have worked with before. I don't usually take on many private clients, but this is a lovely gentleman who has trouble buying anything that fits. His shape has been affected by some health issues and I feel good being able to use my talents to help someone who is so genuinely appreciative to have something to wear that he feels good in.
I started the pattern today, so I'll show you where I get to as I work toward a mock-up and a fitting. Believe me, when you see the pattern, you'll know why I am doing a toile first.


Thursday, September 10, 2009

pattern drafting breakdown

The breakdown, (and I don't mean what happens when you have too many patterns to make and not enough time) of the process of making something three dimensional (clothing) from something two dimensional (a pattern) is endlessly interesting and challenging.

There are many "systems" for drafting patterns, with the heyday of the written development and dissemination of these theories being the nineteenth and into the early twentieth century.

They developed measurement techniques, standards and even devices to support their drafting techniques/theories. These theories use the standard proportionate male figure of the time as a base point. Knowing that most figures are neither standard or proportionate, the theories then go into great detail about how to deal with the "disproportionate" among the population. People often get discouraged when they realize that the system won't give them a perfect fit for every body, every time. Every system then needs to be adapted somewhat for the individual figure. That is where the pattern maker's eye and experience come into play, in both the pattern and especially the fitting. Eventually you learn what your "system's" benefits and shortcomings are, then you adapt when drafting.

The adapt and adopt method works well for me for a couple of reasons:

One: I am largely a self taught cutter. Now I know that this is unusual and at times I do wish that I had been fully instructed in a "system" but I think that I have been freed up to modify my approach without feeling as though I am abandoning my training. My other formal training in visual arts has proven to be invaluable in my cutting career.

Two: in the theatre we are not trying to re-create period clothing absolutely-either in the cutting or sewing. We have timelines, budgets and designers input, and actor requirements and I think that even when we are trying to do true period looks it is always filtered through our own aesthetic as well as those of the designer, director and the audience.

Well, that's a long preamble to what I hope to post about in the future which is how I approach looking at "systems" for drafting patterns and getting around the three dimensions of the body, using some traditional information as well as your eye and sense of shape and proportion.
Lofty ambitions I think!

Cheers.
p.s. I'm going to be posting at a snail's pace through the fall, but stay tuned.


Monday, August 24, 2009

beware the no-iron shirt


Beware the no-iron shirt.
Here are two shirts from the same maker, put in the same dye pot at the same time. The shirt on the left is plain cotton, the other is "no-iron" cotton.
The buyer didn't realize that she grabbed the no- iron shirt and the dyer didn't notice it before the dye process began.
The no-iron shirt has been sprayed with a chemical after it is made. You can see that the areas where the spray didn't hit that dyed darker, and you can see some of the over spray drips.
It's shocking that people are wearing this chemical next to their skin. It's all to save a few minutes pressing your shirt but it could be shortening your life. Is the chemical used indicated anywhere on the labels- no it isn't. Would you buy this shirt if you knew what had been done to it to make your life easier?
No wonder people are getting sick more and more.
I'm disgusted by it.


Friday, August 21, 2009

decorations


I find so many things when I clean up at work.
Here's an example of some skirt decorations that were made (and rejected) for a period dress that Libby was working on a few years ago.
I love that they are made with fabric and pipe cleaners- you know the fuzzy wired bendable kind.

I think they are lovely, so since I have a pair of panels, I think I will hang them on my wall for some colour next season.

Tuesday, August 18, 2009

more detachable collars

Here is an example of the collar pattern made from one of the paper collars
in the last post. With it is a mock-up of a turn down collar and a stand collar.

The turn down collar might be called the "Marley" if I remember correctly.
All the collar styles had style names and they were embossed into the paper or stamped on the inside of the cotton starched collars.

This collar has a deep stand and fall. It also has an extended front on the left side, that tucks under the front portion of the right hand side of the collar when it is done up. The collars and shirt fronts lap left over right for men's wear.
I make the mock-ups out of a specific heavy interfacing, cut raw, with slits as the buttonholes for the collar studs to go through.
They would be tried on with a band collar shirt that has a buttonhole at the centre back of the neckband for the short stud to go through and two buttonholes at the centre front for the longer stud.
The stud goes through the shirt band holes first, then through the holes in the collar, so the front stud needs to be longer to pass through more layers of material. It usually has a pivoting head to help it go through the buttonhole, then you pivot it back to a flat position and voila. You now have a shirt with a collar.

Sunday, August 16, 2009

detachable paper collars

As I was packing things up the other day, I remembered that I had brought these paper collars out of the storage room for style options for one of the shows.

We have boxes and boxes of all styles of these detachable and disposable paper collars.
We also have boxes and boxes of vintage detachable starched cotton collars in sizes from 14 1/2 to 20.

Most of the styles that Arrow and other collar makers had to offer are in those boxes. I don't know who originally got them for the theatre, but they are valuable resource for us.

I remember when we used detachable collars more often then not (I mean in the theatre, I'm not quite that old!)
but with the labour costs as they are now, the wardrobe maintenance department can't afford to be boiling and starching collars. We will often, but not always end up making a new collar and sewing them right to the shirts instead.

So, I will retrieve some samples, make a pattern from the samples, grading up or down if I can't find the right size and make a mock-up for a fitting.

Friday, August 14, 2009

season's end


We've come to the end of our contract at work. It's the end of the season for the wardrobe department, except for management who will begin to organize for next season after they get a well deserved holiday.

The understudy costumes are finished, we had time today to tidy up our room tally up all the time records, make notes for next season, and toast one another's work.

Here you can see on my rack, all the patterns that I made this season. That's eight feet solid of patterns. I'll leave them there until next January when I will come back and sort through everything, throw away most of them and keep a few that I think are worth storing.

The last two weeks have been busy finishing up, as well as trying to arrange some more contract work in the fall.
Those things are still up in the air, but what I am sure about is that I need a little time off. Time to go to the lake, swim, read, relax, and hang out with family and friends.
Thanks for reading so far and I'll try to prep a few posts to happen when I am away.
Then I'll come back and try to wrap up a few things that I started here but didn't have the time to finish- like the tailcoat draft and maybe a bit of trouser making and who knows what.
Cheers,
I'll be back soon.

Monday, August 3, 2009

jacket #6


Suit jacket number 6 while in progress.
This is a jacket made out of a very light weight birds eye weave wool.
I need to tweak the set of these sleeves with Denise, the tailor who is working on it.
I think many people would find it a bit light weight for a suit, I'd guess that the fabric was 6 to 8oz weight maximum. I tend to cut and make a softer looking suit than some other cutters, and I think I should sometimes endeavour to achieve a harder or crisper look.
Something to think about I guess.

This was one of the jackets that the director and designer decided we needed two of, so we made two of these. I should have tried the second one on the actor, but I didn't have time. When I saw it on stage being worn, I knew that I needed to have a look at it, since I think that Jenny set the sleeves a bit differently than Denise and we will need to reset them. It is interesting how two different people put together the same coat- they are the same but different somehow.

Sunday, August 2, 2009

hunting frock coat


A Hunting frock coat.

I think this is the second to last coat that was made for the show. I am very pleased with how it has turned out.
This was the third coat for the actor who had lost a lot of weight, so I was very glad that I had waited and remeasured him before I started the pattern for this one.
I had four of my sewers collaborate in making it up for a first (and only) baste up or skeleton fitting, and then luckily, Susy was available to come back in this past week and make it up to its finished state.
I am reminded again and again how lucky I am to have such talented sewers working with me. They make my cutting work look great.
I think that we (and management) take for granted the skills that we are all required to have. This tailor is the same woman who made the beautiful lace collar pictured here, and is able, as all my team is, to make anything that is assigned to us. From stretch bodysuits to leather breeches to tailored coats, trousers and vests to foam sculptures. Cheers to us!

Wednesday, July 29, 2009

suspender engineering


Wendy brought these suspenders (braces) in the other day. They belonged to her great uncle who died about ten years ago. He was 98 when he passed. I can't begin to guess how old these suspenders are and I haven't had time to even look for any references in my research.
What struck me was the design and engineering involved in something that was of such "everyday" use, and how little of that detail we see in things today.

Friday, July 24, 2009

It's all fun and games....

No pictures today, but I'm in at work tomorrow and I think I'll try to get a few pics to update where we are.
Just in case you were thinking that making suits for the theatre was getting pretty matter of fact, although overwhelming, we get notes from stage management who update us on what the actor's are doing in rehearsal that will affect the costumes.

As I expected, clothes are coming off onstage. Two of the actors will be removing or having their trousers removed for them onstage. OK, we do that in the theatre, actors dress onstage, they undress, they have quick changes, but it always is a bit more complicated than sitting on the edge of a chair and removing your trousers. One actor is going to take his pants off while still wearing his shoes. Have you looked at the size of the modern stylish fashion shoes that guys are wearing now? they are enormously long. So back we go to the "broken down" pair of suit trousers we are making and we need to widen the leg, and also catch the edge of the lining down in the front of the leg, so he doesn't get his shoe caught in it. He demonstrates his rehearsal technique in the fitting room today, almost falling over in one attempt. He then manages to do it by standing on the trousers in a heap on the floor while one foot after the other is pulled out.

The other guy is having someone hook their fingers in his trouser pocket and pulling on them as he drops them from the waist.

Oh, and they are going to be wet while this happens.

It's always exciting around here, what other job would have 5 people in a small room with mirrors, standing around watching with concern as someone else tries to hop out of their clothes.

Monday, July 20, 2009

overwhelmed

This is the baste up of jacket number 8, nice wool, the fitting went well, I don't know what possessed the sewer to make up a finished collar for a basted jacket, so I guess she'll be doing that again. It's the little things like that, working with people you don't usually work with and the communication misunderstandings that can make you crazy sometimes.

Overwhelmed is how I am feeling.

Yes, it is getting down to the wire and there's no time to spare.

I asked for and got 2 extra sewers this week. Hooray, now I am supervising 7 people. That's extra work in itself- especially with people who aren't that familiar with the way I like to work.

My goal for last Friday was to have everything cut out, so I could move on.
At 6 o'clock on Friday, I cut the last pattern piece of the second footman's tailcoat, but I didn't get the linings cut out. Close but not quite done.

The real kicker though, the one that is making me more overwhelmed, is that one of the actors has been working out and dieting- you know every so often someone will come for a fitting and say they're going to lose a few pounds and they rarely do, but this time, he did. Well, he's actually gone down a bit more than a full size. Three inches smaller in the waist. Two inches off the hips and chest.
You know, I cut his trousers out over 6 weeks ago and they were nice and they were finished and hemmed and at 6 o'clock today, I was drafting a new trouser pattern to make new tux trousers and unpicking the suit trousers because I don't have any more of the fabric to cut new ones.

I can't even begin to talk about altering the jackets. I think I'll sit and stew about it a bit more.

Tuesday, July 14, 2009

suit number 9 and 10


Ok, I think these are number 9 and 10.


Maybe I'm getting a bit overwhelmed, some days everything seems on track and others feel as though we will never be able to do all this work on time.

Today, the powers that be decided that our two leads should have a double of their jacket, as well as two pairs of trousers. This is so they can have one suit that stays nice and neat looking and the other will get broken down. Problem is, the designer didn't buy enough fabric for two complete suits so they will have to order more. I think I must have been looking a bit stressed in the past week, so my boss is going to hire my former apprentice to come in for a couple of weeks and she will cut out the second jackets from my patterns and make them up, because we sure don't have the time.

Other news from today:
I cut out the last tuxedo jacket this morning, fit the second footman in his trousers, waistcoat and a toile of the tailcoat. (I thought it was safer to do a toile for someone I had never seen or personally measured, but it would have been fine, I wasn't far off)
I fit this DB glen plaid suit, it's just basted together for the fitting, so it will need to come apart to be finished. Luckily, there are just a few minor alterations, so Silvia can get working on that.
This afternoon, I cut out a cream wool dinner jacket, so I can cross that off my list too.
Tomorrow's schedule has just come out so I am going to fit the overcoat I cut and have a couple of technical (no designer present) fittings, and hopefully figure out one problem that I am having with the fit of one suit and mark some alterations.
Whew!

Sunday, July 12, 2009

riding breeches


We are making two pairs of riding breeches for this show and I am always happy to find vintage examples of garments to look at and to compare to.
This pair dates from 1941 according to the label inside at the back.
The wool is incredibly dense and heavy-I'd guess it is at least 17oz to 20 oz weight, and it could be blended with some synthetic fibre since the label recommends washing in warm, NOT HOT water with "Lux".


This is a detail of the inside of the leg opening, it has handmade buttonholes and very small buttons, the bottom is bound with silesia , creating a facing to the inside, where it has a little jog around the bottom buttonhole. The inside knee suede pieces are stitched on by hand both on the outer edge as well as about 1cm in from the raw edge.


The fabric is so dense that instead of bagging out edges such as on the fly extension, the wool is pinked and silesia is stitched behind, or in the case of the fly facing, the silesia binds the edge.
They have cut the fronts to make the pockets and then left all the excess fabric inside the breeches, where it sits in between the pocket bag and the front of the garment. You can just see a corner of it here in the lower right.

These breeches are cut in the way that you see in the period drafts of the time. There is ample seat room for sitting on a horse, the seams and darting near the inside knee are cut raw and whipped together to reduce friction between your knee and the saddle. The fabric is heavier than most overcoats are these days.
All of these characteristics are beautiful and functional , but not quite what is needed onstage, which is one of many reasons that I while I collect and study and dissect the period drafts, I can rarely use them verbatim for my work.

Saturday, July 11, 2009

suit number 8


This is suit number 8 of the 12 regular suits that we are making, being chalked out on my table.
There is so much work to do, and I am so busy, that I am finding it difficult to get photos and blog!
I had another day this week that was mostly fittings, so I feel that things are progressing, but there is a lot of pressure trying to juggle all these suits that are all in varying stages of construction.
One good thing is that some actors have two suits, which makes it somewhat easier for me once I have one fit and I make the corrections to my pattern, I can be relatively sure of the fit of the second suit, as I make a double breasted suit from a single breasted, or a two button with peak lapels from a single breasted shawl collar tuxedo.

The trousers here are pleated, with two outward pleats, which was a style I wasn't fond of- mostly because I didn't like how I drafted them, nor the way they were drafted in all the references that I had.(It was all about the development of the pleat placement)
I wanted to change how I was doing them so I had a good talk with my colleague and friend Evan (a fellow tailor) about what I didn't like and what I wanted to do to change them, and he confirmed that I should go ahead with what I was planning and they are much better. That talk and subsequent change just goes to show that even after 20 years, you are always learning- and sometimes the solutions to problems are staring you in the face but you don't see them for a while, and when you do, you just can't believe you didn't see it earlier. Thanks Evan.
At this point a suitable Yiddish expletive is called for- wish I had one........Oy!

Tuesday, July 7, 2009

tailcoat started

Tailcoat cut out and ready to go.
I don't usually cut my patterns "net" or without seam allowances but I did this time. Most cutters here have their own method of pattern making and some include seam allowances everywhere, some have specific areas that have allowance included and some cut without and add them on the fabric. I usually have allowances included in certain areas but I changed my method here so I could be clear as to the shapes and sewing lines.

After I cut all the pieces in wool, I then cut all the linings and the canvas pieces to complete the whole package for the tailor. I then lay out all the pieces for her and we talk through the garment, to make sure that I know that she understands how far I want to go to the next fitting, any construction details that may pose problems or require creative solutions, and to convey an overall sense of the piece.
The next stage for the tailor is marking all the pieces, in this case by tailor tacking. We use a slightly heavier and coarser cotton thread, waxed with beeswax to do this. This thread, along with the wax, has more "tooth" and grips the wool so that the tacks don't fall out. We use cotton thread for all basting as it is easy to break by hand and less likely to cut the fibres of the cloth when being removed.

One change that I made after a little more research, was to the sewn on lapel piece. Instead of cutting two separate pieces, to be sewn together along the outside edge, I cut the lapel on the fold, and it will just have a little dart at the tip of the peak portion. It is pictured in the upper left of the photos.

More to come......

Friday, July 3, 2009

a lot of suits


We have a lot of suits to make and it has been a very busy week trying to get patterns made, have fittings, mark alterations, change the patterns and fit suits that are in the baste up stage.


We have quite a variety of suits to make for all shapes and sizes of gentlemen, from the 44 stout to the 38 short. The plaid suit jacket here is being finished off with some trim for an understudy. The trim is a bit odd in my opinion but it's being put on so that it can easily be removed at a future date. If you think that it looks very long, it is, because the man wearing it is around 6'5" tall. We are also just starting a nice navy chalk striped SB with semi peak lapels and on my table, I am just chalking out the footman's coatee onto the wool. I was busy with fittings this afternoon and didn't have time to cut the coatee out, so that will happen Monday morning.
Today, I cut out a Tattersall style waistcoat and fit a DB brown plaid suit, a SB grey birds-eye suit, two doublets and a 17th century coat suit, as well as a lovely SB black tuxedo. I will need to mark the alterations on those on Monday. I think I have only one person so far that I haven't made any patterns for, so I think I'm doing well. The designer returns in a week, so I hope he likes what we've done in his absence!

Sunday, June 28, 2009

coatee pattern continued


Continuing on, my apologies for taking so long to post . Many things are conspiring to use up my spare time, most are enjoyable - our band has been playing music, and others not so enjoyable-my 16year old cat is dying. Big sigh.

Onwards.

When I discovered that the draft was fully double breasted it didn't make any sense when I was making the pattern. So, I decided to move the seam of the lapel one inch in from my usual CF construction line and then draw in the lapel shaping. That puts the break point of the lapel beyond the CF by 1 1/2 inches. The original draft shows darting in the seam of the lapel to the front, both at the neck and at the waist..
I draw the waist seam from the side back panel at the waist up to about one inch below the natural waist construction line and then curve down to the centre front. In the original draft it looked too low so I have put it where I think it should be.
I used the original draft reference points to locate the front edge of the skirt and the size of the "strap" which is the narrow section of the skirt at the waist.
I then cut my pattern pieces apart, walk or measure all the seam lines to make sure that they are correct and also true up the lines such as the armhole, shoulders, lapel and waist.
I then cut it in muslin and had it made up and ready to fit.
I sure hope that the measurements are correct, cause it is a pain to go to all this work and then find out that the person is 2" bigger around than what you were told. Smaller, I can deal with- bigger is much more difficult.

Tuesday, June 23, 2009

coatee pattern drafting


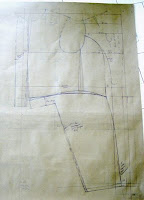
So here's the beginning of my pattern for the Footman's Coatee. Again, my apologies for the photo quality, I had to put these on the floor to take a full picture.
First the basic information:
Measurements- I didn't take the measurements for this actor and in fact I have never seen him, which makes me work on the side of caution. I think that some of the numbers are wrong and therefore when in doubt, I revert to standard calculations and hope for the best.
I read through, well actually I skimmed through the period draft looking for the details that will help recreating this look. I find some of these drafting instructions so tedious that my eyes glaze over while deciphering them.

As a side note, I find it interesting to look at my patterns like this, because I see right now things that I want to change....hmmm, anyway, onwards.......

One concern that I had right away is that these coats are supposed to be closed with a link fastening, but the draft is fully double breasted. Mistake or something that I am missing? I decided that I would have to modify it because it didn't feel right.

I'll start with the back:

I decided to draft this without seam allowances because I feel its easier to develop the shape that way.
I start with a long vertical construction line and a line perpendicular to that at the top.
I find the scye line and it's divisions above that, square out.
Mark the width and height of the back neck and draw it in.
Mark the waist length. His waist length measurement seemed a bit long so I reverted to using 1/4 of height as his natural waist and drop 2" for the "fashion waist".
Mark the full length of the coat. I chose to start 4" above his nape to back of knee measurement
Mark in the amount of waist suppression at the CB waist.
Draw in a gently curved CB line.
Mark out the across back width and square up to the top line.
Mark out the shoulder slope and draw in a rough back shoulder line.
Mark in the width of the CB panel at the waist line, using the draft as a guide to the width.
Determine where the curved back seam from the draft falls on the scye line and where it ends at the back armhole, and draw it in.
I start with a 3cm suppression at the side back waist and draw in the other side of the curved back seam.
Measure along the scye line, 1/2 chest plus 5cm ease for the CF line and square up and down.

I use the scye line as one base for balance in the draft, so I measure the seam line of the curved back seam, on the back panel, from the scye line to the armhole. I then measure the corresponding seam line on the side back panel from the scye line to armhole and extend it as required so they are the same measurement. I go through the same procedure form the scye line down to the waist for these seams to reconcile the measurements.

Measure the width for the armhole, and make a mark.
Now I start working back from the centre front line.
I think his chest width measurement could be wrong so I have to use my judgement here. I mark it and decide on a happy medium between the armhole width and the cross front measurement. Square up to the top line. I measure toward the front along the top line 1/6 working scale on the square(neck width), and again 1/6 scale. I draw in a tentative front shoulder line.
Now I mark 2.5 cm below the drafted waist on the CF line and check the measurement I have for nape to CF waist against the pattern, and I raise the front balance on this pattern, 1 and 1/4 " above the top line and square up my neck and shoulder lines, redraw them in the new location. Then I draw in a basic armhole shape.

I then measure down from the neck point 1/6 working scale minus 2cm and give myself a guide line for the gorge line angle. Draw it in.
Now I need to decide about the link closure and how to make sense of the look of the seamed on DB lapel.

I will stop here and continue tomorrow.

Oh yeah, ok, I know I use metric and imperial measurements interchangeably, or some may say randomly, but I grew up with imperial and draft in metric and use whatever measurement system that suits the situation-no pun intended. You'll just have to forgive me.

Friday, June 19, 2009

tailcoat

In our upcoming show, two of the costumes that I am building will be for footmen.
The footman will wear formal wear consisting of trousers, waistcoat and tailcoat. The designer had a photograph from the 1950's and I found what I think is the technical draft reference of the "Footman's Coatee" in the c.1917 "Climax" System for Cutting Gentlemen's garments by W.E. Leggat and T.W. Hodgkinson. I don't think the design of these coats changed much between 1920 and 1950, so it is a good place to start.
I like that they sign themselves "Faithfully Yours" in the endpapers.

I am going to use this text as a guideline. I am not going to try to reproduce the draft as written. I find these drafts very interesting and I have drafted them up in the past for the sake of trying them out and to see what the accepted style and shapes of the era were, but I have to do this under the time and budget pressure of work and so I will use my own method of drafting tailcoats and I will use the information in the original drafts to guide my eye.
I thought that this would also be an opportunity to document and share both the pattern making and the construction methods that we will use to make theses coats.
I am trying to get my scanner working so until then I will have to just photograph the book for you to see.
My apologies for the lack of quality photos!