Showing posts with label cape. Show all posts

Thursday, April 23, 2015

Counting the weeks:14 and 15 with an overcoat update

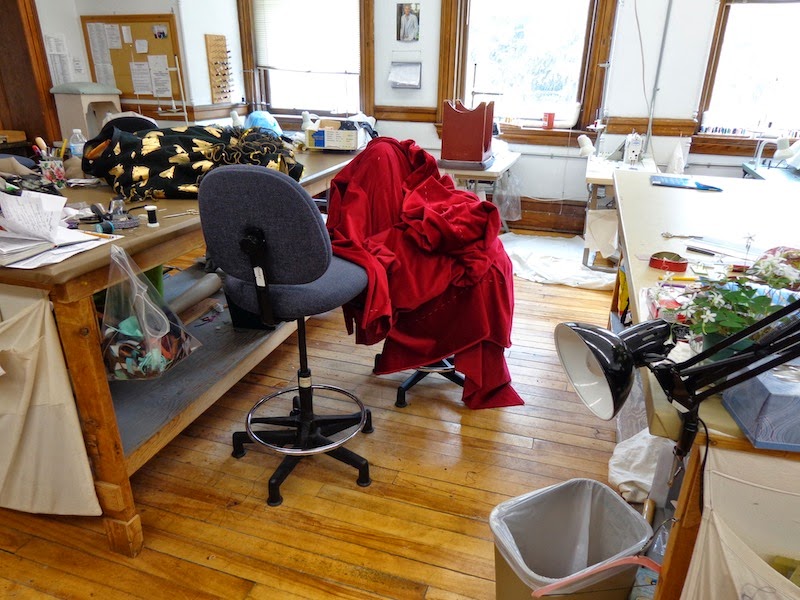
It was getting kind of crazy around the work table over the last two weeks. I put in many more hours than I would have liked to, but the work has a deadline and we do strive to make it work!

That cape in front- will it ever get worked on, and will it ever get out of my line of vision? Soon, I hope someone will be free to work on it.


I included a shot of the wall behind my table just to give an indication of how many patterns I have churned out in the past 14 weeks. I don't make separate patterns for linings or facings so these are just the basic pattern pieces. 
For the 18th century show, I have to cover the builds and stock costumes for 8 different actors. I have 5 skirted frock coats, 6 pairs of breeches, 5 waistcoats, one shirt, 2 capes, one sleeved casaque style cape, and cut, make and finish 9 stocks/cravats. Repair and or renovate three coats, 3 pairs of breeches, 3 shirts, 2 new waist coat backs on old waistcoat fronts, reline a old cape and sundry other things like changing buttons, repairing linings, adding pockets...... washing and ironing 5 new shirts.....it does go on!
Anyway, it adds up in the pattern drafting department!    

Here is an overcoat update. I documented the toile version of it here along with the waistcoat, which has turned out quite nicely. The coat is going to get a removable capelet, and I still need to tweak the set of the sleeves but it is turning out very well- We have also constructed it slightly differently than usual, and I will get some more photos detailing how it was made this week.

That's it for today. 
I have to switch gears and get a pattern for a 1970's "ish" suit drafted up and to be honest I need a day to wrap my head around the change from 1760 to 1970! Maybe I will do that on Saturday when I will have fewer distractions at work.

Saturday, April 4, 2015

Week 12 at the cutting table

Week 12 at the cutting table, and I am trying to get the last few pieces figured out, and hopefully into someones hands pretty soon.
I have fittings from 6 weeks ago from the third show I have to work on, that I have not had time to deal with, and the sooner I can get back to those the better work will progress.

So one of the last costumes that needs extensive figuring out is this one with the red cape.
Luckily the design assistant found a cape in stock that fit the design quite well, so all we have to do is trim it up! Well that sounds easy, but putting trim on a finished velvet garment means lots of hand sewing.
You might think that it would be faster to machine it, but if you have ever sewn velvet, especially sewn velvet to a non velvet, you might end up on the floor in tears if you tried to machine it.
By the time you unpicked the lining and made it possible to get to at the machine, then fought to keep it from looking like a dogs breakfast when finished- and the trim would have to be basted in place anyway, you might as well save the drama and stitch it on by hand.

The trim is wide and it travels around the back neck so there will be some careful manipulation and cutting of that trim to make it work.
The bijoux department will also be adding jewels to the trim, so it has to be placed symmetrically on the right and left sides.

The garment underneath is basted together so we can get an idea of the spacing of the gold trim it needs.
So I have pinned it out and send off a photo to our designer, and well, I found out that it needs to be set closer together.
I still need a black fabric for the centre front detail, and this black will go around the hem with more gold trim on the edge and more inset jewels.
There is a lot left to figure out, but it seems in hand, well on Thursday it still felt in hand, but we will see what Monday brings.


Thursday, May 29, 2014

The finished cape

I don't want to neglect the fact that I have had other work to do- its not all prom dresses here. I confess though to making my daughter two dresses! There I said it. Call me crazy, but the deal was the second dress had to use some of the original fabric and the same bodice fabric and shape..
Anyway....more on that later.

Earlier, I had posted about the very large red velveteen cape here but I haven't followed up yet with how it turned out.

So first, the finished item front and back.

The designer had the crowns embroidered onto the off cuts of the velveteen. Once they came back from the embroidery place, they had a fusible backing applied to them. In the best of all worlds with no budgetary constraints we would have liked to sew them on by hand, but in reality, we couldn't do that, so our decorating department did a test using a paper backed fusible- and it worked, so they were fused and then they were individually cut out and trimmed to shape.

We had a fitting with the full costume and the cape to determine the hem length (the front length is important to get right) - we don't want to trip up our actors! The actor did a bit of movement in it, at which point we decided that it needed to have a harness inside to stay put. We took it back to the table, removed the lining which had been basted in for the fitting, made a neckline correction, and then prepared to hem the beast. 
I knew the cape had to have a closed lining, which means hand sewing the lining hem to the velveteen, but hemming the velveteen by hand seemed like both a daunting task and perhaps not a strong enough technique. We have a semi industrial Bernina that does a blind hem stitch, so the velvet hem allowance was trimmed to one inch and hand basted in place to prep for the blind hemming. It worked like a dream and was pretty much invisible. That process alone trimmed hours off the time. 

Once the hem was done, off it went to the designer, who, with her assistant, laid it out first on the floor to place the crowns, then put it on a stand and tweaked the placement until she was happy with it. 

The next stage went to the decorating department, and they carefully fused each crown using a velvet press cloth to minimize any chance of crushing the surrounding velveteen.

Then it came back to us. 
It was laid out again on a big table for the lining to be basted back in. Each step needs to be checked, so back it went onto the stand to make sure the lining wasn't pulling anywhere, then back to the table to be hand sewn along the front edges, neckline and hem.

Not quite done yet! 
The last stages were to make a harness, and cover the harness in the same fabric as the doublet. The harness was then hand stitched to the cape  from the back neck to just in front of the shoulders. 
Last but not least, the front corners of the cape needed to attach to the doublet and look like it just sits there magically. A couple of hooks and snaps took care of that and then we were finished.

All done and happy with it. 
Now do I keep the pattern for it, or not? Maybe the half muslin would be easier to store.....hmmm.....


Sunday, April 27, 2014

Dress capes and fancy linings

I seem to have a variety of capes to make this year and here are two of them.
These are what I would call dress capes, something usually worn with formal wear earlier in the last century, but for our purposes, worn as character pieces with regular suits underneath.
The brown cape is a cotton velveteen with a silk velvet collar and facing and a wild orange paisley lining. Very vibrant and lots of fun!

The capes have an arm slit for optional wearing opportunities. You can just see the inside of the double piped slit here on teh velvet.
The second one is made of a plain cream wool, and has a wild pink and blue lining.
The difficulty with this one was that the lining showed through the cream wool, which was not an effect we wanted. So what I ended up doing, was to line the cape with a dark beige lining first and then apply the colourful lining as a separate layer to the inside.
This certainly added time to our budget, but on the other hand, the fancy lining could be pulled out at a later date and the cape would then be suitable for a more sedate character.

One tricky thing to keep in mind when making lined capes is the bias drop. The side seams of these capes, being on the bias, drop considerably and the outer fabric and the inner lining drop at different amounts due to the individual fabric qualities.  This means after the outside shell is sewn the lining must be checked and adjusted for size, because as the bias drops the fabric panels get narrower. The lining must always be slightly larger than the outer layer as well. So I always start with allowing a centimeter on the double extra on the CB and side seams of a cape of this size, then adjust as needed.

Sunday, April 6, 2014

a very large cape

Once upon a time I had occasion to make quite a few large garments and one of the things that makes handing large patterns and garments time consuming is that they do not fit on the cutting table.

My cutting table is four feet wide by eight feet long, and most of the time it is perfectly adequate for laying out fabrics that are folded in half lengthwise as most are. Sometimes though, it makes more sense to lay fabric out its full width, so if I have 60 inch/150 cm wide fabric, it is wider than the table and hangs over the edge. This is irritating because I cannot draw out the full pattern at once, and it takes much more time to align the fabric properly, draw out a portion of a pattern, then shift the whole piece of fabric over, so the other side hangs off, and then realign it all and draw out the remaining pattern.

I solved this problem first in my personal space by having a 12 inch wide extension made that hinges to the full length of my table, so when I need it, I prop it up and go to town. At work, I requested an extension and they made me a removable 12" x 8 foot long extension that sits on clever slide out supports.
So far so good. I have used them over and over and it is quite helpful.
This year though I have a pattern that doesn't fit even on the extended table.
I am making a very large cape.
The centre panels are 3.9 metres long.
It is floor length and has a modest train of only 24 inches or so, but it is 7/8 of a circle and I had to find another place to work on it, from drawing out the paper pattern, to cutting a half muslin for the designer to look at and for decoration to be placed,  to laying out the pieced panels of velvet and the silk lining.

It doesn't even look big at this angle!
The lobby turned out to be the best place for the task, so this past week I have been up and down between the basement at one end of the building to the third floor level at the other end of the building more times than I care to think about.
 Laying out the lining.

I think it is coming along now that the panels are sewn.
A heap of velvet, soon to be a cape!
Cotton basted into the front edge and around the neck to provide support.
Next step: cut away everything that isn't a cape!

Now we just have to baste the lining in, and the hem up for a fitting. I am hoping this will be able to be done on the spare tables in the wardrobe proper or else we are all going to be paid by the mile until it is finished! Thanks to Chris and Laurie for helping me on Saturday!

Thursday, June 27, 2013

Not only suits being made

 Well, things have been very busy at work and we are not just making suits, we have some period costumes to put together or refurbish from stock.
These are some of the costumes we've been working on.
A pair of suede trunk-hose. These are built on a fitted under base of twill. This year we are trying a few new techniques for putting these together. The lower leg or canion of suede is flat mounted onto the twill pieces before the legs are put together.   We constructed the fly completely into the under trouser, which allows us to construct the upper suede pouf separately. The pouf is attached to the thigh first, then brought up and attached to the waistline before the waist band is sewn on.
 The centre front opening in the suede is faced back to the fly notch with a cotton twill tape, and that will then be slip stitched to the fly opening of the under trouser at the end. We figured that by doing it this way, we can remove the pouf if required, make changes to its size, add under structure if needs be without too much trouble. So far so good.
We are also making a doublet that has suede sleeves. These are in cowhide and have decorative ridges sewn down the top and under sleeve. We were able to create a similar look on the seams themselves by stitching a regular seam , pushing all the seam allowance to one side then top stitching a quarter of an inch away- like flat felling- then opening up the original stitch line so creating a similar ridge effect. Luckily we have access to boots and shoemakers and their equipment, because the last seam had to be done on the post bed machine. It makes top stitching inside the tube of the sleeve possible.

Lastly, what is a season without a large robe? It seems I get one every year. Last year was the velvet robe completely lined in fur. This year we have a large scale silk damask, lined in silk duppioni. What isn't in the photos is the waist length capelet of the same fabric lined in....you guessed it, fur.

It is time consuming and sometimes stressful cutting out these large garments. Often I have made a pattern and done a toile fitting without knowing what the fabric will be. So without knowing the fabric width or the size of the repeat, I often have to alter the pattern to fit the yardage I get. 

Anyway, I guessed pretty close as I didn't have to modify the pattern, but it takes a good amount of time to lay out the pieces and make sure that the pattern placement overall is good and the pattern matches at the sides, and that you will have enough yardage overall. Garments like this have to be cut in a one way layout as there is a definite up and down to the pattern. This produces a lot of waste as you cannot top and tail the layout. I also lose a half vertical repeat when I cut the yardage so I can lay the fabric right sides together to cut. This fabric is meant for drapery so it is woven with a half of the pattern ending right at the selvedge edge. I prefer to not use the selvedge as my seam allowance, so I lose then lose a half repeat horizontally, as I lay the centre front and centre back in the middle of the next pattern repeat from the edge. Hope that makes sense.......


Under the cape is an under gown of red velvet brocade with a really nice hand. It is a little bit tricky sewing it together and trying to match the pattern as the velvet pile comes and goes along the seam. I think it is easier to sew plain velvet.
The trick according to Denise is triple rows of pinning. One row of pinning on the sewing line and a row either side to prevent shifting. Oh, and using the narrow velvet foot on the machine. Even then it can be a challenge!


This will be fit tomorrow, so I will try to get a photo of it all together next time.


Saturday, July 7, 2012

velvet cape is finished

 Well, the cape has been finished, and as far as I know, it has successfully stayed on his shoulders without needing any other hidden means of support such as a harness Hurray! Not that he could have a harness, for in the end he must take it off himself onstage so the chain of office has a large hook and bar closure on one side, and he does quite well with getting it unfastened. Whew!

The back has a suede red cross and studding details. I wasn't aware of the cross as part of the design when I first cut this out, and I put a pleat in the back of the cape, but I think we've made the best of it.


The idea of applying trim to velvet is always tricky and tends to involve drawing straws to see who gets to do it as well as some deep breathing exercises. This suede actually wasn't as problematic as we thought it would be. Deep breathing always helps!
The suede cross needed to be hand sewn to the cape. Hand sewing a cut, raw edge of suede needs a bit of preparation.
I wanted to create stitching holes along the edges to make the hand sewing easier, and to reduce any possible distortion of the edge that would occur. I created the holes by stitching the edge with an unthreaded industrial machine with a large needle set at the longest stitch length.
I also found it helpful to mark the cut edge, create the stitching holes, then cut on the line. This allows the suede to feed evenly through the machine and eliminates any rippling that would occur if I had cut first.

The studs went in fairly easily. I just created a circle template of the correct diameter, and divided it up into 18 degree angles (I did mention to my daughter that geometry is used in real life) to mark the placement.
Susy had the idea to put a piece of Styrofoam in between the velvet and the fur, and that allowed the studs to press in through the velvet or suede, into the Styrofoam, and it was a simple thing then, to lift the velvet carefully and press the prongs of the studs back with pliers.
Done.
And so is my season here. Early this year, but I have some work coming up in August so now is the time to relax if I can in the 36 C degree weather we've been experiencing. No air conditioning either.
At least I can wear something lighter than this cape!

Wednesday, June 6, 2012

velvet cape progress

Here is the fake fur lining all stitched up and ready to be basted into the cape which is made out of velveteen.
I cut the cape to have a wide standing grown-on collar, a centre back inverted pleat, and a train.
There is some structure in the collar of the cape. I cut an inner yoke of hymo, that extends into the collar and the collar section is reinforced with a layer of heavy white shirt fusible, which we laminated using stitch-wichery and then machine stitched the layers together to prevent any delamination in the future.
The hymo extends down the front edges of the cape, to provide support and stability which we will need when we get to the point of attaching the fur to the front edge.
This is the velvet being laid out on the fur in the other room where there is a free table.  

Denise started at the top and basted the two pieces together down the centre back and along the neck before attempting to baste the fronts. It is really hard to manoeuvre all this fabric around, so she will do what feels right on the flat then double check it on the stand. We will have a fitting with this, when the designer returns, so it will likely have to come apart, although I wish there were some way to not have to do that. The hems needs to be checked, as I am sure that the fur lining has lifted the overall length, and we have to make sure the actor feels okay with the length, especially at the front, since we don't want it to be a tripping hazard.

Here it is at the end of the day today (Tuesday), basted together and on a stand. The fur needs to be re-basted on the left front as you can see there is too much length there. Overall though, I think it is looking good. I should make a harness for it just in case, because it is heavy and slippery too.

Now we wait. Our designer returns on Monday so we should have a meeting, talk with the props department about the state of the armour, bijoux for placement of some decoration, boots and shoes to see if the boots they are making will be ready to fit, and then arrange the last fitting for all the costumes this character wears.

Finally today, some much needed supplies came in, and a few decisions were made so I can move forward with a stalled portion of the project.

Monday, June 4, 2012

fake fur and chain mail


    Well, I managed to get the fake fur cut out by 5 p.m. on Friday.
Susy even found some time to do a couple of stitching samples for me beforehand, just to see how it would behave at the machine.

The best way to seam this fur is to cut it on, or just inside the pattern sewing line and carefully pin then zig the raw edges together. This eliminates bulk at the seams, and is surprisingly strong- we both had a go at trying to pull it apart and couldn't. The zig stitch should actually fall over the raw edge, and if the tension is adjusted properly, you can almost pull the seam flat.

Once the seam is done, you can pull the fur out of the seam as needed with a yarn needle or even a plastic nail brush.

The cloak has bias to bias seaming over the shoulder and a straight to bias seam at the side back. In the velvet, the bias seams went together as cut, but, as you can imagine, the straight to bias had to be hung up to let the bias drop and subsequently the bias side dropped a good inch.
I don't know if a similar thing will happen with the fur, so I guess we will find out tomorrow as it is being put together.

The other thing I have to work out is how to best attach the chain mail sleeves to an under bodice that we made. I think it will entail a fabric strip with metal eyelets that is then sewn onto the bodice so the chain mail can be linked into the eyelets. Then we deal with what happens at the wrist and whether to link the chain mail to a cuff or a drawstring, because there is an armoured gauntlet glove to be worn but possibly taken off onstage.

Thursday, May 31, 2012

leather pants and velvet cloaks


Last week seemed to be all about leather. Leather pants, leather gorgets, leather straps, altering old leather tunics and breeches.
This week has been a bit of a blur of fittings and figuring things out, chain mail sleeves and skirts and gambesons, and last but not least, the cloak.
The cloak of not enough fabric, the cloak of fabric that was then ordered last minute, from England, and the lining of fake fur that just arrived this afternoon. Finally.
Now it is just a matter of cutting it out.
It takes a bit of time to cut large cloaks out, partly because I am interrupted often almost continually during the day and also because I have to lay everything out in order to make sure the pattern fits in the yardage I was given, and then I have to cut it out singly, piece by piece. I have an extension for my table that I can use to make it 60 inches wide which helps a lot, but is very difficult to manoeuvre around.
This cloak has a centre back wedge shaped pleat with a trained hem and a partially grown on collar, so the centre back piece is about 86" long.

This is going to be fully lined in fur. Yikes! I'll have to weigh it when it is done just out of curiosity.
These guys have a lot of heavy costume to wear with armour, chain mail, cloaks and helmets and swords.
Quick change rehearsal should be interesting!

In case you were wondering how much yardage it took....they bought me 9 yards (8.3m) and I only used 7.2m!
      Tomorrow is for more fittings and to cut the fur lining, mask and knife at the ready.
I'll let you know how it goes.