Showing posts with label ruff. Show all posts

Monday, August 31, 2015

coming up for air, and more ruffs

The season at work ended in much the same way as it progressed all year- at full speed and intensity!

I went away for a week, but once I was back home, I felt that I should just remain horizontal for as long as possible in order to replenish my mind, and get rid of the tension in my neck. I needed some time to reconnect with my husband and daughter, and do something with my garden before the neighbours complained.
I have been diligently looking for work as well, so I may have two upcoming projects. For now though, I want to make a few notes and posts about some other things I worked on this season while it is still somewhat fresh in my mind.

Before I get to that I wanted to show you the ruff that we made for the black doublet/large trunkhose costume.
This ruff was quite large (71/2" neck edge to outer edge) as the character was supposed to look like his head was on a plate. The designer wanted to support the ruff with a wire frame or supportasse. This became a project between myself and the millinery and bijoux departments.


My part of it was not only to make the ruff, but to give my co-workers a neck shape to work from.
I have seen examples of these supportasses with circular spaces for the neck, but the neck is not  circular, so we needed to start with a proper shape.
We also needed to figure out how the ruff and supportasse worked with the doublet. As well, how does the actor get into it?

Since we were using a wire frame, we determined that the ruff will sit along the top edge of the doublet collar. We have to attach the ruff to the supportasse and the whole unit to the doublet collar. It needs to be removable for both cleaning and storage as well as just to functionally put it on.

I have seen examples of wire supportasses that had "prongs" of wire that extended downwards and were inserted in channels on the collar, but we decided against that.
In the end we decided to make the grosgrain neckband of the ruff extra deep.
I believe we made it 1 3/4" deep in the end. The depth of the ruff at the neck edge was only 1 1/8" which left us with a good 1/2" of grosgrain "flange" that would tuck inside the doublet collar. We sewed snaps onto the flange and matched them to snaps that were sewn to the inside of the doublet collar.

Once the ruff was prepared, we had a fitting to confirm the fit of the doublet collar. At this stage the ruff is not completely finished- we always leave extra length in the grosgrain and of the ruff fabric to make any further adjustments.
We had prepared a flat template in light cardboard of the ruff  size with the shape of the neck cut out. Then we confirmed the angle that the designer wanted the ruff to sit at. Once the neck shape in cardboard was correct, the supportasse was made. An important note- the supportasse does not meet at the CF. It has a gap of approx 2 inches to facilitate putting it on.

We then laid the ruff on the supportasse and basted them together aligning the inside neck edges.
At this point we had a final fitting. We then removed the supportasse and finished off the ends of the grosgrain and the ruff itself, then added closures to the front of the ruff and reattached the ruff to the supportasse by hand.

The ruff was the last piece of costume that the actor puts on. Once his doublet is fastened, the ruff is put on by twisting the front edges in opposite directions just enough to get his neck through it. Then it is aligned and snapped to the doublet collar. This takes a bit of dexterity by the dresser who has to reach over the ruff and get their fingers of one hand in between the actors neck and the ruff grosgrain, to locate the snaps by feel, while with the other hand is under the ruff, supporting and pressing the snaps together from the outside. The ruff opening at centre front is snapped together last.

I think it turned out well, but I did wonder a bit about the amount of fabric needed for ruffs this large in diameter. I wondered if we should have sewn the inner neck pleats closer together, forcing more fabric into the neck circumference thereby using more fabric overall which would translate into more fabric to arrange on the outer circumference.

Just something to contemplate for the next time, but I think in the end it turned out rather well. I will have to keep my eye on it and see how it fares over a season of wear and tear. Hopefully we can get more than a few years out of a ruff as they are time consuming (expensive) to make.

Next week I hope to get some thoughts on paned and puffed sleeves onto "paper"


Monday, June 30, 2014

Layers and things that are hardly seen

I was looking through some of the work photos I have taken this year, and it struck me that some things which we make just kind of get lost in the final look. I know they are there, but overall they seem a bit lost to an audience. I like to think they would be missed if they weren't there. :)
Actually I know that is true!

so here are a few shots to illustrate....

Here's the final look, but what is under that big square cut robe and chain of office?


A silk sash, with a nice fringe and trim detail.


The blue velvet sleeveless gown and belt under the sash.


The doublet and ruff worn under the blue velvet.

There is also a pair of suede breeches, which didn't make it into my camera, but are indeed worn under the blue velvet gown.


Many layers indeed, and quite a task to wear and perform in under the hot stage lights in the middle of summer.

Monday, March 3, 2014

Ruff details

Just a few more thoughts and pictures of a couple of ruffs we are working on.
As I mentioned, these ruffs are simpler than the circular kind, but there are a few things we think makes a difference in the finished item.


The edge! It help to have an extra bit of something on the outside edge. The ruff starts as a layer of fabric with a layer of marquisette laid on top and stitched down the centre.  Karen then inserted a heavy fishing line in the folded edge of the fabric. Once this step is complete, the inner edge needs to be stitched
together. Both of these ruffs were stitched once with a straight stitch to hold the layers then zigged closely and trimmed.


Silvia's ruff has an edge finished with a close serge in black using woolly nylon thread. As well, we finally found a use for those decorative stitches that seem to be included on many domestic sewing machines! A nice floral stitch pattern added along the edge of the fabric gives the impression of the ever popular blackwork look.
You can see the ruff being gathered up here, mark the spacing you want, then stitch by hand through the dots and gather up the resulting pleats. You need to allow for the turn of cloth when calculating the spacing. For instance, these are pleated up at 1 1/2 inches to be stitched to a 1 1/4 inch band.

Both top and bottom of the pleats are stitched to the band. The outside edge of the ruff also needs to be stitched together by hand. These are stitched about 1/4 of the way up from the folded edge to hold the figure eight shape.


The last picture is the ruff almost complete. We are not sure of the exact size required yet, as it will be attached to a doublet collar, which is still under construction. We have allowed some extra fabric to pleat and extra neck band length, so it can be adjusted to fit, then finished.

Sunday, February 23, 2014

more ruffs!

Was it only just last year that we made some big circular figure eight ruffs?
Well, this year I think we will make more and just to keep things interesting, we are also making some straight grained ruffs.
Now, figuring these out is a lot easier as they are literally straight grain lengths of fabric, drawn up and sewn to a neck band.
One thing we did differently this year was the neckband. The change to our approach came out of not being able to find the right width of grosgrain! We wanted 1 1/4 inch wide but couldn't find any at the time, so what we did was zig together two 5/8 inch pieces, and mount them onto a 1 1/2 inch band. That meant there was a 1/4 inch left that we stitched another piece of grosgrain to, forming a flange that would tuck down inside the collar of the doublet.
Now we can attach the snaps to the flange piece...duh! why didn't we think of doing this last year? Oh well, live and learn! I love it when this kind of thing happens.


Here you can see the clever flange/band technique!


More descriptions and details to come........

Sunday, May 12, 2013

A few finished doublets

 Before I get going on this post, I have to say something about the weather. It snowed today.
Last week the temperatures were in the mid to high 20's (Celsius), and today was a high of 3, with flurries. I am not amused.
 
                                                        I have also been very busy at work, which has tired me out and  on top of that we had a vehicle fire and have lost our VW Westfalia, which has not helped in the staying positive department!
But enough of that talk.

I thought I would show you a few finished items today, two doublets and a variation of trunk hose that I am quite happy with.
The brown doublet is quite a large size, I think a 52 chest if I remember correctly. I wasn't expecting this trim as it was not indicated in the drawing I was working from, so it was a surprise when the designer wanted it.
I had already cut the body out when that happened and I was fortunate to be able to accommodate the trim placement in the existing body panels. The unfortunate part for the budget was that it had to all go on by hand, for a few reasons- One: the backing and structure under the fashion fabric was boned and the fabric had already been mounted to the backing, - Two: the trims were wobbly and needed to be basted in place over a ham so they wouldn't be too tight- Three: one trim was quite open and the other was velvet that crossed over the other, and machining looked like it was going to get tedious. The original though was double lines of trim, but that would have been almost 75- 80 metres of trim, so instead it has single lines and 35 -40 metres of hand sewing. Denise and Karen's fingers were very weary by the end of it all. The sleeves eventually got small ruffs as well- sometimes the opportunity to get a picture of anything totally completed eludes me!

The "trunk hose" that goes with the doublet is an interesting adaptation from an idea that another cutter had on a stand. Instead of building separate panes for the trunk hose, the paned look was created from the main fabric. I marked out the "pane" placement, and cut felt in the shape of each pane. The felt pieces were laid on the fabric and the edges were wrapped and top stitched. The fabric in between the pane area was then gathered and distributed behind the panes which creates the effect of depth. It was very lightweight and effective as well. They are built upon an under structure trouser of lightweight drill, that I fit first. The fabric on the canions was applied first, then the paned piece was stitched on at the lower level, along with some shape support (gathered crin), before being brought up to the waist, where the waistband was stitched on through all the layers. That was a very short description of a complicated process!

Next, we have a suede doublet with contrasting sleeves of striped silk. This was a fun project, marking in all the detailed slashing lines. The suede is a bit soft for this kind of project in my opinion, so it will be interesting to see what it looks like after being worn for six months. We opened up the slashes a bit by stretching one edge with our fingers, like fluting pie crust. The sleeves are bound off separately and then attached into the armhole which is finished with a clipped binding and a second clipped piccadil style wing.

This last doublet is the finished result of the muslin I posted about here. It was supposed to look like two garments, the front edge of the grey is loose and the two are sewn together along the piped seam. It also needed a pocket for a letter, which we found out as we were well into the finishing stages, so on the left side we opened the seam between the two "garments"and added a stay piece of cotton that connected with the side seam and also enabled us to create a pocket bag there, without compromising structural stability.

Whew!


So, what is next you ask?
I have a couple of doublets and breeches to make for understudies on a show I didn't work on in the first place, so that is well underway, and later on I should be starting some suits! Hurray! some regular (1930's-40's) tailoring, and I am looking forward to it.
There may be a doublet or two thrown in for good measure, but I can't wait to make some suits.

Saturday, April 20, 2013

More ruff construction


I have been grabbing photos here and there during the construction of the ruffs.
The top photo shows another ruff being laid out on the original pattern so that the markings for the folds can be made. Once all the circles have been marked (I think I cut 11 circles for this ruff), the next step is to thread a needle with a heavy thread- we use a button thread (Coats and Clark  Dual Duty Plus) and stitch down through one mark and up through the next to accordion pleat the ruff.
Tie off or wind the thread ends around a pin and then start sewing the inside edge of the ruff to the prepared neckband. You can see the stitches in the second photo. Sorry, I didn't get sewing action photos during the construction of the ruffs.


The third photo is another circular ruff we made. This one is in black linen with the same crin as a support structure. The difference here is the edge finish. This one has a piping edge, so that entails finding a fine cord - we ending up using yarn- inside a folded bias to make the piping first. The crin was stitched to one layer of the linen, then the piping was sewn to the edge, then the second layer of linen was used to "bag out" the outside edge. The tedious part of this process is the trimming and the pressing of the seam allowances along the outside edge, and then edge stitching the seam allowances down before you can join all the layers on the inside edge. You need to be careful to cut the one set of circles that form the top layer just outside your drawn line thereby making them just slightly larger, because you have to allow for the turn of the cloth taking up an incremental amount of the fabric.  The piped edge does make a beautiful finished edge to the ruff, but it also adds almost a days work compared to the sewn edge finish. The bottom photo is our spiral ruff in place on the doublet. I think I may need to provide a little supportasse at the back to make sure it doesn't ever flop downwards at the back due to its size.
The ruffs are snapped to the collars of the doublets so they can be removed for dry cleaning and other maintenance such as make-up removal.
I have also made straight ruffs that had a softer fabric sewn to the inner circle to allow them to come from the inside of the doublet collar, so there can be many variations on the theme.

Tuesday, April 16, 2013

Ruff- moving onwards


 The ruff continues..........

Jumping ahead! The sandwich of silk and crin was basted together, then machine stitched to hold all the layers securely.
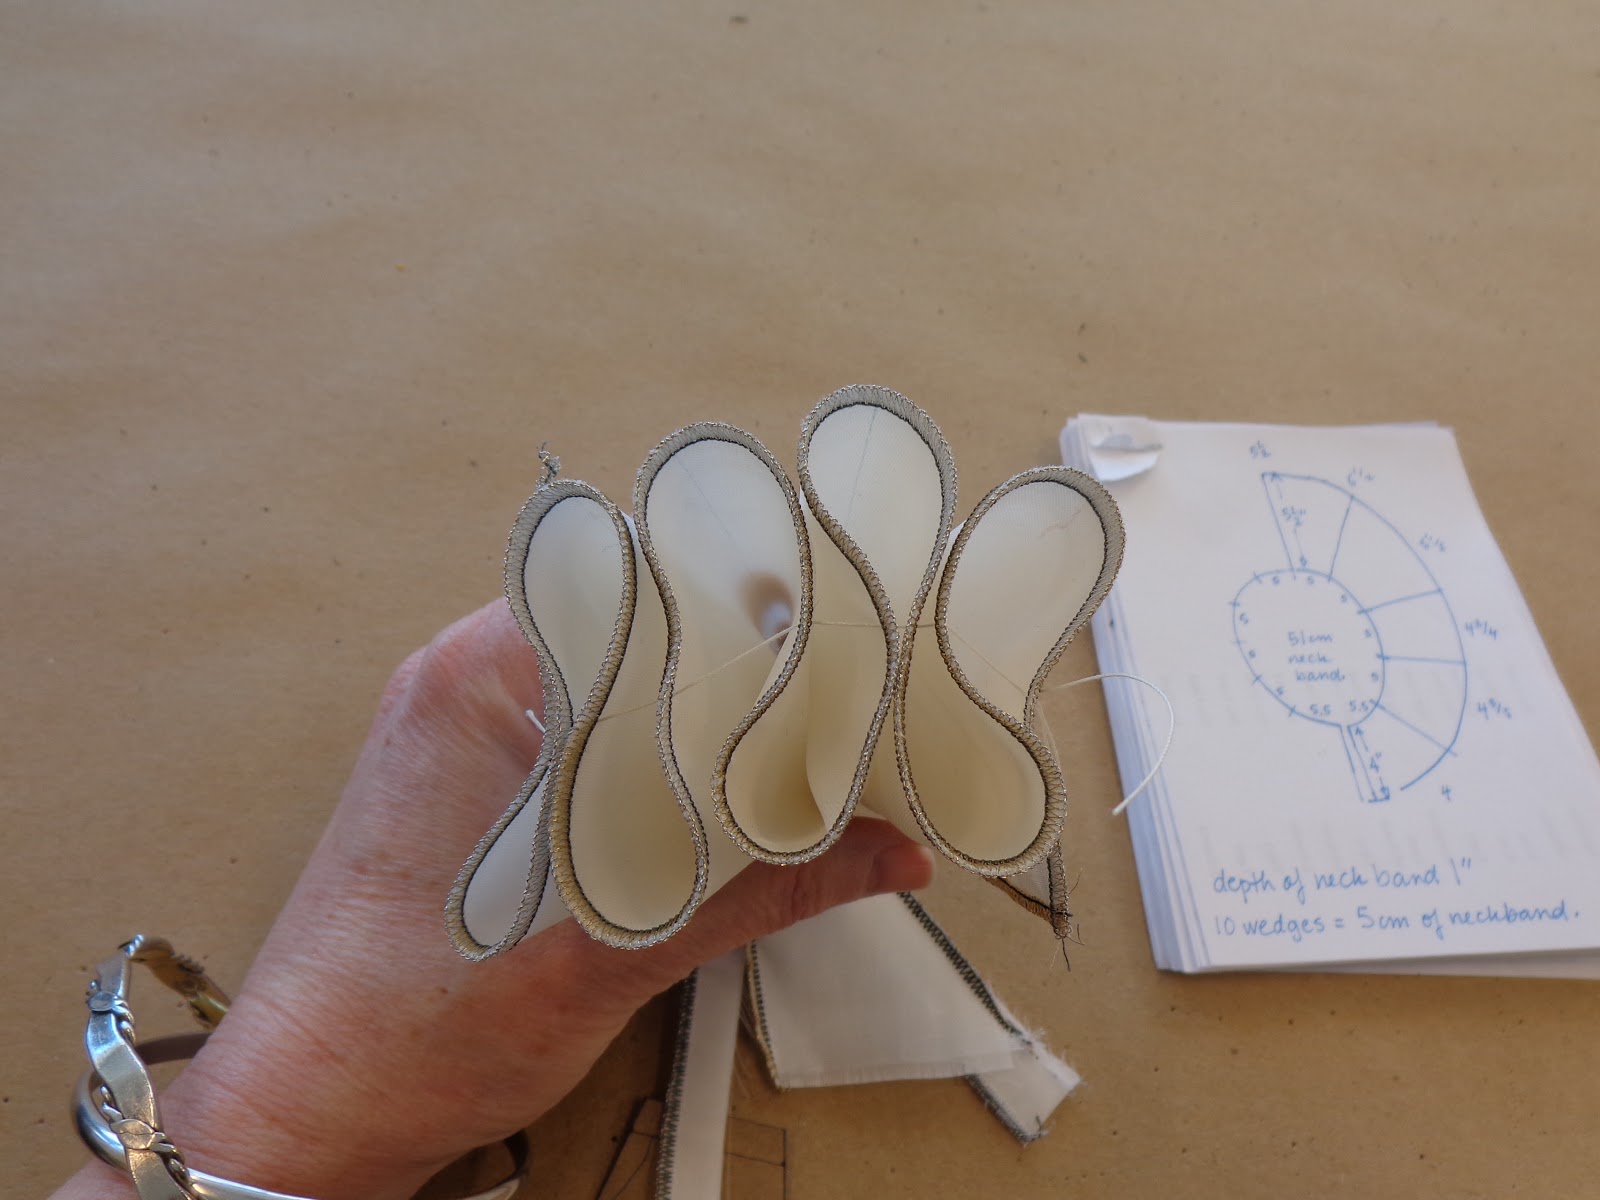
The outside edge was finished with a baby lock edge in metallic thread, silver on one side and gold on the other. The 1/4" seam allowance on the outside edge was cut off in the process.

The inner edge of the circle is not happy to be serged, and believe me, we tried. It was easier to use the industrial zig, and sew a very close zig over the machine stitch, then cut off the seam allowance by hand. A bit tedious, yes, but less
tedious than fighting with a serger!

After the edges are finished, marks must be made for gathering the edges into the figure eight formation. For this ruff, we knew that each section was cut to be 10 wedges, so the sections were remeasured and compared to the original pattern. The outer edge had stretched ever so slightly as may be expected with circles (bias). We decided to divide the sections into ten to maintain our plan, and marked both the inner and outer sections accordingly. Then, by hand with a strong thread, pick up those marks and create an accordion fold of fabric. Secure the thread, set aside and admire!

The next step is to prepare a neckband. We used two layers of grosgrain ribbon so it had some inherent strength. This is also a good time to sew snaps to the neckband, because it is irritating and awkward to sew them on later.

Once that is prepared, mark the neckband top and bottom edge every 1cm ( that is our chosen spacing), offsetting the marks on one edge by half.
For this particular ruff, K started setting the ruff to the band at the centre back. I had cut an extra four wedges at the front as insurance and I wanted the ruff to be symmetrical from the back. once we fit it to the garment, we could remove any extra.
 In even sized ruffs- that is with a single depth overall, you can start at one end and make your way to the other, but a good rule of thumb is to cut just a bit more than you think you need, because it is nothing to cut away excess, rather than trying to add more in.

Almost done by this point!

Thursday, April 11, 2013

Ruff, second post

 I have to say that it is difficult to get photos of the ruffs being made. I get something cut, then voila, it is being sewn together and I am cutting something else.

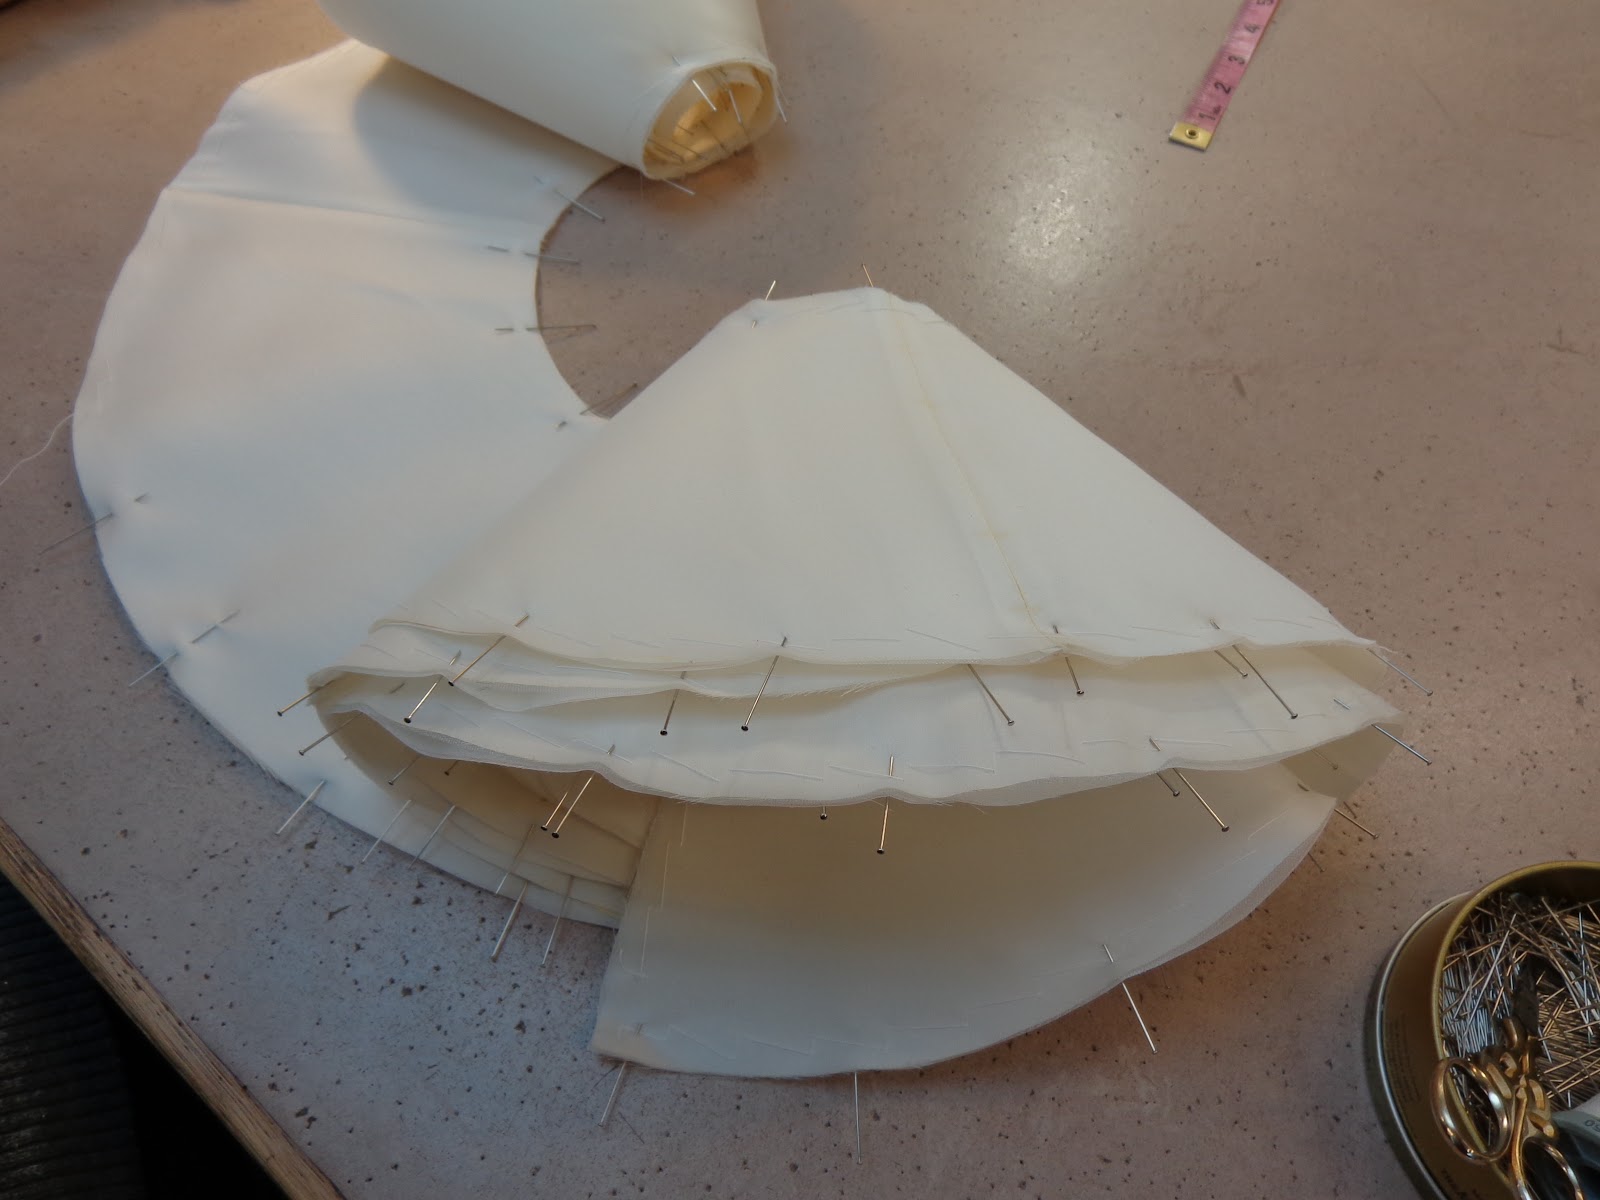
Here, I caught a quick photo of K- sewing together the Crin interlayer of the ruff.  This is the substance that will give the ruff structure. The Crin and the silk are cut exactly the same, there is a 1/4" seam allowance left on the inside and outside of the circles, that will get cut away as the edges are finished.
 The Crin is seamed by overlapping the seam allowances and stitching through the layers, just to keep it as flat as possible.
The silk layers are seamed together with a scant 1/4" seam allowance. The joins between the sections are carefully marked to prevent confusion.
Once all three layers are seamed together, the task of sandwich making begins. I was careful to make sure all the sections had matched grain lines, so the circular aspect was maintained.
The three layers are pinned, then basted together by hand. You can see the basted section being rolled up as K bastes. It is very important to keep the length under control while you are working on it.
After they are prepped, K will overlock the outside edge with metallic thread, and satin zig stitch the inside curved edge which is what will be sewn to the neckband. The inside curve is zigged and cut away by hand. We tried numerous samples trying to overlock the inside edge, but it wasn't working very well, so zigging was the next obvious finish.

Ok, off to cut something else, actually another ruff, then a cape, and some sleeves and a waistband, a collar, as well as some pockets for a variety of items, and talk to boots and shoes about sword belts ....well, you get the picture- it is busy!


Thursday, April 4, 2013

Figure Eight Ruff

 One of the things on our to do list is making a large figure eight ruff.
 It has been a few years since we made one, but luckily Susy had kept samples from the last time as well as notes that she took during a mini course with a colleague. We actually have three figure eight ruffs to make, all slightly different, from black linen with a piped edge to this large graduated one.

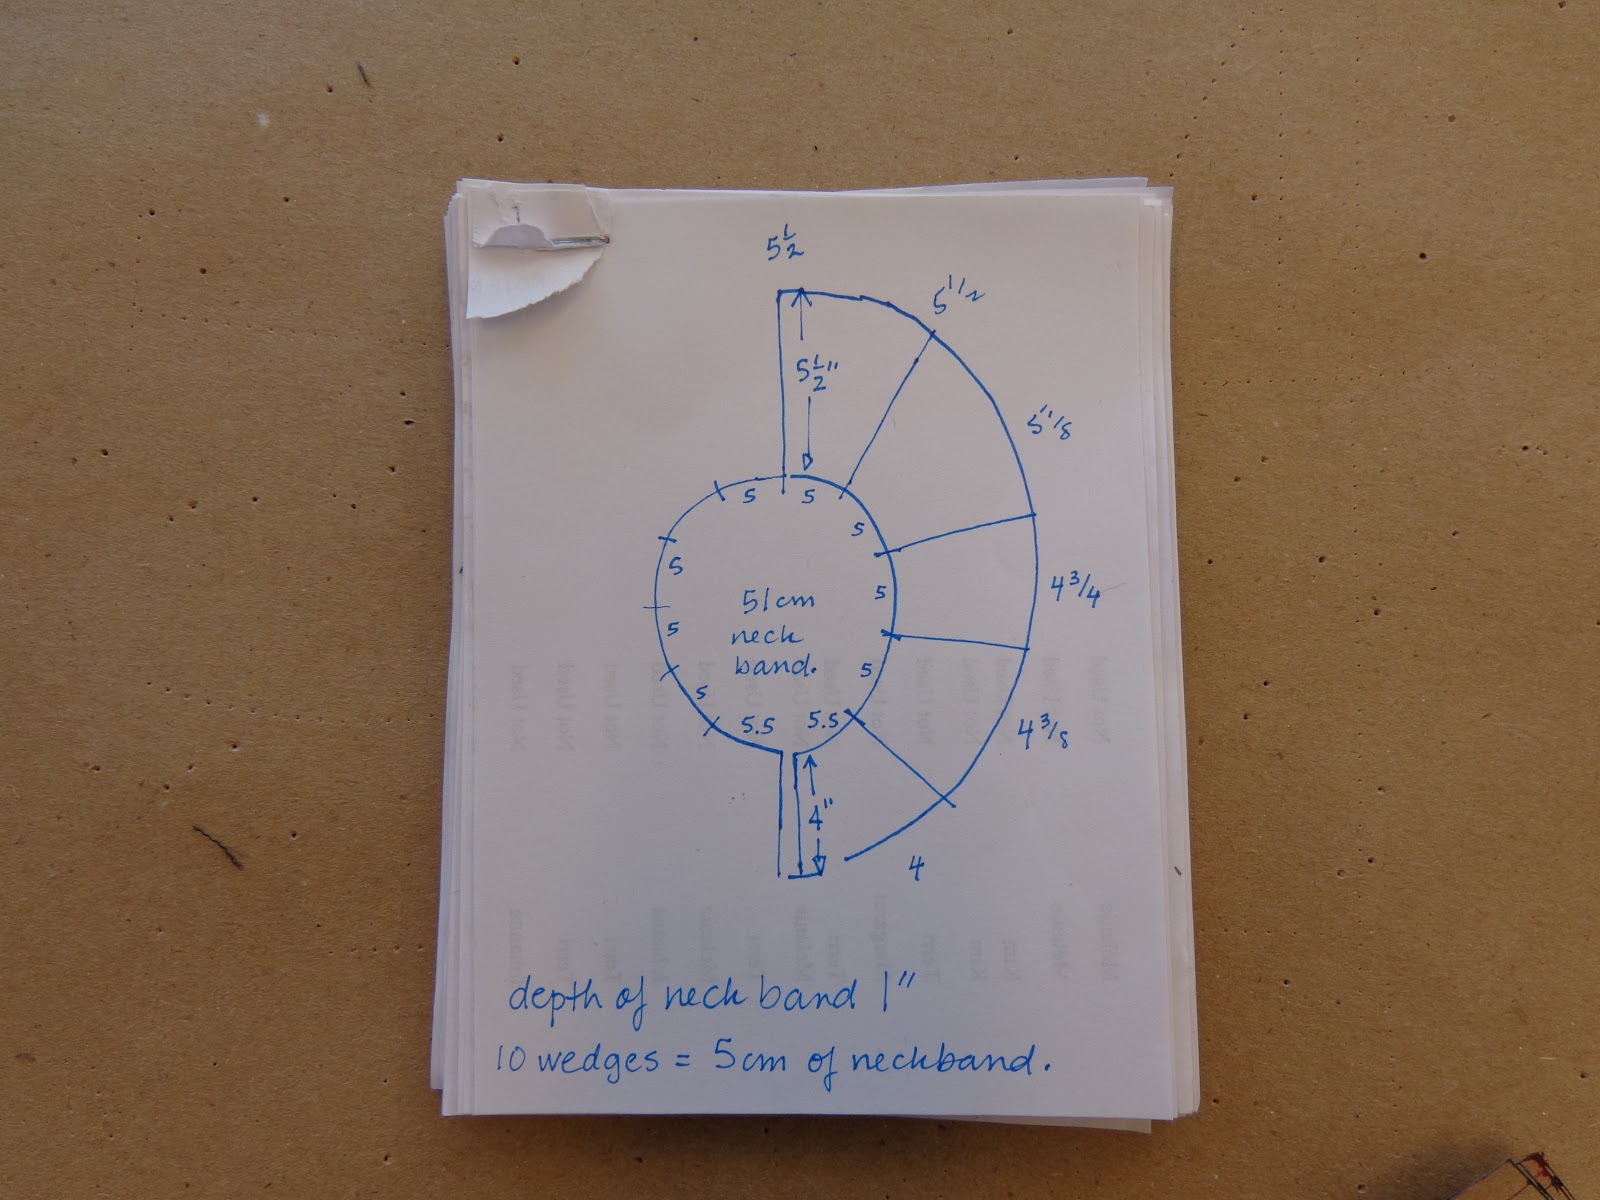
This particular ruff was requested to be made specifically to these dimensions. The size at the neckband should be 2.5cm. The size on the outer edge (the figure eights) should be 7cm. The depth at the front should be 4 inches and gradually increase to a depth of 5 1/2 inches at the centre back.

The edge was to be baby locked in metallic thread.
The fabric is a satin weave silk organza. For structure, Susy made a sample with  an inner structure of heavy nylon crin. Odette 611 from Fucotex to be specific.

So I divided the neckline into sections and determined the depth of each section. I made five different "wedges" to correspond with those depths. I then figured out how many wedges would be needed to fit into each section of the neckband and drew them out as partial circles.
Once that was done, I taped the sections together and modified the outer edge so the 4 inch wedge section would blend into the  4 3/8" wedge section gradually, all the way to the 5 1/2" section. In other words when it was all taped together it was a spiral.
So far so good. Triple check everything. Once you start there is no going back.
Well there is, but it is messy, disheartening and time consuming. So I walked it through with the team, asked them to ponder anything I might have missed while I went to lunch before I started cutting out all the layers.
First- cut all the structure fabric, which is stiched together into a spiral. Then cut all the fashion fabric- double- a layer for the top and one for the underlayer. They will all be stitched together,  into spirals, before they are all sandwiched together.
Pictures to come.