Last week the temperatures were in the mid to high 20's (Celsius), and today was a high of 3, with flurries. I am not amused.
 I have also been very busy at work, which has tired me out and on top of that we had a vehicle fire and have lost our VW Westfalia, which has not helped in the staying positive department!
But enough of that talk.
I thought I would show you a few finished items today, two doublets and a variation of trunk hose that I am quite happy with.
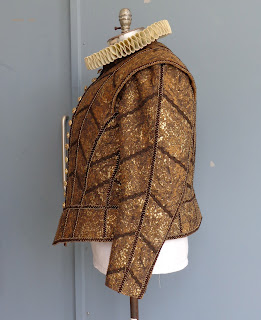
The brown doublet is quite a large size, I think a 52 chest if I remember correctly. I wasn't expecting this trim as it was not indicated in the drawing I was working from, so it was a surprise when the designer wanted it.
I had already cut the body out when that happened and I was fortunate to be able to accommodate the trim placement in the existing body panels. The unfortunate part for the budget was that it had to all go on by hand, for a few reasons- One: the backing and structure under the fashion fabric was boned and the fabric had already been mounted to the backing, - Two: the trims were wobbly and needed to be basted in place over a ham so they wouldn't be too tight- Three: one trim was quite open and the other was velvet that crossed over the other, and machining looked like it was going to get tedious. The original though was double lines of trim, but that would have been almost 75- 80 metres of trim, so instead it has single lines and 35 -40 metres of hand sewing. Denise and Karen's fingers were very weary by the end of it all. The sleeves eventually got small ruffs as well- sometimes the opportunity to get a picture of anything totally completed eludes me!
The "trunk hose" that goes with the doublet is an interesting adaptation from an idea that another cutter had on a stand. Instead of building separate panes for the trunk hose, the paned look was created from the main fabric. I marked out the "pane" placement, and cut felt in the shape of each pane. The felt pieces were laid on the fabric and the edges were wrapped and top stitched. The fabric in between the pane area was then gathered and distributed behind the panes which creates the effect of depth. It was very lightweight and effective as well. They are built upon an under structure trouser of lightweight drill, that I fit first. The fabric on the canions was applied first, then the paned piece was stitched on at the lower level, along with some shape support (gathered crin), before being brought up to the waist, where the waistband was stitched on through all the layers. That was a very short description of a complicated process!
Next, we have a suede doublet with contrasting sleeves of striped silk. This was a fun project, marking in all the detailed slashing lines. The suede is a bit soft for this kind of project in my opinion, so it will be interesting to see what it looks like after being worn for six months. We opened up the slashes a bit by stretching one edge with our fingers, like fluting pie crust. The sleeves are bound off separately and then attached into the armhole which is finished with a clipped binding and a second clipped piccadil style wing.
This last doublet is the finished result of the muslin I posted about here. It was supposed to look like two garments, the front edge of the grey is loose and the two are sewn together along the piped seam. It also needed a pocket for a letter, which we found out as we were well into the finishing stages, so on the left side we opened the seam between the two "garments"and added a stay piece of cotton that connected with the side seam and also enabled us to create a pocket bag there, without compromising structural stability.
Whew!
So, what is next you ask?
I have a couple of doublets and breeches to make for understudies on a show I didn't work on in the first place, so that is well underway, and later on I should be starting some suits! Hurray! some regular (1930's-40's) tailoring, and I am looking forward to it.
There may be a doublet or two thrown in for good measure, but I can't wait to make some suits.


