Sunday, June 28, 2009

coatee pattern continued


Continuing on, my apologies for taking so long to post . Many things are conspiring to use up my spare time, most are enjoyable - our band has been playing music, and others not so enjoyable-my 16year old cat is dying. Big sigh.

Onwards.

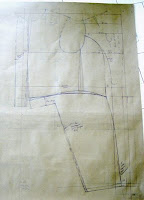
When I discovered that the draft was fully double breasted it didn't make any sense when I was making the pattern. So, I decided to move the seam of the lapel one inch in from my usual CF construction line and then draw in the lapel shaping. That puts the break point of the lapel beyond the CF by 1 1/2 inches. The original draft shows darting in the seam of the lapel to the front, both at the neck and at the waist..
I draw the waist seam from the side back panel at the waist up to about one inch below the natural waist construction line and then curve down to the centre front. In the original draft it looked too low so I have put it where I think it should be.
I used the original draft reference points to locate the front edge of the skirt and the size of the "strap" which is the narrow section of the skirt at the waist.
I then cut my pattern pieces apart, walk or measure all the seam lines to make sure that they are correct and also true up the lines such as the armhole, shoulders, lapel and waist.
I then cut it in muslin and had it made up and ready to fit.
I sure hope that the measurements are correct, cause it is a pain to go to all this work and then find out that the person is 2" bigger around than what you were told. Smaller, I can deal with- bigger is much more difficult.

Tuesday, June 23, 2009

coatee pattern drafting


So here's the beginning of my pattern for the Footman's Coatee. Again, my apologies for the photo quality, I had to put these on the floor to take a full picture.
First the basic information:
Measurements- I didn't take the measurements for this actor and in fact I have never seen him, which makes me work on the side of caution. I think that some of the numbers are wrong and therefore when in doubt, I revert to standard calculations and hope for the best.
I read through, well actually I skimmed through the period draft looking for the details that will help recreating this look. I find some of these drafting instructions so tedious that my eyes glaze over while deciphering them.

As a side note, I find it interesting to look at my patterns like this, because I see right now things that I want to change....hmmm, anyway, onwards.......

One concern that I had right away is that these coats are supposed to be closed with a link fastening, but the draft is fully double breasted. Mistake or something that I am missing? I decided that I would have to modify it because it didn't feel right.

I'll start with the back:

I decided to draft this without seam allowances because I feel its easier to develop the shape that way.
I start with a long vertical construction line and a line perpendicular to that at the top.
I find the scye line and it's divisions above that, square out.
Mark the width and height of the back neck and draw it in.
Mark the waist length. His waist length measurement seemed a bit long so I reverted to using 1/4 of height as his natural waist and drop 2" for the "fashion waist".
Mark the full length of the coat. I chose to start 4" above his nape to back of knee measurement
Mark in the amount of waist suppression at the CB waist.
Draw in a gently curved CB line.
Mark out the across back width and square up to the top line.
Mark out the shoulder slope and draw in a rough back shoulder line.
Mark in the width of the CB panel at the waist line, using the draft as a guide to the width.
Determine where the curved back seam from the draft falls on the scye line and where it ends at the back armhole, and draw it in.
I start with a 3cm suppression at the side back waist and draw in the other side of the curved back seam.
Measure along the scye line, 1/2 chest plus 5cm ease for the CF line and square up and down.

I use the scye line as one base for balance in the draft, so I measure the seam line of the curved back seam, on the back panel, from the scye line to the armhole. I then measure the corresponding seam line on the side back panel from the scye line to armhole and extend it as required so they are the same measurement. I go through the same procedure form the scye line down to the waist for these seams to reconcile the measurements.

Measure the width for the armhole, and make a mark.
Now I start working back from the centre front line.
I think his chest width measurement could be wrong so I have to use my judgement here. I mark it and decide on a happy medium between the armhole width and the cross front measurement. Square up to the top line. I measure toward the front along the top line 1/6 working scale on the square(neck width), and again 1/6 scale. I draw in a tentative front shoulder line.
Now I mark 2.5 cm below the drafted waist on the CF line and check the measurement I have for nape to CF waist against the pattern, and I raise the front balance on this pattern, 1 and 1/4 " above the top line and square up my neck and shoulder lines, redraw them in the new location. Then I draw in a basic armhole shape.

I then measure down from the neck point 1/6 working scale minus 2cm and give myself a guide line for the gorge line angle. Draw it in.
Now I need to decide about the link closure and how to make sense of the look of the seamed on DB lapel.

I will stop here and continue tomorrow.

Oh yeah, ok, I know I use metric and imperial measurements interchangeably, or some may say randomly, but I grew up with imperial and draft in metric and use whatever measurement system that suits the situation-no pun intended. You'll just have to forgive me.

Friday, June 19, 2009

tailcoat

In our upcoming show, two of the costumes that I am building will be for footmen.
The footman will wear formal wear consisting of trousers, waistcoat and tailcoat. The designer had a photograph from the 1950's and I found what I think is the technical draft reference of the "Footman's Coatee" in the c.1917 "Climax" System for Cutting Gentlemen's garments by W.E. Leggat and T.W. Hodgkinson. I don't think the design of these coats changed much between 1920 and 1950, so it is a good place to start.
I like that they sign themselves "Faithfully Yours" in the endpapers.

I am going to use this text as a guideline. I am not going to try to reproduce the draft as written. I find these drafts very interesting and I have drafted them up in the past for the sake of trying them out and to see what the accepted style and shapes of the era were, but I have to do this under the time and budget pressure of work and so I will use my own method of drafting tailcoats and I will use the information in the original drafts to guide my eye.
I thought that this would also be an opportunity to document and share both the pattern making and the construction methods that we will use to make theses coats.
I am trying to get my scanner working so until then I will have to just photograph the book for you to see.
My apologies for the lack of quality photos!


Thursday, June 18, 2009

understudies

It's been quite busy these past couple of weeks, our new designer came in for fittings and we are still trying to get our understudy costumes fit and finished for the other shows that have already opened. You may wonder, "understudy costumes"? Yes, understudies. For every major role and many of the minor ones, understudy roles are assigned and costumes are needed. The first choice is obviously for the understudy to fit into and wear the original costume. When that doesn't work, we try to pull similar costumes from stock and fit and alter those. Sometimes though, the understudy and the original actor are too different in size or the costume is too specific to work, so we occasionally build understudy costumes.
In some cases, these costumes never get worn because the actor never misses a show between April and November. In other cases, especially musicals, injuries are common and the understudy must go on. Injuries are so common for musicals that in addition to understudies of major roles, there is often a "swing" hired. The "swing" is an actor/dancer who understudies many "tracks". For instance, a male swing may cover the entire chorus group of male dancers and they learn all those singing and dancing parts in order to go on whenever someone in the chorus cannot. They usually have a costume made for all the major looks so they are made and ready to go at the tech dress.
This year one of our lead dancers hurt himself so badly that he cannot continue in the season. This means that his understudy has assumed his role and someone else is moving into his role and so on down the line. In fact between injuries and colds and replacements, there were seven people doing other parts today. The pre-show announcements seemed endless! Luckily everyone involved is so talented that this happens seamlessly from the audience's point of view.

Thursday, June 11, 2009

up next

Well, sorry, I have no photos this week because I've been scrambling trying to draft patterns and get as much cut into fabric and basted together for fittings this week.
It turns out that I have only been assigned straight tailoring of the 1950's for the last show and someone else has been assigned the show with the costumes of the 1740's.
Oh well, I do like to make suits and so do the sewers on my team. They will have a lot to make them happy. I entered all the paperwork into our time records binder and tallied it all up.
In the next 8 weeks, we are going to build 15 pairs of trousers, 2 pairs of riding breeches, 6 waistcoats, 2 tailcoats, 1 hunting jacket, 1 Balmacaan overcoat and 12 jackets. This includes all kind of variations of jackets, such as regular SB and DB jackets, shawl collared cream dinner jackets, and black SB and DB tuxedos.

Does that seem like a lot for one cutter and five experienced tailors? I guess I can sew too if needed, but it will be a lot to cut out and keep organized. I do like to make trousers though.........

I had my first fitting today of a lovely black barathea SB peak lapel dinner jacket with matching pleated trousers.
It's always interesting working with a new designer, and he seemed very happy that the jacket was nice and slim fitting and had a good natural shoulder line. I've been promised more fittings tomorrow,
So, ready....set...go!

Monday, June 8, 2009

begin again


Well, our designer is coming in this week and we've still not finished with fittings for understudies in the previous shows.

So, I need to juggle the workload (and my poor head, which could use a rest) around in order to get some things ready for him to see.

I've been asked to cut right into fabric, which can be a bit nerve racking because this is our finished product- so I better be right or I have to be able to make it right if I am wrong. (within budget too!)
There are many elements that come into play when interpreting a design and making it real. One is the feel of what the designer is after. If the design is set in a specific time, say the 1920's, there are still many variations within it that help to define the character. There are period details in tailoring that can be rather subtle to the average eye and it is my job to know or discover these when making patterns. In addition to design interpretation I have to deal with all different shapes and sizes of actors. Some of them I have made things for previously so I have an idea of their shape and figuration, but others I haven't, and I am working from measurements that I did not take myself, so the pressure is on to get all of these elements right the first time through.

So, I've started with some trousers.

Sunday, June 7, 2009

reward/award


It's been a long week or so since I last posted. We've all been under a bit of stress getting 6 of our shows open this week, dealing with understudies and injuries to dancers and fine tuning 3 more shows that open in a couple of weeks.

I met with a new designer in the last week of May for the last show that I will be working on, and he is coming in this week for more meetings and some fittings. The design assistant on his show is still dealing with her previous show, which hasn't opened yet, so that is a bit of extra work for her.

In that regard, I thought that I would share a little something that the ladies wear team made for one of the design assistants.
One of our costume design assistants, Laura, is young, and at an early stage in her career, and she was assigned to assist on a big musical show. The designer she was to work with had never worked in our theatre before, and it turned out that he was not going to be in residence very often. She then became the "go to" person, and was required to go above and beyond the usual duties of a design assistant.
In recognition of the effort she put in, the team put together this manneqiun for her. I think everyone was charmed by the mini shopping bags filled with miniature bolts of fabrics and trim and by the show "bible" which was filled with swatches of the show fabrics and tiny design sketches.
Congratulations!

Now, onward to our next project.