Showing posts with label body coat. Show all posts

Friday, October 8, 2021

18th century costume structure and support

Once I have fused all the fabric and it is cut out, the pieces need to be marked. The style lines need to be seen from the right side of the fabric and some areas need to be stayed to prevent stretching out. Since we are in the fashion fabric, that means most of the marking is done by hand. This coat will come apart after the fitting, so it is essential to have everything marked beforehand.

Here is a partial half scale pattern of the body of the coat I made for you. I made this pattern with a side body panel, not true to period but it gives a bit more shape through the torso and a bit more flare to the skirt at the sides of the body.


Next, I have to think about structure. Which areas need support and what materials are available to give the support needed.


I need a chest canvas- and for this I purchased an overcoat length canvas. Like this one but longer.  I need to make some modifications to it. I want the chest area to remain in its normal position, but I don't have a lapel, so I want to add in a piece of hymo so there is a double layer across the front. 


I cut the coat with the straight grain parallel to the front edge of the skirt as shown here.


I have found that this reduces the issue of excessive  bias stretch along the front edge. it also looks better in striped fabric, as the stripes don't run off the edge!


The chest canvas, from approximately the waist down, is modified by darting it out and slightly shifting the lower area in sections so the grain of the canvas is the same as the coat. The darts are cut out, then joined edge to edge with a strip of fusible interfacing and zigged to hold.  


I also need to give the skirt areas support so they don't collapse. We want the skirts to have some oomph to them. Support inside the skirts is also useful because we will be sewing trim on the skirts and the support will stabilize those areas.

I used a product called Sew Sure firm. This is a narrow sew in interfacing that I have used many times in the past. It used to be available in a number of weights/stiffness from soft to extra firm, but I think now is only available in firm and soft. I use this crosswise so it naturally resists folding flat in the folds/pleats of the skirt. 

I draw out my pattern on the sew sure, and it is then flat mounted to the skirts by hand, down the pleat lines as well as around the perimeter. The Sew Sure that we put in the skirts also benefits us when it is time to hem the coat- there is something to cross stitch the hem allowance to!


Other areas needing support are the cuffs. here I will use a piece of the sew sure, and a piece of fusible canvas/hymo to give me the required stiffness. Pictures and details later!

The collar also needs a support, and for this I use a laminated piece of hymo and collar linen. The collar is cut nett (no seam allowances). This is mounted onto a piece of thin cotton which will act as a seam allowance. Pictures and details to come!

Similarly to the coat, the waistcoat fronts are cut out, a piece of hymo is cut for the fronts and basted in for the fitting. The waistcoat back is just a piece of muslin for the fitting. A collar is cut and mounted to cotton, then basted in place.

Lining- I generally cut  the lining for the sleeves for a fitting- it helps slide them on and off, and I cut the back body lining, again so the garment slides a bit more easily over the waistcoat and sits on the body without friction.

I cut the rest of the linings as well as the waistcoat back after the first fitting.

Friday, December 11, 2015

Montreal and more formal wear

Oh, It has been quite a while between posts!
I have just returned from Montreal where the formal wear trend continued.
It must be in the air, or maybe the water, who knows?

First a lovely early morning view from my window. I admit to having a bit of culture shock coming home- where have all the buildings and the people gone now that I am home?


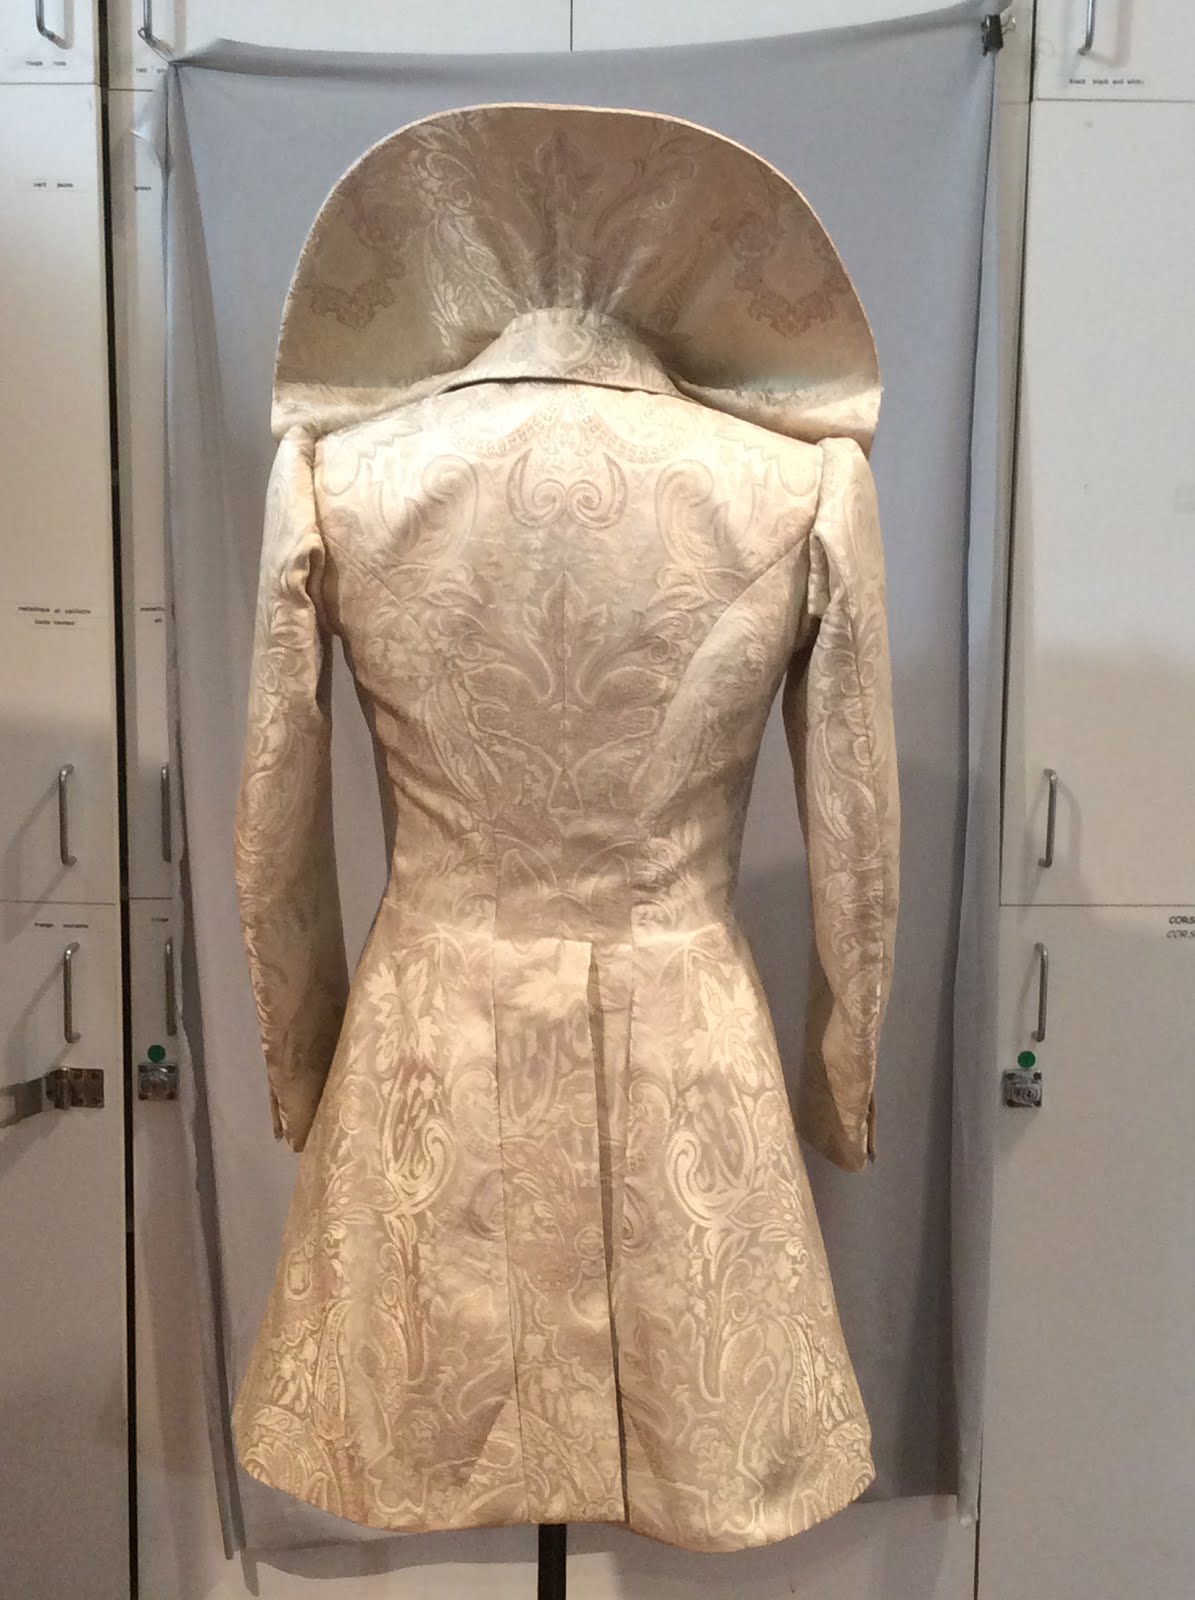
One of the costumes I made happened to cut was this frock coat in a lovely brocade.
It was a good learning experience I think, for the design student. She bought 4 metres of fabric, all that was available in fact, and then we worked it out. I did make a mock up, because I knew there would be no room for error or major changes.

It does not fit the stand quite like it fit the actor, I assure you! He has a much more erect posture hence the extra length showing in the front. The single low button doesn't give a lot of support either. He also wears a Farthingale over it as the Queen, which does complicate things a bit!


The big "collar" is used when the actor appears as "the Queen" and is removable.
It has an inner harness of sorts that stabilizes it on the body, then it snaps into the frock coat to make the two pieces act as one. I should have wired the edge but I didn't want to use hat wire as it can be too easily bent. What I would narmally use is heavy duty fishing line or whipper snipper cable zigged onto the outer edge. I hope it holds up for the run!


It all turned out well in the end, and I just squeaked it all out of 4m of fabric while keeping the patterns matched too!

Monday, February 18, 2013

Both ends of the size spectrum


Last week I was able to get a couple of fittings on the Bekishe coats that we are making.
These are traditional long coats traditionally worn at weddings.
The designer wanted very soft construction and not necessarily a perfect fit, so these will get some breakdown later. They have only a single layer of hymo for support, no shoulder padding and they will only get a half lining to keep everything soft.
I was happy that they worked out so well. though one could argue perhaps too well, since the fit was pretty spot on.

We have four of these Bekishe and two of the Kapoteh to make in sizes from 36" chest to a 52" chest.

When I am cutting multiples, I prefer to have one prototype fitting to see if I have interpreted the style to the designer's satisfaction. Unfortunately, we didn't have that opportunity, so I was cutting right into fabric hoping that both the fit and the style were OK.

I don't grade my patterns up or down to get the different sizes. I just draft each of them as I go. Grading isn't a skill that I really have- I understand the premise but I really don't have practical experience with it. I tend to draft one pattern in which I work out the proportions I think I will use on the other sizes, ( the amount of waist suppression, the size of the panels at the waist, overall length, the amount of flare in the skirt) make notes and then draft each one separately. Drafting new takes less time than trying to teach myself a new skill set that may or may not be the best choice in the situation.


In the top photo, I am dealing with the smaller end of the size range and the bottom photo shows the larger.
The gentleman in the top photo I had never seen before, I just got his numbers and a photo to work from so I felt very gratified to have such a good fit.
In the bottom photo is someone I have made for before, but hadn't done anything like this for him. 
(you know, I keep certain patterns but honestly I rarely get them out and use them again, not that an eighteenth century coat pattern would have made life any easier)

The challenge for me was to try to quantify my draft in a larger size. 
Most drafting systems are based on a 5'8"tall man with a 36" or 38" chest and as you draft for sizes past about a 44" chest, the formula starts to go wonky. Things like the depth of the armhole and the width of the back neck.
That's when I think it comes in handy to be willing to adapt and adopt bits and pieces of knowledge as you go. It also helps to have a lot of experience, to lessen the worry when cutting right into the fabric.

I do wish I had more time to analyse things like this while at work, but for now I just try to scribble notes on the pattern as I go and hope that at some future time I can go back and look at it, and it will make sense. 

Tomorrow I have one more to cut out in fabric, and the linings and bits of the three I fit this week to cut so they can be finished. 
Then I can start my patterns for the next show. Onwards!


Wednesday, January 16, 2013

Almost finished or A rack of suits


Oh, we are almost finished the project!
I started bagging up the suits today. I tagged them and double checked everything.
It is very gratifying to have accomplished all this work.

We made five complete tail suits, which included altering the shirts, adding dance briefs and quick changing the bow ties by snapping them to the collars.
We also made 9 other suits, five of which were three piece suits, plus an extra pair of trousers.
We put period collars on the shirts, and quick changed some of them as well.

I put the last eight buttonholes in today as well, so that is done too.

I need to box up the remaining fabric, finish up my paperwork and arrange delivery. I am looking forward to seeing them worn when the show techs.

Next week I start back at my regular gig, and I will be working on three very different shows: Fiddler on the Roof, Mary Stuart, and Blithe Spirit. It should be interesting, and I will keep you posted.

Wednesday, December 19, 2012

year end thoughts and photos

Year end? Where did the time go?

I had planned on doing some posting while I was guiding Lela through drafting and fitting body coats, but it fell by the wayside due to her mother's illness and subsequent passing. We did get through quite a lot of drafting and fitting but I didn't have the wherewithal to document it as I have done in the past.

These are a few of the last things we've been working on- the tailcoats with the Ballet gusseted sleeves- they don't hang as cleanly as a regular sleeve it is true but you can raise your arms! The fitting I did last week was for these checked trousers with a dark grey jacket. I don't know why I like the checked trousers so much, but I do! I guess they feel rather cheery and they stand out compared to the more sombre grey suits that we had been making.


On Friday, we collectively decided that it was time to put down the shears and needles for a break before Christmas. I have 76 buttonholes to do (by machine of course) so I got all those marked and basted and ready, planning on getting over to my colleague's place to have them done when I was just hit by fatigue and I gave in to it. They can wait until the New Year. I just need a break, so I am taking one, since it has been a very busy year so far.

I wish each and every one of you a Merry Christmas and all the best for 2013!


Saturday, November 24, 2012

Tailcoat layout


I have been so busy these last few weeks. All I can do is check in here and show you what is keeping me so busy.

On my table is the last two of the five tail suits chalked out and ready to be cut.

I have an extension piece that is piano hinged to the length of my table so that it can be extended to allow 60" wide fabric to be rolled out flat. This is so helpful when cutting capes or other large projects. In this case, I am cutting five sets of tails so I can utilize the fabric better with it laid out flat. As you can see here, in one trouser length, I can also lay out the front, back and side panel of one tailcoat as well as the front of the next one. When I lay out the next pair of trousers, I can get the next tailcoat back, side and the skirts of two tailcoats. Once that is done, I can cut all the sleeves.

As of Friday afternoon, I had all five pairs of trousers bundled separately with all their components and all five coats in nice little bins awaiting sewing. I have all the period collar patterns made and cut out for the men's shirts, so for all intents and purposes, I am finished the major cutting work until I can fit again.

Monday I think will be a day off just to catch up with all the things I have been neglecting over the past month, then I have a week and a half of instruction with Lela to finish up her training. Funnily enough, we will be delving into body coats. I have a fit model lined up and think that a tailcoat and a frock coat are in order, as well as some period styling discussions. I am hoping we can document a bit of that process here.

That should take us into December and one or two more Ballet fittings before Christmas, then it will be after the New Year to fit all the tail suits before starting back at the Festival.

Where has the time gone?


Wednesday, October 31, 2012

Onto another project

 I haven't really been neglecting posting here on purpose, honestly!
I have been very busy finishing up the one project while getting onto the next one at the same time. It wasn't supposed to work like that, but it did and it was a bit crazy at the studio.


I have 9 suits and 5 tail suits to make and I had to get all the patterns made and everything cut into fabric and basted up for fittings in Toronto on Monday of this week.

So, I had Denise, Lela, Emma working on the first project and had to bring in Jennie to meet the deadline, with Silvia putting suit jackets together for the second project. As the first project wound down, the others joined in, and we got everything ready to fitting stage by Friday afternoon.


It is always a bit nerve wracking going into fabric based on measurements that you didn't take, and that can be over 10 years old! Really. It sometimes happens that a dancer is measured when they join the company as an apprentice, then as they mature, adjustments are made on the fly, but the measurement sheets aren't updated. I know it sounds like an easy thing to do, but it is often crazy busy, and well, it happens.


So sometimes I luck out like I did in my first fitting here, where the dancer was pretty close to the numbers on the sheet, just a bit bigger in the hips. I just have to take in a bit in the upper body above the waist and move the shoulder line in marginally. I have to tweak the trousers a bit for size as well.
Everyone of these guys noted how long the jackets are, which they are not for 1920, but in comparison to today's fashions they are.
I have to say that it is a pleasure to fit dancers- they have incredible posture and pretty ideal shapes overall. They usually have built up their trapezius muscles and lats, full seats and substantial quads, but even amongst those similarities there are still differences.
For instance I have a two dancers, both 6'2" one with a 35" chest and 27 1/2" waist and 37" hip,  the other is a full 42 chest with a 34" waist and 44 hips.
It makes for interesting and challenging pattern making.


Now that I am home from doing my fittings, I have to regroup, look at the measurements I took and go forward from here, taking things apart and remarking and getting all the linings cut.

 I plan to have Silvia, Denise and Emma back to sew next week so there is a lot to do in the next few days to get ready for them to return.

For tonight though, Happy Hallowe'en!


Friday, May 25, 2012

shoulder dart in suit pattern

 A while ago I posted about putting a shoulder dart in the back of a suit jacket and I finally took a couple of quick pictures to show you the changes to the pattern.
You will have to forgive me for the rough state of the patterns. They are working patterns, encompassing my thinking process as well as the changes that come from a fitting. I rarely have time to correct my patterns after the fact. I make the changes on the cloth and sometimes make a few notes if I can. I just don't have the time to redraw and cut out clean versions.
Anyway, we made two jackets for this individual. One was a black barathea cutaway coat and the other was the fine grey beige striped wool. On the top you can see the the back pattern for a black cutaway coat and on the bottom the changes I made to the pattern for the striped wool.


Men's jackets generally have a hidden dart in the shoulder seam.
This means the back shoulder is longer than the front shoulder. The jacket must be big enough to go over the prominence of the blade. Above the blade, you then have excess fabric that need to be handled somehow. What do you do with it? Well, usually some of it is taken care of by easing it into the shoulder seam. Some goes into the armhole where it could also be eased a bit or filled by shoulder padding.
The amount of ease depends on the figure, the style of the jacket, and the particular fabric you are using.

In this particular case, I was dealing with quite a stooped figure, and rounded blade and shoulders. The period (Edwardian) didn't call for large shoulder pads, so I had a larger amount of fabric to get rid of over the blade in addition to the stooped back.
In the top picture, for the cutaway coat, you can see that I transferred some of the excess shoulder ease into the curved frock seam, and since the fabric was plain black, I could keep the curved centre back seam and no one would notice.
In the bottom picture, which was for the striped fabric, I made changes to the pattern to straighten the CB seam, and in doing so created even more ease in the back shoulder seam, which had to be turned into a dart.
This dart was placed alongside a major stripe and is much less noticeable than the bulls eye effect that would have happened down the centre back seam if I left it like the pattern for the cutaway. I did gain a bit of extra length over the blade in this manipulation, but it seemed as though that particular fabric needed it.

Saturday, April 14, 2012

Striped fabric and shoulder darts

One of the most difficult figure issues to deal with is the stooped figure. In a recent situation, I had made a toile jacket for an actor and I knew that his pattern required some modification for a stooped back and rounded sloping shoulders.
I hadn't made anything for this person for a number of years, and I was surprised to have to open up the back another inch to get the jacket to fit properly. That is a full 1 and 3/4 inches additional length in the CB!

This is also supposed to be Edwardian so I cannot mask it with extra large shoulder pads either. Now, in a plain fabric such as his black cutaway jacket, I can just lay the pattern out as is, but when there is a stripe, that must be dealt with differently.

The CB neck must be in the middle of the stripe pattern, and if I laid the pattern out as is, I would have quite a bulls eye effect in the upper middle part of his back. That isn't a suitable option. If I straightened the CB by opening up more ease into the shoulder, I would end up with too much for the fabric to handle and if I opened it into the armhole, I can't ease enough in to make enough of a difference, so the other option is a shoulder dart.
Shoulder darts are quite common in women's wear but I have to say that I personally have never seen one in a man's jacket. I was so happy to see a reference to darting the back shoulder in a post on The Cutter and Tailor forum a couple of years ago, and ever since then I feel like I have some back up when I am required to do it for difficult figures. Especially difficult figures and striped fabrics.
The trick as far as I can tell is to not interrupt the main stripes in the dart. The dart end on this one needs to be moved just a tidge to the left, to follow the stripe edge exactly, but overall you can see the effect. The dart really isn't that noticeable when all is said and done, and the benefits outweigh any negatives as far as I am concerned.

You would not know this just from looking, but I will tell you, the other issue I had to deal with here, is the fabric. It actually is a one way design. As woven, the white stripes are on the one side of the stripe right across the width of the fabric. I had to make a choice. Either the stripes would travel around the body, always to the left for instance, or I could fold the fabric end to end and make it symmetrical, which is what I did. Great, so far so good, except when it comes to the collar. The collar is one piece, no seam at the CB. So the stripes travel one way only. Merde!
So unless I seam the top collar CB that is what will happen, and I have to decide soon.
Any thoughts?
............
We are probably the only ones who will notice or know. The stripe is subtle, and if the audience is that engrossed in the stripes on a jacket, then the play needs some help. I won't be putting a seam in the top collar.

I'll post the pattern modifications in a future post.

Saturday, March 10, 2012

Hand worked Buttonholes


Hand worked buttonholes are a hot topic these days on the discussion forums.
A sign of bespoke craftsmanship and a badge of honour to many, and subject to discussions of technique and materials to use, from needle size to which brand of silk thread and gimp.
Obviously, buttonholes needed to be made by hand before the invention of a machine that could make them and even then, the machines were, and are, expensive and generally limited to factories which could justify the expense.
Many people who are interested in the craft of tailoring are keen to learn these hand sewing skills and all the power to them. I too, learned the art of the hand sewn buttonhole and was equally enamoured of it.
I think for me the pleasure wore off after a time, due to the volume of buttonholes we were making at work because we didn't have a machine. Hours and hours spent on the buttonholes(always under time pressures too). Some people made them more beautifully than others and there were debates about the nicer form, whether an elongated teardrop shape or a pronounced keyhole was better, but I have to admit that some of the nicest ones you will see are found on vintage coats.

One of these vintage coats appeared in a fitting the other day, to be used in a show. It was a cutaway coat, I'd say from between 1910 to 1920 anyway, and look at these buttonholes.
Not bad for their age, don't you think?

We got a Reece industrial buttonholer at work around 15 or so years ago and to be honest it was a relief to have it. If you are good making them by hand, you can do one in 20 minutes, but now it is maybe a minute each including the prepping before going to the machine. If you have 90 buttonholes on a period costume, or even just a dozen or so on a suit, the time saved is enormous.
Some may say that hand sewn buttonholes aren't needed on costumes, and that may be true if you have options. We didn't, but now we do. The downside is that some of my colleagues have never made a hand sewn buttonhole, so that isn't good for maintaining traditional skill sets. The upside is that it is a skill that can be learned and there are people still interested in having that finishing touch on their garments.


Tuesday, May 17, 2011

18th century toile

I don't think I'm going to get any modern tailoring this season. No wait, I think I have a set of plus fours and a 1930's tennis jacket and white flannels to do when the fabric arrives.
In the meantime......
The next assignment harkens further back in time to the mid 18th century, and since our designer was coming in from afar this week, I had to switch gears and get together a toile fitting to get an idea of where we are heading for shape and fit.
This wasn't too bad a start, I had never made anything for Mr. J seen here. He is quite tall - about 6'4" and has a 10" chest to waist drop, (a challenge) so it was a good first fit. I have to shorten the coat and change the waistcoat a bit and deal with a few more fit issues especially on his right side (DRS) before I will chop into the real fabric. Then I need to add a lot more volume in the pleating and will have to figure out what kind of interlining I will need to use to get the coat to bell out through the skirts.

That's for a bit later in the month, so all I can do for now is make some notes, hang it up and get back to the current lot of work.

Monday, May 16, 2011

mondays


Some days are more difficult than others. Monday morning should not be accompanied by plaid. Especially an uneven plaid. Especially an uneven one directional plaid. Especially an uneven, one directional plaid with a 4"x 4 1/4" pattern repeat for a frock coat on a size 52 man.

Never mind. The colour is totally off in this picture. The fabric is really a brown and black background with a double grey stripe on two sides of the yellow bordered rectangle.

After much consternation, I made some decisions.
Which way was up? I ran the grey stripe downwards.

Could I use both sides of the fabric as the "right" side so as to have a mirror image symmetry in cutting? Yes I can, and did.

Which part of the plaid should be prominent at the CB? Not the bright yellow part of the pattern. I picked the centre of the rectangle, so the grey stripes book-match mid back.

What about the pattern at the CF? I picked the same mid point of the rectangle but at the front the brown areas will book-match.

Should I close the chest dart and move it to a lapel dart? Yes. What you see in the photo is the preliminary closing of the dart and the resulting opening into the gorge line. I shortened the lapel dart so it will be hidden. I do gain a bit of fabric mid chest but that may work in my favour- we'll see. Less pattern interruption at the waistline.

Should I wait and cut my sleeves in muslin? I think so. I'm not that brave on a Monday morning, or afternoon it turns out. Tuesday could be an option.

Yardage- it took 2.8m for everything except sleeves and top collar. I'm pressing for a solid contrasting top collar fabric. There's a plaid limit somewhere! I like to keep track of yardages for future references.


Book-match. Don't words seem odd when you use them a few times too many? Just in case I am confusing you it is a term used more often in woodworking, but it applies here too.
Book Match: The most commonly used match in which every other piece of veneer is turned over so adjacent pieces are opened like adjacent pages in a book, creating a mirrored-image pattern at the joint line and yielding a nearly continuous grain.


Sunday, March 13, 2011

step vent

The back vent of all/most body coats are open and traditionally have a type of vent opening that I call a step vent.
For the first fitting, or for a toile, I usually ask for both sides the vent to be basted back on the CB line, so I can judge whether the backs are hanging correctly- if they are, the two edges will hang straight edge to edge. If they are crossing over in the back, or pulling apart I can easily see it and correct it at the fitting.

The vent from the outside looks like the photo on the left. The left side of the centre back is sewn to form a "step" that sits on top of the right back.
The middle photo shows the inside of the coat as the lining is being put in.
You need to clip the seam allowance on the left back to form the step vent but we don't clip the seam allowance on the right back as it makes that point much weaker. We press open the seam allowance from the neck down to a point a few inches above the vent, then gradually allow the seam allowance to fold and lay all in the same direction.

A note about the back lining ...for years, I always cut the back lining in one piece, but it is a more complicated technique to install it, so now it is cut in two pieces and it will have a short horizontal seam in the end. It makes much more sense to do it this way because it saves time, is stronger in the long run, and is easier to put in.

I confess that I have to be reminded everytime to cut it like this, because my automatic tendency is to do what I've always done. I just need a few more years practice for it to become my new "normal".

Tuesday, March 8, 2011

1830's coat

I had to put aside the medieval for a moment while we wait for the designer to return for fittings so I finally had time to alter my pattern for one of our 1830's coats and cut it out. I needed some time to mull things over because it will be made out of velveteen and I wanted to be sure I was approaching it the right way because I don't want to be altering velveteen very much if I can help it.
One thing the designer wanted to see was the neckline of the DB coat opened up and curved outwards to follow the waistcoat's neckline, and to keep the neckline of the waistcoat visible even when the coat is worn closed.
Usually a DB coat closes up the fronts a bit by virtue of the way the roll line travels from the gorge to the top button of the coat. To get the neckline to open up required what is essentially a dart running parallel to the roll line hidden under the lapel of the coat. The dart pulls the neckline into a curved shape rather than a straight line.
I also had a seamed on lapel which is very typical of the period so I needed to combine these requirements and all I can say is I am glad this isn't plaid.

Once I had the pattern to where I thought it should be, I cut a half muslin and tried it on the stand with the waistcoat it is worn with. I made a few additional changes and then I started into the velveteen, which I have to say is a wonderful weight to work with, and a low pile, so I have high hopes for the end result.

One thing I do when cutting heavily napped fabrics is to mark and cut the pieces singly. It does take a bit more time, but it is better than fighting with the two layers of fabric laying on one another.
Sometimes the top layer will look nice and flat but the under layer has either shifted or the naps are gripping each other. I think it also makes it easier for the tailor to mark- either with a line baste or with tailor tacks.

Saturday, February 19, 2011

Edwardian tailcoat

I've been very, very busy these past few weeks and along with my regular gig, I have a small side project that involves making a set of Edwardian tails.
I finally got a chance to nail down the details and the measurements and fabric just arrived this week, so off I went to make a pattern.

First, I have a good number of visual references for this look but since I left them at work I will have to show you an image from a fairly popular book depicting menswear of the period.

This gives a good illustration of the ideal silhouette and gives me a lot of information about the detailing required for the period.
The trousers are flat fronted, cut with a high rise and are quite narrow at the hem.
I look at the waistline of both the figure and the garment to determine where the waist shaping is in the garment, where the front hem of both the waistcoat and coat sit in relation to the body's proportions. You always have to take into consideration that these are fashion illustrations, and then, as now, they can be disproportionate in order to show off an ideal look.
I will be making a DB white pique waistcoat with a deeply cut out front and a laid on collar.

These coats have a long low rolling lapel that can be cut on or grown on. The lapels are either fully faced with lapel satin or have an inset facing of satin (not shown in this illustration).
The tails also generally retain the "strap" at the waist. If you look closely, you can see a narrow horizontal waist section that is part of the tails. A remnant in my view of the time (1820's) when the tailcoats first developed a horizontal waist dart that later developed into a seam, before the seam was discarded in favor of the separate "tail" that does not have a horizontal component.
I also have a draft for a tailcoat that I think is quite similar to what I am after, so that also gives me an idea of how the shape in the pattern is created. This gives a good idea of interpretation of proportions for the period, so with all this in hand along with the design sketch, I have come up with a pattern.

It was difficult to get a photograph of the pattern on my cutting table, so I brought it home but between the distraction of the floor, the lighting, and the cat trying to sit on it, I could barely get an adequate shot, so this will have to do.

I am going with the cut on lapel and the strapped tail in my pattern. The sleeves will also have a seamed on cuff detail or else a trim applied to delineate a "cuff".

My pattern isn't quite the same shape as the one in the book because my client isn't the shape that the book uses as a standard to ilustrate the draft. Also, when I draft, I like to have seam allowances bigger than the 1/4" standard of the time (I prefer a full 3/8" or 1cm) and I like my armholes to have no seam allowance so that also changes the visual aspect between the draft and the pattern.
I have to cut this right into fabric for someone whose measurements I did not take, which makes me a bit nervous, but I tried a quick half muslin on the stand to make sure I was happy with it so tomorrow I will lay out the fabric and start cutting.
I'm hoping to have it all together for a fitting by mid March so I'll be posting its progress.


Sunday, July 25, 2010

another coat, more trim


Another few pictures of one of our coats in progress. It is actually finished, but I lost the pictures somehow. Nevermind, I'll try to get some more later this week.

This is a "nice to work with velvet"- or velveteen.
That makes me wonder if all cotton velvet is called velveteen ? I'll have to look that one up.

This is cotton with a black cut pile on a white warp and weft. It has a soft stable hand, light, but not too drapey or shifty. The pile is quite short so it doesn't move around too much when it is sewn, but it does require more careful handing than a flat woven fabric. Some people adore working with velvet or rather they fear it less than other people do. They know who they are, and I am thankful for them- it has never been a favourite of mine although I love the richness of it . I'm happy to cut it but that's where it stops with me.

Applying trim to velvet can be a tricky situation because the pile of the fabric fights you.
(Susy can testify to that- and we don't like to talk about the black silk velvet casaque with rows of thick soutache that once almost brought her to tears)

With careful hand basting first, both Susy and Silvia have been able to apply most of the trims by machine. The trim must be basted on over a ham or the tailor's egg that we use. There must be enough ease in the trim to not distort the shape of the coat when the trim is sewn on. Even the pocket flaps are prepared like this because if you didn't, the flaps would end up with the opposite curve to the body of the coat, and be sticking out and curling up around the edges.
The basting must be very secure because when you go to the machine to stitch it, you are laying it flat on the bed of the machine, and the ease you put in the trim will buckle slightly as it goes under the presser foot. In some cases it will look as though there is too much trim but don't be fooled, you will need all the ease you allowed.


Sunday, January 24, 2010

more frock coat details


Here is a shot of the undercollar and under the lapel. I was surprised that it was machined through the stand. It has been felled to the coat by hand. The collar end has been clean finished, the collar and lapel were edge-stitched by machine and then the collar was caught to the lapel with a very small cross-stitch. It has a functional buttonhole and loop behind.

This is the back step - you can see the hand stitching that catches the under step area to the coat itself.
The lining is cut in two pieces at the back, which is so much easier to put in. Linings can be without a waist seam here, which is was how I learned to do it, but I have changed to this method as well for the tailor's benefit. Cutting the lining all in one is guaranteed to cause heart palpitations when you make that clip for the first time.

Saturday, January 23, 2010

frock coat details


It is difficult to take good photos of black garments.
If you enlarge the picture of the lapel, you will see how nicely made it is. Please ignore the little crumpling on the lapel-my iron was not hot so I did not press this coat.
There is a beautiful shape to the lapel, and it has a thin neat edge because it was cut on the fold. It has been seamed only on the top edge that abuts the collar and this seam travels just about 1/2" or so around the lovely curved peak of the lapel. The outer edge of the lapel has been shaped with the iron into a gentle curve, and then shrunk in at the CF before being seamed to the body.
You can see the handmade buttonhole and the machine edge stitch here. Some frock coats are cut with a silk facing but this is all wool. I wonder whether it was made without silk for a particular reason. Mourning perhaps? Or maybe it was a less formal look.

Here's the first working buttonhole on the left front.

I thought I had managed to lose a button when I looked at the sleeve, but no, there are only two buttons here (on both sleeves) and a quite wide spacing. The false sleeve vent has a tiny curved edge that has been manipulated into the curve rather than having a facing sewn on.
The sleeves only are lined with a cotton sateen, it is almost a pale tobacco colour now with age.