Showing posts with label collar. Show all posts

Thursday, October 14, 2021

Collar structure and the importance of ease

     In some areas of a garment we may want substantial support and we need to figure out a way to create that structure with interfacing. We want that structure to not compress, squish down or lose its shape over time.   We don't want that interfacing in the seam allowances though because that will make them thick and bulky.  

The choice of structure in a collar for instance, could be something as heavy as buckram or multiple layers of collar canvas ( sized linen ) put together with or without a "glue" to hold the layers together. 

Here I have made a rough sample of one layer of linen collar canvas fused (with stitch wichery), to one layer of hair canvas. This may or may not be enough for your purposes,  you need to sample different materials to get the right combination.

If you use multiple layers laminated together with a fusible you should stitch through the layers to ensure they will not de-laminate over time.


Cut the laminate to the finished shape and size required - no seam allowances.


Laminate and cotton ready.


Stitch through the layers to hold the laminate together permanently.


Cut a piece of thin cotton larger than the laminate  

stitch the laminate to the cotton, stitching through all the layers again. 


Trim the cotton leaving a seam allowance beyond the edges of the laminate.


Cut your fashion fabric leaving ample seam allowances 


Baste the fashion fabric onto the laminate/cotton. *


* This is important- Baste the fashion fabric to the laminate/cotton over your hand, or a ham or tailor's egg to give it shape. A collar is going to go around the neck, so think of it as a partial circle. The outside of the circle is larger than the inside of the circle so the fashion fabric needs to be slightly bigger. If you just apply it flat on the table, it will resist being forced into a curve and will spend the rest of its days trying to lay flat again, and it will be trying to do that while attached to your jacket! 

The fabric thickness should be accounted for as well. Don't forget about turn of cloth! It takes a bit extra ease and seam allowance to wrap a thick fabric around the interfacing to the inside than a thin fabric. 

join the laminate to the fashion fabric by stitching about 1/8 inch away from the edge of the laminate through the layers.

Lay it flat on the table- see the slight ripples? You need this ease in the fabric to make a successful collar.


The same technique is used for the cuffs which are actually joined into a circle. Once you sew the cuff seam creating a cylinder you do not want to see any buckling of the structure.




Friday, December 11, 2015

Montreal and more formal wear

Oh, It has been quite a while between posts!
I have just returned from Montreal where the formal wear trend continued.
It must be in the air, or maybe the water, who knows?

First a lovely early morning view from my window. I admit to having a bit of culture shock coming home- where have all the buildings and the people gone now that I am home?


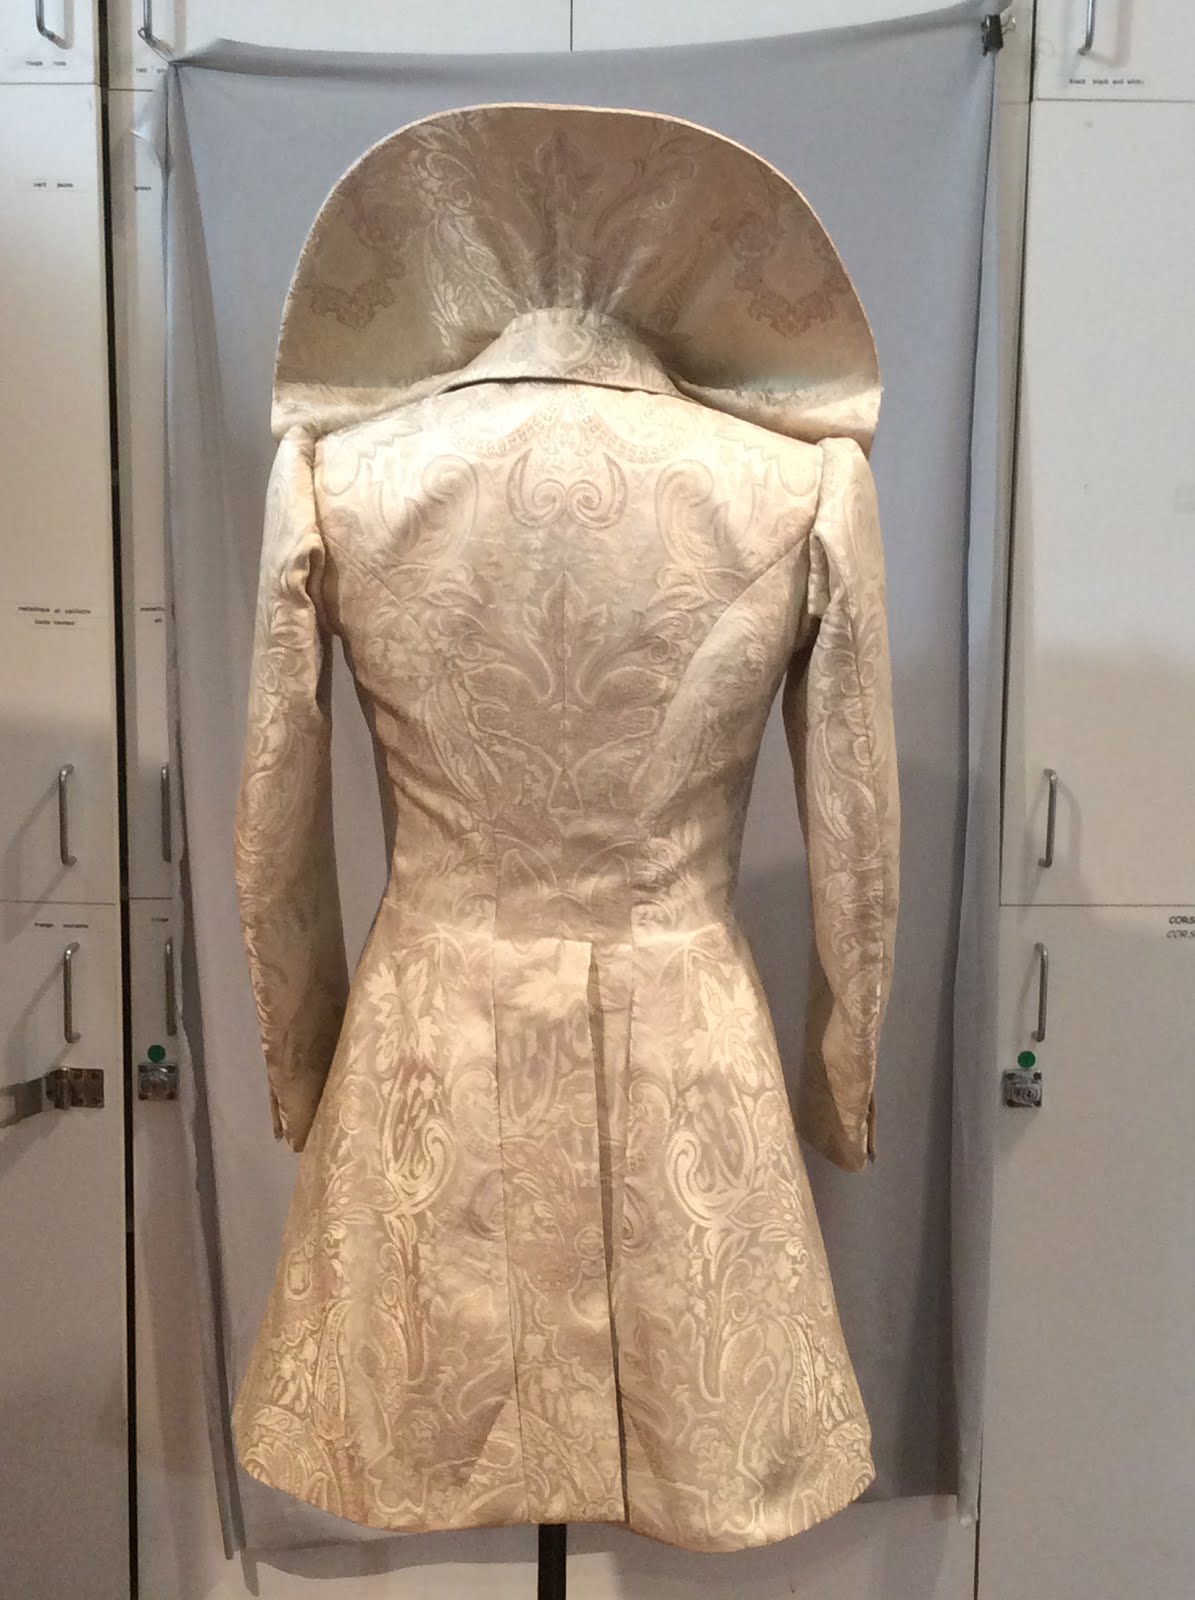
One of the costumes I made happened to cut was this frock coat in a lovely brocade.
It was a good learning experience I think, for the design student. She bought 4 metres of fabric, all that was available in fact, and then we worked it out. I did make a mock up, because I knew there would be no room for error or major changes.

It does not fit the stand quite like it fit the actor, I assure you! He has a much more erect posture hence the extra length showing in the front. The single low button doesn't give a lot of support either. He also wears a Farthingale over it as the Queen, which does complicate things a bit!


The big "collar" is used when the actor appears as "the Queen" and is removable.
It has an inner harness of sorts that stabilizes it on the body, then it snaps into the frock coat to make the two pieces act as one. I should have wired the edge but I didn't want to use hat wire as it can be too easily bent. What I would narmally use is heavy duty fishing line or whipper snipper cable zigged onto the outer edge. I hope it holds up for the run!


It all turned out well in the end, and I just squeaked it all out of 4m of fabric while keeping the patterns matched too!

Saturday, September 7, 2013

shirt collar and deadlines


Are there any crazier people than theatrical costumers?


If you've been wondering where I have been lately, I'll tell you. Margaret and I took on a project in a new venue for us, not sure if I can even publicly say what it is for, as I don't want to spoil any surprises, but it had a short timeline by any standards!

We got measurements August 24th. I started on patterns and cutting out on the 26th, ready for a fitting on the 31st. back the same day after 8 hours in the car and delivered half of the goods on the 4th, and the other half of the goods today, the 7th.

 It was such a nice shirt collar that I choose to stop and take a photo. I had a sample paper collar from the 1940's that I used as a reference. I liked the soft rounded corners.
So this is where I was at this morning around 11 am.
 

At 5:30, I bagged it up and went off to Margaret's house and waited for our clients to arrive.
They did, along with wine for both of us, so tonight I am putting my feet up, drinking a glass or two, then crashing.

Wishing them the best of luck in their endeavours though.
Will let you in on it all later.

Sunday, July 21, 2013

Suits: the finishing details


Well, we are reaching the finishing stage for our suits. I thought I would share a few photos of the finishing details here.


Marking the lapel buttonhole, ready to go to the machine. You can see the way the under collar has been hand stitched onto the jacket and how the collar end has been finished
Here is a view of the inside of the back neck. I cut two piece top collars nowadays because a lot of the fabrics we use don't respond to being stretched and shrunk. This one actually is a stretch wool! A challenge to work with, but if carefully handled you get results like this.


A close up of the finished jacket front.
Here is a view of the top collar of a linen jacket, nicely matching at the centre back. This one had top stitching details on the patch pockets and the front edges.
Front view


Back view.


Here is a silk, linen and wool windowpane check jacket with a notch collar and patch pockets.
This one turned out very nicely. I am not sure how well it will stand up to wear and tear, but for now it looks great.
This one needs a final press and we don't have a stand that shows it well. Wait! did I forget to put the lapel buttonholes in?
No, I think they're in, just very subtle. DB in a tone on tone stripe wool. I guess I will check the jacket tomorrow just to be sure.
This one is one of the last minute additions, in the fitting it went from a two button to three ( good thing we hadn't taped off the roll line and had the front edge still basted! ) a ticket pocket was also added at that time. This is a black wool tone on tone herringbone stripe. These shoulders have a flatter look that the other jackets, the seam allowances have been pressed open at the shoulder/crown of the sleeve, to give less shoulder expression. They have just a little sleeve head of soft lambswool instead of a canvas sleevehead.


Tomorrow, we have to get the last jacket wearable for Tuesday, finish a couple pairs of trousers and get back to finishing our doublets and robes which need to be loaded out by Friday. It will be another busy week, and I am looking forward to the deadlines being over!

Thursday, March 25, 2010

coat collar continued

I cut the collar on the bias in one piece- without a CB seam because of the bulk (and extra work) a seam would add. You would usually have a CB seam in a bias cut collar - such as the under collar on a suit -because you can ensure that the bias is the same on both halves. The 2 biases in a fabric stretch differently.
Onwards..

I check the collar one more time by pinning it to the neckline, then I bound the outside edge with bias binding and serged the neckline edge.This collar will only be one layer of fabric thick. This was only being worn a few times so a serged edge was ok.


I proceeded to hand stitch the collar to the neckline of the coat. I am using a heavy button/craft thread to do this and whipping evenly over the serged edge

All done- here's the finished collar installed and the coat is now ready for trimming which I will show you next. You will notice that with the one piece bias collar, the quilting pattern is not the same on the right and left, since I was covering the collar with "fur" it did not matter. If it didn't get trim it would have been a better choice to put a seam in the CB and have a symmetrical look.


Wednesday, March 24, 2010

collar for child's coat


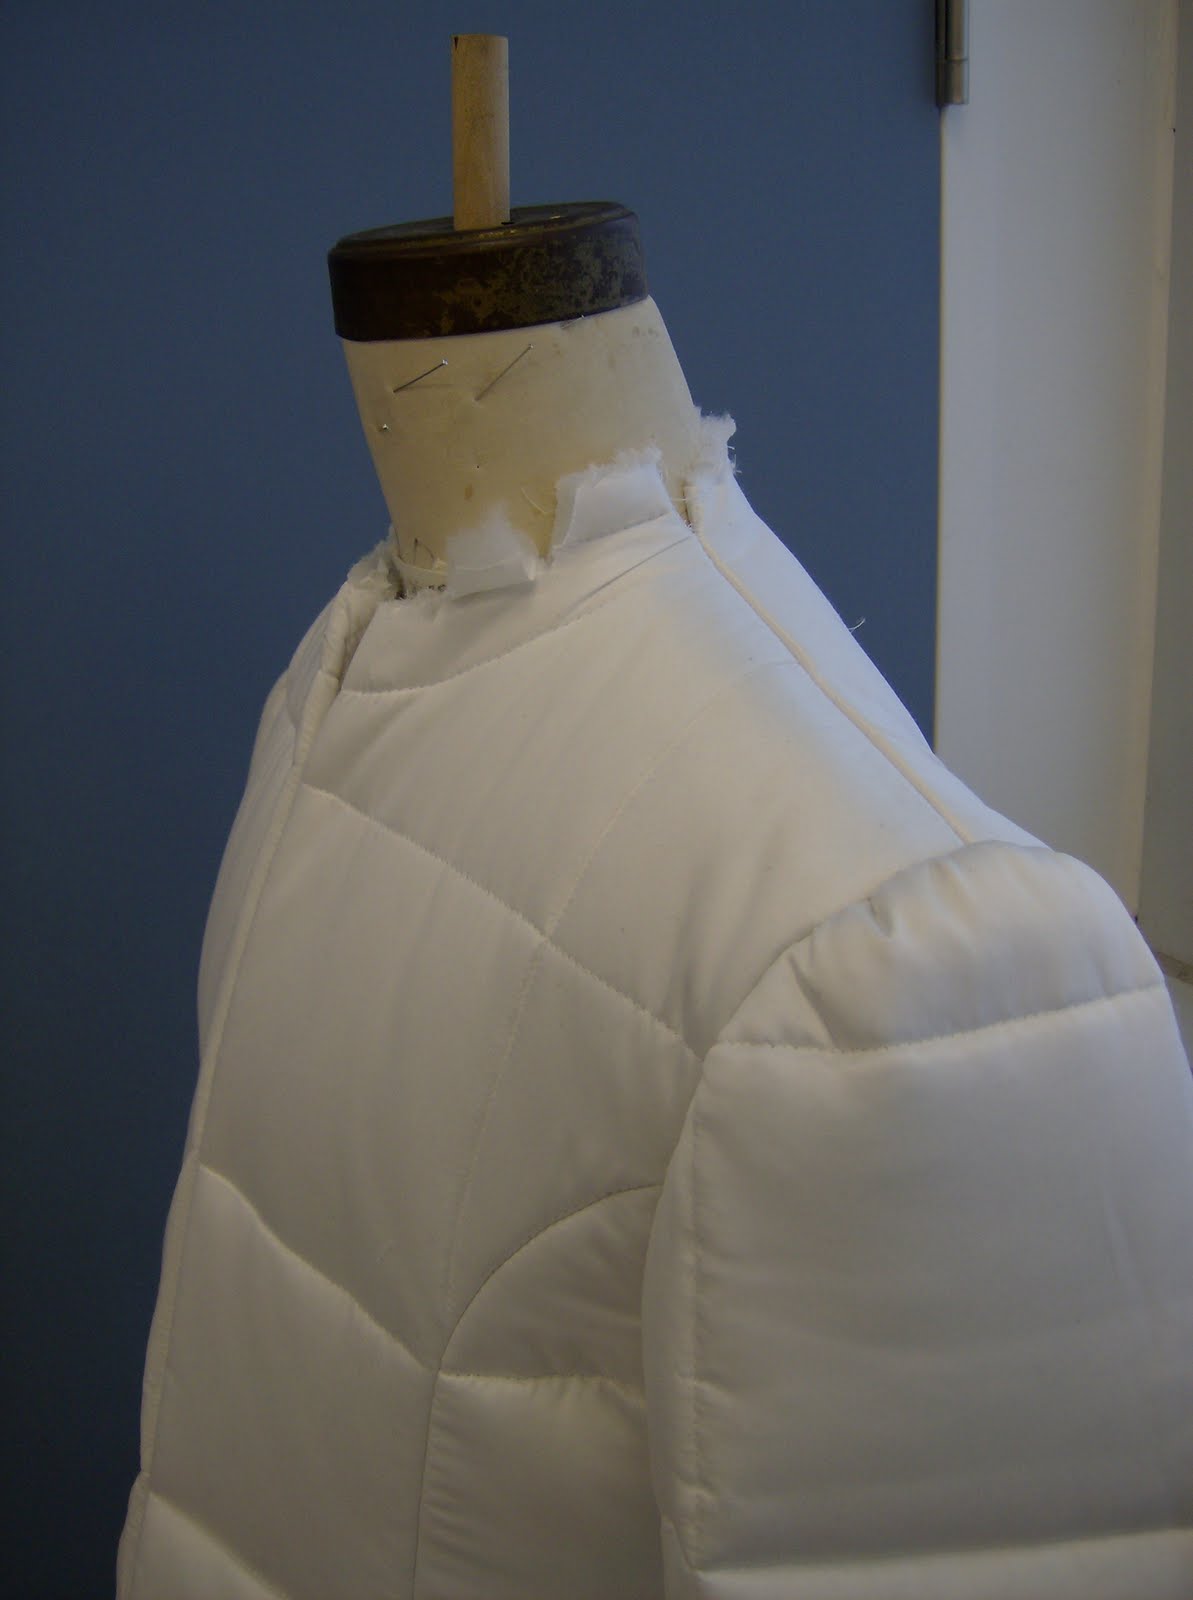
I had to make a child's floor length coat that was similar to the men's coats that I showed earlier. One difference was that the child's coat zipped up to the neck and thus required a differently shaped collar.
I started here with the coat on the stand with the neckline machine stitched to compress the batting.
I could have drafted a collar but I often find when I get to this stage, it is just as easy and quick for me to cut a rough shape out in the fabric by eye (I have been at this a while and I kind of knew what the collar shape should be) and drape a collar.
One advantage is that I can see right way what this fabric is doing rather than make a paper draft and try it twice.
Here's my rough shape cut on the bias. Just half the collar to drape with. I have to make sure that the CB does not pull out of alignment when I pin the collar shape on.
Here it is pinned to the neckline, and then as it looks when it is turned down.

I measured the neck sewing line to get the proper measurement to check against what I have draped and then this is my corrected pattern on paper.
Next: cutting it out and sewing it on.

Thursday, May 21, 2009

another bit of lace


Well, this has been a very busy week with two shows tech dressing, and I think we're through the most stressful part.
We worked on the holiday Monday, in order to get important pieces like this collar made.
The collar in a previous post was made by Susy, this one was made by Karen.
Again, I started by draping the shape I wanted in muslin, making a paper pattern from that, cutting the base out of black crin, then double checking it in a fitting with the actor and designer. The edging lace was made up of a very wide lace border that we cut down into the elements that we wanted to use.
Karen did a couple of samples of how to create the best corner motifs and she laid it out along the edges, and we changed the pattern slightly in order to get the motifs to fit in well. She then proceeded as Susy did, basting over the tailor's egg and then zigging the lace down in sections.
I think the next time I cut one of these, I will consider putting a seam in the base fabric at the centre back, since I was noticing slight variations in how the collar sat at the front. I think it was due to the different bias at the front with the centre back on the fold.
Minor things really.
I am very pleased with the way this collar turned out.

Wednesday, May 6, 2009

lace collar sample


Well, the military jacket is waiting for a fitting, so Susy was able to get started doing a sample for the lace collar we are making for a doublet.

I had started with an underbase of light nylon crin, but I decided it was too flimsy, so this is a heavier version called Odette 611 from Fucotex.

First we measured what we were given to make sure that we could cut some lace off for the sample. This is really important- don't ask how I know!
She took the pattern and drew it on the backing fabric and basted the edging lace down by hand .
Wherever needed, she cut sections of the lace away in order to fit it to the design outline and to make it look good and make sense.
On one edge she pre-finished the crin on the design line and on the other she zigged within the motifs and cut away the excess beyond the motifs. We're going with the cut away look.
Then she took the middle section and basted the other lace there and randomly zigged it to the backing trying out various stitches. It didn't take her very long, I was surprised because I thought it would be more tedious and I have no patience for that kind of thing so I am glad to work with people who do..

Wednesday, April 29, 2009

lace collar

It's been a bit hectic this week.
We have a show onstage tomorrow afternoon, and our next show deadline is the 12th of May, so I am doing things like marking alterations on finished suits for actors who have lost weight, and continuing with this project that I've been documenting.
This is the beginning of a large lace collar that will go on this doublet.
I started with draping a collar in muslin with the garment on the stand. At the last fitting, we fit the collar and looked at the overall proportions. At that point I didn't know what kind of lace I would get. I cut the collar base out of a light nylon crin that we have in stock and thread marked the outline of the design. Then the designer brought me some lace and I have pinned it roughly within the design lines. There will be another lace to go into the open area. We will cut away pieces of the lace where required to create a pleasing arrangement of the patterns of the lace.
Now we just have to figure out how to sew it. That task will go to my most experienced team member who has a knack for figuring out the most difficult tasks. I'll show you her samples as she does them, after she finishes the military uniform jacket she is working on.