Showing posts with label techniques. Show all posts

Friday, October 8, 2021

18th century costume structure and support

Once I have fused all the fabric and it is cut out, the pieces need to be marked. The style lines need to be seen from the right side of the fabric and some areas need to be stayed to prevent stretching out. Since we are in the fashion fabric, that means most of the marking is done by hand. This coat will come apart after the fitting, so it is essential to have everything marked beforehand.

Here is a partial half scale pattern of the body of the coat I made for you. I made this pattern with a side body panel, not true to period but it gives a bit more shape through the torso and a bit more flare to the skirt at the sides of the body.


Next, I have to think about structure. Which areas need support and what materials are available to give the support needed.


I need a chest canvas- and for this I purchased an overcoat length canvas. Like this one but longer.  I need to make some modifications to it. I want the chest area to remain in its normal position, but I don't have a lapel, so I want to add in a piece of hymo so there is a double layer across the front. 


I cut the coat with the straight grain parallel to the front edge of the skirt as shown here.


I have found that this reduces the issue of excessive  bias stretch along the front edge. it also looks better in striped fabric, as the stripes don't run off the edge!


The chest canvas, from approximately the waist down, is modified by darting it out and slightly shifting the lower area in sections so the grain of the canvas is the same as the coat. The darts are cut out, then joined edge to edge with a strip of fusible interfacing and zigged to hold.  


I also need to give the skirt areas support so they don't collapse. We want the skirts to have some oomph to them. Support inside the skirts is also useful because we will be sewing trim on the skirts and the support will stabilize those areas.

I used a product called Sew Sure firm. This is a narrow sew in interfacing that I have used many times in the past. It used to be available in a number of weights/stiffness from soft to extra firm, but I think now is only available in firm and soft. I use this crosswise so it naturally resists folding flat in the folds/pleats of the skirt. 

I draw out my pattern on the sew sure, and it is then flat mounted to the skirts by hand, down the pleat lines as well as around the perimeter. The Sew Sure that we put in the skirts also benefits us when it is time to hem the coat- there is something to cross stitch the hem allowance to!


Other areas needing support are the cuffs. here I will use a piece of the sew sure, and a piece of fusible canvas/hymo to give me the required stiffness. Pictures and details later!

The collar also needs a support, and for this I use a laminated piece of hymo and collar linen. The collar is cut nett (no seam allowances). This is mounted onto a piece of thin cotton which will act as a seam allowance. Pictures and details to come!

Similarly to the coat, the waistcoat fronts are cut out, a piece of hymo is cut for the fronts and basted in for the fitting. The waistcoat back is just a piece of muslin for the fitting. A collar is cut and mounted to cotton, then basted in place.

Lining- I generally cut  the lining for the sleeves for a fitting- it helps slide them on and off, and I cut the back body lining, again so the garment slides a bit more easily over the waistcoat and sits on the body without friction.

I cut the rest of the linings as well as the waistcoat back after the first fitting.

Friday, March 12, 2021

Drafting on the computer

     I have been trying out some new things this past year of Covid woe. For someone like me who is used to having problems to solve on a daily basis, this year has been a challenge in the absense of a sense of purpose and accomplishment.

    One of the things that I am using for a brain exercise, is learning some new things on the computer. I have been seeing so many patterns by Indie designers out there available for digital download, and I wondered what software some of these people were using.

    I thought that I could learn to draft patterns with the computer and started a search for software (affordable) with which to do this. 

    I have no experience using the computer for this task and I love, love, love, drawing patterns on paper, so I am not likely to give that up by any means.

    I started this journey with Inkscape, and began teaching myself some of the tools of that program. It was quite enlightening, I learned a lot - much of which may not have lodged firmly in my brain, but it opened up a door to a place I had never gone before. It was interesting and there are so many helpful YouTube videos out there that made the steep learning curve ever so slightly scalable- hats off to Logos by Nick for an excellent set of tutorial videos, even though I had to stop and start constantly because at his slowest I still was struggling to keep up.

    I decided that Inkscape was not the pattern making solution for me.  I am keeping it in my back pocket but decided to look further afield.

    I encountered a program called, Patternmaker Pro (closed down recently)which also did not work out for me- I could hardly get started and I was not looking for plug and play solution. I want to be able to control the parameters of my own drafting.

That then led me first to Valentina and then Seamly2D

    I am still learning the software and the tools with in it, but I have been encouraged by my progress so far and also by the welcoming and helpful forum of users.

Here is a little learning exercise I did recently.


This is a replication (just as written) of a vintage waistcoat draft.


It is a challenge for a paper and pencil gal to adapt, as following the process as written works well with paper, but isn't in the best order of operations for the computer.  I do like a challenge and this has been a lot of fun to do.

I don't necessarily have a plan beyond learning right now, but who knows, this may come in handy in the future.

I might become an indie pattern designer of period menswear😉

What do you think? Do you use a drafting software? Any advice?


Sunday, February 28, 2021

sewing tips: inserting jacket zippers

      I am sure that it is something many people already know, but for me I am not routinely inserting zippers into coats, but when you need to do it, you figure it out and get on with it. This sample represents a coat with a centered zipper, an offset facing, and has a Peter Pan collar. It was also quilted, but that is neither her nor there really, just an added layer!

Step one. My pattern is Nett so all the lines are sewing lines. I have my centre front stitched through the quilting and the backing. Press the seam allowances of the CF back to give it a light crease.

Measure from the centre of the zipper teeth to the edge of the zipper tape. That is 1.5 cm by my ruler. 


Mark a line on the CF body seam allowance  1.5 cm away from the CF. 

This is a guideline for sewing the zipper in. lay the edge of the zipper tape against the drawn line. Stitch the zipper in approximately .5 mm in from the edge of the tape.

Fold the CF edge back on the crease you ironed in. Check to see that the teeth are in a good position. The stitch line is 1 cm away from the CF line.


Next the facing. The next stitching line needs to be marked 1 cm from the CF. Mark a line 1 cm inward from the CF on your facing. This line will be sewn to the previous line of stitching you just created. 

You can work it out so you have a line to visually run the edge of the zipper tape against or you can just pin the facing in place and stitch line to line. 

The facing seam and the previous stitch line for the zipper are right on top of each other.


Done? Now you will fold back the CF of the body again and see that on the inside, the facing is now set back 1 cm back from the CF edge. 


Nice! If you have a stand collar where all the seam allowances will live up inside the collar you can go ahead and catch all the CF  layers down by topstitching, or if you are careful, and things look fab, stitch either just beside the facing seam through to teh fronts, or edgestitch the facing edge from the inside. 


If you have a collar such as I do- a peter pan style, one that requires the seam allowances of the neckline to be opened, then you must wait until the collar is installed before topstitching the CF.

 This type of garment has a fabric facing around the whole neckline. The only place the facing and body are attached at this point is the CF zipper insertion.

 Bag out/ prepare your collar as usual. 


Open up the front body and facing at the CF so they are flat. Match the CF seam of the under-collar to the CF of the body at the neck. Pin or baste it all around the neck.  Stitch*.  (*it just may make it easier to have one section already stitched while you pin and prep the top collar/facing neckline side). Pin or baste the top collar all around the neck line of the facing, pushing the seam allowances of facing/zipper seam away from the CF. Stitch.

As I said you can do this all in one go it you wish.

Here you can see what happens at the CF area. 


Trim, clip and press the seam allowances of the neckline open, on the body and the facing. 

Press and whack it with a hammer if it needs encouragement!


Turn right sides out and check the placement of everything.

Go back inside the facing at the neck and hand stitch or machine the opened neckline seam allowances together face to face.

I think you are done. 

Topstitch as desired.


One advantage to this is that all the seam allowances are not all concentrated at the CF which can get quite bulky. 

Sunday, January 24, 2021

bathing suit sewing tips- a bagged out edge with elastic

Okay, so apart from the basics of getting the swimsuit and lining cut out, there was a small sample to be made.


On the neckline of the bodice, the elastic is applied differently than on the other edges. The front neck edge does not have a visible zig or cover stitch holding the elastic in place. The lining is used to bag out that edge. It is the left edge in this photo, where you see the zig on the blue lining.


You can see here, that the neck edge is bagged out but the armhole edge has a visible zig stitch 

I made a sample before starting.

For the sample you need a piece of the fashion fabric, a piece of lining and the elastic. I thread marked the line in yellow so you can see it. 

The lining and the fabric are placed right sides together. The elastic will be serged to the two fabrics, keeping the one edge of the elastic right against the line that is marked in yellow. 


You could zig it on if you do not have a serger. 

Here you can see that as the lining is turned to the inside, the elastic edge stays along the yellow thread line, which of course, is the finished edge.   
It all nice and neat. 

The final step is to control the edge by understitching. I am going to zig the elastic to the lining and in doing so, that will keep the lining and elastic in place on the inside of the garment.

The layers are opened up and laid down flat (sorry no photo of that!!)

The lining and elastic seam is under the foot and the fashion fabric is to the right of the foot while you are stitching. 

This is when you can test your machine for the best zig width and stitch length, as well as to see that you need a new needle! (Boo, skipped stitches are not good!) That is why a sample is a good thing to do! Identify issues before you work on the final garment.


Remember, the face of the fashion fabric is not caught in the zig, and when it is all laid in place, you get this nice clean edge. 


This, by the way, is the same technique I use on a tailored trouser waistband. Instead of bagging out  the top edge of the waistband, I do a variation on this, using the waistband canvas in the place of the elastic and it offsets the seam between the wool and the silesia. 

I will have to look for a photo of the technique used on trousers, I am sure I have one somewhere.

Cheers!

Tuesday, January 12, 2021

Keeping busy?

      In March of 2020, when everything shut down,  I was up to my eyeballs in work. It was quite astonishing how in the previous year and a half we had gone from worry about not having enough work being available, to way too much work, and then absolutely no work at all.

At the time of shut down, I had a large ongoing project for the new Swan Lake for the National Ballet of Canada, I had a project for a suit and overcoat for a tv show, and I had started back at the Festival. (once those projects get onstage or onscreen I will share, but for now I cannot)

On paper, and in our most positive outlook, it was all scheduled to pan out properly but of course it didn't. Unexpected delays, fabrics or fittings unavailable pushed all these projects upon each other. It is exactly the kind of situation that I try to avoid.  

When we were sent home from the theatre two weeks before the tech dress, I frantically used the strange gift of time we had been given to get everything back in order. Ballet costumes done as far as possible, check! Overcoat and three piece suit finished?Check!

Then what? If you work in this business you get used to deadlines and gearing up to the finish line, but the finish line became a distance blur.

We made masks, yes, many masks. When the call came from the local hospice, we were a well oiled machine of co-operation, organizers, cutters and sewers.

then what?

Well, we (myself and Lela- with whom I share the studio space) started creating projects with deadlines for ourselves! Honestly! Old habits die hard.

The first project was stretch wear- specifically bathing suit drafting and construction. Luckily for us, Pattern School Online run by the amazing Stuart Anderson had resurfaced from the depths of neglect on the internet, and it proved to be a valuable learning experience.

I made three bathing suits, and not only did I finish them, but I am very happy with them. The first was the trial run and mock up of a basic rather modest pattern. Cheap and cheery too. 


I went on a shopping expedition. I found this basic floral print fabric and I found something to use as lining- not marked as bathing suit lining per se, but something I felt would perform well as a lining. Since I was making a trial garment that I hoped would be wearable, I went old school and hand basted in the lining, and left a fair bit of seam allowance for alteration purposes. It was zigged together and tried on, then serged using a domestic four thread serger for the main seams and an industrial three thread serger and domestic zig for elastic application. I think I found patience to be a virtue in this endeavour especially with the elastic and how the machines handles the fabrics.

I think the calculation for elastic was the most challenging and most interesting part of the process. I really appreciated delving into the why and how of it all. Stuart does an excellent job of examining and explaining how stretch works (or doesn't). 

By the time I was ready to hit the beach, there were shutdowns at the lake due to overcrowding, so this piece had its debut at a friend's pool! My daughter thinks it is matronly looking but I don't care. The next one has a lot more flair!

That will be next.


Wednesday, December 13, 2017

paned breeches updated and finished

Home again home again jiggity jig.
That month away felt so long, yet went by so quickly if you know what I mean.

It is refreshing to go to Montreal. There were so many wonderful cultural experiences to see and do. Here are some of the things I did while there.
AURA amazingly breathtaking! watch the video!
Leonard Cohen exhibit at MAC , Centaur Theatre,  Boys with Cars , McGill music concert , Redpath Museum , Souk à SAT , Cité Mémoire , Salon des Artisans Récupérateurs, Beautys, wandering the old town of Montreal and Griffintown, watching the Grey Cup with friends down in Lasalle, shopping, restaurants, Loving Vincent and The Other Side of Hope

I did work too. Really! No wonder I am a little tired!

so a few work photo updates
the paned trunk hose.
This is what I did with the tulle/net to create the shape under the "paned" layer. I forgot to take photos of this.

After applying the netting, sew the base layer up. 
I had already created a zip fly in the base layer before I applied the netting, so my fronts were actually joined together as I applied the net. Sew the inseams, then sew the centre front/centre back seam.
Sew the CB seam completely up before applying the waistband. The next steps can be modified, but this is how I did it, as I needed to have a fitting before finishing. I am also trying to think ahead as to how alterations could be easily made after the fitting, or in the future.
I interfaced and applied the base waistband (just a single layer), sewing it on so the seam allowances are facing outwards. This will make sense, I assure you. I turned the top edge of the waistband and pressed it.

Next, sew up the paned layer, inseams first, then cf/cb leaving the fly area open. Sew the waistband(single layer of fabric) on as usual. You now have two pairs of "shorts"
Slide the paned layer over the base layer. Baste the CF fly opening to the base layer.
Finger press the waistline seam allowance open, pushing the seam allowance of the panes downwards and baste the waistband seam allowance of the pane layer to the waistband seam allowance of the base layer. Machine these together close to the seam.
Slip stitch the centre front fly of the paned layer to the base with a permanent stitch. 
Baste the leg openings together flat.


Fit
make any alterations- I had to take a few small tucks in the back under the seat towards the inseam. I put the tucks in the base layer and gathered the paned layer to the new size.
Finish them!


I used premade bias tape to finish the leg opening. I sewed it on, cut my seam allowances down, wrapped the bias to the inside as a facing, and slip stitched the bias to the base fabric.
joined the waistband layers together on the top and front edges.
Sew on hooks and bars.
Voilà. 

Production photo credit Maxime Cote

Saturday, July 15, 2017

Cutting an "old fashioned" bathing suit

Tucked in amongst the suits and trousers we are making, is a little project that was a lot of fun to do.
We needed to make an old fashioned bathing suit for the character of "the lifeguard".
Sort of like the gentleman second from the left in this photo.

First the material- we used a wool/Lycra blend from Whaleys which for some reason I cannot find listed on their website- I hope it has not been discontinued! It is really fabulous fabric. Pricey- yes, at $78/ yard  (2008 pricing from our stock tag) but for specific projects like period tights or period bathing suits, nothing else that I have used compares to it. Anyhow, being wool it does shrink too, so a wash and dry to preshrink it was necessary.
For the red stripes, we used a lightweight poly cotton colourfast knit that was cut into 3" strips and laid on top of the wool/Lycra base.
It is important to make sure the red was not going to run and turn the whole thing pink!

I had to make a few pattern decisions right off the bat. There are a few options for making this pattern.
Breaking it down- where do we want the seaming to be?
It could be an all in one unitard pattern- no waist seam. These unitards often have no CF seam at all. Sometimes they have a side seam, but many do not. In that case the pattern would have to have a CB seam from the neck down through the CB of the seat. All the body shaping happens through that one seam.
I didn't think that a CB seam in the bodice area would look right. Plus I am applying stripes, and that didn't seem like a good shape for this.

So I decided that the bodice should like a tank top, with only side and shoulder seams.

That leaves the lower section to think about.

Normally a pair of shorts has a waistline, CF, side and CB seams to shape around the body. I decided to not have a CF seam in the shorts, allowing the stripes to be applied flat across the front.
I decided to keep the waist seam, which would allow me to fit and adjust the garment length very easily.
Since we were applying stripes, I figured that a stripe could be used to disguise the waist join.
That meant that the back of the shorts would have a CB seam and all the length required through the fork or crotch extensions would be on the back piece.

This is the first fitting, cut right into the fabric and zigged together.You can see that I have pinned some length out of the bodice section. This was just at the back waist not in the front.The designer did not want this fit very tightly to the body, so I left the overall fit around the body as is, and honestly the waist seam allows a good fit without it being stretched to the limits.

I basted on a few stripes to confirm their width. I thread marked the neckline and armhole lines but did not insert any elastic at this point as I wanted to confirm the design lines.


The next step was to mark the alterations, take it apart, cut the stripes and start sewing them to the base. We used a coverstitch machine to apply the stripes. The only tricky part was that we worked from the inside as we wanted the covering threads to cover the raw edge of the red stripes. The usual double line stitch of the coverstitch was now on the inside.


You can see the inside of the fronts more clearly here with the stripes applied.
At the waist we joined the bodice to the shorts with a flat overlapped seam rather than a regular seam so the join would not be noticeable. Again we used the coverstitch for this.
The same technique was used to put the shoulders together. This is much less bulky overall. The only seams that had regular four thread serging were CB of the shorts, inseam and the side seams.

The stripes on the front of the shorts section will determine how we place the stripes in the back section. If this were pre-striped fabric I would not be able to control the look of the stripes overall, and would likely have to cut this quite differently.


On the back of the shorts section, the CB seam was joined first, then it was attached to the back bodice. Then the stripes were applied.

You can see here that the third stripe down from the waist takes a drastic turn from the side seam under the seat, then over to the inseam. The stripes will match at the side seam, and will also match to the corresponding stripe on the front inseam.
This is where a pre-striped fabric will be a problem visually! It would never match up to the front at the inseam. Here we can manipulate things to be as we want them. Very tricky, don't you think?

Once all the stripes had been applied, the shoulders were sewn, and then the sides and inseam.

The final process was to finish the neckline and armholes. We wanted to install elastic in those edges but not in the usual manner of zigging or serging the elastic in. This seemed too thick to do that successfully. So we serged those seam allowances down to a scant 1.5cm, turned them to the inside  and stitched a half inch away to form casings, then fed elastic into the armholes and neckline. We could then adjust the length of the elastic as needed at the next and final fitting as seen below.

How much fun is that? 
It was a good project to stretch (haha) my pattern making and our sewing techniques.

cheers!


Sunday, May 14, 2017

Cutting cloth with one way design

Well, first I need to say that I am just crawling out from under one of the most trying times at work.
I shall not go into it here but suffice to say that management errors have left our department with crippling amounts of overtime.

Hence the lapse in my best laid blogging plans.

Back to the topic at hand though.
The designer makes 99% of our fabric decisions, and although the cutters are sometimes asked their opinion on whether it is suitable or not, usually it arrives on our table and we work with it.
Many fabrics don't pose much of an issue. The easiest are plain fabrics without a nap or one direction design- think a good plain woolen cloth. You can top and tail the layout of your pattern pieces (this means you can turn a pattern piece upside down/top to bottom in the layout) taking advantage of every square inch of the cloth and being quite frugal in its use.

Up the ladder from the basic could be a cloth with a woven pattern in it- a symmetrical or balanced check or stripe. The challenge is to place your pattern on the cloth keeping in mind the centering of the garment on the woven pattern in the cloth, and matching the pattern where needed at centre front and back and sleeves to body. You can still top and tail the layout.

Another rung up the ladder might be velvet (or corduroy), a definite one way fabric. I remember as a teenager, cutting myself a pair of overalls in corduroy, and being completely stymied by the fact that one side of the body looked dark and the other side light. I knew nothing about "nap" and I don't think I ever finished them as I was so confused.
We often cut velvet "nap- up" for the stage because it usually reads as  a richer colour than when cut nap down. You must cut your pieces all in one direction- you cannot turn a piece upside down to fit better on the layout because it will end up a different colour than the rest of the garment. You can turn a pattern piece over, only as long as up remains up. These fabrics often have a fair bit of wastage depending on the garment type.

Next up could be asymmetrical/unbalanced or one way printed or woven designs. These could be plaids, florals, uneven checks or uneven stripe combinations. These fabric designs cannot be "book matched" at the centre front or back.  When they are folded in half, right sides together for cutting, the design in the fabric does not lay matched atop each other.

I have run into uneven or unbalanced cloth a couple of times this year. Twice with suitings and once with a velvet floral. I had no problem making the decision of how to cut the velvet but I started wondering about the options for the stripes.
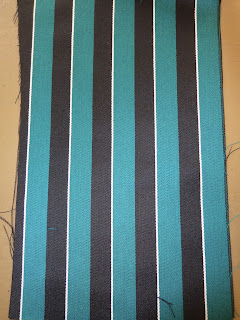
Here is one of the striped fabrics:


It made me wonder about whether I should cut the jacket as a one way design or not. I could conceivably cut the yardage in half lengthwise, and turn one layer of the fabric to make it symmetrical. Hmmm....I didn't do that in the end, but it did make me wonder if doing so was a "thing" or a no- no.


Here is a visual of what I mean. Imagine that you are looking at the centre front of a jacket- does it look better as a one way pattern or symmetrical? Chime in by all means!


Here is an example of an 18th Century style waistcoat in the floral velvet where you see the one way fabric in the cloth and how I have laid it out so the pattern continues uninterrupted at mid centre front. It requires enough fabric to do this and there are a lot of offcuts, which I used for the facings and such so as not to waste fabric.


Of course, it also takes a bit more time when cutting out cloth like this as you have to be quite careful to make sure that all your pattern pieces are oriented the same direction. The tricky bit is with pattern pieces like trouser backs and undersleeves. These pattern pieces are developed from the trouser front and top sleeve respectively. They "face the same way" when they are drafted.
In laying them out on the cloth you must make sure you flip the trouser underside pattern and the undersleeve to maintain the directional patterning at the side seam in trousers and of the sleeve.
that sounds complicated so here is a quick sketch of what I mean.


Okay, I think that is all I can muster up in the bad drawing department this evening!

It is certainly a lot to keep in mind while cutting things out!

Sunday, March 26, 2017

fitting and pattern alterations part 2

I thought I would follow up a little on the fitting and pattern alteration post where I was dealing with pattern alterations for scoliosis.


I had to make three different garments for this particular person, all with different patterning requirements.
We made a suit, a bolero and a 1950's style casual jacket. (with a quick change (11 seconds) front panel held on with magnets but that is a whole other bit of business)

With the bolero, I have created a seamed panelled back as it gave me more control over the fit. This garment does not have shoulder padding, whereas the suit jacket does.

I have laid the left body pieces over the right sides to show the differences in the two sides of the body.
I did end up lowering the armhole on the left side of the body as compared to the right.
I think you can see how much lower the left is at the shoulder, as well as the difference in width that was required on his right side at the upper blade area.


I have found this to be both a challenge and an interesting learning process.
Tomorrow I will try to lay out the pieces for the 1950's casual jacket which has a yoke as well as panel seams.

In terms of the suit jacket back, here it is in a finished state.
I think the comment about adding a dart on the left shoulder to make it visually more symmetrical was spot on but I left it as is because I had no time to re cut and reconfigure. If I had time to do it over, I would have tried to transfer some of the left horizontal drop into a shoulder dart rather than take it up with a shoulder pad.
Of course this stand does not reflect his actual shape so there is an air space on the right blade.


One of the job challenges is letting some things go, because we have such time pressures.
He was very happy with all the pieces we made, the designer is happy, I have learned something so I am happy too.

No time in the fittings to take really good shots for a blog, I make do with photos taken for the designer's references. :)

Sunday, February 26, 2017

fitting and pattern alterations

One of the more challenging aspects of my job is drafting patterns to fit a variety of body shapes and fitting them to the individual.

Over the years you realize that almost no one is symmetrical, but some people are less symmetrical than others, sometimes from their occupation, sometimes from bad posture or habits (like carrying a heavy bag on one shoulder for years) some from injuries or occasionally a medical condition.

This week I fit a mock up suit on an actor/dancer who has scoliosis.

I had not measured him myself nor had I fit him before, so I drafted up a jacket and trousers to his basic measurements making no special pre-adjustments, figuring I would do that in the fitting.
Here is a photo of the my fitting adjustments.


I pinned out across his back as the left side is quite dropped, and on his right, I just cut the toile open over his blade.
(a good reason to make a muslin because you can cut it open rather than guess how much to add, and you can draw on it! )

Here is a look at it on a stand.

So, what to do?
First, I let it sit for a while, getting on with some other things which gave me a bit of time to think about it all. Then I made copies of the original pattern so I had individual pieces for his right and his left sides. Two back two side panels and two fronts.

I altered the left side of the pattern for a severely dropped shoulder/side. This entailed cutting from the mid back and mid front, angling down to the side back and front panel seam and closing out a good 1.5 cm there. the side panel piece was similarly reduced. (I will refit and see if this was enough of a modification.)

On the right side, I cut open the pattern down over the blade to the waist line. I cut horizontally at the waist line allowing the panel to spread apart the amount that I determined it needed in the fitting.
This opens up the back shoulder of course, and creates a large dart.

Now, this is going to be a striped suit. 
I laid the back patterns out on the fabric and had a look at what my options were.
The lower portion of backs need to be parallel, and could be, no problem. The CB at the neck needs to end up mid stripe or give that impression as well. I knew I might have to modify the dart placement to be as discreet as possible. 
I was not sure how this would look, but I chalked it out and pinned it up and I think it looks pretty good. At the neck, the left back ends up on a red stripe and the right back ends up with a full blue stripe! Win, win situation there! I did modify the dart placement slightly and I hope it becomes less noticeable once it is sewn
I am hoping that this does the trick, but I expect to have to tweak things a little bit more with some light padding here and there so I have my fingers crossed and onwards we go. The fronts need a bit of modification as well, but minor compared to the back so we will put the shell of this together and see what else needs to be done.