Showing posts with label pattern drafting. Show all posts

Sunday, November 10, 2024

More trouser pattern thoughts

Continuing on with some of the topics that Handmade PHD is attempting to make sense of through exploration...

Side seam length and shape. 

Length- the front and back side seams in her sample trouser pattern should be the same length. In most trouser patterns they are. Is there a time when the lengths could be different? Yes, if it is an intentional design feature, or sometimes for shaping. (see calves below).

But,,,,In general, the side seams do not have to be the same shape at all. Especially from teh knee up to the waist.

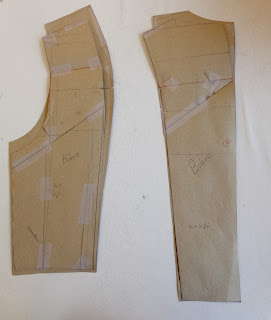
Picture here shows a 1950's German draft, a 1920's draft and a 1970's draft for men's trousers.


Sometimes they are the same shape - as is the case of pyjamas or the flat block referenced in the previous post
If you do a bit of research you can see that traditionally men's trouser draft will not have the same outseam shaping on the front and back. The waist to hip ratio for men is generally less than for women but we must remember that shaping needs to reflect the body, and the body shape needs to be accommodated regardless of gender. If the hip is not full at the sides, there is no point to putting the shaping there. If it works for a particular body shape -great- but it is not the only way, nor necessarily the best way to go about it.


Side seam shape- if the outseams of a trouser are the same shape, or almost the same shape the trouser block could have been developed from a skirt pattern


  Patterns shown here from More Dress Pattern Designing by Natalie Bray.  

This shape of pattern development was very common in the days when trousers were more of a novelty garment for women. It puts more waist suppression in the side hip area, and the patterns tend to have a straighter CB seam angle (smaller amount of waist suppression). It is certainly much more common practice in women's patterns then in men's.


Inseam length.

The inseams from hem to knee in her sample trouser pattern should definitely be equal on the front and back panel. I'd argue for them to be equal completely but there are bigger issues with the drafting here.

The back inseam from knee to the tip of the fork/crotch is on more of an angle than the front, so naturally to keep the measurements equal, when drafting, it will drop down just below the horizontal crotch line at block development. Thinking it has to be on the same horizontal crotch line as the front is incorrect. You can see that in the Bray draft above.

As the angle of the back inseam increases, not only does the thigh size increase, but the bias of the fabric comes more into play. Bias will stretch out (more in certain fabrics) so sometimes the back inseam is shortened to account for bias stretch.

Lastly, in some trousers drafts, the back inseam is shortened to clean up the amount of fabric under the seat. Stretching the back inseam up with the iron before sewing it to the front, leaves the section under the body (before the seam turns vertically) lower.  Makes for a better fit in tailored trousers.

Calves                                  

An example of uneven seam lengths can be seen in some drafts which provide a bit of shaping for the  calves. You may see drafts/patterns where the back inseam and outseam from the knee to the hem are drawn with a slight convex curve. This increases the seam length relative to the corresponding seams on the trouser fronts. The extra length is eased in and provides a bit of shaping for the calves, and it increases the width over the calves as well.  This can be useful with very narrow trousers, or for people with prominent calves.

Knee shaping

You might also see some close fitting or speciality trousers drafted with a dart in the inseam and outseam at the knees to create a pocket at the knee. This is most often a style consideration.

next post - looking at the waistline .....

Wednesday, October 23, 2024

Looking at a trouser pattern shape problem


So, Hello! I am back after a very lengthy hiatus - its funny how we lose interest or motivation over time for some of the things we do. Other platforms pop up and it satisfies something different or us, and for me I think I needed a break and IG seemed useful, but it has issues too and I guess I found that my thoughts are less "Insta" so to speak.

but anyway......recently on Instagram....and her accompanying blog-

Handmade PHD was recently trying to dissect a pattern for trousers that were not working for her and I have a few thoughts as to whats going on there. She has been looking at various patterns and how they perform by virtually trying them on 3D avatars. 

So, instead of burdening her comment section,  I figure I could post some of my thoughts here instead.  


This is the digital pattern shape she is working with. She has drawn in grain lines from the centre point of the hem and knee on both pieces. That seems to be reasonable assumption on the front but not on the back as the perpendicular angle of the knee and crotch line don't make sense. 

I think there was a problem with the way the basic pattern has been developed, either at the block stage or during manipulations of the basic block.

Here is an example of a flat trouser draft from Metric Pattern Cutting for Menswear as an example - this would be the draft I would imagine would be used for this style of trouser. On the left they show a block developed with a straight side seam (which could be placed on the fold and cut as a one piece pattern) or, for a slightly better fit, a flat two piece trouser block.


Even in a flat block, the front and back of the pattern must directly relate to each other in the block development drafting stage.

From the basic block, one may then make modifications, like adding pleats to the front, without distorting the relationship between the front and back


Unfortunately the back pattern piece she has looks like it was from the straight side seam block and the front from the two piece. They just don't work together.

On the two piece block, you should be able to superimpose the front on top of the back, match the hem level, and centre the front piece over the back piece. The backs, which are drafted wider that the fronts at both the hem and knee, should have an equal amount showing beyond the fronts at the knee and the hem on both inseam and outseam. The centre leg/grain line should be right on top of each other.

Here is a little that exploration I did.


1. if side seams were straight, the centre front goes off grain and front hem at inseam drops 

2. the front is overlaid on the back, centered at the hem but the knee is not centred 

3. if the hems are on the same plane with the hip hip area touching, there is a big offset in the lower leg.


I also wonder why the back waist line has virtually no rise to it. You can see that the CB waist point is only marginally higher than the side seam at the waist. 
hmmmmmmm, I wonder if their back waist measure was too small, and to increase it,  they slashed and spread it? no, I tried that in a paper model and it didn't produce that kind of shape. 


I'm stumped there.....

But... I can imagine if the back waistline does not rise much above the horizontal construction line for the waist, then the centre back seam length must be made to intersect with the back inseam length somewhere out there in space. I can see how someone might make that make sense somehow.

I mean, there are patterns that don't have any rise in the back waist, which may look something something like this- of course that straight CF/CB line must be long enough to accommodate the full girth, so the crotch point will be quite a bit lower than a trouser with shaped CF/CB seam.   


There are some other issues that bear examining, like inseam length and side seam shape, but that will have to be discussed in the next post.

Do you have issues with the patterns you make up? 


Tuesday, May 18, 2021

benefits of a basic block

To continue with my coat adventure, I thought I would step back a little and look more closely into the pattern development.

I usually draft for men, and the process is direct as in I draft a shirt, or a waistcoat or a jacket from scratch. Tailoring doesn't start with a basic block, but women's wear does; a basic block is drafted and all the subsequent patterns are derived from the basic block. 

So, one needs a basic block to start with. 

I have seen many instances online of people developing a skin tight block, they take courses on how to do it, but I have noticed that many people struggle through that process only to find that they don't know what to do with it once it is done. I guess it is good if you want to create a judy for your particular shape, or create a very fitted shell to squeeze a foam judy into.  Having a judy of your size and shape can be a real asset especially if you are not a standard shape or size, but it seems a challenging starting point for most people.

I think the better choice is a block pattern that is fitted but still has wearing ease in it. 

I have a block that I drafted using on older (late1960's) version of the Muller et Sohn method. Technically, it was a draft for a jacket but I think it gives me a lot of flexibility to make a closer fit as well as a looser fit depending on what I want to make from it.

It has 4.5 cm of ease on the half pattern, so 9 cm total ease around the bust. To compare, the Natalie Bray block (circa 1950's) drafts with 5 cm of ease on the half bust (or hips if the hips are bigger).

I like the Muller version, it gives a lot of flexibility in that it divides the body up into sections back, armhole and front. The sections of the body have proportional formulas to which you add ease. I think it gave me a good idea as to whether my personal measurements fit within the proportional parameters to start with. 

The other aspect that I like is that as the bust circumference increases, the proportions change to reflect that. In other words there are size break proportional changes. 

Here is the basic chart. the english translation caption I believe should read: back width, scye width and chest width. 

As with any drafting process, just following the instructions as written is not going to produce a perfectly fitting model. Drafts need to be adjusted for the reality of the shape you are drafting for. This is something I don't think people are aware of.  Measurements are not shape. If your measurements are not exactly what the draft calls for and your shape differs, then you still need to account for that in the drafting and the fitting.  

In order to draft a personal block, I think you need a few specific measurements. 
Here is my basic list:

height
neck
bust
waist
hip
nape to waist back
across back
nape to bust point
nape to waist front (going over the bust point then straight down
bust point to bust point
throat to centre front waist 
across front (upper chest)
nape to shoulder, to elbow, to wrist
shoulder width from neck.

There must be a waist tape on the body to provide a destination point for these measures and I recommend a set of photos with the waist tape on in order to double check when drafting.

I like measurements that have defined starting and ending points.  I don't like weird measures like side seam, honestly, where are you measuring? or front waist arc from side to side. Really too random for me.

Even measuring from the mid shoulder is suspect. Can you locate and apply the measurement  reliably on your pattern draft? Using your t-shirt seam as a starting point? not for me. 

That being said, I know that learning how to use a basic block for pattern development and to adjust your pattern is a steep learning curve but for some it may be a good thing. 

I think having a set of your measurements would also help the user of commercial patterns adjust them with a bit more confidence. 

If you are interested in discussions about tailoring and cutting women's wear, you might want to check out this site. click on the bespoke cutter and tailor forum link. 


Monday, May 17, 2021

perspective on home sewist issues

 Time seems so fluid these days, I can't believe a month has passed since I last posted.  

I was thinking the other day about how the pattern making process is a mystery to a lot of people.

I don't take the process for granted, yet I am at a different vantage point regarding pattern making than the average or even experienced home sewist.  I have almost 30 years of experience doing this, intensive years of learning how to draft, how to fit different bodies and how to adapt the information provided (measurements and design) into a paper pattern. 

There is always something to learn, problems to solve, and I enjoy that aspect of the work. In the absence of a lot of work (Covid issues),  I have tuned in more to the home sewist platforms and their particular challenges. 

Yesterday I read a post on Instagram (blog post here) about a sewing wiki. I found it interesting that these two women were considering this, but I think they have made a wise choice in not going forward.  I cannot imagine trying to curate the information! The thought makes me ill 😉. 

The internet has opened up a lot of information to so many people in such a positive manner, but unfortunately it also has let loose a lot of misinformation. I think it is mostly misguided, not malicious in any way. I think there has been a generational gap (or two) of knowledge and learning in the area of pattern making and sewing, and now that the art and craft of it is seeing a resurgence, the gap is showing.

 In the age of social media and the loyalties it engenders, I have noticed a certain interesting embracing of failure. It sometimes seems that people identify with the struggle and sharing the struggle, often to the point of dismissing or disregarding sound advice. I am all for figuring stuff out on your own, but why not accept good advice or pointers in favour of failure?  Eventually with time you may realize that you have been reinventing the wheel.

I guess I am just seeing it from a much different perspective than most.


Anyway, I could go on and on about it all, but I am sure that would be too much for both of us. 

I was going to post about my coat pattern here today, but this is already too long. That will be another post.

I would be interested in your opinions on this, 

cheers.


Friday, April 2, 2021

lockdown project- a coat for myself

It seems that spring is here, and it is time to switch out the winter clothes for something slightly lighter. That makes me remember that I had another lockdown project I can tell you about. 

I made a coat for myself. 

I still have the first coat I ever made for myself, way back in the early 1980's. It was a Vogue pattern, I believe, I bought the fabric at Duthler's in London Ontario- they had nice fabric in the day! Sigh.

It was a classic cut, DB camel coloured tailored coat. I haven't worn it in decades, I did love it, but, it was time to make a new coat. 

First-design- I had to pick a style. Oh gosh, I had so many pins of women's overcoats on Pinterest that I liked but I couldn't decide on any of them. Then, I saw an online ad for a winter coat at the Bay, and I liked it enough that I thought I could use it as a jumping off point. 


I did a little drawing first. 


Then I got out my base/block pattern that I drafted and fit on myself last year.


I made a pattern, started a mock up and realized it had way too much ease allowance, so I started over,  made a new pattern and cut right into fabric. I figured I would baste it together and try it on as I went and make adjustments to the style and fit on the fly.

Maybe not the best decision, but in my defense, I had what I will call "Covid Brain",  very fuzzy thinking, and I had the time to spend. 

This project also provided something I had been lacking since the lockdowns, and that was a deadline! I planned to have it finished in time for my working gig in Montreal.

I muddled through. I am sure Lela thought I was crazy at times when we were working in the studio together but it all worked out in the end and I got a coat out of it.

I will show you some of the stages in the upcoming posts.


Friday, March 12, 2021

Drafting on the computer

     I have been trying out some new things this past year of Covid woe. For someone like me who is used to having problems to solve on a daily basis, this year has been a challenge in the absense of a sense of purpose and accomplishment.

    One of the things that I am using for a brain exercise, is learning some new things on the computer. I have been seeing so many patterns by Indie designers out there available for digital download, and I wondered what software some of these people were using.

    I thought that I could learn to draft patterns with the computer and started a search for software (affordable) with which to do this. 

    I have no experience using the computer for this task and I love, love, love, drawing patterns on paper, so I am not likely to give that up by any means.

    I started this journey with Inkscape, and began teaching myself some of the tools of that program. It was quite enlightening, I learned a lot - much of which may not have lodged firmly in my brain, but it opened up a door to a place I had never gone before. It was interesting and there are so many helpful YouTube videos out there that made the steep learning curve ever so slightly scalable- hats off to Logos by Nick for an excellent set of tutorial videos, even though I had to stop and start constantly because at his slowest I still was struggling to keep up.

    I decided that Inkscape was not the pattern making solution for me.  I am keeping it in my back pocket but decided to look further afield.

    I encountered a program called, Patternmaker Pro (closed down recently)which also did not work out for me- I could hardly get started and I was not looking for plug and play solution. I want to be able to control the parameters of my own drafting.

That then led me first to Valentina and then Seamly2D

    I am still learning the software and the tools with in it, but I have been encouraged by my progress so far and also by the welcoming and helpful forum of users.

Here is a little learning exercise I did recently.


This is a replication (just as written) of a vintage waistcoat draft.


It is a challenge for a paper and pencil gal to adapt, as following the process as written works well with paper, but isn't in the best order of operations for the computer.  I do like a challenge and this has been a lot of fun to do.

I don't necessarily have a plan beyond learning right now, but who knows, this may come in handy in the future.

I might become an indie pattern designer of period menswear😉

What do you think? Do you use a drafting software? Any advice?


Friday, February 26, 2021

Childen's wear drafting and trying to find information

     I recently needed to produce a few garments for a child, and it occured to me that I had only one drafting book to reference for children's wear.

That book is the Winnifred Aldrich's  Metric Pattern Cutting for Children's Wear and Babywear. 

I have an older edition so out of curiosity I borrowed a newer edition just in case. I found there were  some changes to some of the basic drafts which made me wonder. 

Things like the calculations for neck width used 1/5 neck minus 2mm now its 1/5 neck plus 2 mm on some drafts.Were there errors in the older drafts or just typos? Strange.

     I wanted to find a draft for a one piece snowsuit. It is not a garment covered in the Aldrich book. The child would arrive after quarantining, go for fittings, alterations would be done there, and then be on camera two days later.   They didn't want a waist seam in the snowsuit, so I had to get it right the first time. I needed to find basic torso girth measurements for children so I could have some kind of reference point. "It shouldn't be difficult" I thought to myself....... Anyway, it sent me down a rabbit hole of internet searching.


I did finally find a study of children's measurements here, done in 1939. So I waded through all of this and got a number range for height. 

I called friends with children too! "how tall is your child? Can you take a measurement of his torso girth for me?"

What a run around for information! Oh I forgot to mention, all I received was height and a chest measurement taken by a parent. That is all I was working from. What a business! and let's not talk about the deadlines.

What else did I find? I found a snowsuit draft on a Russian website, which I downloaded for reference and I could follow along looking at the diagrams. My desktop translated the pages, except for the sizing tables!! because they are photos not text! Drat!

I was on Pinterest and I found an Italian children's cutting book. In Italian, of course. Again, I could follow along by "reading" the diagrams. But I don't think there was a one piece snowsuit draft there either. That book, by Antonio Donnanno is available here in English.

I decided to basically stick with the Aldrich using the flat overgarment blocks for jackets and the flat two piece trouser block, and melded them together so they looked right ot me.

Once I made the basic draft, one of the things I had to take into account was the thinsulate lining. My base pattern was for the lining, but the outer fabric layer needed to be bigger than the under layer. I think I read somewhere about re-calculating the draft for the amount and type of insulation being used, maybe it was on the russian drafting site, maybe on a german site....I can't remember now.

Anyway, in the end, I figured out how much bigger to make the shell and made a pattern for that too. 

It was lots of work mentally and then a lot of work just cutting and sewing them. (yes, plural! I needed to cut two of them) I think they turned out really well, The best part is that they fit. I breathed a sigh of relief. 

We did get stuck waiting for zippers to arrive, but all in all it went fairly well. 
The shutdowns have made getting supplies a bit more challenging! So many things are being shipped its a miracle everything gets to where it is going.


Sunday, January 17, 2021

Bathing suit drafting and construction- 2020 projects

 Well, where are we?

Oh yes, lets look at the next bathing suit I drafted. I had one successful pattern and contruction under my belt, so I felt this next one was worth using some fabric I had purchased but didn't want to waste on a trial garment.

I had an existing tankini suit that had seen better days, and I liked the design of the top, but I felt that it never really fit me that well. You know, it was good enough but better is better, right?

The top was a halter style with ties and a ring detail at the centre front bust. The ring was in great shape, so I took the old bodice apart- which is always an interesting and informative process. You can see the order that the garment was constructed and the techniques that were used.

I had been poking around at my local fabric store and I found some lightweight power net in a pale blue colour. It was onsale too! I decided, since I am experimenting, that I would try that as a lining in this suit. I think I also bought some flat rubber elastic for this one as well. I hadn't worked with it before, so why not now?

Stuart had a tutorial on his website for this process. I have since discovered that these lessons are now under a paywall. I think if you are interested in making bathing suits, or stretch wear it is well worth the cost.

My first draft, and then the altered pattern. I basically made the same pattern alterations here as I did in the first bathing suit in the previous post. (I added length over the bust)
I started again from scratch though, partially for the practice, and also to make sure that I wasn't making changes based on fabric characteristics.  

The second photo is the altered pattern. 

At the bottom you can see the idea of the design pinned up on the stand.

We will have a more detailed look at it next...


Tuesday, January 12, 2021

Keeping busy?

      In March of 2020, when everything shut down,  I was up to my eyeballs in work. It was quite astonishing how in the previous year and a half we had gone from worry about not having enough work being available, to way too much work, and then absolutely no work at all.

At the time of shut down, I had a large ongoing project for the new Swan Lake for the National Ballet of Canada, I had a project for a suit and overcoat for a tv show, and I had started back at the Festival. (once those projects get onstage or onscreen I will share, but for now I cannot)

On paper, and in our most positive outlook, it was all scheduled to pan out properly but of course it didn't. Unexpected delays, fabrics or fittings unavailable pushed all these projects upon each other. It is exactly the kind of situation that I try to avoid.  

When we were sent home from the theatre two weeks before the tech dress, I frantically used the strange gift of time we had been given to get everything back in order. Ballet costumes done as far as possible, check! Overcoat and three piece suit finished?Check!

Then what? If you work in this business you get used to deadlines and gearing up to the finish line, but the finish line became a distance blur.

We made masks, yes, many masks. When the call came from the local hospice, we were a well oiled machine of co-operation, organizers, cutters and sewers.

then what?

Well, we (myself and Lela- with whom I share the studio space) started creating projects with deadlines for ourselves! Honestly! Old habits die hard.

The first project was stretch wear- specifically bathing suit drafting and construction. Luckily for us, Pattern School Online run by the amazing Stuart Anderson had resurfaced from the depths of neglect on the internet, and it proved to be a valuable learning experience.

I made three bathing suits, and not only did I finish them, but I am very happy with them. The first was the trial run and mock up of a basic rather modest pattern. Cheap and cheery too. 


I went on a shopping expedition. I found this basic floral print fabric and I found something to use as lining- not marked as bathing suit lining per se, but something I felt would perform well as a lining. Since I was making a trial garment that I hoped would be wearable, I went old school and hand basted in the lining, and left a fair bit of seam allowance for alteration purposes. It was zigged together and tried on, then serged using a domestic four thread serger for the main seams and an industrial three thread serger and domestic zig for elastic application. I think I found patience to be a virtue in this endeavour especially with the elastic and how the machines handles the fabrics.

I think the calculation for elastic was the most challenging and most interesting part of the process. I really appreciated delving into the why and how of it all. Stuart does an excellent job of examining and explaining how stretch works (or doesn't). 

By the time I was ready to hit the beach, there were shutdowns at the lake due to overcrowding, so this piece had its debut at a friend's pool! My daughter thinks it is matronly looking but I don't care. The next one has a lot more flair!

That will be next.


Sunday, March 26, 2017

fitting and pattern alterations part 2

I thought I would follow up a little on the fitting and pattern alteration post where I was dealing with pattern alterations for scoliosis.


I had to make three different garments for this particular person, all with different patterning requirements.
We made a suit, a bolero and a 1950's style casual jacket. (with a quick change (11 seconds) front panel held on with magnets but that is a whole other bit of business)

With the bolero, I have created a seamed panelled back as it gave me more control over the fit. This garment does not have shoulder padding, whereas the suit jacket does.

I have laid the left body pieces over the right sides to show the differences in the two sides of the body.
I did end up lowering the armhole on the left side of the body as compared to the right.
I think you can see how much lower the left is at the shoulder, as well as the difference in width that was required on his right side at the upper blade area.


I have found this to be both a challenge and an interesting learning process.
Tomorrow I will try to lay out the pieces for the 1950's casual jacket which has a yoke as well as panel seams.

In terms of the suit jacket back, here it is in a finished state.
I think the comment about adding a dart on the left shoulder to make it visually more symmetrical was spot on but I left it as is because I had no time to re cut and reconfigure. If I had time to do it over, I would have tried to transfer some of the left horizontal drop into a shoulder dart rather than take it up with a shoulder pad.
Of course this stand does not reflect his actual shape so there is an air space on the right blade.


One of the job challenges is letting some things go, because we have such time pressures.
He was very happy with all the pieces we made, the designer is happy, I have learned something so I am happy too.

No time in the fittings to take really good shots for a blog, I make do with photos taken for the designer's references. :)

Sunday, February 26, 2017

fitting and pattern alterations

One of the more challenging aspects of my job is drafting patterns to fit a variety of body shapes and fitting them to the individual.

Over the years you realize that almost no one is symmetrical, but some people are less symmetrical than others, sometimes from their occupation, sometimes from bad posture or habits (like carrying a heavy bag on one shoulder for years) some from injuries or occasionally a medical condition.

This week I fit a mock up suit on an actor/dancer who has scoliosis.

I had not measured him myself nor had I fit him before, so I drafted up a jacket and trousers to his basic measurements making no special pre-adjustments, figuring I would do that in the fitting.
Here is a photo of the my fitting adjustments.


I pinned out across his back as the left side is quite dropped, and on his right, I just cut the toile open over his blade.
(a good reason to make a muslin because you can cut it open rather than guess how much to add, and you can draw on it! )

Here is a look at it on a stand.

So, what to do?
First, I let it sit for a while, getting on with some other things which gave me a bit of time to think about it all. Then I made copies of the original pattern so I had individual pieces for his right and his left sides. Two back two side panels and two fronts.

I altered the left side of the pattern for a severely dropped shoulder/side. This entailed cutting from the mid back and mid front, angling down to the side back and front panel seam and closing out a good 1.5 cm there. the side panel piece was similarly reduced. (I will refit and see if this was enough of a modification.)

On the right side, I cut open the pattern down over the blade to the waist line. I cut horizontally at the waist line allowing the panel to spread apart the amount that I determined it needed in the fitting.
This opens up the back shoulder of course, and creates a large dart.

Now, this is going to be a striped suit. 
I laid the back patterns out on the fabric and had a look at what my options were.
The lower portion of backs need to be parallel, and could be, no problem. The CB at the neck needs to end up mid stripe or give that impression as well. I knew I might have to modify the dart placement to be as discreet as possible. 
I was not sure how this would look, but I chalked it out and pinned it up and I think it looks pretty good. At the neck, the left back ends up on a red stripe and the right back ends up with a full blue stripe! Win, win situation there! I did modify the dart placement slightly and I hope it becomes less noticeable once it is sewn
I am hoping that this does the trick, but I expect to have to tweak things a little bit more with some light padding here and there so I have my fingers crossed and onwards we go. The fronts need a bit of modification as well, but minor compared to the back so we will put the shell of this together and see what else needs to be done.


Sunday, April 10, 2016

a man in wolf's clothing?

It has been quite hectic here with all that is going on. I think I say this a lot don't I?
I mentioned in a reply to a comment that everything is happening April 30th!
We need to assist our daughter to move out of her university digs and into a sublet in the city she is in, and I have a tech dress rehearsal on the 30th too. I guess my studio is moving on May 1st, and therefore my dear husband is on his own for the big city/daughter move. Whew!

I believe that I have been able to secure a new spot for my studio -knock on wood- but I am waiting for confirmation and a few more small details to be worked out. It is a relief, and just in time because I have more than enough stress with work and life in general.
I still need to hire a truck and finish packing up in preparation. I will also need to do some painting and flooring work before I can set things up, so I don't think I will be set up and functioning right away. Oh well, at least there is a light on the horizon.

So I actually have two shows going into tech in three weeks, one on the 28th and the other on the 30th. Then I have a small window to get a show together for the mid May period. The pace is not going to get slower for a while yet.

Here's one of two costumes that I fit yesterday, which I am quite happy with. This is an example of what I term "there is no formula" for doing the work we do. Trial and error  experience and adaptation. Or flying by the seat of your pants way of working!

This is the wolf.
This has been in limbo for a few weeks while we were backed up with other priorities. The tail was ready though! There was a lot of pattern making to do for this costume.

The base layer to this costume is a stretch legging and a long sleeved stretch top that zips up the front.
I think it should have been a unitard and it may still get joined together but for now it is two pieces.
Pattern number one and two- actually, I had to redo the patterns as I was given a fabric to use that had a different stretch factor, but there wasn't enough of it in the end to make the whole costume. So ditch those patterns, get new fabric, recalculate the stretch and make new patterns!

We also needed a pattern for the basque that supports the tail. That pattern I developed from a skirt draft. ( I am not actually following a specific draft, merely the concept of it here).

The next set of pattern making involved the fur layer.
The fur does not stretch. We have a few hanging stands in the wardrobe, but the one with a good size for the torso has legs only to above the knee, and the stands with full legs have short stocky bodies.  I decided to trust my flat pattern making skills to figure it out rather than draping something on a stand.

I then needed to draft for the fur layer and figure out how it could be manipulated to fit closely in the body and allow the actor full movement. He demonstrated some of the fight choreography (full lunges in armour) in the first fitting, so that informed my subsequent thinking.

The fur on the wolf's tail was applied in sections to allow movement, and I applied the same principle to the leg area.
I drafted up a trouser pattern outline, and then modified it to be closer fitting, then I figured out the areas of overlap.

My actual pattern is so marked up with thinking lines that I drew a little diagram of what I did.

I didn't need to cover the areas of the body that are covered with armour, such as the lower legs which have greaves, and a knee piece - what are they called?   Poleyns, I believe.

The thigh area fur is cut in four pieces. It is seamed up the back of the leg and shaped to follow the contours of the thigh and buttocks. It has an inseam and outseam, and a seam up the front of the leg where I left adjustment room- extra seam allowance.

The over layer is like a pair of short shorts.
I reduced the girth a bit as I am working off a trouser draft, which is too roomy in general. I also darted out from the CF and CB lines to the hem of the shorts in order to get a closer fit there.

The basque was made of duck and corseting and is heavily boned with spiral steels in order to support the escutcheon for the tail.
We found out that we need to shorten the spring inside the tail as you can see! Move the escutcheon piece upwards as well.
The escutcheon piece has holes drilled in it so it can be sewn on. It needs to have some kind of keeper as well, because the tail is very bouncy and popped out of the holder. Well that is what the fittings are for- figuring stuff out- what works and what doesn't.
We will then cover the basque with fur.

In the course of talking this through with Susy- who put it all together, we found that we could sew an elastic to the edge of the fur, and use that elastic as a means to attach the fur to the leggings. That means the thigh piece can be a little bigger than the thigh measurement, we can ease the fur to the elastic, and when it is attached there is still some give for muscle expansion.

The same principle with the shorts- the lowered waist can be eased onto elastic then attached to the stretch legging. This leaves the fur shorts free to move independently from the fur on the thigh. and also still be a pull on garment.
I had a lucky guess in how nicely the pieces worked together. The fur is bulky so the over layer needs to be bigger than you might think, and all our layers worked well together. you couldn't tell they were actually two pieces.

We did a similar process with the chest and armhole and sleeves. The fur elbow to upper bicep in one piece, the fur upper sleeve attached to the fur armhole facings/chest area, but left loose over the upper arm piece.
We will leave the armholes and sleeve of the stretch and fur separate so the fur pieces just float over the stretch. That should allow the most freedom of movement-  I hope it does anyway. Seemed good on the day anyway.

The other fitting was for a suit- which I guess i will talk about later as this post has gone on and taken me most of the day to get together.

Later....


also
Goodbye to our friend, Paul "eggs" Benedict, sound engineer extraordinaire, and all around lovely person.
2016 has been difficult- losing so many people we have had in our lives.


Thursday, July 2, 2015

Prominent chest - pattern changes


While browsing through a sewing forum, I noticed over and over the plight of adjusting a pattern for a full bust. There are many solutions offered both online and in many of the sewing books, yet many people still struggle with making sense of it all.
Here's a little sample of what I did to deal with a garment that needed more room in the chest, but fit well in the front length, armhole, neck and waist.
Whereas in women's wear, darts are an accepted way of dealing with shape, the challenge with men's costuming is often how to hide the shaping in a garment, in order to keep the traditional construction format.


I recently fit a doublet and while pinning it up the centre front, I found that it closed on the line at the neck and at the waist, but at mid chest, it would not.
It went off the line there by 1.8 cm.
The person I was fitting had a prominent pec area, and that was the cause of the gap. What often happens with a full chest is that there is a lack of length and width.
I had enough length in my pattern for the full chest so I am only correcting for width.


You can see that the pattern CF line is not straight, but it is curved already from the mid chest to the neck. This is basically a dart, which is masquerading as the CF seam. I did not wish to increase this CF "dart" by just adding the extra at the CF line and tapering it off to the waist and neck. 
Now, I split the pattern vertically through the mid chest, and separate the pieces half the amount of the gap. I need this much more at the mid chest level but in splitting the pattern I have made the neckline  larger and have increased the length of the side front seam. I don't want that, and so I need to modify the pattern further. I need to close the gap!
So, here you can see that I have made two cuts in order to further modify the pattern. One is at the chest level, and the other one is cut diagonally from the side front seam to the mid chest. 
I can now bring the neck back to the way it was and also close the gap in the seam. What happens though is the CF opens up and gains some length, and the side front seam also had a small increase.
Depending on your fabric and method of construction, you may be able to ease in those small increases. 
Here is another option. This time only the horizontal cut at the chest level is allowed to open up as the neckline and seam line openings are closed. The increase in width at the chest is maintained, the neck and waist are kept as they were. 
I am making doublets backed on cotton duck so easing is not easily accomplished, so I opted for this method in the under structure of duck, and used the previous method for the fashion fabric layer. 
The horizontal dart is cut out completely and the raw edges are butted edge to edge and zigged closed with a strip of fusible tape to reinforce the join. The outer fashion fabric is applied over the shaped duck, carefully maintaining the shape you have created as you do so.

Thursday, April 23, 2015

Counting the weeks:14 and 15 with an overcoat update

It was getting kind of crazy around the work table over the last two weeks. I put in many more hours than I would have liked to, but the work has a deadline and we do strive to make it work!

That cape in front- will it ever get worked on, and will it ever get out of my line of vision? Soon, I hope someone will be free to work on it.


I included a shot of the wall behind my table just to give an indication of how many patterns I have churned out in the past 14 weeks. I don't make separate patterns for linings or facings so these are just the basic pattern pieces. 
For the 18th century show, I have to cover the builds and stock costumes for 8 different actors. I have 5 skirted frock coats, 6 pairs of breeches, 5 waistcoats, one shirt, 2 capes, one sleeved casaque style cape, and cut, make and finish 9 stocks/cravats. Repair and or renovate three coats, 3 pairs of breeches, 3 shirts, 2 new waist coat backs on old waistcoat fronts, reline a old cape and sundry other things like changing buttons, repairing linings, adding pockets...... washing and ironing 5 new shirts.....it does go on!
Anyway, it adds up in the pattern drafting department!    

Here is an overcoat update. I documented the toile version of it here along with the waistcoat, which has turned out quite nicely. The coat is going to get a removable capelet, and I still need to tweak the set of the sleeves but it is turning out very well- We have also constructed it slightly differently than usual, and I will get some more photos detailing how it was made this week.

That's it for today. 
I have to switch gears and get a pattern for a 1970's "ish" suit drafted up and to be honest I need a day to wrap my head around the change from 1760 to 1970! Maybe I will do that on Saturday when I will have fewer distractions at work.

Saturday, February 14, 2015

week 5 with a waistcoat fitting


Table- taken at a random random time during week five.
Well, it is getting busier! was surprised to get two major fittings on the first day of rehearsal as  that day is usually eaten up with meetings and a read through of the play.
Those costumes are hanging on the left of the picture. I fit two suits on our leading man- he came in a bit smaller than the last measurements I had. It is better that the costume is too big rather than too small, but, it does mean a bit of extra figuring out time.
I confess that cutting right into fabric is not my favourite thing to do, it certainly doesn't save time or money. It is much more efficient to cut a quick mock-up or toile- especially when you are not sure of the details of the design or the measurements of the actor.
The toile in the foreground is a waistcoat for an actor I have never had to build for up to now. Well, I lie, I made him a shendyt last year, but now I have to put him into some nice early Victorian clothing.
So I made a toile mostly because I thought he would be a challenging fit. He has a 45+ chest and a 34.5 waist and a 47.5 inch hip. Actually, the chest measure was incorrect, as I found out in the fitting. He really is 47 inch chest, so making a toile was a great idea, as I had to make more changes to the pattern than usual.
When I put the toile on him, I could easily do it up at the CF waist. right on my drafted CF line. As I pinned it closed in the front I could see that it would not be lining up on my line, the further up I pinned. So I just pinned it where it wanted to sit, and had a look at what was going on.

This is the fitting photo, in profile and you can see that he has a very prominent chest. Please note the drag lines from the full part of the chest towards the side waist. This was the second big hint to remeasure his chest. This is a really good example of why it matters where the fabric is distributed around the chest, and especially where you make the waist suppression. I need to make sure that the waist suppression happens where he needs it which is directly underneath the fullest part of the chest. Now in this case, I would end up with a very large front dart, so I will split that dart up and rotate it elsewhere, likely a little into the armhole (which will be eased in) as well as through the neckline dart which will be hidden by the lapel of the waistcoat.
If I released the side seam and let the front hang there, I could pin out a larger dart pointing to the chest and then if I re pinned the side seam where it lay, it would have swung downwards and towards the front, adding the amount taken in the dart fabric back at the sides.

This is a good example on why you cannot make the waist fit better just by taking in the side seams.
You will see this on Internet gentlemen who keep trying to get rid of fabric at the waist of their shirts. Usually these drag lines appear in the back, where a dart would better serve the purpose, but on a gent with a very full chest, taking in the sides aggressively will give you this look too.

That is it for now, I must get outside and contend with the snow which seems to be relentlessly falling! I cleared three inches from the sidewalks and drive this morning already, but more has fallen. The good news is that it is great for cross country skiing. I can walk out the door, put the skis on and go, which I did already today!


Thursday, February 5, 2015

the work table week 4


Week 4! How does the time go by so quickly? As you can see, I have made quite a few patterns already- I have all the patterns done for the musical, and in fact this week I finished making all the patterns for the early Victorian show and also cut toiles for them.
One of our musicals starts rehearsal on Monday and that means the actors are in house and available for fittings! Yay!
I will have three tailors to keep gainfully employed next week, and four the next, so bring on the fittings.
Now I am onto my eighteenth century show and will try to get a lot of those patterns done before it gets too crazy around here.
One issue that I am struggling with is that some of the measurements are quite outdated, and/or seem off, or photos are missing or just bad. I think if an actor haven't been measured in four years, it is time for an update.
         Things I hate to hear: oh, you know Mr.X - he never changes size-

I am a stickler for taking accurate measurements. I cannot stress it enough. The measurement that seems to be most often off is the chest measurement- it is easy to let the tape sag or drop slightly and poof! an inch or more is gone. I experienced that today when the actor  I tried a mock-up waistcoat on had a 47 inch chest not a 45 3/4 inch chest. Good thing I didn't cut right into the expensive fabric.
  
The trick is to be careful and consistent and use a waist tape- we have 1" wide fitting belts made out of webbing with a hook and bars at one inch increments that we put on the actor's waist. This stays in place and gives a defined place to take measurements to and from. It also stays in place for the photos we take. Regarding the photos, it is not useful for the person to be wearing an oversize untucked shirt over baggy jeans for these photos.
     It makes me wonder what people are thinking the photos are for if you can't see anything!
   
I recommend giving the actor a white t shirt in a size smaller than they would normally wear, so you can see the outlines of their shape. White t shirt, dark fitting belt, photo in front of a contrast wall or door.
Ok that is the end of my mini rant, and I will be able to show you some works in progress next week.

Friday, October 24, 2014

Project puzzles.

Every so often interesting projects turn up out of the blue and I have to say that  love it when this happens.
Give me a puzzle and I am on it.

This week I am making a pattern for a friend who spend quite some time in the Arctic decades ago and wanted to make herself a new winter coat. She wants a modern take on a traditional amautik. 

I have not checked all the information I was told about, and I do not pretend to know very much at all about these garments. Just be forewarned. 

She told me how the Inuit would wrap their babies when they were small and carry them inside the coat, up against the mothers back. The coats were cut in such a way that as the babies grew, they were accommodated by the shape of the coat. The hoods were made large enough to cover the heads of both the mother and child.
The babies were held in place with a cord or sash that looped through a hanging cord at the centre front of the coat, pulled down between the breasts and wrapped around the waist holding the back of the coat tight and keeping the baby inside. She recounted how the mothers would line the inside of the coat back with moss, (no diapers then) that would absorb the child's urine and feces for later removal.

She gave me a child's size cotton amautik that she had, which I took a pattern from, and I have to say it was a very complicated garment. More complicated than it looks.

I am refraining from posting a picture of the pattern I made, as I believe that it is considered the intellectual property of the Inuit and that needs to be respected.

It was quite fun to design a coat for her incorporating some of the traditional aspects of the amautik.
I will have a mock up fitting with her tomorrow, and I am interested to see if she likes it. I know the hood isn't quite right on mine, but I really was winging it! Hooray for mock ups! She plans on making the coat out of melton, and has a nice little Arctic fox in her freezer (really!) that she may use to trim the hood....

The other puzzle I am working on is a soft case for a stand up bass I made for another friend almost 20 years ago. The zipper finally went!
Just a wee repair, but it was another one of those fascinating puzzles that grabbed my attention. His old case was not sturdy and it was falling apart and I took it on myself to make a new one all those years ago.

In other news, if you want to see the waistcoat for the Opera in action so to speak, click here.
The beautiful dress and the other ladies' costume was cut by my colleague Margaret.


Saturday, May 10, 2014

prom dress part four - drafting

 I feel like the month of May is trying to rush by, and I have been slogging it out doing overtime at work. This means that I feel quite behind on the prom dress project but I managed to squeeze a bodice draft into my week-end.
When I was first training as a cutter, I used Dress Pattern Designing by Natalie Bray as a text, so since I am familiar with it, it seemed the best choice to use for this block.
Some of my colleagues use it or use it as a jumping off point.  Just like the men's drafts, you cannot expect it to be 100% right off the page. With practice, of course, you begin to see the shapes being created on paper and can recognize areas that you can tweak or modify right away for a better fit, but a toile or mock-up is always a good idea.

One thing I did was to reduce the amount of ease in the basic block. There is usually 2 inches on the half in this draft, but I want a close fit, so I reduced it to 1 inch on the half.  This should be close to what I need.

I didn't take all the ease out beacause I wanted some ease in order to be able to fit it properly.
Too tight is always more difficult to deal with. It is so much easier to be able to pin the excess out, and see that your alterations are not causing other problems. If your garment is too tight, it can be difficult to determine how best to fix it. Too tight at the waist for instance can cause bodices to ride up, distorting the position of darts as well as affecting the armholes and even neckline and shoulders. You can end up in a guessing game that entails multiple changes when really all you may have needed is more fitting ease.


I marked out the style lines on the basic pattern, front and back, then I traced them to a clean sheet of paper using a needle point tracing wheel. I will keep the original block intact so that I can go back and manipulate it as needed. For instance,  even though I measured her myself, I think the bust point to bust point measurement seems narrow, so I could go back and easily make the front panel wider, and the side front panel narrower, without throwing anything off.


Once that was done, I trued up all the seam and style lines, and cut out my pattern.
Then I cut out a mock-up, leaving an inch of seam allowance both below the "waistline" as well as above the upper edge of the bodice. All the lines on this pattern are "nett" so I can choose how much seam allowance I want in specific areas.

Next will be the skirt and then a fitting. 

Sunday, May 4, 2014

prom dress part three-pattern sketch

When I am getting ready to make a pattern for  garment, I often find it helpful to sketch out the rough pattern shapes. This dress is not particularly complicated but it is a helpful process to go through nevertheless.
  You can then look for potential style, cutting or fitting issues. 

So, as I would if I was actually drafting, I would start with sketching out the basic block, and then drawing in the pattern lines.


The bodice front will be in two pieces to fit closely over the bust.
  Allow enough seam allowance on the top edge so if bodice needs pinching in along the top edge, you can still correct the line. Same goes for the waist seam allowance.

The back could be cut in two panels or the two sections could be made into one, and eliminate the seam.
  If cut as one piece, allow enough seam allowance to make changes without re cutting.

The collar/neck piece shape is made by closing the bust dart from the bust to the shoulder, closing the back shoulder dart and then putting the front and back shoulders together and drawing out the shape desired.
  It could be cut in one piece but if the CF is on the straight grain, it puts the majority of the neck piece on a bit of the bias which may stretch, so it may be more prudent to allow a shoulder seam in the neck piece, which would keep the back portion on a more stable grain. Not sure how much tension can be put on this piece without it buckling on either edge. It will be a more decorative rather than a structural part of the dress. 

The pleated overlay is created by initially closing the panel seam/dart from waist to bust, then opening/flaring out the top edge. You could calculate how many pleats you want at the neck, and how deep they might be first and then measure out how much more you need open the top edge.
  The amount to add depends on the fabric chosen and what looks good, so allow enough for changes to be made. The more flare, the more the side ends up on the bias, so that may be an issue with stretching.

The bodice will also need some kind of boning to keep the shape, and provide support. The boning will have to be attached to an inner structure.

The under skirt could be cut into panels which keeps the waist seam flat and allows for flare at the hem.

The over skirt has to be cut with the bottom edge straight, so figure out how much fabric is needed at the hem, then the length at the front, side and CB is marked, and the gathering lines are drawn in hitting those marks. 
  Remember that gathering an edge tends to hollow it out and therefore shorten in the other direction, so keep it in mind. Alterations to the hem have to happen at the waist.

Pick the shoes! they are needed to get the final skirt length.

Did I miss anything? Oh yes, figure out where the closure will be and how long it needs to be. I imagine CB. It may need a waist stay, so perhaps an inner grosgrain waistband that hooks closed first and takes tension off the zipper closure.......

Okay, onwards!

Sunday, February 16, 2014

Dart manipulation and doublets

 I am making a few doublets this year and this one  happens to have horizontal lines of trim which means I will want to move my dart shaping to accommodate the design.


I started with an understructure that is seamed vertically and you can see the shaping that is built into it.
These doublets fit the body quite closely and I often opt for a more modern approach in the understructure, accommodating the body with darts or seaming. It is easier to fit this way and allows us to manipulate the outer fabric over the shape more akin to the period.

Once I have fit the understructure, I correct the pattern and in this case, manipulate the darts into horizontal lines which is where the trim will be featured. You can see that the front dart turns into very minimal darts into the side seam, and this will be easy to ease in. The back shoulder dart and the blade dart/seam reveal the greater amount of shaping required to fit the back of the body. This results in two seams horizontally in the upper back area as they are too large to ease in nicely. The centre back here is on the fold which is how the over layer will also be cut.
After I drew in my lines and double checked that I liked the placement, I then had to mark in the positions of the slashing, and get some samples of the slashing made to see whether the  slashes could just be straight cuts, or should be shaped cuts allowing more of the under colour to show through. The original concept had a flat red silk under the slashes, but it looked a little uninspired, so the designer asked for something with a bit more oomph, so we are experimenting with it here.


As I was getting this prepared for waiting hands, I was reminded about how much time it takes to prepare all the elements of the patterning as well as decoration and to cut all the pieces out. The sleeves also have this treatment of lines of trim with slashing in between and the silk underneath!  
Luckily I have very experienced team members who love the challenge of sampling and trying out ways to get the result we are after and it lets me focus on drawing out all the details.
Maybe a bit too much of the under silk here but it is headed in the right direction.