Showing posts with label toile. Show all posts

Tuesday, February 24, 2015

week 6 and 7

I meant to get last weeks table posted on the week-end but life ended up getting a bit hectic so this week you get another two for one special!
Last week:

a view from my side

This week:
I had a technical fitting with this jacket, so we were able to move forward. The technical issue was the amount of shoulder padding needed to achieve the shoulder line that the designer was after. I didn't have quite the right profile in the first try so I needed to make sure my alterations were correct before moving on. Today I cut the sleeves so it can be finished. Yay!
Here's a little detail SA stitched at the top of the back pleat.
The frock coat mock-up in last week's photo is cut in real fabric and bundled up on my table. The waistcoat that I was about to cut out in last week's photo is almost put together, and I have also managed to draft up and cut in toile one of the 18c costumes- breeches waistcoat and coat and got another 18th c coat toile cut out and stitched up, and am awaiting fittings at the end of this week. I have SW working on the trousers for the tailcoat she put together, KM on the military frock coat, SA and DB on the modern suits. One more stitcher to arrive on Monday so we will be pushing ahead and making lots of progress.
I have lots of pattern alterations to do on the rest of my 1840's costumes as I had all my toile fittings as of Friday. I am still waiting for fabric on a few costumes yet, but I think we are making progress.


Tuesday, May 15, 2012

leather gorget

And now for something different. Onto the next show and its designs. The designs include making
some leather gorgets. A gorget being a leather or steel piece of armour worn to protect the throat. From the french word gorge, for throat. On a suit jacket you have the gorge line,  which is specifically the  seam line that joins the collar to the lapel.


 I started by draping a shape in muslin on the stand. After that is done, I transfer my muslin to the table and carefully mark the seam lines and matching points before taking it apart and tracing through to paper. The I recheck the shape and walk all the seam lines so they can be sewn properly, correcting the lines at the top and bottom edges.
For my mock-up or toile, I found a scrap of heavy overcoat melton, fused some canvas to it and cut out all my shapes. The seams were butted together and zigged instead of using a traditional seam allowance. This keeps everything flat, and reduces bulk.
 I did a bit of playing around with possibly using cording as a detail as well as using wide twill tape to stand in for strips of leather. I'm not sure which way the designer will want to go, so for the next fitting, I will return with this toile, but I cut some leather for one side of it. This is a weight of cowhide suitable for boots, and I am not sure if it should be heavier. Well, I don't want to waste leather, so I will just leave it like this and see what the designer thinks. I'm sure this will get some decorative studding as well.

Tuesday, May 17, 2011

18th century toile

I don't think I'm going to get any modern tailoring this season. No wait, I think I have a set of plus fours and a 1930's tennis jacket and white flannels to do when the fabric arrives.
In the meantime......
The next assignment harkens further back in time to the mid 18th century, and since our designer was coming in from afar this week, I had to switch gears and get together a toile fitting to get an idea of where we are heading for shape and fit.
This wasn't too bad a start, I had never made anything for Mr. J seen here. He is quite tall - about 6'4" and has a 10" chest to waist drop, (a challenge) so it was a good first fit. I have to shorten the coat and change the waistcoat a bit and deal with a few more fit issues especially on his right side (DRS) before I will chop into the real fabric. Then I need to add a lot more volume in the pleating and will have to figure out what kind of interlining I will need to use to get the coat to bell out through the skirts.

That's for a bit later in the month, so all I can do for now is make some notes, hang it up and get back to the current lot of work.

Thursday, September 2, 2010

waistcoat toile

I like to make a toile for a garment if it is the first time I have made something for that person. A "toile" is a trial garment, used to test out the pattern for a first fitting. In some places, people would refer to it as a muslin.

You can make a toile out of any fabric I suppose, but I generally use an unbleached cotton or muslin, but not a wimpy drapey one. This one is a bit more tightly woven- more like ticking in feel. You don't want to spend a lot of time or money on the toile fabric because it is going into the round file after the fitting. It is important though, to chose a fabric that will give you a good "reading" of your pattern, and isn't too far off the weight and drape of the final fabric. For instance if you are making an overcoat, you could choose some heavier cheap "unknown fibre" yardage rather than a thin muslin that would be more suitable for a blouse.
I like a fabric that is easy to draw on as well- either with pencil, tailor's chalk or a sharpie marker.

What you want to avoid is making changes to the pattern that an unsuitable toile fabric may cause you to do.
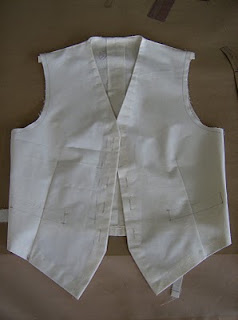
Once you have a toile fabric, give it a good steam press or even wash it so that you aren't accidentally shrinking your toile as you are making it. Unwashed muslin will easily shrink at least 1/4" t0 3/8" in length on a waistcoat if you don't press it beforehand.
In a toile, it is important that you leave enough "inlay" or seam allowance to make alterations in the fitting, or in some cases, like trousers, to sew a change without having to recut a brand new toile. This means giving a bit of thought beforehand to the possible fitting issues and the changes you might need to make as you fit.
You have to leave enough allowance to do this without distorting the fit.

On a waistcoat I leave inlay at the shoulders and sides that are pressed in one direction rather than pressed open. This makes it easier to unpick and repin without fighting the pressed back seam allowance. I leave extra to turn back at the CF to give some stability- same as the hem- it will give a better idea of the finished line. I don't bother to turn the armhole seam allowances back, but stitch the line and cut about 1 cm away through the curve and leave a bit more up at the shoulder area.

You need to see your design lines from the right side of the garment, so use whatever method works for you -tracing or machining or hand basting the lines as needed. We usually try to machine the lines to the right side as it saves time. Mark your details like pocket or button placements and sew your toile up with a long machine stitch that won't be too tedious to unpick, or baste by hand securely if you want to. We always hand baste the fronts back and the hems up as it is really irritating to try to unpick those in a fitting if they are done by machine.
Give it a good press as you go- make it look good.

It is also important to include the elements that will affect the fit in your final garment, put shoulder pads in and crease the trousers for instance. I don't think you should fully canvas your toile or make fly buttons by hand and you don't have to put the sleeves in a jacket at this point but try to get close to what you want it to look like in the end.

In terms of saving time, fabric and money, a toile is well worth it. You may not think so if your toile requires little, if any changes, but you will appreciate it on those occasions when things don't go as smoothly.
It was made more clear to me recently as I was able to track the times of three similar jackets made by the same person this year. The jacket that had a toile made for the first fitting took about ten hours less than the jacket that was cut directly into the fashion fabric, fit, taken back to flat then finished.

Friday, November 13, 2009

jacket toile


I cut a toile (mock-up) of the jacket in an inexpensive wool blend fabric I found at a local shop. It needed a bit of support so I interfaced the fronts with some leftover suit fuse that I had in stock.

Silvia put it together ready to fit. It's only a few hours to put a shell like this together- which I feel is time well spent when dealing with more difficult body shapes.
The front edges were just turned back, the collar was literally just a bias cut collar of the same fabric with the suit fuse for some stability. The sleeves were made up from a stock pattern that I already had in the approximate armhole size, but not basted in. Very thin shoulder pads were tacked in place.

The purpose for this was to just get a shape together to fit and make pattern adjustments. The clients hadn't even looked at fabrics, or thought much about the styling they were after except that it be single breasted and have a vent in the CB. I like to be able to pin on a pair of sleeves after I fit the body- just to give the client an idea of what it will look like- many people find it disconcerting to try to envision a final product without sleeves.

Obviously from the pinning you can see that I had to pin out at the shoulders(sloping).
I had a bit too much length through the front( as I suspected).
I needed to pin out a dart of about an inch of excess width at the front hem that terminated just below the chest. The back of the jacket seemed to sit well although I had to reduce the cross back width that I had allowed for. I will reshape the armhole all round.
The only other issue was his regarding his left shoulder. Due to a deteriorating shoulder, the ball of his shoulder was protruding in front and I will have to make allowances for that to be accommodated.

Next stage: pattern corrections from the fitting.

Monday, March 16, 2009

1960's suit toile


Our designer on this show arrived this week, and rehearsals started as well, so we're off! I didn't have a chance to speak with him about the design before I started this, so I did a mock-up or "toile" in a heavy muslin. It a nice double breasted early 1960's suit for a man with quite a barrel chest so it doesn't fit as nicely on the stand as it did on him.
Whenever I make a muslin that fits really well, I kind of kick myself cause I think I should have just gone for it, and I wonder if the designer thinks "why did you do a mock-up?" Then I stop and think about the fact that the design was single breasted to start and a phone call with the design assistant resulted in a change to DB just as I was finishing up the SB pattern, and what if the actor shows up 2 sizes bigger or smaller? or the pockets looked off?

Anyway, there were minor changes, so this one is cut out and the trousers are made already and the jacket is in process.