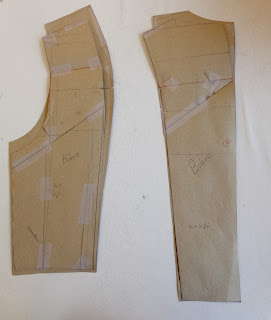
I thought I would follow up a little on the fitting and pattern alteration post where I was dealing with pattern alterations for scoliosis.
I had to make three different garments for this particular person, all with different patterning requirements.
We made a suit, a bolero and a 1950's style casual jacket. (with a quick change (11 seconds) front panel held on with magnets but that is a whole other bit of business)
With the bolero, I have created a seamed panelled back as it gave me more control over the fit. This garment does not have shoulder padding, whereas the suit jacket does.
I have laid the left body pieces over the right sides to show the differences in the two sides of the body.
I did end up lowering the armhole on the left side of the body as compared to the right.
I think you can see how much lower the left is at the shoulder, as well as the difference in width that was required on his right side at the upper blade area.
I have found this to be both a challenge and an interesting learning process.
Tomorrow I will try to lay out the pieces for the 1950's casual jacket which has a yoke as well as panel seams.
In terms of the suit jacket back, here it is in a finished state.
I think the comment about adding a dart on the left shoulder to make it visually more symmetrical was spot on but I left it as is because I had no time to re cut and reconfigure. If I had time to do it over, I would have tried to transfer some of the left horizontal drop into a shoulder dart rather than take it up with a shoulder pad.
Of course this stand does not reflect his actual shape so there is an air space on the right blade.
One of the job challenges is letting some things go, because we have such time pressures.
He was very happy with all the pieces we made, the designer is happy, I have learned something so I am happy too.
No time in the fittings to take really good shots for a blog, I make do with photos taken for the designer's references. :)
Sunday, March 26, 2017
Sunday, March 5, 2017
A draped shirt
While I wait and wait for a fitting to find out if my pattern changes for scoliosis were successful, I thought I would browse back to last season just to see if there was anything interesting that I didn't have time to show you.
Ahh, I did find something- a draped shirt.
I don't often get draped garments in my work assignments, but I was delighted to see that one made its way to me last summer.
It is a nice challenge to make yourself think in slightly different ways and this certainly made me do that!
Here are some photos of the final shirt, the muslin toile and the final pattern pieces
The final shirt was made in a beautiful embroidered silk.
It is sleeveless, and the back is quite plain. It also requires a centre back seam.
Not as nice in muslin, but I had to make sure it worked before cutting into expensive fabric.
Here you get a peek at what is going on around the neck. this is the area shown in the upper right area of the pattern pictured below.
Ahh, I did find something- a draped shirt.
I don't often get draped garments in my work assignments, but I was delighted to see that one made its way to me last summer.
It is a nice challenge to make yourself think in slightly different ways and this certainly made me do that!
Here are some photos of the final shirt, the muslin toile and the final pattern pieces
The final shirt was made in a beautiful embroidered silk.
It is sleeveless, and the back is quite plain. It also requires a centre back seam.
Not as nice in muslin, but I had to make sure it worked before cutting into expensive fabric.
The right shoulder (on the left side of the pattern below) is pleated to the back shoulder length.
Even after making this, I kind of look at it with a bit of a head tilt, trying to make sense of the pattern.
Below is the pattern piece for the left back of the shirt.
The upper left area of this pattern piece (below) joins to the area in the upper right of the picture above and that ends up wrapping around the neck.The other half of the back is not shown. It was a basic shaped piece, with CB seam, side seam and a normal armhole shape.
Somewhere, we have some notes on the seaming techniques that we used to make this, which I should dig out and photograph as well, because once these costumes are done I mentally let them go- so the blog is a place for me to look back for reference!
Subscribe to:
Comments (Atom)


