Sunday, November 20, 2016

waistcoats on the bias

I am making some suits for a show and the designer has designed the waistcoats to be cut on the bias.
OK, I think- or rather I didn't really think about it much at first- no problem.

I know it isn't really an impossible task, but it is time consuming and it is always hard to judge how much more time consuming until you are in the midst of it.... So lets break it down.

The basics:
Firstly- the design is a 1930's double breasted waistcoat with a laid on collar/lapel.
The cloth is a windowpane check. White on black. The windowpanes are rectangles not square.

Challenge: Bias- it stretches, so it needs control.
Solution: fuse straight grain fusible interfacing onto bias fabric.

Challenge: the true bias on a pattern with rectangles gives no happy visual location for the CF line.
Solution: draw a line through the corners of the rectangles and use that as a CF line, so it is not on the true bias.

Challenge: a traditional vertical dart in front will not be a good choice as it will distort the look of the "bias"
Solution: close out the front dart and transfer it to the neckline where it will eventually be covered by the collar.

Challenge: which grain to cut the collar? With the neckline dart, the laid on collar will never be able to match the fabric of the body. It can only match up to the dart, the worry is that it will just look like a mistake.
Solution: cut the collar/lapel so it is a contrast grain so the windowpane contrasts with the body- make a detail out of it.

Challenge: applying the fusible to the wool, making sure the right and left fronts are mirror images. dealing with shrinkage that comes with fusing.
Solution: Use a fusible that is somewhat translucent so I can see the windowpanes through it.
Draw out the pattern pieces on the fusible giving a clear CF line.
Block out the fabric in a single layer at the ironing table using a metre stick and a square, so the windowpanes stay square and true.
Chalk the pattern pieces onto the wool. including a clear CF placement line.
Apply the fusible to the wool carefully maintaining the alignment of CFs and overall placement.
Fuse one front, re block wool, chalk other front, and repeat making sure the alignment of the other front is a mirror image of the first.

At this point, the pieces are rough cut and I have to take them back to the table and check and redraw the pattern, because fusing always shrinks slightly.

Do the same process for the lapel/collar pieces.

Repeat for the second vest which must match the first.


This is the idea, partially done and placed roughly in position. We are going to put the welt pockets on the straight grain to match the lapels.

I think it will look very striking once it is finished, but oh boy it took a lot of time to get them cut out!

Monday, November 7, 2016

Dear dear Desmond

I first met Desmond Heeley in 1986. I was a new stitcher, and I was in my third professional job contract, working at The National Ballet of Canada on his production of the Merry Widow.
I was gathering strips of different colour fabrics for the underskirts of the Can Can dancers. Miles of them, tying off the gathering thread on the door knob of the wardrobe workroom and standing at the other end of the long hallway, pulling, ruching.
Anyway, one evening after my cutter and I had worked some overtime, we exited the building at the same time as Desmond, and him, desiring some company, gathered the both of us up and took us to dinner next door at a very expensive restaurant. I sat there completely out of my element, enthralled and quite speechless at finding myself in this position.
I realized yesterday at his memorial that he was the age I am now when we first met -isn't that funny- and I had no idea at that time that he would have a great influence on my future development as a cutter and that I would have the very great fortune of knowing him just a little.

There have been so many people that he worked with in the early days and became his "family" and so many stories told by him, told about him, stories of the development of theatre in this country, the crazy things they did for the love of their craft and of each other. I wish, and not for the first time in my life, that I had been born a little earlier, to have been able to know some people a bit more fully.
He gathered people to him, and he treated you as if you were the most important person in the world to him, his letters were the most vividly described, his interest and emotion so genuine.

I discovered quite by accident his mentor, Oliver Messel, when I read an article in an architectural magazine about homes built on the island of Mustique by a man who had been a theatre designer- and the accompanying images made me think of Desmond. When I asked him about it he told me that Messel was indeed his mentor, and later sent me, in a letter, a photocopy of a design of a spray of roses by Rex Whistler for the ballet Spectre of the Roses (Sadlers Wells) - just before WWII- great hero of mine, killed on the last day. a postscript to check him out online and another notation * He, Tanya & Oliver Messel my idols.

We shared a a love of Gilbert and Sullivan and Desmond sent me a few things over the years- a little book he found, a postcard, but by far the most amazing and generous was a sketch he made of the Fairy Queen in Iolanthe for the G&S society in New York and I am going to transcribe the exuberant handwritten note that came with it.

p.s. Am not quite sure that this is the sort of sketch one hangs  BUT I thought it might make you smile- (and help G&S along) -
In the '60's I designed Iolanthe for Sadlers Wells opera- the first production away from the copyright (much concern from the diehards!) and a few sniffy folks at the Opera who thought that G&S was beneath them.
it was a huge success---this costume for the Fairy Queen was for a lady- named Heather Beggs- almost  six feet tall--glorious voice & great style--at the end of the piece, "Up in the air sky high--" we actually flew her in a chariot made of Giant roses & pulled by two vast butterflies!---- two baby paniers spangled crin overskirt, (silver & gold brocade under!)-- the "ermine" was swansdown with black coque feathers----and the centre panel "chunky" leaves, roses, with a gauze layer on top!----
 This sketch is a recreation done for the G&S Society here in NY

signed with a heart with an arrow through it,
 Des


Thursday, November 3, 2016

mid 1950's references

I posted photos of the mid 1950's jackets that I recently made, and I thought it might be interesting to show some of the references I used to make my patterns.

There were the sketches and visual reference provided by the designer, but I like to research a bit more in order to make the patterns. I like to look at various drafts of the period I am trying to recreate but I don't actually use them because I don't have time to find out if they do or don't work on someone else's dime. I use my basic drafting set up and modify from there for fit and style.

I have a small collection of reference materials to use, and here are a few things that helped me.
I have had some opportunity to make 1950's  suits before but I think I really was not successful in getting the silhouette right. I was determined to do better this time.

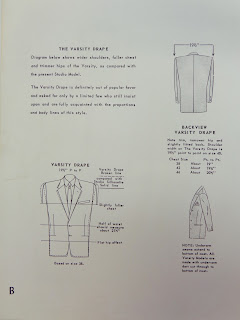
One thing I found was a chart showing proportionate back widths for jackets- you can see they offered three distinct widths for each chest size, depending on the style of jacket the customer wanted-
1. regular
2. modified drape or wide shouldered young men's
3. drape coats or lounge coats


You can see that for a size 38 the back width could be between 8 1/8 inches  and 8 3/4 inches

Compare that to the standard proportion of  approx 7 1/2 inches for a size 38 across back.


We wanted a more extremely young men's shape for these jackets and in looking at some of the period photos of these musicians, and other people of the period, the jackets were quite roomy, boxy and slightly oversized, and long. The waist shaping was minimal, the visual waistline was lower than the natural waist and the hip was quite slim. The shoulders were wide and quite square, buttoning point was lower, hence longer lapels, and pocket placement was lower as well.


These pages give an indication of the body silhouette, shoulder width, waist shaping, and overall jacket length.

These jackets were for young men so you can see that the studio style is longer, has lower set pockets and less waist shaping.

The length for someone 5'10" is 32".

Suit drafting uses a formula to determine length and a basic jacket length calculation is half height minus something- minus 4 inches or 1/2 h minus 1/16 of height.
If the actor is 5'10" (70") /2 = 35 minus 4= 31 inches
in metric which I prefer to use
178cm/2 = 89 minus 11.125cm = 78cm (30 3/4")

So these jackets are longer than that.
for 5'10" 70/2 = 35 inches so 35 -3 would give us a 32" length.
for 6'2"   74/2 =37 inches so 37-3 = 34 length


I started then with this information in hand, set up my drafting as I usually do, and made modifications until I though I had a good idea of where I was going.
I then cut out a half jacket in some cotton I had and put it on my stand. I photographed that and sent it to the designer for his input.
Once that was done, I took an idea from my colleague Evan and I drafted in half scale to show the changes and modifications to my basic draft. This is what I then referenced in making the subsequent drafts for the other jackets.
That half scale draft is now tucked away in my files for future reference.