Friday, August 20, 2010

costume and sculpture 3

Ok, here's the last of this little trip down memory lane.
One thing that needs to be worked out for all costumes is how the actors put them on and take them off- usually, but not always, that is a straightforward issue. These were a bit different. In the costume above, we made a back opening using hammer-in dome fasteners. The rigilene overlapped onto itself and each piece snapped together with two domes for rigidity. The straps came from the shoulders and criss-crossed to the back for stability. The collar pictured here, was attached to the body by means of a dome on a short strap like a bra-keeper, and the wings attached with short pieces of elastic for movement.
The costume below, pictured earlier here, was put on and fastened by means of corset like lacing on the sides. Every so often we like to try things on so we can see how it looks.
After this stage, the costumes went to decoration and they were covered with colourful bits of fabric "feathers" as you can see below.

So another work season has come to a conclusion. It was a year of ups and downs, challenges and pleasures. I'm not sure what's up yet for the fall, I know that I will be doing a month of teaching and training so I am looking forward to that. I have to update a lot of my teaching notes and to be honest I learn just as much from teaching as my students do. I hope to be able to talk about some of that process and show you some of the fittings we do.

I am also going to be on the other end of the fitting process as I have volunteered to be a model for a corset show coming up this October in Toronto. My former apprentice, Jennie will be creating a "tailored" corset design for me to model- I've seen the sketch which is wonderful and my first fitting is next week. I'm looking forward to it- not sure about the modeling part but hey- I figure if something makes me feel nervous, I probably should push myself to do it. What's the worst that could happen?
Don't answer that! I'd rather stay in the dark a while longer.

Enjoy the remains of the summer, more to come,
Cheers!


Wednesday, August 11, 2010

costume and sculpture 2

The Birds by Aristophanes designed by Teresa Przybylski was a project that I had a lot of fun doing.
Teresa is a wonderfully creative designer and teacher and I had worked with her on a few other projects before this one. The show was great.

As you can see from the sketch, we were making what I called "bird cages" for the actors to wear. These were a couple of the more complex pieces.
The structures were made out of rigilene and nylon webbing. The rigilene is dyable (who knew?) so we had what seemed like miles of it and the webbing dyed in preparation.
Estimating how much rigilene we needed for the project was it's own challenge!

For rigidity we then stitched the rigilene double so we could be guaranteed that it would hold its shape through the production.
There were some challenges along the way- one was how to hold some of the shapes together while working it out- rigilene is not pinable to itself and less so if it is double thickness, so we had to come up with a technique involving bull dog clips, masking tape and twill tape.
Rigilene has a natural circular tendency, so I worked with that by trying to use circular forms for the main structures, clip or tape them together to try out the proportions, then hang or pin them them on the stand so I could stand back and have a look. The pieces that rested against the body were probably the easiest to deal with and the free form floating shapes more difficult.
If it looked good, we would stitch it together in components at the machine, then we would re clip it and hang it up again, have another look with the designer, take it apart if it didn't look right and continue on until we had our final shapes.
Then it all had to be put together as a whole and I think that is what gives Denise the shivers- trying to mark the placement of each intersecting component and then wrangle it to the sewing machine where it felt as though you were sewing inside out and backwards while standing on your head to get it under the needle.


Monday, August 9, 2010

costume and sculpture

Every so often we get to do something really out of the ordinary and this project was one of them. Instead of wondering how to incorporate period detailing or adapting period shapes for modern bodies we get to make sculpture. Well one could argue that all patternmaking, and the subsequent garments are sculptures, since they are the three dimensional result of the two dimensional pattern, but we don't think of clothing often in those terms.
I had a blast creating these costumes for a 2003 production- not all of my team felt the same way, it was more of a "props" type job and required us to invent the construction as we went.
More to come.

Thursday, August 5, 2010

18th century period waistcoat

I finally managed to find some time to take a few more photos of the garments we've been working on before we wind down our building season here at work. We've made it through three dress rehearsals without too much trauma, the quick changes have worked, actors are comfortable and our designer was happy with the show so it is a nice way to be ending the season.

This is a period waistcoat for our leading man, and the fabric that the designer chose is so beautiful and evokes the eighteenth century to me. I find it interesting that many fabrics and patterns in fabrics are available today that had their heyday centuries ago. They are mostly found in furnishing fabrics, not fashion fabrics per se, but some designs are classic in the truest sense of the word- they resonate with us even now.

This waistcoat fabric had a one way design so it was impossible to have mirror imaged fronts. It had a very prominent branch design in one area that I didn't want to accentuate, so I laid it out with the designer and we chose to have that area under the trim at the centre front, and it reappears under the arm area. I cut it so that if the trim were removed, the overall design of the fabric is not interrupted when the CF is closed. This meant that I had to carefully plan the layout and I managed to squeak it out of the only piece of fabric that we had. As it was, I had to piece one of the pocket flaps to have enough, and I snuck a seam in the centre back of the collar in order to get some of the pink flowers to be more in a more pleasing position.
The back is a piece of rose moire we found in stock and I just had enough to make the ties out of the self fabric.
This is one of the quick changes, so the waistcoat actually closes with snaps CF and the buttons sewn just to the edge for decoration.
All in all, I'm really pleased with it.

As a postscript, I am heading out on vacation and I'll try to prepare something different for you to see while I am gone. A different angle on being a tailor in the theatre and the interesting projects that we sometimes get to make. You'll never guess what it is..............

Sunday, July 25, 2010

another coat, more trim


Another few pictures of one of our coats in progress. It is actually finished, but I lost the pictures somehow. Nevermind, I'll try to get some more later this week.

This is a "nice to work with velvet"- or velveteen.
That makes me wonder if all cotton velvet is called velveteen ? I'll have to look that one up.

This is cotton with a black cut pile on a white warp and weft. It has a soft stable hand, light, but not too drapey or shifty. The pile is quite short so it doesn't move around too much when it is sewn, but it does require more careful handing than a flat woven fabric. Some people adore working with velvet or rather they fear it less than other people do. They know who they are, and I am thankful for them- it has never been a favourite of mine although I love the richness of it . I'm happy to cut it but that's where it stops with me.

Applying trim to velvet can be a tricky situation because the pile of the fabric fights you.
(Susy can testify to that- and we don't like to talk about the black silk velvet casaque with rows of thick soutache that once almost brought her to tears)

With careful hand basting first, both Susy and Silvia have been able to apply most of the trims by machine. The trim must be basted on over a ham or the tailor's egg that we use. There must be enough ease in the trim to not distort the shape of the coat when the trim is sewn on. Even the pocket flaps are prepared like this because if you didn't, the flaps would end up with the opposite curve to the body of the coat, and be sticking out and curling up around the edges.
The basting must be very secure because when you go to the machine to stitch it, you are laying it flat on the bed of the machine, and the ease you put in the trim will buckle slightly as it goes under the presser foot. In some cases it will look as though there is too much trim but don't be fooled, you will need all the ease you allowed.


Thursday, July 22, 2010

coat in progress


One coat finished and three to go. Here are a few pictures of the coat in progress. The first baste up, the trim decisions and then the finished coat and a close up detail of the trim. This way it looks like you can snap your fingers and here's a coat, but there are days and days of careful work going on from one stage to the next.
More to come as we head for the deadline.

Tech dress is the big deadline on Tuesday but Saturday afternoon is the rack check -off deadline which I should explain.
Every costume in the show gets a detailed "dresser sheet" which describes everything the actor wears, from underwear to hats, and very importantly, when it is worn during the play.
These sheets are kept up to date during the fitting process by the wardrobe office rep, so if something changes, it is recorded. As the deadlines approach, eight foot long rolling racks are stationed in the hallways and sectioned off alphabetically by actor. We place the finished garments on the racks, the footwear, hats, and personal show boxes are situated below. These personal boxes contain underwear, socks, jewellery, gloves, glasses, kneepads and the like.

On rack check-off day a crew of one or two dressers come in and using the detailed dresser sheets, go through the process of checking off each and every item listed for each and every actor before the racks are transported upstairs to the stage level.
Anything that isn't on the racks that should be is then listed and then checked with wardrobe management who checks with the cutter, so everything is accounted for and if you still need to work on a costume, you can.
Costumes that don't make it to the rack go on a special late rack, and are checked in separately until the whole show is loaded into the dressing rooms for the tech dress.

Once the costumes are up there, they are out of our hands and the dressing crew takes over. Tech dress is then the big day for all of us.
At the tech dress, the dressers get people into and out of costume according to a very detailed computerized show time line that tracks each actor's entrances and exits and costume changes, making notes about functional issues that come up.
We watch from the house at tech dress- it is the first time we get to see our work onstage with all the design components of light and sound- giving us a chance to correct anything that we or the designer think needs changing.

Monday, July 12, 2010

split fall front breeches

Along with the eighteenth century coats we are making, there are waistcoats and breeches to be made as well.
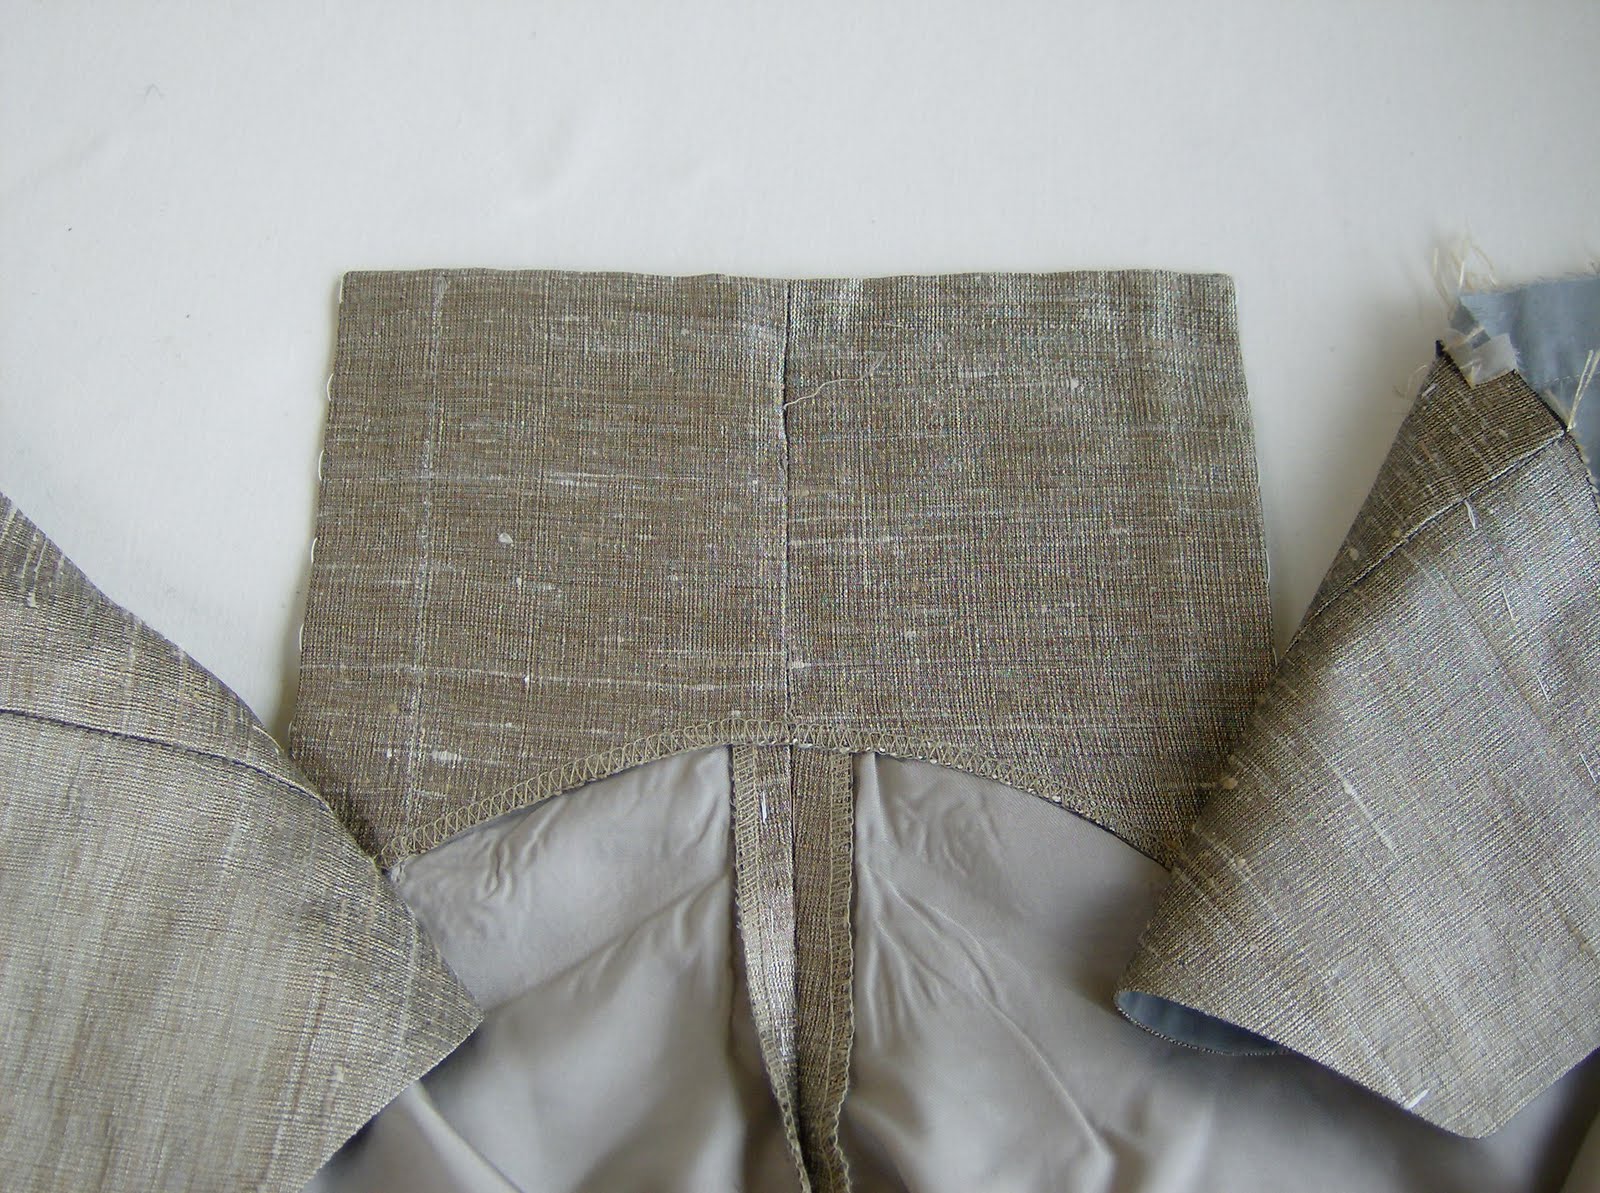
These breeches, like most of their era are styled with fall fronts. This means that instead of a centre front opening or "fly front", these have a "flap/fall" front as seen here.

Fall fronts come in a couple of configurations- whole/broad falls in which the flap is the complete front of the trouser, from side seam to side seam, and split falls in which the "fall" is a portion of the front of the trouser.

As I am writing this, it makes me wonder what the origins of "fly front" are. I mean, fall fronts are pretty self explanatory really- if unbuttoned, the flap will fall down- that's my own reasoning- nothing scientific.
Historically speaking, both centered and fall fronts appear and disappear throughout fashion history for various reasons- one the most popular reasons in this era for fall fronts was supposed Victorian prudery. A fly front was too obvious. I don't know if I really believe that, but it was the fashion of the day and continues to be the fashion for official "court dress" when one is required to wear breeches.

This is another view of the inside of the fall on the breeches I am working on.
The basic technique is to sew the centre fronts up and then make cuts/slashes into the fronts to create the flap. The slash can be made into a dart or into a rectangular area and have a flap that is either "clean fronted" or with a placket - which is how these were done. I think the dart technique is quite unstable so I rarely use that method.
The flap needs to be faced to the inside to finish the top edge. These were made by using a single piece of fabric to create the placket, finish or "bag-out" the top edge and become the inside facing. I think it is important to minimize bulk when making these and to also keep the opening from tearing out with repeated wear.
While constructing the flap, you also need to make an underlap so that you have something to sew the waistband to and for the breeches to be closed properly. I like to cut the underlap pieces so the top placket is stitched through the layers of the underlap.

I have not sewn the waistband on yet in these photos, but the waistband is sewn to top edge of the underlap, across the remaining front that is not part of the flap and continues along the waistline to the centre back.

The breeches are put on, the underlap is buttoned first and then the flap is brought up and buttoned to the waistband.
I like to leave a section of the centre front seam undone to create a buttonhole in the flap rather than making a machine or hand sewn buttonhole through all of the layers.


It is a technique that is really quite easy to master although it can be a bit difficult to wrap your head around at first- it is really like a men's shirt sleeve placket in many ways. You can see the finished placket above and the "buttonhole" in the flap below.