Showing posts with label trim. Show all posts

Monday, October 4, 2021

18th century costume and wow how time flies!

Isn't it funny how when you are busy you can find more time to do things than when you are not busy?  

Four months flash by.....I was working, but boy things feel strange theses days. 

I need to get back to my posts about making my coat and my thoughts on pattern drafting for women. but I am ignoring that right now and talking about something new.

Anyway, onwards and upwards.

I received a call mid summer by the designer asking me if I could reproduce an 18th century costume I had cut way back in 2014. It was to be for a filmed version of a new Opera piece. The AD loved the costumes we had made and wanted a new version for another singer. 

Of course I could! (confident that I still had the patterns handy, because I keep a lot of my old patterns.)  In the cold light of the next day, I went looking for those patterns only to find out that during my covid cleanup at the studio, I had thrown out those seven year old patterns, because I figured I wasn't going to need them again.

Isn't that always the way?

Merde!

Nevermind....

I proceeded to redraft, to the new singer's measurements: luckily they provided me with the originals to look at so I could jog my memory, and meanwhile the designer went shopping.


It was like Christmas unpacking all the bags of lovely fabric and trim and buttons. He had made me a bit of a map as well, which was essential as we were not going to be able to work in person on this. 
I was in one place and he was going to be eight hours away working on another project. 

The other complicating factor was time, as rehearsals didn't start until September 7 and delivery needed to be by the 22nd. 
This only left a two week window after the fitting to get it all done. I know that sounds like a lot of time, but for an 18th century costume, it is not a lot of time. Luckily I had a couple people on board with me to help out. 

first step- drafting patterns
second step- prepping fabrics and getting everything cut out ( right into the real fabric!) 
third step - putting it all together for the first and only fitting.

More to come..... 


Friday, May 1, 2015

week 16 with trim!


This was the view on Monday at the front of my table. Three of the five coats for the 18th century show are prepped after the fittings with their respective trim and buttons. That pesky cape is still there, and honestly, it was still in the same position on Friday. This show is on stage a week from today so I have to get someone to work on it next week- it has just come down to the wire.
Now the view from the front looks in control but the view of my table is not.
Bags of trim and buttons for all five coats, waistcoats and breeches were in the process of being dumped out, pinned on, discarded, confirmed, mixed up, reassigned, organized and kept track of all through the day. I did finally get some space cleared to actually cut something- it took a concerted effort to make sense of it all, go to other fittings, answer questions, and get out 19th century show on the racks for Wednesday. 

Do you ever get to the information overload point? I sure did this week. At the end of the day I just felt the I couldn't make another decision- I was just out of answers. On that note, I am taking the week end off, and recharging because this coming week will be very busy. More on that later.


Saturday, April 4, 2015

Week 12 at the cutting table

Week 12 at the cutting table, and I am trying to get the last few pieces figured out, and hopefully into someones hands pretty soon.
I have fittings from 6 weeks ago from the third show I have to work on, that I have not had time to deal with, and the sooner I can get back to those the better work will progress.

So one of the last costumes that needs extensive figuring out is this one with the red cape.
Luckily the design assistant found a cape in stock that fit the design quite well, so all we have to do is trim it up! Well that sounds easy, but putting trim on a finished velvet garment means lots of hand sewing.
You might think that it would be faster to machine it, but if you have ever sewn velvet, especially sewn velvet to a non velvet, you might end up on the floor in tears if you tried to machine it.
By the time you unpicked the lining and made it possible to get to at the machine, then fought to keep it from looking like a dogs breakfast when finished- and the trim would have to be basted in place anyway, you might as well save the drama and stitch it on by hand.

The trim is wide and it travels around the back neck so there will be some careful manipulation and cutting of that trim to make it work.
The bijoux department will also be adding jewels to the trim, so it has to be placed symmetrically on the right and left sides.

The garment underneath is basted together so we can get an idea of the spacing of the gold trim it needs.
So I have pinned it out and send off a photo to our designer, and well, I found out that it needs to be set closer together.
I still need a black fabric for the centre front detail, and this black will go around the hem with more gold trim on the edge and more inset jewels.
There is a lot left to figure out, but it seems in hand, well on Thursday it still felt in hand, but we will see what Monday brings.


Monday, October 6, 2014

trim layout

These period coats have scads of trim, and the placement of the trim needs to be worked out in detail according to the sketch and what the designer has chosen.
The construction of the coats would come to a standstill at some point if we don't have the trim decisions.
Luckily, the designer of this project is organized and has thought out which trim he wanted to purchase and where it would go. On top of that, the trim arrived with tags indicating what it was for and in individual bundles/bags, separated by character.
Budding designers take note! 
This is a way to impress your construction team.

The first thing I do is make a trim map on my pattern, and then lay out the trim flat on the table.
The trim choices can dictate changes to the design. For instance the design may have 12 horizontal lines between the neck and waist but the spacing change if the trim is narrow or wide.

Our designer M.G.  dropped by the studio and we tweaked the layout of the trim a bit, at which point I make a trim map for the tailor. This means a separate pattern piece that they can use as a guideline for chalking out the placement.

Here you can see the coat fronts in progress. The trim must go on by machine. No budget for handwork on that scale.
Another note for budding designers. Get to know how garments are constructed and why things need to be done in a certain order.

The coat does not sit on the body like it is pinned here. It will look even better once they sit at the correct cutaway angle.

Onwards, I have two more trim maps to complete.

Friday, July 11, 2014

Something old....

I have to tell you that the availability and affordability of trim for period garments seems to be getting worse with every passing year.
We still have a lot of trim in stock but it is old stock, purchased by the 50 m and 100 m rolls many years ago.

Within this cache is a stash of really old trim. I think it must have been a donation many moons ago. Probably 1920's vintage, and we have scads of it in both silver and gold. We have it in widths from 1/4" to over 2" wide, and it is so pretty with its label and the black paper that separates the layers.

I have always loved this trim, as have many designers over the years.
                                                                               

Sadly, the silver trim is a little less stable and we no longer use it on costumes as it doesn't withstand the wear and tear and cleaning, but the gold has been pulled out to be used on a costume we are making. 

It is a bit finicky to put on and doesn't bend around corners very well, but I think Susy has done a fabulous job with it.
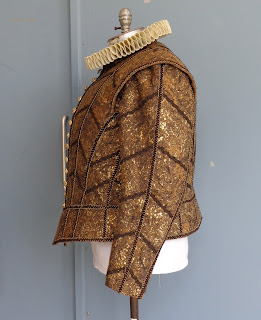
Oh in case you were wondering- this is a view of the back hip area of an eighteenth century coat we are making.
Here's the coat in progress. I still have to do some alterations and correct the sleeves, and the collar is just a basted idea at this stage, but it is coming along.


Sunday, May 11, 2014

doublet sleeves with slashes

Do you ever wonder about how fashions develop and why they are popular and what keeps trends going? I do. I especially wonder if in the future some poor costume maker is going to have to recreate the style of trousers worn by guys today, the sagging ones hanging on with no visible means of support, and wonder why it was popular. By then of course the deep meaning of it will have been analysed and discussed and theories made and so on, and it will all make some kind of sense.

I relate this line of thinking in some ways to the fashions of the past which we are now trying to interpret for the stage. Now, we are not trying for academically historical accuracy, but theatrical interpretation and one of the things we have been working on it slashed garments.
I am not going to go into the history behind it here as you may Google to your heart's content and read all about it. 
What we have to do is interpret what the designer is after.

We want a slashed look and there are a few options to making that happen.
First, you could cut slashes or holes in the fashion fabric and have a coloured lining beneath that which shows through the holes you have made. The downside is that it can look a little flat.

Second, you could have fullness in the coloured under layer so the coloured fabric poufs out through the cuts in the outer fabric. A more interesting look.

So, can we manipulate the coloured fabric to show through the cuts consistently over six months of wearing and dry cleaning and still have it looking good to be used over and over again? Yes, we can. There are probably endless possibilities or at least quite a few, but here is one that we used this year.


We have a pair of suede sleeves with slashes.  The good thing about leather/suede is that we do not have to finish the cut edges of the slashes as leather isn't about to fray. The slashes were cut first, using  small chisel and a pair of scissors. The chisel gets the cut started and you finish the cut with the scissors. The slashes are shaped, not just straight cuts.


There will be lines of narrow trim running vertically between the columns of slashes.

This gave me the idea to use those lines to attach the pouf fabric on the inside of the sleeve.
This is our sample.
You can see that the suede has been painted down. The original colour is in the middle. We also showed the designer the two different colours of silk that she was interested in using. We used the more yellow version on the right.
The pouf fabric was cut on the bias and arranged in place on the back of the sleeve. Once we were satisfied with the amount of fabric coming through the slashes, it was basted in place and then machine stitched to hold it permanently. The silk fabric was stitched in, then narrow trim was zigged on, covering the previous line of stitching.

After that, the lining was inserted into the sleeve as usual. I don't think that the poufs will require any further stitching to hold them, but while the sleeve is flat we could have stitched a tack at the ends of the slashes.

I think that was quite successful and it has the advantage of not being bulky.


Sunday, May 12, 2013

A few finished doublets

 Before I get going on this post, I have to say something about the weather. It snowed today.
Last week the temperatures were in the mid to high 20's (Celsius), and today was a high of 3, with flurries. I am not amused.
 
                                                        I have also been very busy at work, which has tired me out and  on top of that we had a vehicle fire and have lost our VW Westfalia, which has not helped in the staying positive department!
But enough of that talk.

I thought I would show you a few finished items today, two doublets and a variation of trunk hose that I am quite happy with.
The brown doublet is quite a large size, I think a 52 chest if I remember correctly. I wasn't expecting this trim as it was not indicated in the drawing I was working from, so it was a surprise when the designer wanted it.
I had already cut the body out when that happened and I was fortunate to be able to accommodate the trim placement in the existing body panels. The unfortunate part for the budget was that it had to all go on by hand, for a few reasons- One: the backing and structure under the fashion fabric was boned and the fabric had already been mounted to the backing, - Two: the trims were wobbly and needed to be basted in place over a ham so they wouldn't be too tight- Three: one trim was quite open and the other was velvet that crossed over the other, and machining looked like it was going to get tedious. The original though was double lines of trim, but that would have been almost 75- 80 metres of trim, so instead it has single lines and 35 -40 metres of hand sewing. Denise and Karen's fingers were very weary by the end of it all. The sleeves eventually got small ruffs as well- sometimes the opportunity to get a picture of anything totally completed eludes me!

The "trunk hose" that goes with the doublet is an interesting adaptation from an idea that another cutter had on a stand. Instead of building separate panes for the trunk hose, the paned look was created from the main fabric. I marked out the "pane" placement, and cut felt in the shape of each pane. The felt pieces were laid on the fabric and the edges were wrapped and top stitched. The fabric in between the pane area was then gathered and distributed behind the panes which creates the effect of depth. It was very lightweight and effective as well. They are built upon an under structure trouser of lightweight drill, that I fit first. The fabric on the canions was applied first, then the paned piece was stitched on at the lower level, along with some shape support (gathered crin), before being brought up to the waist, where the waistband was stitched on through all the layers. That was a very short description of a complicated process!

Next, we have a suede doublet with contrasting sleeves of striped silk. This was a fun project, marking in all the detailed slashing lines. The suede is a bit soft for this kind of project in my opinion, so it will be interesting to see what it looks like after being worn for six months. We opened up the slashes a bit by stretching one edge with our fingers, like fluting pie crust. The sleeves are bound off separately and then attached into the armhole which is finished with a clipped binding and a second clipped piccadil style wing.

This last doublet is the finished result of the muslin I posted about here. It was supposed to look like two garments, the front edge of the grey is loose and the two are sewn together along the piped seam. It also needed a pocket for a letter, which we found out as we were well into the finishing stages, so on the left side we opened the seam between the two "garments"and added a stay piece of cotton that connected with the side seam and also enabled us to create a pocket bag there, without compromising structural stability.

Whew!


So, what is next you ask?
I have a couple of doublets and breeches to make for understudies on a show I didn't work on in the first place, so that is well underway, and later on I should be starting some suits! Hurray! some regular (1930's-40's) tailoring, and I am looking forward to it.
There may be a doublet or two thrown in for good measure, but I can't wait to make some suits.

Friday, May 4, 2012

another uniform...

Sometimes when working in the tailoring department, you can find yourself working on a lot of dark colours, so it is almost a shock to the system to suddenly have colour to work on!

Our uniform of a different colour had some inspiration from the New Years Day mummers parade of Philadelphia.
Mummers parade? Who knew?
Mummers in Canada are associated with a Christmas tradition mostly in Newfoundland of masked or disguised neighbours showing up at your door for merrymaking. So I didn't really have a clue about the parade in Philly.
Holy Cow!
Well this is just tame by comparison, but fun anyway.
The pants are orange by the way, with the yellow and red trim centered on a wide green stripe.
Oh and theres the sash and rosette too. And a gold and red decorated sword belt with a sword too. (Didn't have it to photograph as is was in the weapons lock-up).


Now that this is up and on stage, I am onto some understudy fittings with some extra costumes being built and the next show, which will not be as bright as this.


Saturday, April 28, 2012

velvet smoking jacket

 Well, actually it is velveteen or cotton velvet. Much easier than rayon or silk velvet to work with when making a jacket.

I posted earlier about the inspiration behind this jacket here, and this is the version we are making.

I had cut right into the fabric for this, fit the basic shell, taken it apart and marked the alterations. I then cut the linings and facing, then the pockets and cuffs were made up and basted on. The sleeves are basted in and then we are ready to fit.
The binding trim that we got to work with is a knit! It is much wider than the original vintage trim, but so far it has handled well. I don't know about how you feel about velvet fabrics but they can be very tricky to sew. Not necessarily sewing two pieces of velvet together, because the naps grip each other,but sewing other fabrics to velvet. The depth of the nap can cause no end of slippage or bending as you try to machine sew linings to facings or trim to an edge.

The flat trim that is on the pockets will also bind the edges of the jacket, finishing off the lapels and hem. The cording is separate and will be zigged onto the edge of the flat binding.
On the sleeve cuffs we will probably attach the cording by hand, as it needs to go along the edge of the cuff, then form a clover leaf (which is outlined in white) on the sleeve itself then come back onto the cuff to finish off.


So we have a few alterations to make, dealing with a severely dropped right shoulder and corresponding sleeve length issue, then on towards finishing this for Thursday.  (it is sitting crookedly on the wrong stand)
I was sidelined Friday by some virus that was going around and I know that when I am back to work on Monday, there will be a line up of sewers with questions to answer and details to be finalized so I am off to get more rest.

Saturday, April 7, 2012

random photos of costumes in progress

Oh, it has been very busy the past week or so. It is like the train we are on has picked up speed and we're on for the ride, no braking for the next little while.
I had first fabric fittings for two gentlemen this past week, and our deadline is the 17th. They have between them 11 pieces plus a pair of spats so that is 2 cutaways, one jacket, 4 waistcoats and 4 pairs of trousers. Those pieces are in addition to finishing up the rest of the workload on the show which at last count was 4 uniform tunics, 4 prs uniform trousers/breeches, another cutaway, two waistcoats, two trousers and refurbishing 4 other uniforms. I also have to work on the smoking jacket and another uniform for the next show, arrange understudy fittings for the last one and get a head start on the show in late May.
Phew, I'm exhausted thinking about it!
So, this post will just be a few photos of some pieces currently being worked on in the shops.
Enjoy.

Saturday, March 24, 2012

vintage smoking jacket


Santo brought me this vintage smoking jacket as a reference for one of the costumes we will be making for his show. What exact vintage is it? I'd guess late 20's maybe thirties? I looked up the company and found out quite a bit about the history of garment manufacturing in Rochester that I was unaware of.
I love seeing the real garments. It is always interesting to see the silhouette, the materials used and the finishing details.
I love this double faced wool, dark charcoal on one side and lighter grey on the other. It allows for many design details and a simplicity of sorts. The cuffs are grown-on turn backs of the sleeves, providing a contrast of colour, as do the lapels and the pocket details.
The whole jacket is finished on the inside with bound seam allowances, along with a very short lining in the upper shoulder. The raw edges are bound off in a decorative binding and cording combination, the binding has been applied and the cord zigged to the folded edge of the binding.
That is, I assume the cording was added after the jacket edges were bound. Hmm...it seems likely.
Our version of it however, is not made of a double faced fabric, rather it is made of blue velveteen with a plum and blue patterned velveteen contrast. We will be finishing the edges in a similar manner, with a binding and a cord, so we will experiment soon on the trimming and finishing details. I'll make sure to take photos.

Saturday, March 3, 2012

trim trauma


We were running out of the trim that we used on our uniforms and I bet you didn't know that trim is getting more and more difficult to source. Like many products that we use, many manufacturers, especially in North America have downsized or gone out of business completely, which leaves us in the lurch.
So, it's a long story but the buyers found someone who was able to make us more trim.
When you try to get a replica of something made, you know that it is never going to be exactly like the old product, but live in hope that it will be close.
Well the new trim came in this week and it wasn't until today that we had really had a go at using it.
Not so good.
I really never thought much about how trim is made, and really, if it works for us, it works, and we use what we are given.
The new trim doesn't want to bend nicely. Yes it is a different colour but we can live with that I guess, but it is uncooperative. Why?

Well the base or interior of the trim tells the story. The old trim is created over a flat 1/4" wide woven braid that is very flexible as you can see in the picture.
The new trim has many many strands of coarse thread bunched together inside. It does not like to bend. The strands are really tightly packed. I was able to cut a length of trim and painstakingly pull out 6 or 8 strands which made it more flexible but still isn't as bendable as we would like.
Sigh..........but now I know.

Sunday, February 12, 2012

military tunic underway


We've been really busy over the past couple of weeks, getting people in for fittings so we can determine if we need to build new uniforms, or fit them into the ones we had already made.
As of Friday, I believe we are now making three new uniforms. Two will be single breasted and one in a double breasted style.
We are using a heavy barathea wool from Whaleys in a midnight blue colour.
You can see that we are using a pre-made suit fronts/chest canvas in these uniforms instead of building our own. The cost factor is the influence here- the pre-made suit fronts run anywhere from $15.00 to $30.00 each so that is a huge savings over making them from scratch.
We have sourced the gold trim for the sleeves and it is being made to order for us, so hopefully that will come in within the next month. The trouser braid is another issue, we have enough in stock for what we need to do, but we bought the last of it from our supplier, so more sourcing is needed in case there is another pair to be made in the future.

While this is going on, I have turned my attention to the 1930's and have made up some trousers and one suit so far. These have been fit, so I'll be marking alterations on Monday and taking some photos to show you.
I also need to get on with drafting some cutaway coats for some rather full figured gentlemen, and I need some time to think them through before cutting into the fabric.

Tuesday, January 31, 2012

déjà vu all over again

Well, it has been a very busy start to a new season of work. I have some nice 1880's Victorian work to do, some 1930's, and some Edwardian as well, so I am looking forward to it!

There has been a lot of concern with the economy as we are a business to a large degree dependent on our patron's disposable income.
We are often asked whether we reuse costumes, and the answer is yes, we do. Most shows use at least some pieces from previous productions and because they are made well, they last, and are able to be refurbished, and reused.
This year, one of the things that are being reused are uniforms that we built in 2008.

We refit some of these already, and found to our shock that someone had removed the trim from the sleeves of one of the uniforms! Arggh! These were not supposed to be rented out so it is a mystery why it was done and for what reason. Luckily we had some of the trim left in stock, and since the sleeves were too long for the actor who is now going to wear it, we can shorten the sleeves and retrim them.
I did spend a frantic few minutes searching through boxes of patterns that I kept, hoping that I kept a copy of the sleeve decoration pattern so I didn't have to rethink and redraw it.
Luck was with me and I did have it stashed away. Whew!
I can't keep everything, so I throw lots of patterns out, and you know, everytime I throw them away, I have that nagging feeling that as soon as they hit the recycling bin, I will need them within the next 24 hours. I don't think I am alone in this feeling.

So, then it turns out that we are going to be making a couple more of these uniforms to add to the collection, so now we are on the hunt for more trim. If the trim had not been removed from these sleeves we might have had enough to trim for the two new uniforms, but not now.
And so it goes.......


Wednesday, August 10, 2011

18th century dress details


While I am away I thought you'd like to see some of the beautiful dress details on the ladies costumes for our last show.
Sorry, the colours are a bit off as I was taking photos in the hallway with flourescent lighting.

WE had a lot of trim and details on the menswear but again the womens costumes out trim us.

They are even more beautiful when you see them worn- the fit is so good and what more can I say, they evoke the period perfectly.

Monday, August 8, 2011

finished coats


Here's a final look at a few coats and waistcoats that we have finished.
You've seen the process for the grey coat all along, the green coat is the made of the wrong side of the same fabric as our footmen coats. The cream coat is a very thin silk that needed a fair bit of supporting structure inside it. I love the mauve lining.

I'll be back to regular posting soon.


Friday, July 29, 2011

trim details


When I start making patterns for the costumes, I usually don't have any idea of the trims that may be used or the button size that may be chosen but those things make a huge difference in the final pattern and in the making up process of the costume.
With our footmen costumes, the shape of the wide trim and the placement of the trims dictated the amount of button stand and the spacing of the buttons as well as the construction technique to a degree.
I first fit the waistcoat by pinning it together along the CF line so I have a true line to go by once the trim is decided.
After the designer pins the trim in place, I have to work everything out for the stitchers.

(I also need to make sure that there is adequate support behind the trim so if I haven't cut enough support at the beginning I have to add more later. Luckily I had cut it in the first place.)

So I need a map of sorts.
I made a small sample of the front, and went to the buttonhole machine to put in some holes so I could determine the smallest hole size I could use. I wanted the wide trim to cover the tail end of the buttonholes, and I also wanted the button spacing to work out so that there was a buttonhole at every curve of the wide trim.
I needed to allow just enough space in front of the buttonhole to accomodate the narrow trim.
Once I had all of that figured out, I could mark the garment properly for sewing.

Armed with the map, the seamstress did a preliminary lay-out of the trim, so we could make sure it worked for button placement and also to figure out how the best way and place to turn the corner with the trim as it travels around the skirt and neckline of the waistcoat. This preliminary work allows us to sew most of the trim on by machine which is usually the most efficient way of applying it.
The right front is not a problem in that the trim could go on by machine before the facing and lining were installed. The difficulty with trims and functional buttonholes is that the buttonhole machine does not take kindly to trim, so we had to be clever and put the trim on around the skirt of the waistcoat by machine and then stop just below the bottom buttonhole. The buttonholes have to go through the facing, so the facing was put on and basted to the inside, then I put in the buttonholes. After that, the trim was basted in place, covering the buttonhole ends and then handsewn to the fronts. The facing and lining seam was then joined by machine and the waistcoat front was finished as usual.

It is interesting how many details need to be thought out in order to finish a garment. More than most people would realize, don't you think?

Wednesday, July 27, 2011

18th century coat finished

This is the final stage of the coat that I blogged about here (toile) and here.
Done.
Finished.
Both of them. (there are two matching footmen in the show)
The other coats are done too!
Stats for those who like them:
I cut this coat out of 5.25 m of 140cm wide upholstery damask/brocade
(sorry, I'm not sure what I would call this and I'm too tired to search for it today)
Lined in pink silk duppioni.
13.5 m of the wide trim on the coat
13.5 m of the narrow trim
buttons: 49
It took three and a half days to stitch the trims on the first coat. Less time on the second as we knew where everything was meant to go.
No trim on the sleeves, which was surprising but that is what the designer wanted.
Here's a little close up of the back.
I feel a bit stunned that all the coats are completely finished. Now I really feel tired!