Thursday, September 30, 2010

Rundschau jacket draft

I spent a couple of hours the other day writing out the German draft in English, which really helped me get a better feel of the system. I made a quarter scale draft as I wrote and yesterday, I went back to it in full scale on brown paper.
It was a much smoother and quicker process this time.
There were a few areas I had concerns about and I noted them on the pattern. I didn't change them at this point because I just wanted to follow the draft as written just to see how it turned out.
I cut a half muslin, stitched it up and pinned it on the stand.
I know the inside out seam allowances are distracting but please bear with me. The front doesn't look too bad, I stretched the front neck point a bit just by hand and I pinned in a modest 1 cm thick shoulder pad.

Concerns:
I pinched out 1.5 cm in the front skirt as directed which opens up the pocket dart- maybe 1cm pinch would have been enough, as I think the hem felt a bit cupped.

The hip width determination in the draft- The measurement of my stand made the side hip narrower, and perhaps it is a case of "if the hip is smaller than "X" use the larger proportion". The narrower hip made the centre back line pull away from hanging straight. I released it about 1/2" at the hem and pinned it where it wanted to sit and it was improved.

The shoulder seams have .75 cm seam allowance. When the necklines are drawn as indicated, there is gain in the shoulder length and shortness in the back neckline unless the curved lines are terminated .75 cm from the points on the draft. Kind of hard to describe in words. It's not a lot but it sat better when I changed it.

The only other concern I had was the obvious width of the back. I was strictly using the proportional formula given 2/10 of chest plus 1 cm rather than a direct measure. That back is 4 cm wider than the "body" in total, which seems excessive to me.
The overall body ease at the chest level was 5 1/2" which is much more than I normally get using my own drafting system.

The armhole circumference looks ok and the armhole depth isn't too low.

I think I will draft a collar and sleeve and maybe the other half of the body, and then see what it looks like.
I think this draft is from the 1950's/1960's but I'm not sure. There is little waist shaping and narrow hips so that fits with that silhouette.
I also have a photocopy of another German drafting book which I think is earlier and the draft is slightly different, so if I have time I'll try that too.

Wednesday, September 29, 2010

breeches pattern

The thought for this post started when I went back to look at a pattern I made for "18th century" breeches earlier this summer. I kept the toile pattern and laid it out to compare with my final pattern, then tried to work backwards to quantify what I did and turn it into a draft that I could keep and use again in the future.
Interpreting a design and making patterns for that design is not always a straightforward process. Many people assume that to make 18th century style breeches we would just try to reproduce an historical garment by looking at the few pattern references available such as this one from The Cut of Men's Clothes by Norah Waugh.
The reality is in fact quite different. In the case of our design requirements, we didn't want that kind of period look. We wanted a more modern take on them-a bit more of the seducer rather than the equestrian. That requires a differently shaped pattern. In addition, while looking at the diagram gives you an idea of the period pattern shapes, a cutter needs to have a drafting system or formula to make a pattern.

So what is that period look? What would the breeches in the book look like on the body? If you wanted to make a scaled up pattern directly from it and make a toile you could, but if you look closely at the pattern shapes in the book and look at someone or a photo of someone you can begin to imagine what it will look like on the body.
A little visualization technique.......
First, the side seam is quite straight, and hollowed out. The legs are narrow and you can see that the inseam is quite long - look at the CF line and the front fork. Think about how that will sit on a body. In your mind's eye anchor the pattern at the outseam at the hip, down to the knee. Above that line the fabric will follow the body which has a convex curve not a concave one. Align the front waist line of the pattern along the body's waist and get that CF line sitting vertically in your mind. Remember you would join the two fronts together so that may help your thinking. Look at the leg below the hip and imagine the outseam following the outer leg of the body. Remember, these breeches fit the leg closely. What happens along the inseam at the fork? Align the back waist line on the body- look at the shape of the CB seam. What look will result over the seat of the person now?

I was looking for a good photo to illustrate this but if you've seen some of the BBC's historical movies or TV series, or the truer to period Jane Austen movies you'll see what I mean.

In a nutshell, the excess length in the inseam is great for riding horses, the length and breadth provided by the shape of the back and the CB seam allow for the expansion of the buttocks and thighs while on horseback. When standing though, that excess length sits in the front fork and the excess breadth in back drapes over the seat area.

That is what we wanted to avoid but still have a "period" interpretation. Fall fronts, buttoned leg closures, narrow fitting legs, clean fitting fork and some - but not a lot of - extra fabric over the seat. Tight, but with enough ease that the actor could sit, kneel, lunge, squat, and fence in without problems.

Back to the drafting board!


Tuesday, September 28, 2010

mittens


When translating drafts from German gets to be too much (and I spent a good amount of time on it yesterday) I knit.
These are thrummed mitts for my husband. They are very warm to wear because as you knit, you knit in wisps of wool roving that fill up the inside. You can see the roving inside the unfinished thumb of the one still on the needles.
Very cozy.
I found that writing out the Rundschau draft myself, and drawing a quarter scale draft as I went really made the draft more accessible. I had a German English dictionary at my table, and although many of the technical words were not defined, it was relatively easy to dissect the words into their components and look them up and then I could translate some of those long words.
Back to the full scale version today or tomorrow.

Sunday, September 26, 2010

trying out a suit draft

After I had my fitting on Friday,I had a couple of hours free, and I thought that would give me an opportunity to try out the Rundshau Draft that I downloaded from The Cutter and Tailor. It is a "modern" drafting system -mid 20th century I guess - and I always like to see whether drafts work as written, and whether I can make any use of them.
I decided to just use a stand to measure and draft for, so I got our my measuring tape, measured the stand and I started.
Well, the first thing is that I don't speak or read German, and neither Susy or Silvia were around to help me translate. I just had the draft and a rough translation that someone posted. I'm not the most patient or dedicated follower of instructions, but I was determined to make the effort, but to quote my husband, "Those Germans have a different word for everything". Long, long words, and although I had to keep referring back and forth to various pages, I did construct a basic suit jacket pattern.

There were a few things I felt were a bit off.

The measurements I was working with were chest 100 cm, waist 86 cm and hip 100 cm.
Following the written instructions didn't produce the same visual pattern as the one they had. So when things didn't look right, I just made decisions that looked better to me than the ones that the draft provided.
I was stymied so I started by looking at the measurements for the sample draft. Chest 96, waist 88, hip 104.
There was 8cm difference between chest to waist which is very little.
The waist to hip difference was 16 cm, which is more usual, but the hips were 8cm bigger than the chest, which I thought was not usual. There was no mention of whether the measurements were standard sizing or not- not that I could have determined that, since, as I said, I don't read German.
So, I'll try cutting it out in muslin and pinning it on the stand to see what it looks like.

Saturday, September 25, 2010

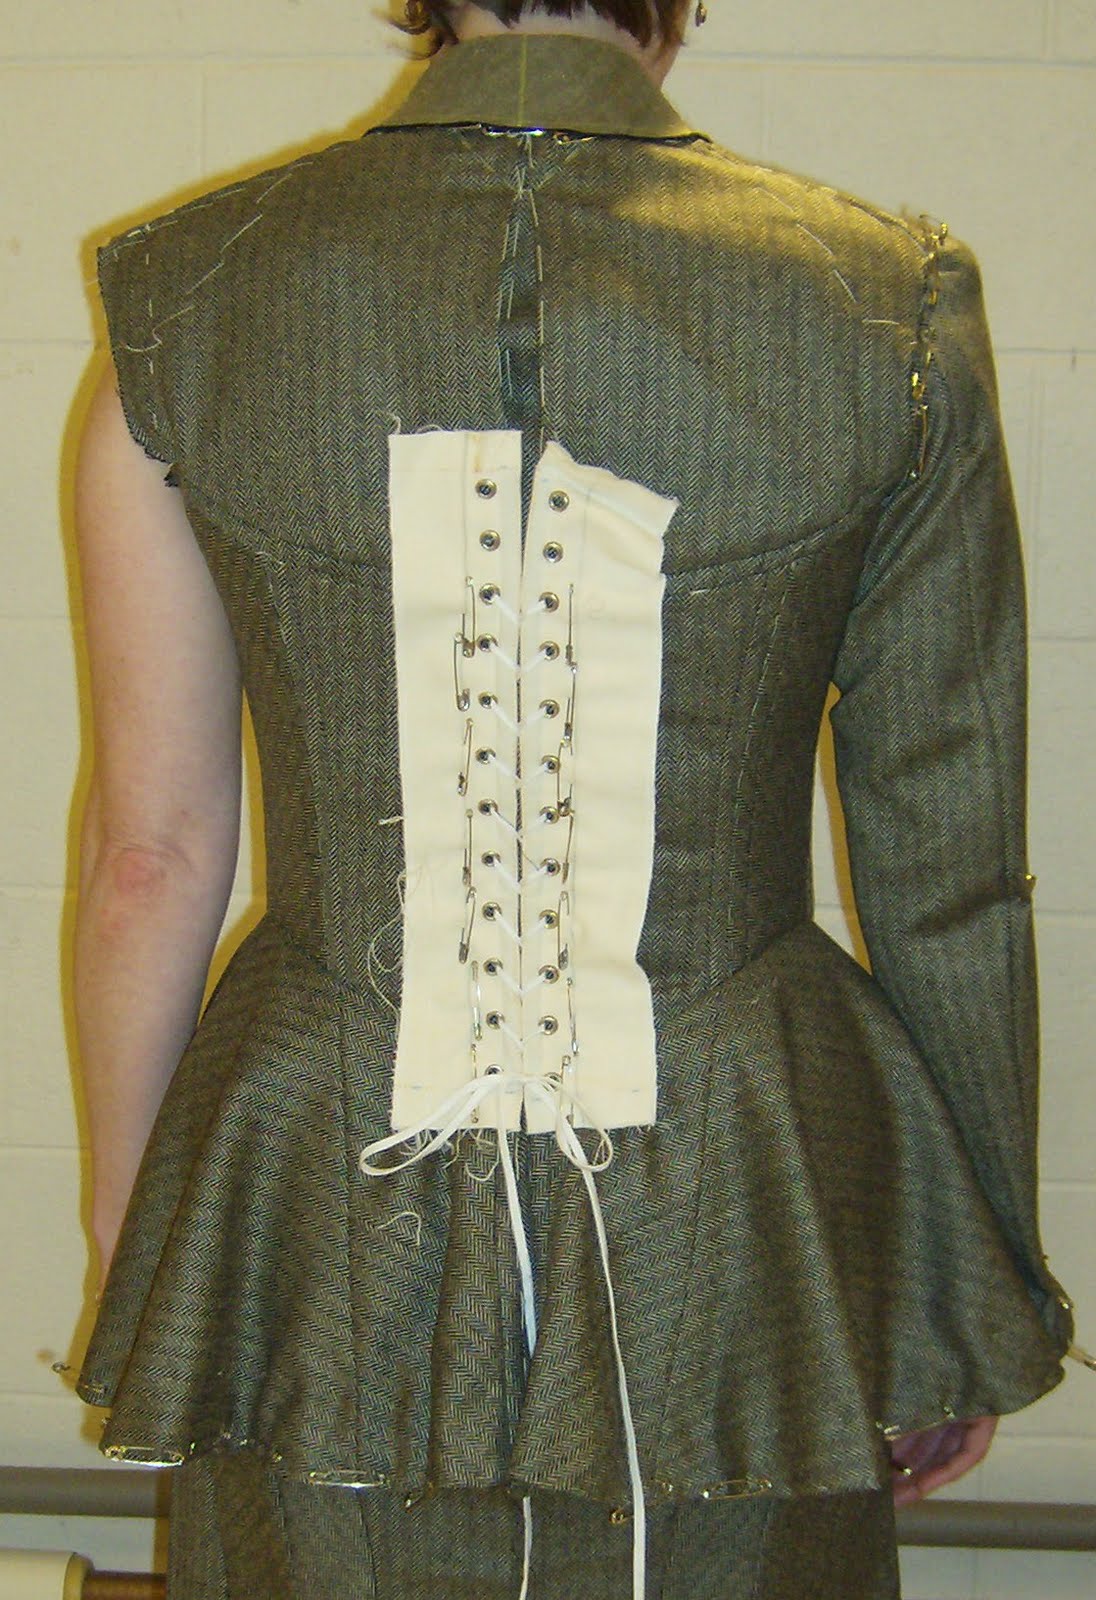
corset suit second fit


I had a second fitting for the corset suit yesterday.
Jennie had to take the jacket waist in a fair amount from the last fitting, so she concentrated on doing those alterations and wanted to check them before going forward with any other details.
So, the sleeve is just roughly pinned in place for now. The skirt has been altered and needs a lining and a press as well as a few minor tweaks. The jacket peplum needs a few changes too and then we'll have another fitting.

I'm showing you the back because Jennie is using a temporary lacing placket that we use quite often in the theatre. It is easily made from muslin, duck or coutil and consists of a double layer of fabric with casings/channels for spiral steel boning. The boning is placed right along the outside folded edge and again, just past the eyelet section. This keeps it from crumpling when laced and allows it to be pinned in place as Jennie has done here, or it can be sewn in place for a fitting.
This, of course, allows you to figure out the correct position of the eyelets without actually committing to putting them in at the fitting stage.
Once the fit is determined, the temporary placket is removed and the garment finished with its own boning, eyelets and lacing.

I need a blouse of some sort to wear underneath so I am looking at some 1940's designs and maybe I'll make myself something to go with it. There's a project........

Monday, September 20, 2010

delays

Sorry for the delay in bringing you some new posts.
My corset suit is delayed by the dreaded September back to school colds- new germs brought home, and both Jennie and I have been suffering from those.
A project I had thought would happen has fallen through, so I find myself at liberty and looking for gainful employment until my teaching project starts in November.

Then there's the garden to work on after I've neglected it for most of the summer, packing the camping things up, music rehearsals, everyday family life and adjusting to the weather which somehow went from summer to fall in an instant.

So, I'll leave you for a moment with a few of photos I took just outside my back yard. Travel can be an eye opening experience- we travel to see new things and experience new people and environments-but often home can feel so familiar that we forget the beauty that is all around us.

Friday, September 10, 2010

corset suit project


More camera issues- my batteries were dead the day that I had my first fitting of the "corset" I am modeling at the upcoming Creative Festival in Toronto. The only person with a camera handy was Linda from Farthingales (the driving force behind the project) who snapped this one as Jennie was just pinning me into the jacket.
I was expecting to be fit in a toile, but Jennie was daring and had cut right into the fabric for both the skirt and the jacket. I don't have a picture of the sketch to show you, but you can see the corset boning details and that she has cut some of the panels of the jacket and the skirt on the bias. The skirt will be getting some kind of detailing at the hem as far as I can remember. There will be sleeves. Honest.
The jacket will fasten at the front with regular buttons and holes and the lacing will be in the back. It was much too big in the waist, even after the lacing was drawn as tightly as possible, so I think she will be taking at least three more inches out there.
I will have to inspect it more closely next week at my next fitting as I'd like to have a better look at the way she is dealing with the transition between the laced section at the back and the upper portion with the collar.
I had a momentary Cinderella moment when she brought out the vintage shoes a half size smaller than what I normally take. They were beautiful and I squeezed into them without removing any toes!
This week-end I believe there is a meeting with the milliner who will create a hat to go with the look, and one of the theatrical jewellers has also made some jewellery crafted something to go along with it.
I saw some of the other corset projects that people were building and they range from true period corsets to very modern interpretations. Linda is showing the progress of a few here.