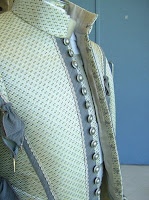
Here's a peek at the way we closed this doublet at the centre front.
We used alternating hooks and eyes down the front. The buttons are decorative and are stitched just to the edge of the front so that when the hooks are done up, all you see is the illusion of the buttons being the closures.
If you put all the hooks on one side and all the eyes on the other, there is a risk that with movement, the hooks could pop out of the eyes. If you sew them on alternating this does not happen. They are stitched on with a buttonhole stitch with heavy thread. When stitching hooks and eyes or bars, it is important to take at least one small stitch through all the layers to the right side of the garment. This holds all the layers together as one when the hooks are done up.
The centre front is supported on both sides with spiral steel boning to keep it rigid. We also put boning in the garment underneath the trim detailing at the side front, sides and side back. This will keep it looking crisp and uncrumpled over the months to come.
costuming, tailoring and pattern making for the theatre with an emphasis on menswear
Wednesday, May 27, 2009
Tuesday, May 26, 2009
more completed
I just wanted to post a picture of another completed doublet that I had posted about previously here and here
I find that I am so busy juggling so many projects at the same time, that it is hard to get in and photograph all the stages of building a costume.
Today we realized that we will need to build something for an understudy and I just stood there with a couple of my team members while we debated whether or not we flat mounted the original costume fabric or not. That happened only a couple of months ago, but we all had different opinions as to how we proceeded. There's just too much information to absorb! I'll deal with figuring it out tomorrow and start drafting anew.
Sunday, May 24, 2009
completion
Completion!
This is the final stage of the doublet that I have been posting about since February.
It has successfully made its debut onstage in a technical dress rehearsal and the 1st dress. This Tuesday it will be worn again for the 2nd dress rehearsal and after that come a number of previews, then opening night.
All of these rehearsals allow a chance for everyone involved in the production to run the show from beginning to end with costumes lights, sound, changes and cues to make sure that everything runs smoothly. For the costume designer, it allows a chance to see the costumes from the audiences perspective instead of in the fitting room.
It will be worn until the beginning of November, and that is why we take such pains to construct these costumes well.
They have to withstand being worn and sweated in, and cleaned a number of times a week over many months and when the show is finished, they are catalogued and put in our warehouse of stock costumes. They then may be resurrected another year, refit and altered, and changed to fit another designer's vision.
It feels good to have it, all the others finished too and to look back on all the stages it has gone through getting to this point. The last things we added were the rosettes at the waist, and the Cordon Bleu medal .
Thursday, May 21, 2009
another bit of lace
Well, this has been a very busy week with two shows tech dressing, and I think we're through the most stressful part.
We worked on the holiday Monday, in order to get important pieces like this collar made.
The collar in a previous post was made by Susy, this one was made by Karen.
Again, I started by draping the shape I wanted in muslin, making a paper pattern from that, cutting the base out of black crin, then double checking it in a fitting with the actor and designer. The edging lace was made up of a very wide lace border that we cut down into the elements that we wanted to use.
Karen did a couple of samples of how to create the best corner motifs and she laid it out along the edges, and we changed the pattern slightly in order to get the motifs to fit in well. She then proceeded as Susy did, basting over the tailor's egg and then zigging the lace down in sections.
I think the next time I cut one of these, I will consider putting a seam in the base fabric at the centre back, since I was noticing slight variations in how the collar sat at the front. I think it was due to the different bias at the front with the centre back on the fold.
Minor things really.
I am very pleased with the way this collar turned out.
Monday, May 18, 2009
dressing gown
While we are bogged down getting the last minute things ready for our tech dress rehearsal tomorrow, here's a dressing gown to look at.
This is from "Anything Goes" that was produced a few years ago.
Patterned silk body, quilted silk lapels and cuffs with piped edges, and fully lined.
Dressing gowns like this need a little bit of soft structure to them, but not a fully structured chest canvas, so they don't look like a bathrobe!
Suitable wear for drinking a gin and tonic, lounging in your stateroom on a cruise, don't you think?
Designer: Patrick Clark
Saturday, May 16, 2009
cuffs
Here are the lace cuff samples that we did before moving onward.
The base of the cuff is the same black crin as the collar. The main body of the cuff is dupioni silk with the trim applied on teh edge ans then zigged and trimmed away.
We decided that it needed a bit more structure, so we took apart some rigilene nylon boning which is made up of filaments similar to very heavy fishing line, and it was zigged on up the sides and across the cuff at the base of the trim.
I'll take a picture of the rigilene and the technique to post next week.
As for the deadlines, it feels like a bit of a train wreck. Forces beyond our control this season have put us behind by about 244 working hours which is huge, considering my workload stayed the same.
I was really looking forward to this Victoria day long week-end, but we'll all be in on the holiday Monday, trying to make our Tuesday deadline.
Friday, May 15, 2009
black and white dress
I thought that I would show you this dress from the ladies wear side of our room.
I love how graphic it is and what a nice job that both the cutter and the seamstress did with this collar.
The dress is actually one that was pulled from stock- which means that it was built for a previous show and it has been resurrected and altered to fit, and had this lovely collar added to it. The dress is made of Holland linen and the collar is of organdy with a cotton trim.
Thursday, May 14, 2009
black uniform
I think that we are finished with this black uniform. I am very pleased with the results- it looks crisp and clean, fits well, but not too tight and the sleeves, which are cut with a "grown on" gusset hang nicely even just on the stand.
I made the decision to cut the sleeves with a gusset even though the other tailors did not.
When you have a suit that fits quite closely and has a belt at the waist, whenever the person lifts their arms, the jacket rises and sometimes gets stuck and will not drop back down easily. A gusset allows for lifting the arms with minimal movement of the body of the coat.
This jacket has box pleated pockets with flaps on the chest and bellows pockets with flaps on the hip. The centre back is cut on the fold and has curved frock seamed panels ending in double vents.There is a self fabric belt. The medals and lanyard were made in the decorating department.
Next on my to do list- get the last of the doublets trimmed and ready for Tuesday.
Monday, May 11, 2009
tailor's egg?
The "tailor's egg" - well, that's what we call it. It is an egg shaped piece of wood, about 1 3/4" deep, about 12 to 13" wide at the widest point, 15 or 16" long and gently rounded and sanded smooth.
Many of the tailor's here have one. One of the women here gets her father to make them up and offer them for sale every so often.
I asked around and it seems to be one of those tools that no one can quite remember who started using it. I don't know if people use them anywhere else.
They are useful for many things, but primarily we use them when basting chest canvases into jackets.
I was originally taught to baste the chest canvas into the jacket front by holding it over my hand in order to allow the fabric to mold over the shape that the canvas provides. Most of the tailors here now use the tailor's egg instead of their hand underneath the jacket front when they baste the canvas in. I think it allows for a more controlled way of working especially for people who are just learning, but the senior tailors love them too.
Sunday, May 10, 2009
variety
Here's a few shots of a variety of costumes on stands here and there in the wardrobe. Never a dull moment!
One of the interesting things about this job is the variety of work we are assigned to do. Every season is different, with different designers and shows and challenges. In some of the more stressful moments I swear that I would prefer to only make suits, but the reality is that variety is best. It keeps you from getting complacent or bogged down, or bored.
Saturday, May 9, 2009
uniform jacket
Just in case we were getting bored with doublets and lace, we are also working on some military uniforms.
There are two of these that I am cutting, one in green and one in black.
This show goes on stage on Tuesday, and is part of a quick change rehearsal on Monday, so we still have some work to do before it is worn.
I need to make a little adjustment to the sleeve since I notice a bit of a vertical drag line. Otherwise, it is close to being finished. We just need to add insignia and rank and regiment patches, cut open the buttonholes, sew on the buttons and put the buckle on the belt. The matching trousers were fairly simple- basic military style with a ribbon down the outseam, side pockets, belt loops.
The trick will be changing into this from full fatigues in about one minute and thirty seconds. That is a change out of a fatigue shirt, tan t-shirt, canvas belt, pants, combat boots, and beret into dress trousers and belt, dress shirt, tie, shoes, jacket with belt and hat.
We'll see how that goes!
Friday, May 8, 2009
lace collar pt.2
The lace collar took shape rather rapidly! So rapidly that I didn't even get a shot of the inset lace being basted on. Well, we were busy with many other things, so I shouldn't be surprised.
On the left is a shot of the perimeter lace basted in place around the edges of the collar. Susy used a tailor's egg underneath the crin base as she stitched the lace in place. If the lace is basted on flat on the table, there is a chance that it will be too tight and pull or curl upwards when put on the body.
After the edges were in place, she zigged them down and then started placing the inset lace, again working over the egg, basting the lace and cutting away where needed until the collar was covered. She would stop and try it on the doublet as she went just to make sure that nothing was going wrong, then continuing. She then zigged it down permanently. Now she needs to sew on a grosgrain ribbon to the neck seam allowance. This will then be stitched or snapped into the inside of the doublet collar.
I think that the design assistant liked what she saw, so we can cut away the base around all those little points.
Next: cuffs to match.
Wednesday, May 6, 2009
lace collar sample
Well, the military jacket is waiting for a fitting, so Susy was able to get started doing a sample for the lace collar we are making for a doublet.
I had started with an underbase of light nylon crin, but I decided it was too flimsy, so this is a heavier version called Odette 611 from Fucotex.
First we measured what we were given to make sure that we could cut some lace off for the sample. This is really important- don't ask how I know!
She took the pattern and drew it on the backing fabric and basted the edging lace down by hand .
Wherever needed, she cut sections of the lace away in order to fit it to the design outline and to make it look good and make sense.
On one edge she pre-finished the crin on the design line and on the other she zigged within the motifs and cut away the excess beyond the motifs. We're going with the cut away look.
Then she took the middle section and basted the other lace there and randomly zigged it to the backing trying out various stitches. It didn't take her very long, I was surprised because I thought it would be more tedious and I have no patience for that kind of thing so I am glad to work with people who do..
Tuesday, May 5, 2009
frock coat
Here's a frock-coat for a show that went on stage Thursday. I think this was the first frock coat that this particular stitcher has made from start to finish. She handled it quite well.
The designer wanted this character to look like a sculpture when he came on stage and to that end, chose a very firm and heavy wool. A bit too heavy maybe?
It becomes difficult to judge how much the fabric thickness affects the fit. We don't have the luxury of making a finished prototype in the real fabric, finding out what could be changed, then making another. I just have to make a judgement call as we go.
I think it is going to be a bit too snug when it is buttoned up. The CF seams should sit right on top of each other when it is done up. I suppose I also could have tried to match up the curved back body seam to the sleeve seam... although that would be really thick for all those seam allowances to meet in one place. Some designers really want those seams to meet , others don't and this one didn't care either way as long as the silhouette was right.
Well, I'll see if it comes back with any notes.
Saturday, May 2, 2009
dance
Ahh, a costume that I didn't have to make.
Today is the big dance recital for the studio that my daughter dances at. In a town of 30,000 people, there are over 400 dancers enrolled and four and a half hours of performance time in many genres of dance.
I'm always moved to tears by the little ones who look so adorable, trying to remember their steps and not bump into each other, and amazed by watching children, including my daughter advance in their skills and poise and performance abilities over the past 6 years of dance.
I wish that it was something that was available to me when I was growing up.
I used to get involved making dance costumes but since it is a busy time of year for me, I am more than content now to just pay for them and happily watch.